Puzzle ring fabricating process

Does anybody knows, which is the process for fabricating those
beautiful puzzle rings, I know yo can make them from 4, 6, 12
modules, but I dont know If you first start from wires, knot them,
laminate and then solder each one or if the method is another.

Thanks in advance,
Santiago

I’ve been hand-making puzzle rings for over 45 years; it was the
desire to make a puzzle ring that started me making jewellery. I made
the very simple bending jig shown in this link:

I started by drawing the shape of the knotted part of the ring, full
size, on a sheet of paper, then copied each individual part to get
the shape of each of the four sections. These were then cut out and
glued to the block (you can just see the remnants of some of them -
its well over 45 years old) shown. Nails were then hammered into the
block where the wire would be bent, and the heads of the nails were
then cut off. The jig is then finished. This particular jig is for
making two types of ring - one for ladies, and a heavier one for men.

To make a ring, I cut 4 pieces of wire (silver, gold, or platinum)
of the correct length, then bend each one round the nails for that
particular component. The knot is then assembled (its pretty rough
and crude at this stage), the shanks are bent to bring the ends
together, and then soldered up. That’s the easy bit. The hard bit
comes next: the pattern of the knot is then gradually improved until
it fits really nice. It takes time and perseverance to get it just
right.

These two links show a plain ring and one with 3 emeralds, both made
with the above block and technique.


Regards, Gary Wooding

Amazing, Gary. Thanks for showing us that.

But I’d still find it very difficult!

Brian

B r i a n A d a m
Auckland NEW ZEALAND
www.adam.co.nz

Hi Gary,

Thanks for the pictures of the jig for the Puzzle rings. Now I’m
interested and have to make one…see what you started… The next
time you make a ring, can you post a picture of the wires on the jig?
That would be great for a step by step process for Lapidary Journal.
Did you have to buy a puzzle ring first to find out how it all fit
together? How did you affix the stones to the ladies ring, which
stone is mounted on which wire?

I love the inspiration I get from this digest, thanks again for
sharing all your wisdom.

Love and God Bless
randy
http://www.rocksmyth.com

Gary:

I really want to thank you for your answer, I appreciate very much
the will to share knowledge of some people I like very much to do the
same every time I am asked about something, I’ve been on jewelry
business for 14 years not as long as you, but since I saw it the
first time, the puzzle ring took my attention and I told myself that
I would once try to make them, the opportunity came now that I am
getting married and I want to make a pair as a wedding band for my
future wife and me, so this Is a great present from you,
to us and we Thank you very much!!

I don’t have time now to analyze your answer but as soon as I can do
it, I will let you know and probably came back to you if I have any
doubt and If you let me. Please take a look at my page www.s-abud.com
and if I can help you any time it woud be a pleasure for me, also If
you ever come down to Argentina I’ll be here to guide you.

I enclose a very beautiful piece from a great designer from Brasil
called Antonio Bernardo, its another kind of puzzle ring, with this
piece he won the 2006 product IF award in Switzerland.

Best Regards,
Santiago Abud

Attachment Removed

I’ve had several offline requests about the following, so have
decided to answer here.

I’m in UK and saw a puzzle ring for the first time early in 1961. I
was really taken with it and tried to buy it, but the owner wouldn’t
sell. I started looking in jeweller’s shops without success, but my
girl friend was luckier and managed to find an antique one that she
gave me as a Christmas present. I was delighted with it and quickly
learned how to assemble it.

Unlike the original, where each ring was a rather crude casting in
low grade silver, this one was in gold and obviously made of wire, so
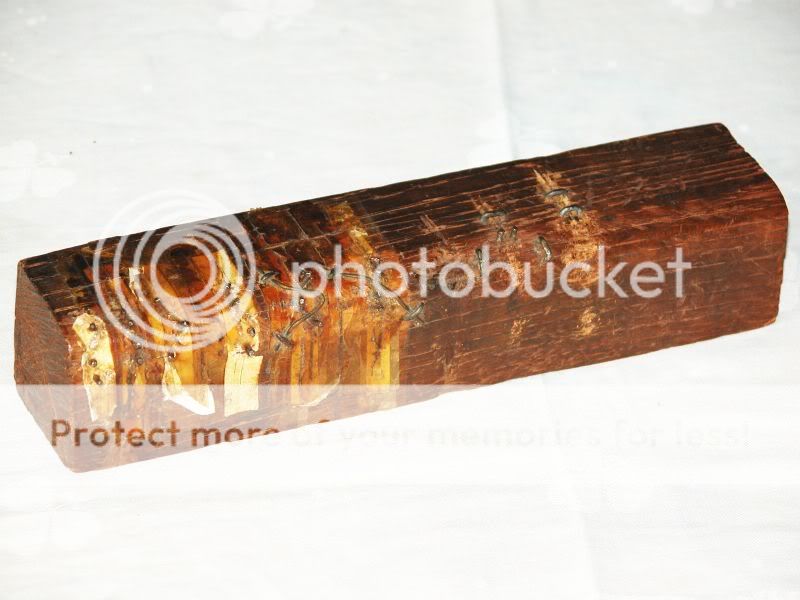
I thought I’d like to try and make one. I made the jig (I still use
it - its the one in the photo) and made one out of 1mm copper wire.
It wasn’t very attractive, but was a working puzzle ring. Spurred on
by my “success” I decided to make one out of silver, but where to buy
silver wire? I had no idea. Up to that time I had no interest in
jewellery at all! A jeweller’s shop owner suggested I tried a bullion
dealer in London’s famous Hatton Garden, so off I went to Johnson
Matthey and purchased 10" of silver wire, a tiny square of silver
solder, and a pot of EasyFlo flux.

I rushed home and made my very first bit of jewellery - a sterling
silver puzzle ring. That was is 1961.

An aunt saw it and asked if I would make one for her. I sold it to
her, purchased some more wire and made another one, which another
aunt bought. My mother was one of 13 so I had lots of aunts and
several requests for puzzle rings. Eventually I made a couple out of
gold wire and one day an aunt said “I like these rings you’re making,
but I don’t want a puzzle ring. Can you make me a ring with a stone
on it?”. Of course, I said “Yes”, but really I had no idea. I went to
the library and “devoured” all the books on jewellery making I could
find, trooped up to Hatton Garden, purchased a green zircon (rather
pretty brilliant cut about 6mm diam) a coronet setting to suit, some
gold shank wire, and eventually made my first “normal” ring.

I was then “hooked” and have been hand making jewellery ever since.
I still make puzzle rings, but mostly its other things - rings of
course, earrings, necklaces, bracelets, etc.

The following link is of a gold puzzle ring with 3 rubies, assembled
and disassembled to show how the the stones are attached.

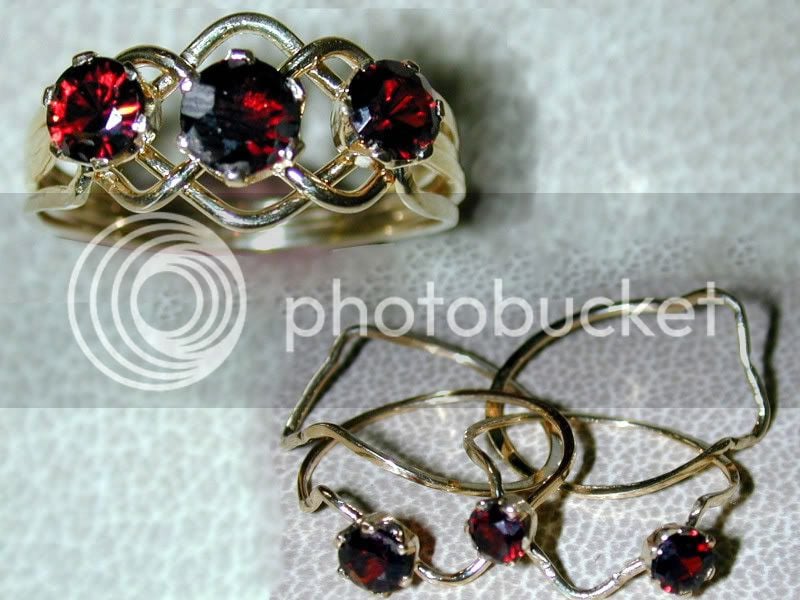
The ring is made first, then the collets for the stones. The first
collet to be attached is the central one; the underside is cut to
fit the top ring (its the top “8” ring) and clear the one beneath it.
It is then secured with binding wire with the ring assembled so as to
get it in the correct postion. The ring is then carefully
disassembled without disturbing the collet, which is then soldered
on. The two remaining collets are fitted the same way, but both to
the same ring - the top “V” ring. The rings are cut away from inside
each collet so as to leave room for the lower part of the stones
which are subsequently set in the usual way.

If there is sufficient interest I’ll create and post a tutorial of
making the next one - but I doubt that it will have stones.

Regards, Gary Wooding

Gary,

Thanks for posting, that is so cool. I received a gold puzzle ring
back in the early '60’s and used to know how to put it together, but
to this day it is apart. I guess I just get to frustrated and
impatient. I don’t really know why, I seem to have incredible
patience for my jewelry.

thanks again,

jennifer friedman
http://www.jenniferfriedmanstudio.com

Jennifer,

There is a Web Site online, that offers schematics for reassembling
Puzzle Rings. Many years ago a TWA Pilot began making and selling
Puzzle Rings. This is his site.

Hugs
Terrie

Hi All,

I did some research on the Web for Puzzle rings, and found what must
be the Puzzle Ring King, Norman Greene. I checked the Archives and
couldn’t find his name, so have added him to the cc line.

Check out his Web site for some inspiration,

This must be the result of a life long passion, and he has some of
the most beautiful rings I have ever seen. And to think, I just
missed him by 6 days, he was here in Dallas at the Scarborough Faire
for almost 2 months. May be I can catch him in Houston at the next
faire.

And Norman, if you are listening, Welcome to Orchid, a World Wide
community of jewelers.

Love and God Bless
randy
http://www.rocksmyth.com

used to know how to put it together, but to this day it is apart 

Jennifer and all - somewhere I have the “solution” to puzzle rings
put away, but you can Google it, too. I forget what I’ve used -
“assemble puzzle ring” or some such. There are various places that
have the thing posted. Periodically I’ve been called upon to save an
owner who lost or never had the instructions. It’s pretty easy,
really - there’s just a little twist to them…

I made the jig (I still use it - its the one in the photo) 

Gary, I do not understand what you mean by jig? I did not see it in
the picture. Could you explain more?

Thank you, jeanette

...and used to know how to put it together, but to this day it is
apart. 

Jennifer, I copied page 596 out of a catalogue (it might have been
Stuller’s big book of mounting): Instructions for Assembling the
Puzzle Ring. If you have access to their books, or maybe on line
even, you may find it. I’ve always wanted one, maybe now I will make
one for myself!

jeanette

I wrote these instructions for my customers. Its in the form of a
PDF. I hope they help.

Regards, Gary Wooding

Hi Jeanette,

Its a bending jig - just a block of hardwood with nails in it. the
following link shows how the nails are used to get each piece of wire
into the required basic shape.

In an attempt to clarify matters I have yellow-hilited (its
surprising how difficult it is to draw straight lines with a mouse)
how each wire is bent around its nails. The two “Z” rings (that
eventually form the “8”) require a little more adjustment after
bending round the nails - that’s what the staples on the right are
for.

Regards, Gary Wooding

More than 40 years ago an airline pilot named Jose Grant, who lived
in Stamford CT, started making high end puzzle rings. He had seen
them in his travels and become fascinated with them. He set up a
production facility in his home and made a wide array of rings
including ones that had upwards of fifty separate bands and that
were so difficult to put back together that even he would need hours
to reassemble them. He produced the ultimate in puzzle rings and I
don’t believe anyone since has ever matched what he was producing. He
eventually opened a retail store and I’m fairly sure he’s dead now,
although I believe the store, run by his children, is still there.
I’m not sure whether they are still active producing puzzle rings,
but if they are they’re better than anything else out there.

Daniel R. Spirer, G.G.
Daniel R. Spirer Jewelers, LLC
1780 Massachusetts Ave.
Cambrige, MA 02140

Daniel,

As a former TWA employee, and a long time jewelry lover, I knew Jose
Grant quite well. From his web site, http://www.josegrant.com it
seems he is now 97! The rings are still being made. I had one that
was 13 rings and that was not easy to put back together. Wonder where
it is?

You are right, no one ever made them better.

Hugs,
Terrie

You sure have a lot of people interested in this ring you posted,
you sure got my attention.

Please post a tutorial when making your next one.

Lloyd.

I'm fairly sure he's dead now 

I first met Jose in 1970-something. He stopped by my shop a couple
years ago just to chat. I believe he was 95 at the time, looked 65.
He is an original.

Yes, his puzzle rings are tops.

Setting this thread straight…

Jose Grant, at 100 years old, is alive and well!

He works every day at managing his top notch line of Ag, Au, and Pt
Puzzle Rings at his jewelry store in Stamford, Ct.

His quality is excellent and he makes ~198 different styles of
Puzzle Rings from the standard even number bands to his odd number
bands. His odd number “N”, “Q”, and “F” type Puzzle Rings offer as
much enjoyment and “puzzle difficulty” in solving, as I or most any
die hard puzzler could want!

How many master craftsmen (read Silver and Gold Smiths) do you know,
who work every day, at the century mark, and continue to strive for
improvement in their art?

He is truly a unique maverick in the field!

So, if you or your customers appreciate beautiful quality puzzles,
from easy to the most complex, you can’t go wrong with Jose’s
Puzzles… the standard from which all puzzle rings should be judged!

E. Bonato.
Reading, Pa.