I’m trying to learn about how to inlay metal (silver) into wood. I
have read about a pique point style the French developed. Anyone
know what this is? Or have any other ideas of where I can learn about
inlaying metal into wood?
Thanks.
Carla
I’m trying to learn about how to inlay metal (silver) into wood. I
have read about a pique point style the French developed. Anyone
know what this is? Or have any other ideas of where I can learn about
inlaying metal into wood?
Thanks.
Carla
Hi Carla,
The person to ask is Paul Schurch at Schurch Woodwork. He is a
master in wood Marquetry and Pietra Dura.
He probably has other pieces of where he has inlaid silver.
Karen Christians
Cleverwerx
Hi Carla
I bought a slat about 1/4 inch by 1 1/2 inch by 2 feet of some
exotic hardwood from a store here in Denver, Rockler. Didn’t need as
much as I bought, but was experimenting. I sawed out a piece about 1
1/2 inch by 1 inch to resemble a cab. I ground it until it was
smooth. I had quite an assortment of round wire, from 22 ga up to 3
and 5 ga. I drilled holes to fit each gauge of wire and inserted the
wire in the hole. Cut the wire. I made about 6 or 7 different gauge
wire holes and put a short piece of wire in each one. Through the
holes in the back I put epoxy to hold the wire. On the top side where
the wires were rough, I put the wood and wire on the flat lap with
the diamond grinding discs and ground them flush with the wood,
using the series of discs to remove and scratches. Now I have it
mounted in a bezel/Sterling Silver base, surrounded with Gallery
Wire and made into a pendant.
It wasn’t that difficult - finding a drill bit to make the hole was
the hardest, but with a round file I was able to make the hole
absolutely just the size of the wire - there was not gap between the
wire and the wood. Turned out really neat. Earlier I had made a ring
with a smaller piece of wood with the wire inlay.
I can’t put a pic on here to show you. Let me know if I can help!
Rose Marie Christison
Its the laying in of wire along a horizontal line that has me
baffled. I want to add lines of silver, spirals etc into ebony and
can’t make it work. I have googled, watched videos, ordered one (its
back ordered) searched my own library, and there is surprisingly
little specific how to info I can find. Tho I was fond of the how to
do it site that suggested I get my silver liquid hot and pour it into
the crevice I made in the wood. That was a fun image.
I have also experimented a great deal.
My problems are:
When I pound the wire to seat it, the ebony splits, the wire bends
up-curves outta the hole. I am using super glue not epoxy. I think
its the cutting of the hole I’m sorta off on. I’m trying to use my
hammer to force a slightly larger piece of fine silver into a groove
and the wood can’t take the force. I think. So how deep, how wide,
how much force…and I’m working on small pieces of ebony so a good
whap with a metal hammer will break even that noble wood.
I have ordered a knife making video that deals with this subject…
Other ideas?
Thanks.
Carla
Its the laying in of wire along a horizontal line that has me
baffled. I want to add lines of silver, spirals etc into ebony and
can't make it work.
Carla, this shouldn’t be so hard. I suspect you’re overworking it,
making it more complex than it should be. Think of how you’d inlay
shapes cut from stone or glass into the wood, and you’ll be on the
right track.
Tho I was fond of the how to do it site that suggested I get my
silver liquid hot and pour it into the crevice I made in the wood.
That was a fun image.
Sounds like Brian Adam’s neat primative method of making ring shaped
ingots or even rings themselves. Very very low tech, kind of
exciting, something you can show beginners to get them interested in
metal, or something more advanced craftspeople can appreciate to get
them out of their usual mode of thinking…
When I pound the wire to seat it, the ebony splits, the wire bends
up-curves outta the hole.
So don’t pound. The wire used should be actually thin sheet, or
rectangle wire, not round, so it’s narrow dimension is what you see
at the surface, while it can extend vertically into the wood far
enough to be secure. That means you start by cutting your design as a
slot shaped opening in the wood. For straight lines, use a saw. For
curves, you’ll need to use a small cylinder shaped bur, using it much
like a router. Dremel makes a router attachment for their tools that
would make this even easier, maintaining a nice vertical cut. Wood
doesn’t like expansive pressure. As you’ve found, it splits. So the
slot needs to be the right size, not smaller. Slightly oversize
works, but doesn’t look as neat. The metal is shaped to simply
lightly press into the wood, no great effort or pounding, so the
metal doesn’t distort, and the wood isn’t stressed. You rely on the
glue to hold it, not the sort of inlay under pressure you’d use for
metal into metal inlay, where you DO hammer the inlay wire into a
prepared dovetailed shaped recess. Into wood is simply a different
process because the wood cannot take the same treatment as metal can.
I am using super glue not epoxy.
Poor choice. Brittle, and not so good on either porous stuff (wood)
or on filling gaps, which you’re likely to get. Remember too that
wood expands and contracts a bit with humidity and temp, so a
slightly flexible glue is preferable. Epoxies are the usual choice
for wood to metal joints, but a number of others are available, such
as gorilla glue, goop, etc, that would also work.
I think its the cutting of the hole I'm sorta off on. I'm trying to
use my hammer to force a slightly larger piece of fine silver into
a groove and the wood can't take the force. I think. So how deep,
how wide, how much force....and I'm working on small pieces of
ebony so a good whap with a metal hammer will break even that noble
wood.
You’ve already pretty much figured out the answers you need., The
hammer is the wrong tool, made necessary by the wrong (too tight)
fit. How deep is up to you, but a simple round wire into a shallow
groove in the wood probably won’t be strong enough all by itself
(though you could get fancy, soldering on a few pins that would
extend into drilled holes along the wire.) The rectangle wire is to
give the glue enough surface area, and it’s shape means the outer
visible surface of the metal fits the groove, whereas with a round
wire, at the surface you’d see a gap…
In short, once you’re at the point of inlaying the metal into the
wood, forget that it’s metal. You’ve shaped it like metal, of
course, but once it’s getting put into the wood, it should be inlaid
and treated the same as though it were another piece of wood, a piece
of gemstone or glass or plastic, or the like. None of these would
suggest the use of a hammer or anything else that would put any
stress or pressure on the wood. Think like this, and it will work
just fine. The main difficulty is the task of cutting a precisely
dimensioned opening for the wood, so that once inlaid, it’s a clean
neat fit. Get that part down (which is just plain careful
craftsmanship and the appropriate tools), and you’re home.
Peter
i inlay metal into ebony but i don’t see where the difficulty is that
you are experiencing Are you gluing it in?? You must draw the spiral
and use a ball burr or a very diameter wheel, must have your hand
steadied, maybe rough with the ball so you have the spiral right,
and go with the wheel, or only the ball bur
When I pound the wire to seat it, the ebony splits, the wire bends
up-curves outta the hole. I am using super glue not epoxy. I think
its the cutting of the hole I'm sorta off on. I'm trying to use my
hammer to force a slightly larger piece of fine silver into a
groove and the wood can't take the force.
There are 2 basic ways to do inlay.
One, mostly used on metals, but can be done if wood is very hard and
metal like fine silver of gold, is to cut a channel, having profile
of swallow tail; with narrow end at the top. Round wire is place into
the channel and gently hammered. Wire expands on the bottom and that
fixes it in place. The important point of the technique is that
cross-section areas of both, wire and channel be equal, so wire would
fill space completely.
Second technique used mostly with woods is to go over the design
with knife blade or similar tool, which slightly thinner than metal
to be inlayed, The goal is to create a channel of rectangular
profile. The metal is used in sheet form. wire will not work here.
Cut strips of metal, with height of 3 times the thickness. These
strips are hammered down into prepared channel. What is holding the
metal in this case is friction, so again channel must be prepared
very carefully. Too narrow and strip would bend, rather than go in,
too wide and metal will be too loose and will not hold.
Leonid Surpin
Metal hammer??? My suggestion is to use a leather mallet or a
rosewood head hammer 4.97 -14.95
heat the silver LOL flambe
be sure you are using dead soft sterling if it is sterling me I
would use fine silver or argentium, but that is just me. Should not
take more then a light tap to get in inlayed the cut does not have to
be that much tighter than the wire size especially with epoxy in the
mix. the epoxy plus too small hole plus metal hammer = ouch
I am sure somebody else knows more about it but in my experience any
reason to buy a new hammer is a good day lol
Teri
Hi Carla,
I’ve got an old Indian (India indian) blunderbuss from the 1700’s
that has wire inlay. It’s in pretty marginal shape, with some of the
wire sprung out.
It looks like they took coin silver (90%), rolled it out into a wire,
and then sharpened one edge, and pounded it down into the wood. I
can’t tell if they cut a groove for the wire first or just pounded it
home. What I can tell you for sure is that the bottom edge of the
wire is sharpened, (or at least tapered) and that it surely isn’t
fine silver. Given what it looks like, my bet is coin silver. It may
be even lower than that. It’s springy as anything.
The strip is (from eyeball memory) about .020"-.030" thick, by
about. 125" wide.
Ebony’s great stuff, but hard as hell, and not particularly
flexible. You might want to experiment with something a little
softer, like maple. Once you get to the point where it works in
maple, then switch over to the expensive stuff. I also wouldn’t
drive it with a steel hammer. A mallet of one sort or another. Either
delrin or rawhide. I have memories of having seen pictures of Indian
goldsmiths driving the wire with wooden punches. You might try that.
(Maple or ebony, not pine.)
For whatever that all’s worth,
Brian.
If you have not seen this copy, the Jan/Feb issue of Jewelry Artist
Lapidary Journal has a piece that includes a bit on this idea.
brenda
Carla- First use very soft fine silver or very well annealed
sterling. Use epoxy not super glue. It sounds like you are forcing
too large a wire into too small an opening. I would not use a large
hammer. Maybe a small watchmakers hammer with a setting punch or
just burnish in with a polished hand burnisher. Cut your seats so
that the metal just fits and then use epoxy blended with fine ebony
dust or charcoal dust to match the color of the glue to the wood. If
the metal stands proud, just emery down and finish it all with 8
ought, (very fine) steel wool.
Have fun and make lots of jewelry.
Jo haemer
www.timothywgreen.com
Carla,
If you want to do this old school, I think the best person to answer
your questions would be Masters Surpin or Meeks. Based on my reading
on the latter’s book of engraving, he would probably tell you that
you need to have gravers available that would perform proper
undercutting for your wire. Prepare to either buy gravers (and
handles!) or make them yourself from jewelry files and a bench
grinder.
Now melting metal into the wood is a time tested technique dating
from the Romans, but only for relatively low temperature metals like
lead, pewter, bismuth, or some solders. Silver would burn your wood.
If I put on my engineering hat, I consider faking it as follows:
Hmm… maybe I might do it this way myself…
Andrew Jonathan Fine
Hello Carla,
I have a woodworking friend who makes very artful bowls on his lathe.
He inlays silver on them. As I recall, he began using silver filings
and glue to fill the groove. Maybe worth a try?
Judy in Kanss
Working in Denmark in the 60’s we had a fellow who did this all the
time. After making a box in or whatever was required, he varnished
the wood. (Palisander wood. dont know how it is spelt.)
Then placed whatever he had to inlay carefully on top of the wet
varnish then allowed the varnish to dry. He then carefully lifted the
silver shapes off the varnish and delicately routed out the areas
defined on the varnished
surface. He used his flexi shaft and engraving tools and small
chisels. The important thing was to get the edges perfectly cut as
per the marks on the varnish. The finish of the cutout area was not
so important as it was filled with glue and the silver was then
inlayed. Draw down or roll out rectangular wire, probably about 1.5mm
to inlay into the prepared grooves, Not round wire!
David
jewellerydavidcruickshank.com.au
Based on my reading on the latter's book of engraving, he would
probably tell you that you need to have gravers available that
would perform proper undercutting for your wire. Prepare to either
buy gravers (and handles!) or make them yourself from jewelry files
and a bench grinder.
Nope. That would be for inlaying metal into another metal, such as
when an engraver works on a nice gun or knife and inlay’s gold into
the steel. For wood, gravers aren’t the best choice, and you don’t
need to undercut the groove, since you’re gluing the metal in, and
the porous wood absorbs enough glue for this to work just fine with
no undercutting. Roughing up the metal a bit so the glue has
something better to stick too than just smooth metal can be a good
idea.
If I put on my engineering hat, I consider faking it as follows:
Why fake it. Just do it.
1) Use a dremel with an engraving point to cut your lines.
2) Mix fine silver filings with Epoxy 330 to make a putty.
The dremel and epoxy 330 is the right idea, but unless your inlay
area is vary crude and varies in width, etc, there’s no reason you
have to use filings, which never quite look the same as actual solid
metal, even if they can be decorative. Better to simply cut and fit
the metal to your openings. With slots/grooves of uniform width, a
rectangle shaped wire can be fitted neatly and closely without
stressing the wood, and simply glued in. Think of the way frets are
installed in guitar necks…
This is actually simpler than it sounds. The main thing is using the
right cutter in your flex shaft or dremel to cut a nice uniform width
groove that neatly fits the rectangle wire or whatever other shape
you’re inlaying, so that you don’t have a sloppy gap between the wood
and metal. If there IS such a gap, mix a bit of sawdust from the wood
into the epoxy to form a color matched wood putty. That, after the
whole surface is finished, will be less obvious than just plain epoxy
filled gaps.
Peter
Carla–
There is a YouTube video that shows how a woodworker with a lathe
inlays copper wire into a wood bowl. This is not your situation, but
you might see a thing or two of interest in watching the video.
Wire inlay woodturning tutorial
Wire inlay woodturning tutorial - YouTube
Whit
Nope. That would be for inlaying metal into another metal, such as
when an engraver works on a nice gun or knife and inlay's gold
into the steel. For wood, gravers aren't the best choice, and you
don't need to undercut the groove, since you're gluing the metal
in, and the porous wood absorbs enough glue for this to work just
fine with no undercutting. Roughing up the metal a bit so the glue
has something better to stick too than just smooth metal can be a
good idea.
I usually agree with Peter, but not this time. Gravers work very well
with wood, just needed to be sharpen differently. On very hard woods,
like ebony, under-cutting is the only thing that works. As far as
using glue for inlay, that is where I am exiting the conversation.
Leonid Surpin
Hi Carla,
Getting the knife making video is probably a good idea.
To inlay lines you should start with flat “wire” - strips. Chisel
straight down into the wood, tracing out the the line you want to
make. You are not trying to carve a groove like you would in metal.
You are just making a split in the wood. Then tap the wire into the
groove. It will be held in by friction, like a nail. File/sand the
wire flush with the wood. This is different from inlay into metal.
You don’t make a mechanical join (undercut, expand the inlay etc.)
Trying to pour metal inlay into wood is never going to work. The
closest you can get is casting pewter elements onto wood, but it
doesn’t work well for detail.
Cheers,
Walter
1) Use a dremel with an engraving point to cut your lines.
sorry but the straightest line with a flexshaft is acheived with a
wheel bur, and the diamond ones work very well, as do the carbide
ones, but the depth must be practiced on a scrap piece many times.
Round wire will go as well as square wire, but with square wire
debur the bottom edges slightly so they slide into the groove without
rip, absolutely rough the bottom of the wire, and of course
measure the width of your test cut so you know the thickness of wire
needed. Then when all thickness are measured and fit well burnish
the wire in
I really appreciate all your help on this. As I read all your
helpful suggestions, I realize I have been imprecise in my
language.which leads to varying input as you struggle with what I am
trying to do.
So let me clarify. When I said wire I was meaning round wire of
various gauges. But the more I read online and from you all, I can
see square wire, bezel wire, etc could also be used.
My goals: To inlay silver shapes, varied width lines, etc in ebony.
It must be efficient in labor time needed as I need to sell these,
not admire my handiwork. But I take pride in the quality of my work,
so I am looking for a solution that is workable not just quick and
dirty. Make sense?
I was also hoping to change the width of the lines do they look more
hand drawn… I do wish I could post pictures on Orchid because it
would make this all easier.but I have posted them on picturetrail.com
to help illustrate my learning curve.
So you can see what I am talking about.
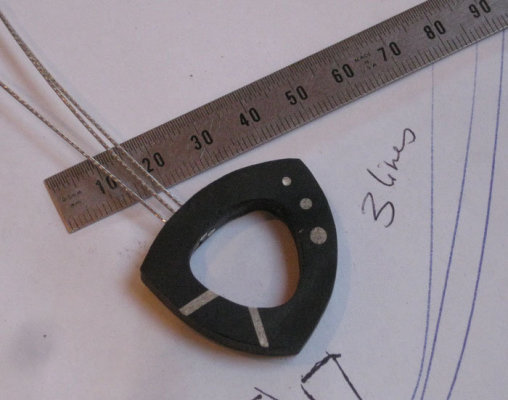
A. http://www.ganoksin.com/ftp/395975654.jpg
My piece of ebony with inlays of epoxy and white pigment powder. Most
unsatisfactory. I have figured out how to do the round shapes in
sliver, but those long straight lines are what has me puzzled. (For
chuckles I also tried silver dust in epoxy. The silver is too light
to sink thru the viscous epoxy so does not reach to groove. Plus it
looked like glitter in glue…ick.)
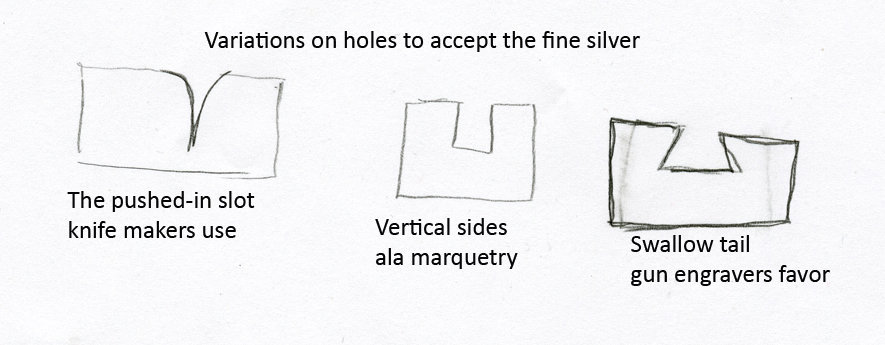
B. http://www.ganoksin.com/ftp/395975653.jpg
A drawing of the various shapes of holes to accept the silver. The
knife inlay info suggests a “pushed-in” hole, that removes no wood.
The marquetry approach where you have vertical sides a hole that just
fits the shape of your wire. And finally the gun engravers suggest
the swallow tail approach.
I am still experimenting with the knife inlay approach to make small
narrow lines. I have to rework some tools and get smaller bezel wire
I think. I’ve tried the gun engravers swallow tail the most. Frankly,
Peter is right. It won’t work. As you try to tap the silver in it
hardens and curls up and out of the hole.
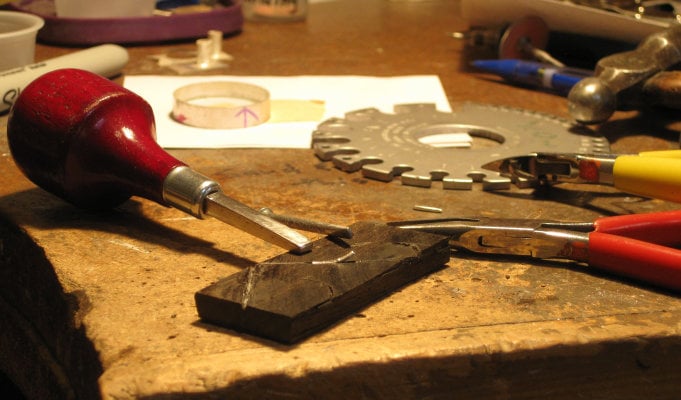
Photo C. http://www.ganoksin.com/ftp/395975655.jpg
Even ebony isn’t strong enough to contain fine silver as it work
hardens, when you are trying to spread it into a swallow tail
groove.
So this leaves me with the marquetry approach. And Leonid it will
require epoxy. I can figure no way around it. If you can make it
work let me know and send photos!
Today guests are coming for a few days, so I will have limited time
to experiment with this today and tomorronw. But I do want you all to
know that I REALLY appreciate you puzzling this with me. I am
thinking about each suggestion and trying many of them.
Carla