Can anyone point me to a tutorial or give me a synopsis of how to “back set” a stone? I have a lovely rectangular moss agate that I want to set so that a pierced design is on the front of the stone; the stone is inserted through the back of the pierced piece and, I guessing, would be pushed over the back of the stone to hold in place? I just want to make sure to do this correctly and any help you can offer would be greatly appreciated. Thanks!!
3 Likes
Hi,
have you decided if you want the back to be “open” or “closed/ covered” yet?
will this be a pendant, pin, ring, bracelet? ie: will there be additional findings to consider?
Julie
Hi, Julie. I want the back to be open because the stone is translucent and I want light to show through. It will be a pendant and I had planned to solder a piece of tubing to the top of the piece as a bail to run the chain through. Thanks for responding.
Martha
Hi again,
so you might want to google youtube for frame setting, backsetting, setting from the back, etc…or! search cold connections and modify concepts to suit/ enhance your designs…
what i have seen in the past, but not tried myself is:
- having a number of tabs on the back…which are pushed down/over after inserting stone…the bottom edge of the bezel can be sawn to create the tabs, and then the excess bezel cut/filed away…
you only need a little bit of metal to captivate the stone, at a minimum of 3-4 points around…or make many decorative tabs as a back design feature…could be scallops, shapes, etc…it either captivates the stone or it doesn’t…dont neccessarily need a full all around bezel
-
insert a round wire ring that is tension set into the underside of the bezel, after the stone has been inserted, and then again possibly use tabs to hold it in place, or raise beads with a graver if you are proficient with that…or bur a slight groove inside the bezel for the round wire to pop/seat into…
-
solder decorative prongs/ design elements…like a shape, to the outside of the bezel, longer in the back, and push down/ over to captivate the stone
-
maybe drill holes is bottom wall of bezel…take wire and ball the ends…stick thru holes, using balls to hold in the stone. then rivet from outside of bezel…
-
your bezel can be temporarily “slit open”…put the stone and wire ring in back, bur a groove for round wire to seat into, then close the bezel with a cold connection…like a screw or rivet…perhaps designed into bail…like a spectacle setting…
maybe practice a few concepts first to check for form and function…
just a few thoughts.
Julie
3 Likes
Julie,
I really appreciate you taking the time to write such a detailed response!
I have googled those phrases–frame setting is definitely not what I am looking for–but have not found any videos or instructions on backsetting, back setting, setting from the back, etc.
I have two questions regarding your information:
-
Why is it necessary to insert a round wire into the underside of the bezel? (By the way, this is a rectangular stone, if that makes a difference).
-
The piece of metal covering the front of the stone is pierced in a design that meshes with the natural designs within the stone (moss agate). Is it not feasible to construct a rectangular wall and solder to the back of that pierced piece with a wall matching the height of the stone, insert the stone into what has at this point has become a rectangular box with a pierced front, and then hammer set around the walls just as you would if the stone was set from the front into a rectangular bezel? Would that not hold the stone?
Thanks very much for your help!
Martha
1 Like
Hi,
opos! yes! you did say rectangle!
also, i was assuming the bezel was already attached to the front plate when i was typing…sorry, i spaced out!
i think setting it like a regular bezel should work…maybe others have comments to offer as well…my brain just went to all the different ways i have seen settings done from behind, without soldering, after stone is in place.
your suggestion is definitely the most obvious and least convoluted!
the round wire was just an idea to hold the stone in…like adding a bezel seat, after the fact…(i spaced and was picturing a round cab there!)…the question would still be how to hold that in as well, so you are totally right that it is not neccessary…that was just an idea if you like a cleaner look without tabs…not sure what will show from front…
if you are thinking of pushing over bezel as per normal, i would consider filing a. bevel on the outside edge/corner so that the metal moves inward, and easier due to less metal to move…or even notching out areas for less metal to push over…
just a thought
julie
1 Like
hi,
here is an interesting board on pinterest by Giorgia Atzori.
there is one example kinda like my #5 regarding spectacle settings, and scallops and tabs, and balled up pins, etc…not my style, but nice examples of stuff…I can really appreciate the creativity!
trapped spectacle
Julie
1 Like
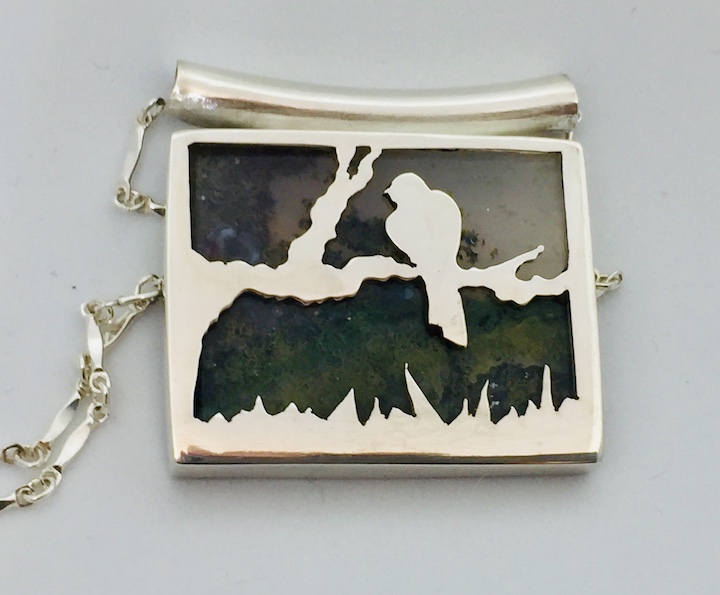
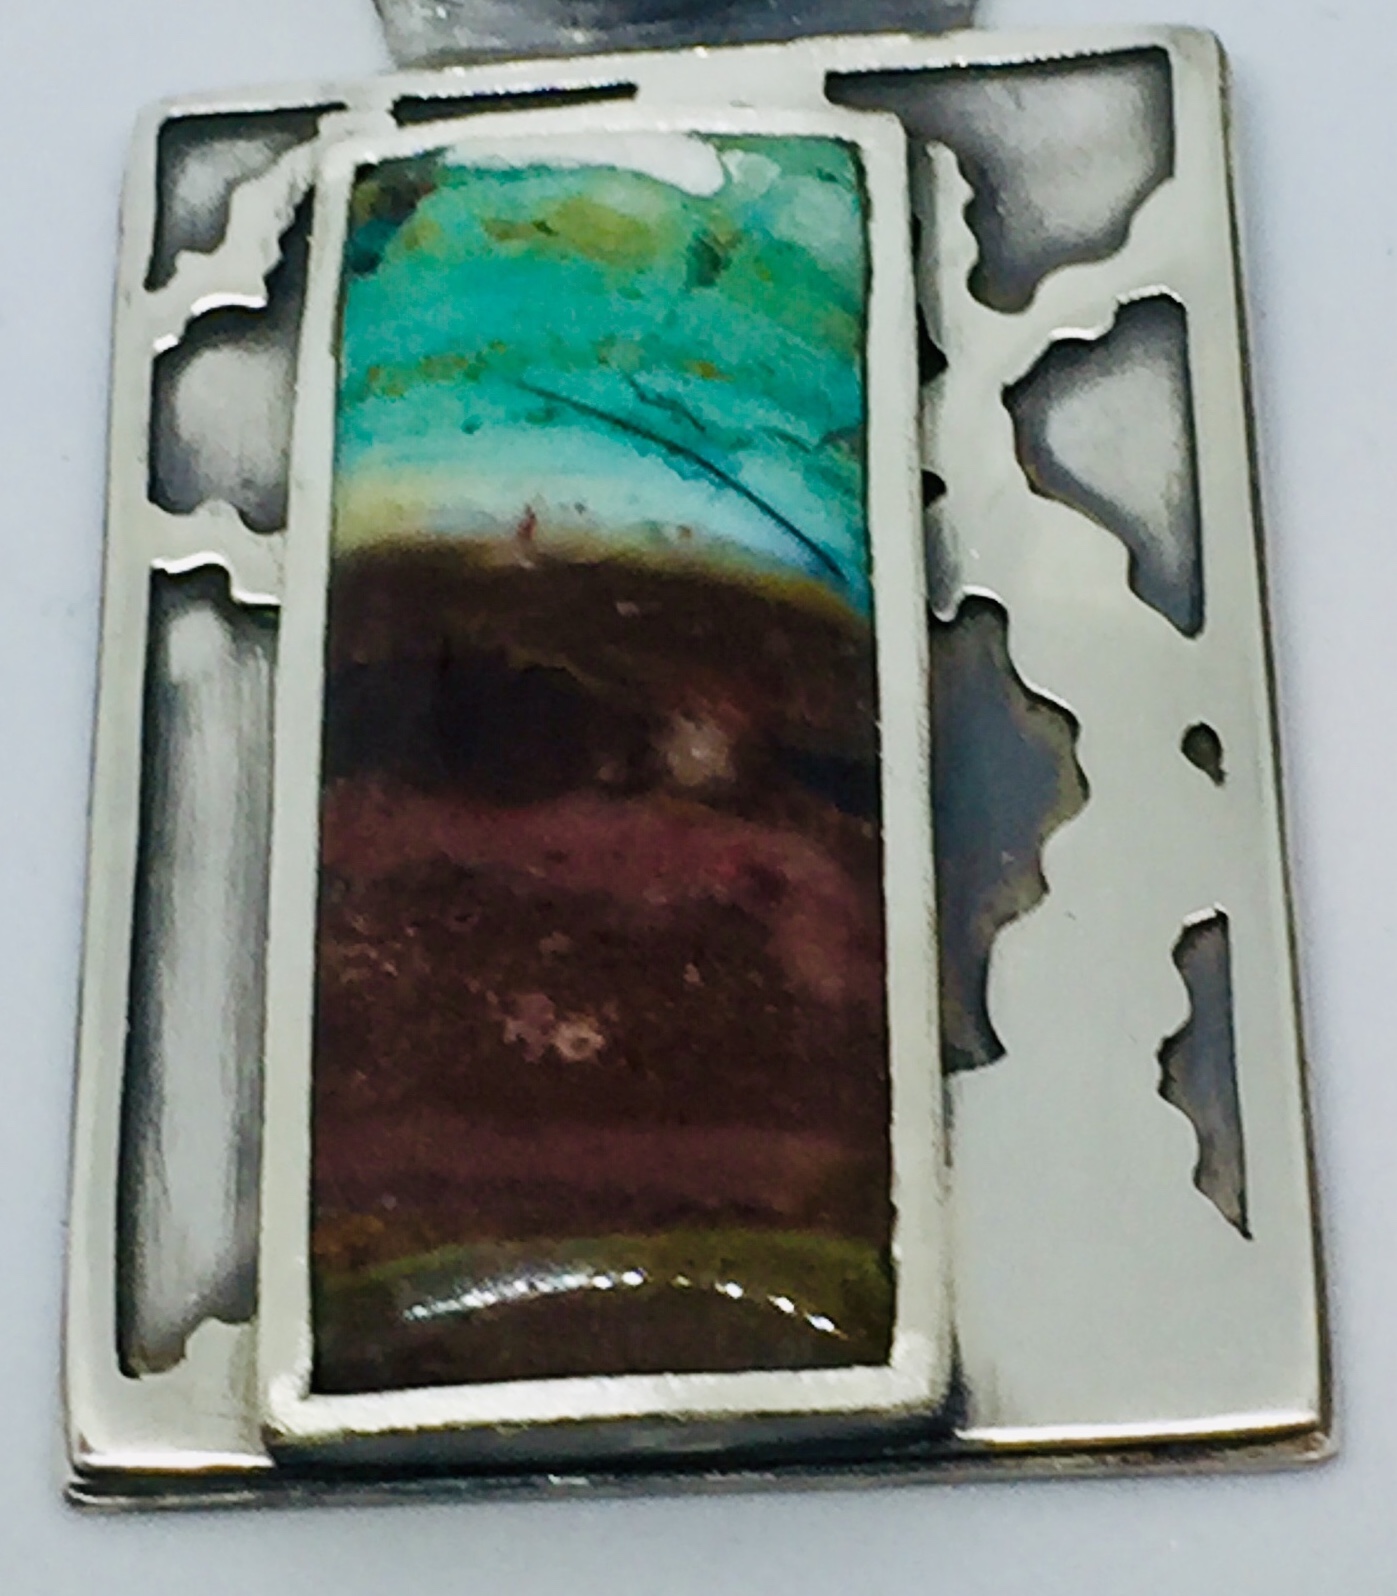
Just thought I’d share the finished pendants that I finally back set. They’re not perfect by any means but, hopefully, I’ll improve as and when I try again. Thanks again for all your help!
5 Likes
Hi,
very nice work! did the back bezel setting technique go off well without a hitch?
julie
This is beautiful, thanks for sharing!
Hi Martha,
I did not read your question when it was posted or I would have made a few suggestions earlier. Here are some suggestions for the future:
Setting things from behind can be as easy as making an upside down bezel. If the frame is made with fine silver instead of sterling silver it is easier to set the stone in the end. You can trim, file and polish the outside or extend the edges as an untrimmed bezel and make it part of a larger design facing front.
We are lucky to have several wonderful suppliers here in New Mexico. The best place to buy a variety of heights and thickness of fine silver strip is Santa Fe Jewelry Supply. You can check with them by phone or on the web and order any length or weight you want if you do not want to buy a lot. This is a great service because many suppliers require ordering in larger quantities. They will cut things to any length which is handy if you want to have a selection of options to use. They even have fine silver coiled strip 22g & 24g if you want the sides of the bezel to be more substantial.
In many cases because the design may call for an additional adjustment in height. It is relatively easy to do trim along one edge with Fiskar’s shears and a bit of practice.
When finally setting the stone, if the bezel is low enough, file the edges thinner and roll them over the back of the stone carefully paying attention to any irregularities in height of the stone. Things can be trimmed down to match the ups and downs of the surface. In the case of square stones I find corners look more professional if the bezel is filed down to the level of the stone at the corners. Gently taper the height of the bezel so that it is slightly higher in the center and lower at the corners. The change in width is not noticeable from the front. With practice and care, you can even file the edge with the stone in place if you are very careful.
There are other alternative methods that you can use like notching the bezel and making prong like tabs to hold the stone in place. Adding a wire formed and soldered to the exact shape and inserted into the inside of the bezel after the stone is in place adds dimension and strength so the rolled bezel doesn’t sit directly on the stone. I sometimes use a sheet of metal cut exactly to the shape or the inside of the bezel if you want to cover an ugly back or need a reflective or darkened surface behind the stone. Plan to make the bezel slightly higher to allow for the change in thickness.
Jewelers may be interested to also know that SFJS has a fairly large selection of tubing that they will cut into short lengths so you don’t have to buy a foot or more of each size and some telescope so making tube settings is easy. Rio Grand in Albuquerque has fine silver tubing that makes it is easier to make and set small stones. Both places will ship orders.
Hope this helps in the future because setting from behind is not any more difficult especially if you partly use fine silver… Marilynn
3 Likes
Marilynn Nicholson
I would suggest using photographs in your ‘greatly detailed’ instructional essay!
![]()
Virus-free. www.avg.com
Hi Gerry,
I admire your knowledge and the fact that you share it so freely on Orchid.
I was just casually viewing things on the net this morning when I decided to check out what people said about setting stones from the back. I did not mean to write anything so long I just started and it seemed to go on and on…… I have
a lot of knowledge about this because I teach and use that technique myself. It was just a matter of time…. I agree photos would make things clearer but they would take a lot more time. I may write an article in the future and take your advice. Thanks….
Marilynn
Mail](Outlook) for Windows 10
Martha- I don’t know how fragile or flat your stone is.
I use an old school technique for setting fragile and irregular stones from the back.
I have the front pierced out and shaped to conform to the stone.
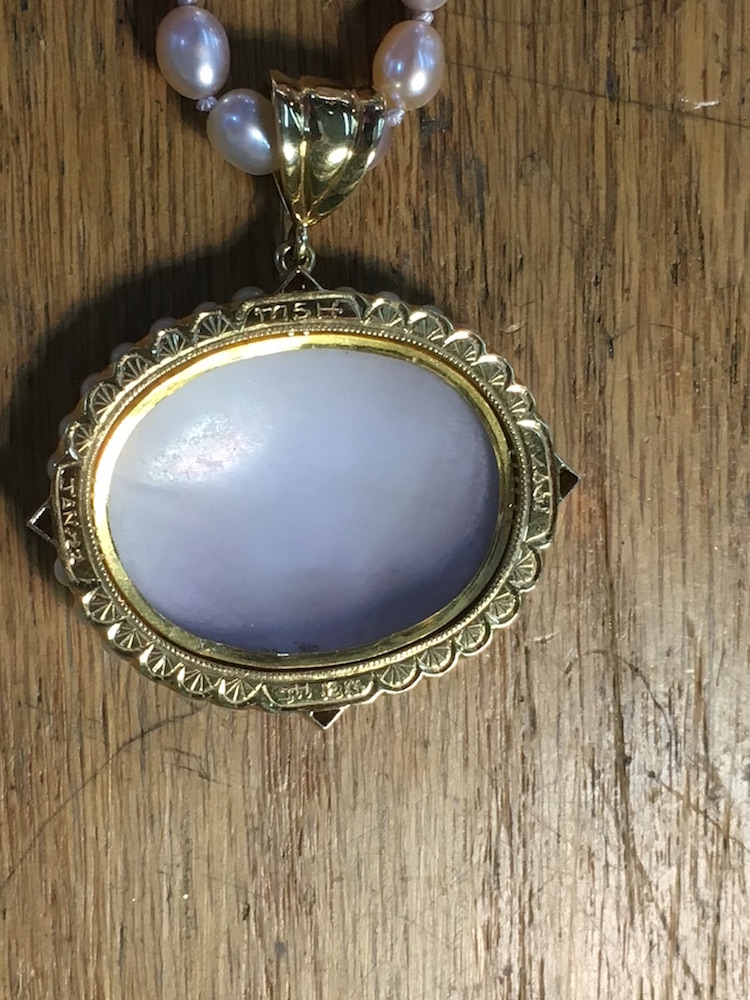
Then I use a piece of flat wire of .999 fine silver or 24 kt gold that conforms to the outside shape aka the girdle of the stone. I then very carefully using my fingers or a wooden manicurists orange stick to squish the annealed and very soft underwire into place under the stone. Then I raise beads on the inside edge to hold the wire into place. I’ll try to attach some photos of the front and back of a piece that I made wth a very old and fragile cameo. If you enlarge the back view enough you can see the tiny beads holding the underwire in place.
4 Likes
I want to thank everyone for your time and sharing your knowledge in helping me get through this learning curve. And I apologize for my delay in responding. Unfortunately life and family events took up a lot of my time in the past couple of weeks. I did end up setting the stone as one would if setting from the front–just backwards–by piercing the front, making a rectangle to fit the stone and soldering that to the front as if it were a back plate; and then using a hammer hand piece to roll the top sides of the rectangle over the stone to set it. I like having a little heavier bezel than normal which is one of the reasons I make my own with 20 gauge sterling silver (a little cheaper than fine). I’m not really happy with the bail on the one shown in the second picture but I always have trouble with bails–in the sense that I don’t want to just solder a jump ring on the top and have to rack my brain to come up with something different. And, as I said, these pieces aren’t perfect but I learned a lot and know what I would do better/differently next time. Plus the 2nd pendant sold already so I sure can’t complain.
Thanks again, everyone, for your help and encouragement.
Martha
1 Like
Show us your handiwprk please 
Aaron
Hi Martha,
Your work is lovely and ambitious.
Your comment about bales is right on. I think the bale should relate to the design of the piece, not compete for attention, and be sized proportionately. That said, the round tubing in your photo appears large in relation to the piece and the round shape is not present in the piece. A smaller bale, 1/3-1/2 in length might be a better size. Constructing a box-shaped bail would be a lot of work, but something less round would be more in keeping with your rectangular shaped piece. Bales can be a real bugaboo and spending a lot of time on one may not be cost effective, but struggling with these little design details is a great way to exercise one’s design muscles. I’ve often spent more time working out the design of the little details and findings than the design of the piece.
I hope this is helpful. Constructive criticism from my piers over the years has been a big help to me.
2 Likes
Awesome, and i second Santa Fe Jewelry Supply. Love them.