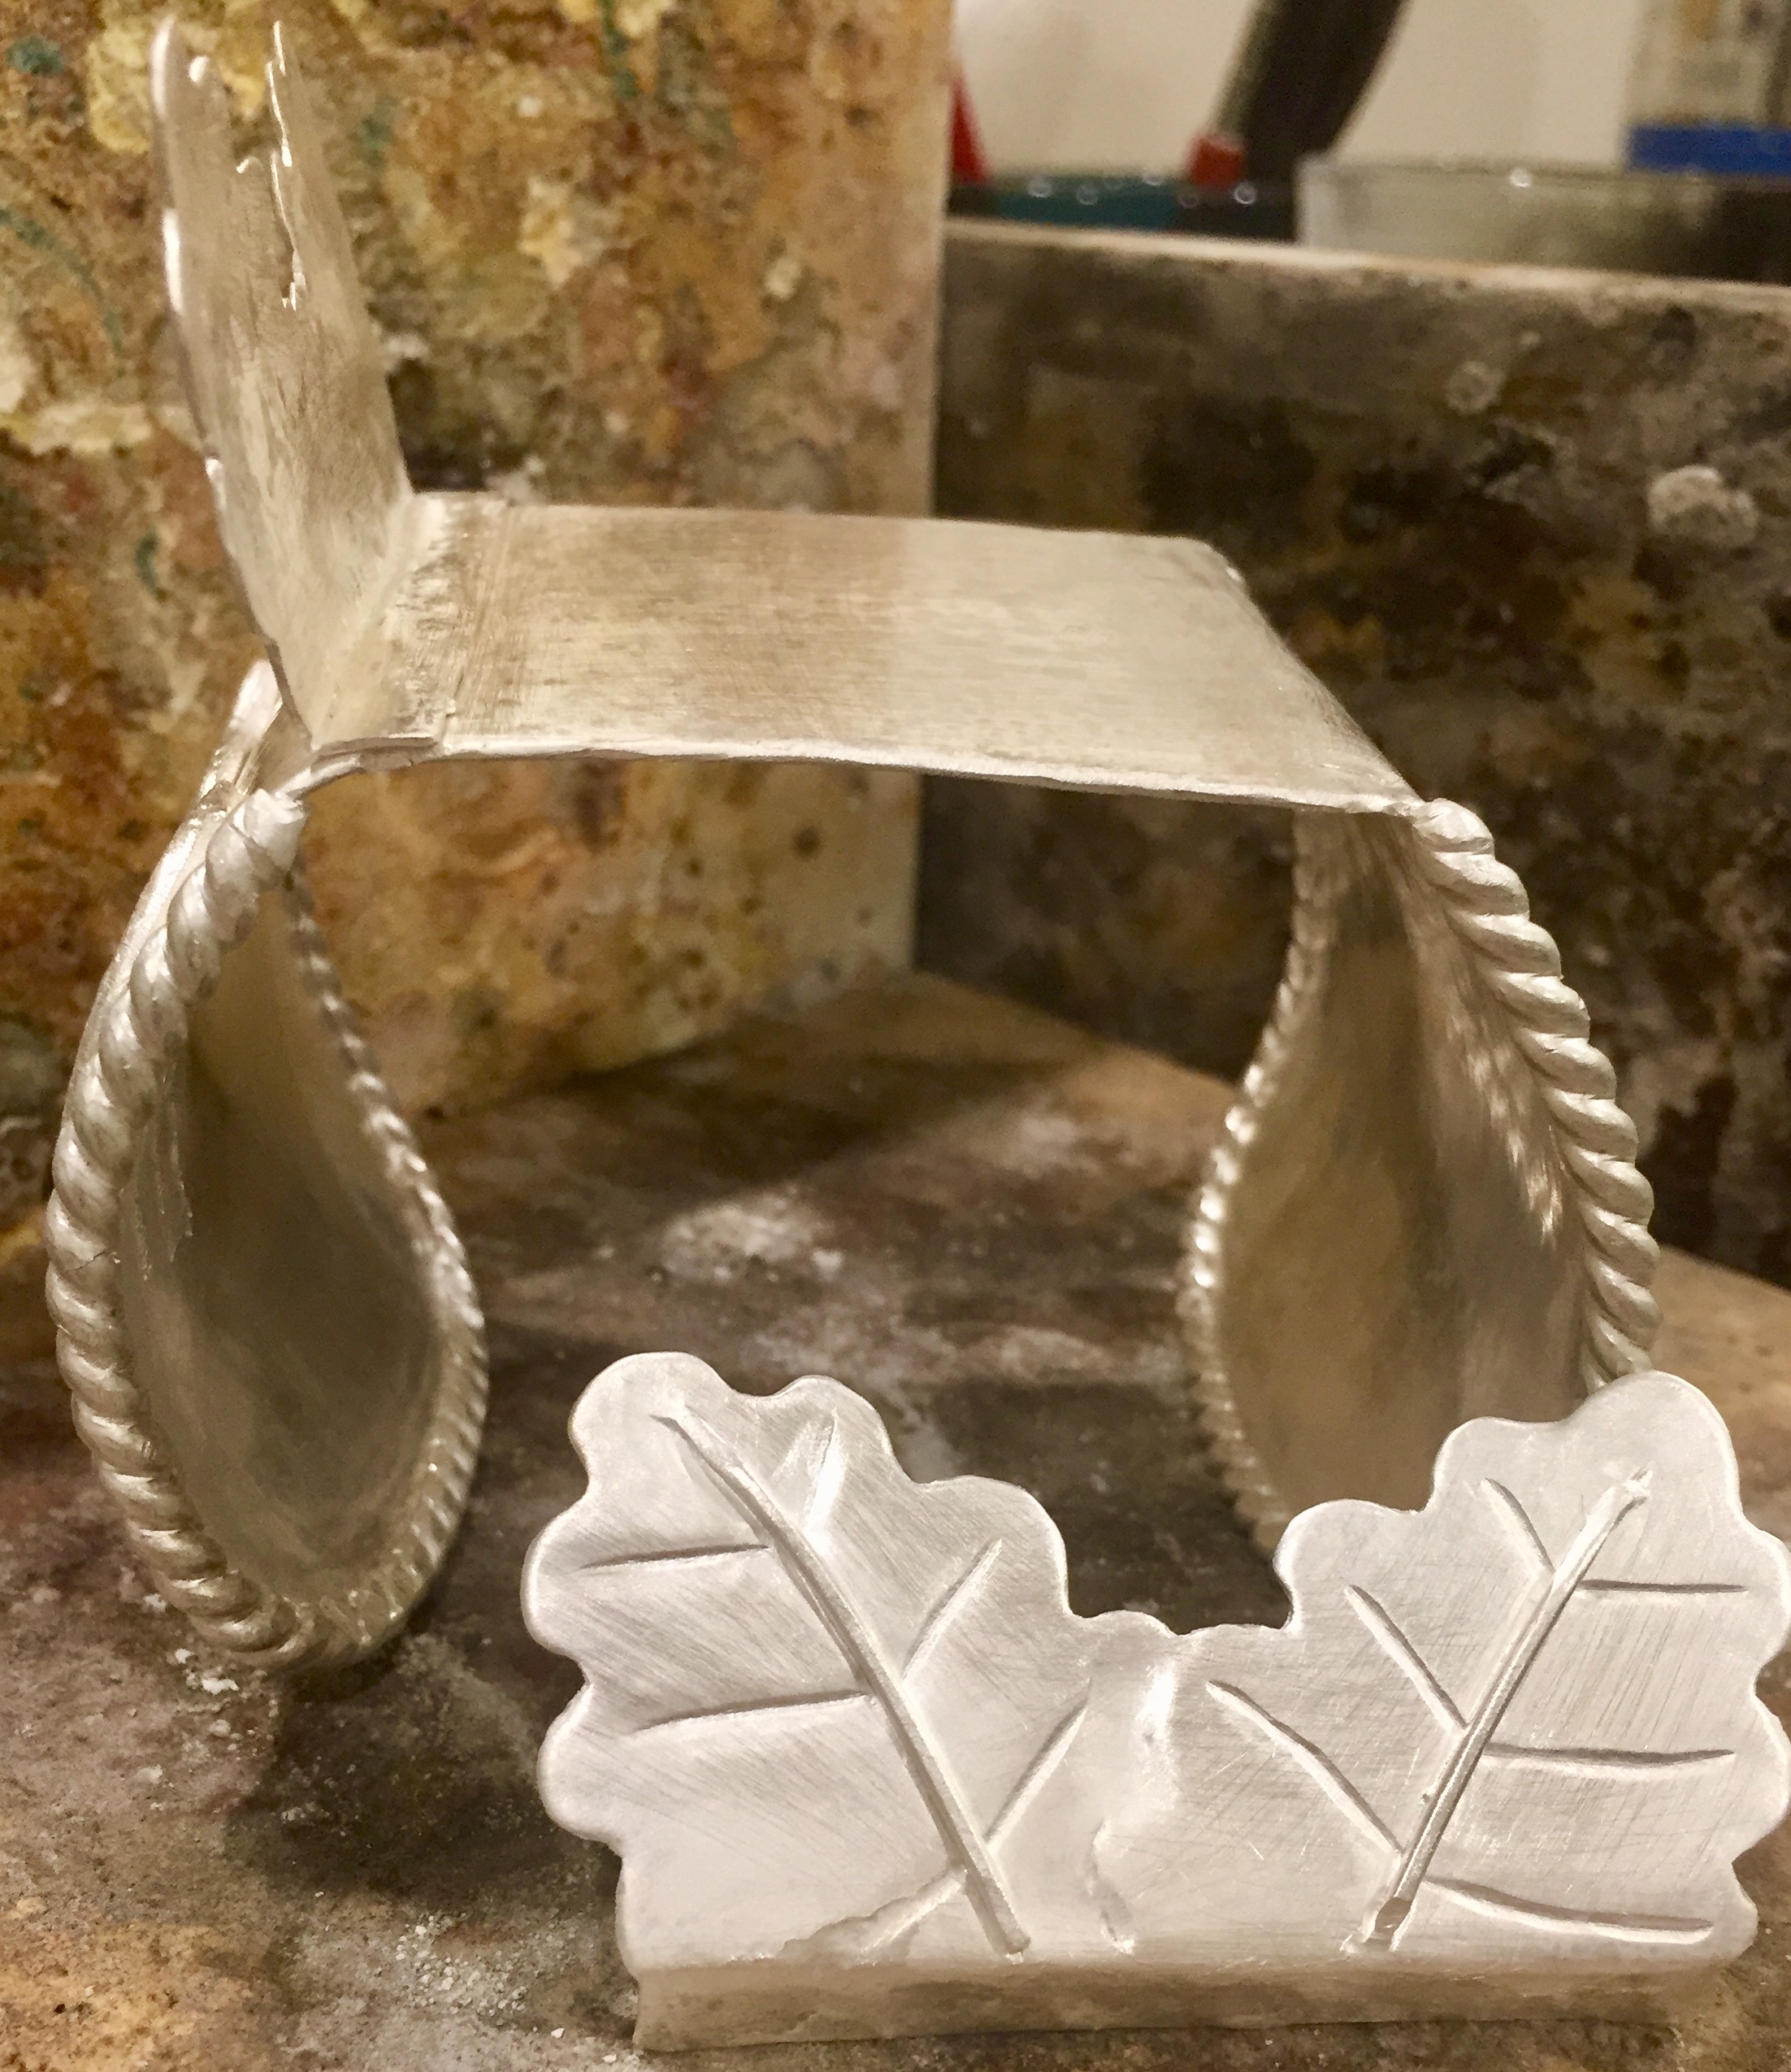
I am desperate for some help. I am trying to solder a 20 gauge piece of sterling in the shape of two leaves (about 1.5" X 1") to a 16 gauge sterling silver cuff. I cannot get the solder to flow. I have cleaned both pieces of silver; dipped them in denatured alcohol and borax and torched them; covered them with paste flux; insured that the two pieces were touching with no gaps (I am using cotter pins to hold the small piece to the larger piece and I realize these are heat sinks); I’ve pickled and cleaned between solder attempts. I’m using a Little Smith torch with Paige Tools Rosebud tip, oxygen and propane. Oh, and I’m using easy solder since there are other components on the cuff that have been soldered on with hard and I’m trying to avoid those components becoming “un-soldered”. I’ve tried heating from above, heating from below, heating from the back…nothing is working and I would really appreciate any help and/or advice anyone could give me. Thanks in advance.
Try medium solder.
Try everything you are currently doing except use your titanium solder pic to pick up your piece of solder as it melts on the tip and bring it over to your joint and hopefully it will melt into the joint as you continue to apply heat to that joint area.
I agree with robert on this.
I have often had this concern. And I was using a Prestolite torch. Now I am getting on with a Little Torch and Paige tips. The Paige tips are a superior product but the learning curve is steep. I find that the Little Torch burning propane creates such a concentration of heat it is possible to super heat just the surface of a work piece and have the interior still be too cold to solder. And by the time the interior is up to temp you are changing your design to include the accidental reticulation of the piece you are applying. Secondarily by the time the heavier gauge is hot enough you have burned up the flux along with the thinner gauge material. Dial back the heat.
And I think Rob is correct. Use a medium solder. Soft solder will burn through some work on the lighter gauge stock before the heavier work piece gets hot enough to flow the solder.
So here I sit with the benefit of not seeing the work you are struggling with. But what I can envision may have this for a solution:
Can you lightly tin the thinner metal you are trying to apply? Once tinned the thinner gauge material can be applied to the work piece. The work piece can be heated from below and the solder on the appliance can come to temp and flow to the heavier stock with out the 20 gauge appliance needing to be brought to temp at the same time as the work. I have used this technique on pieces through the years to good success.
Send a picture so we can see what your project is.
Don Meixner
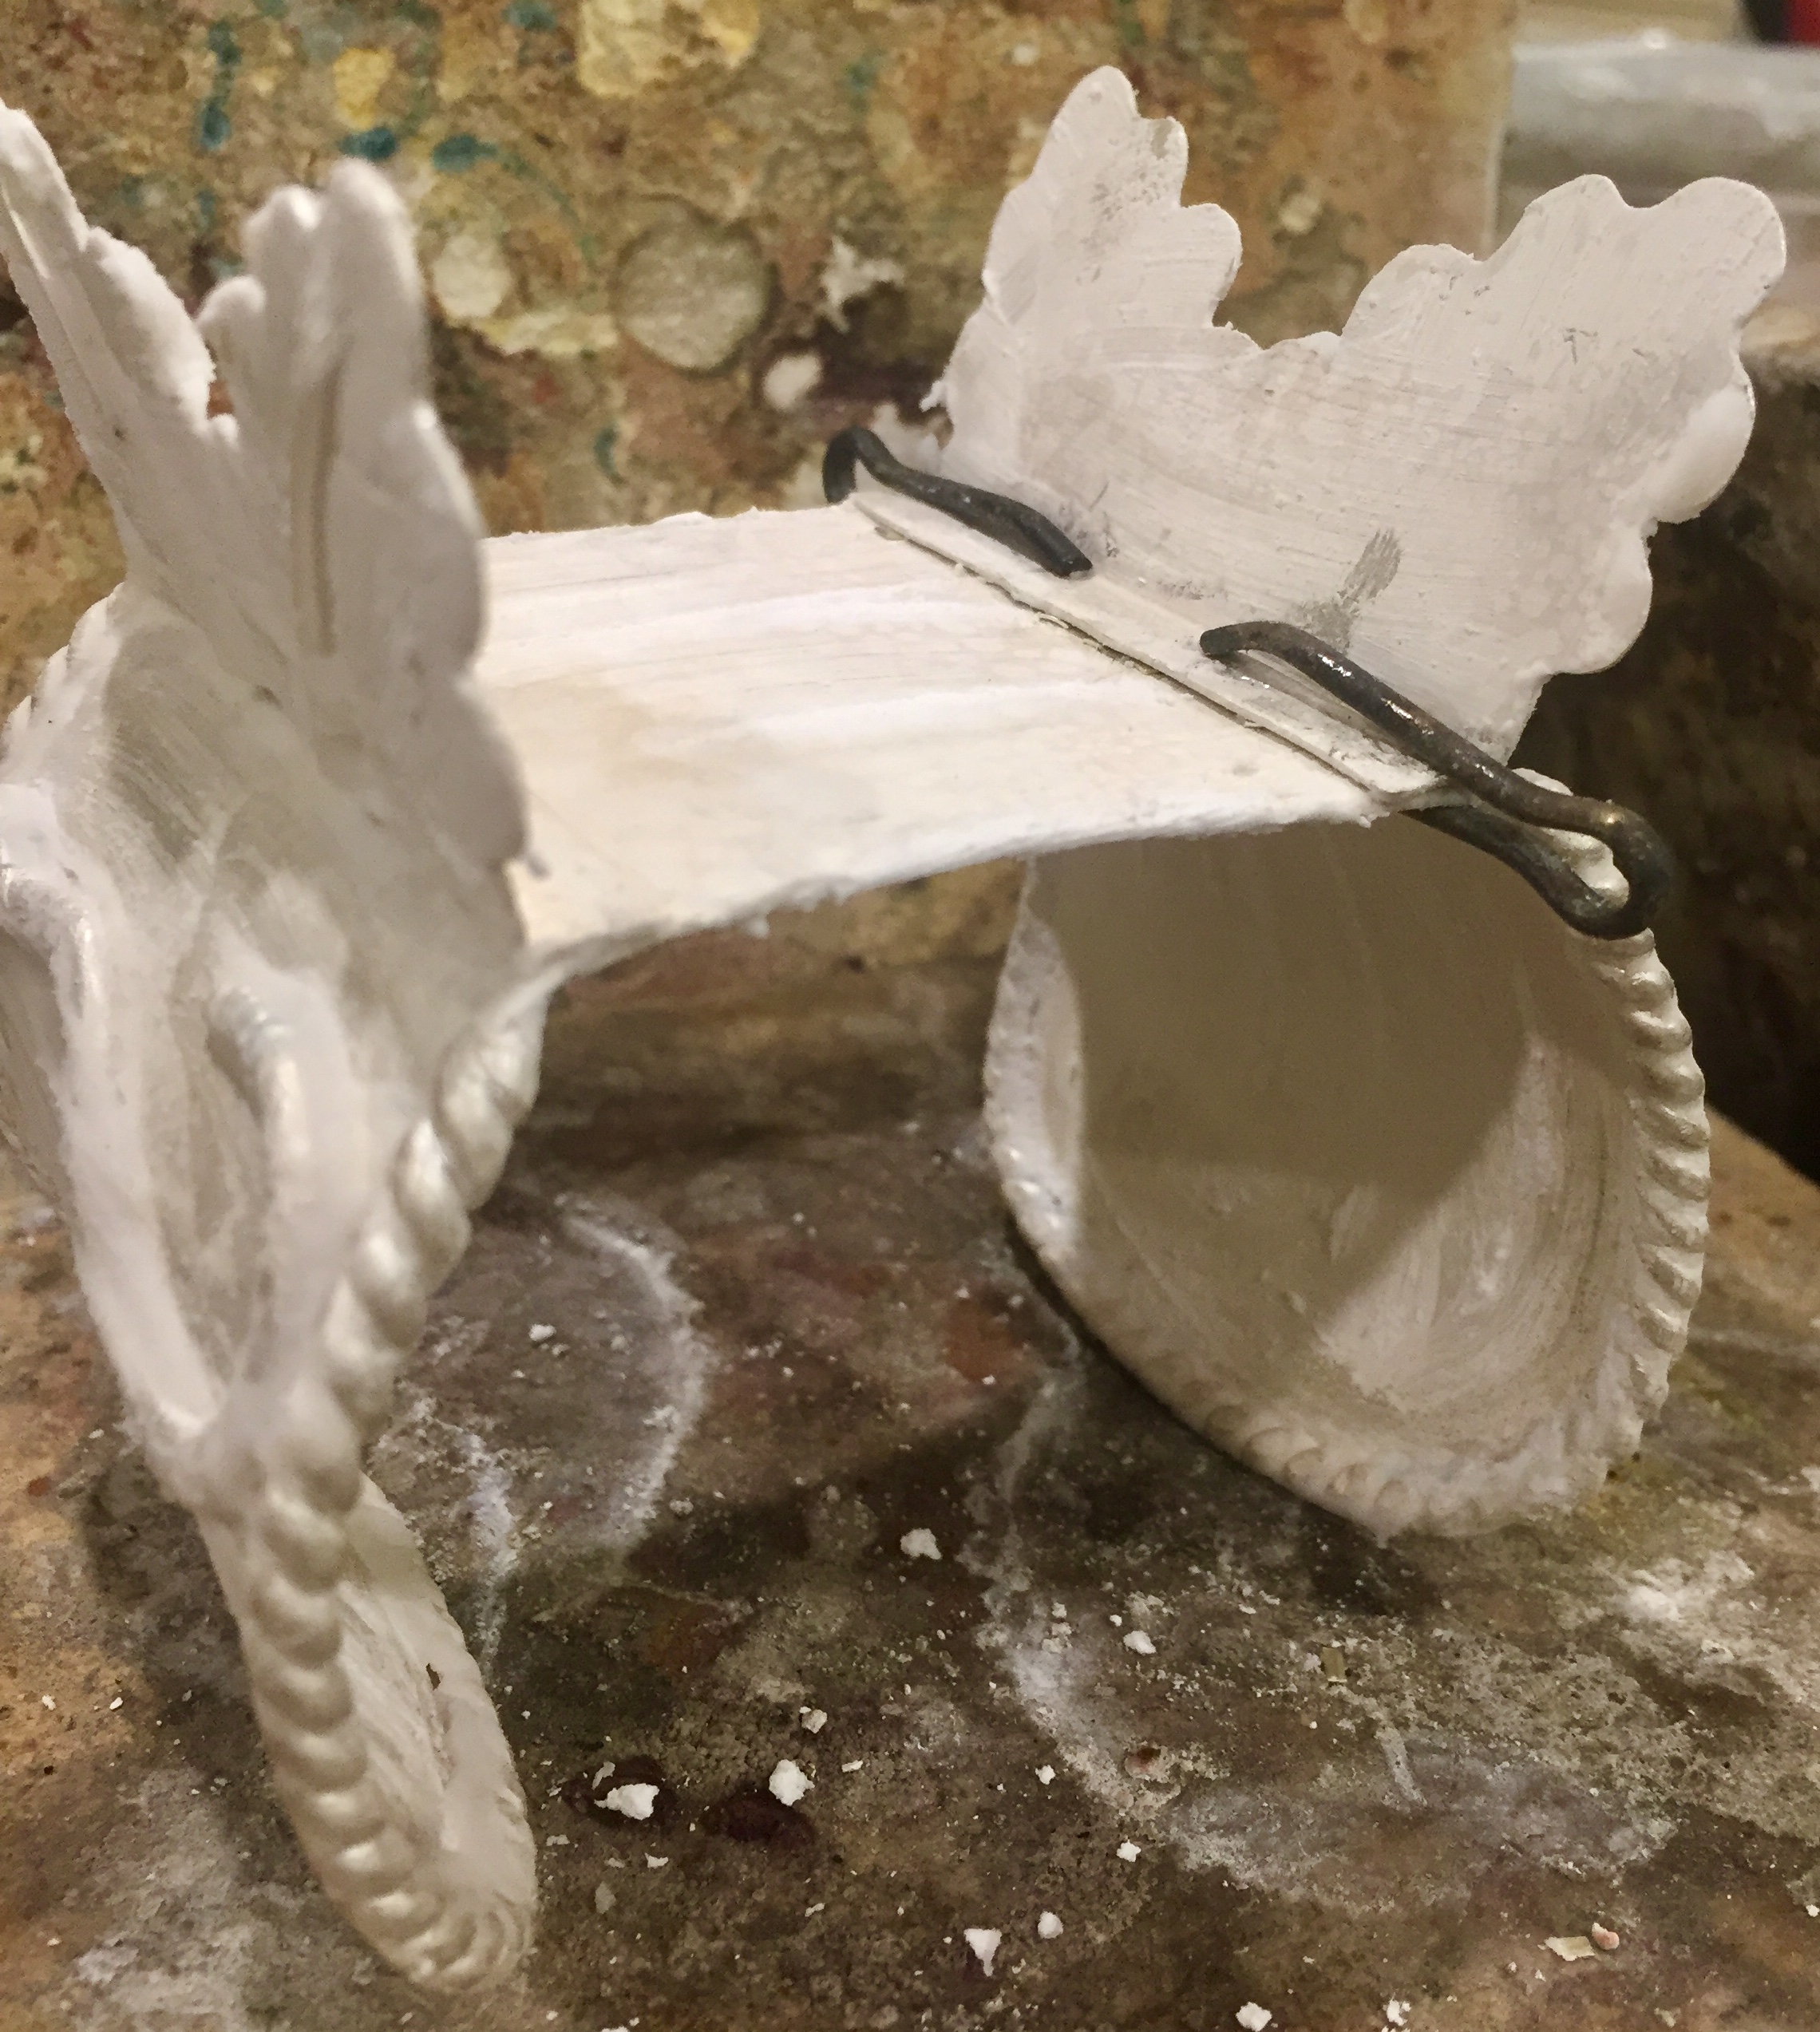
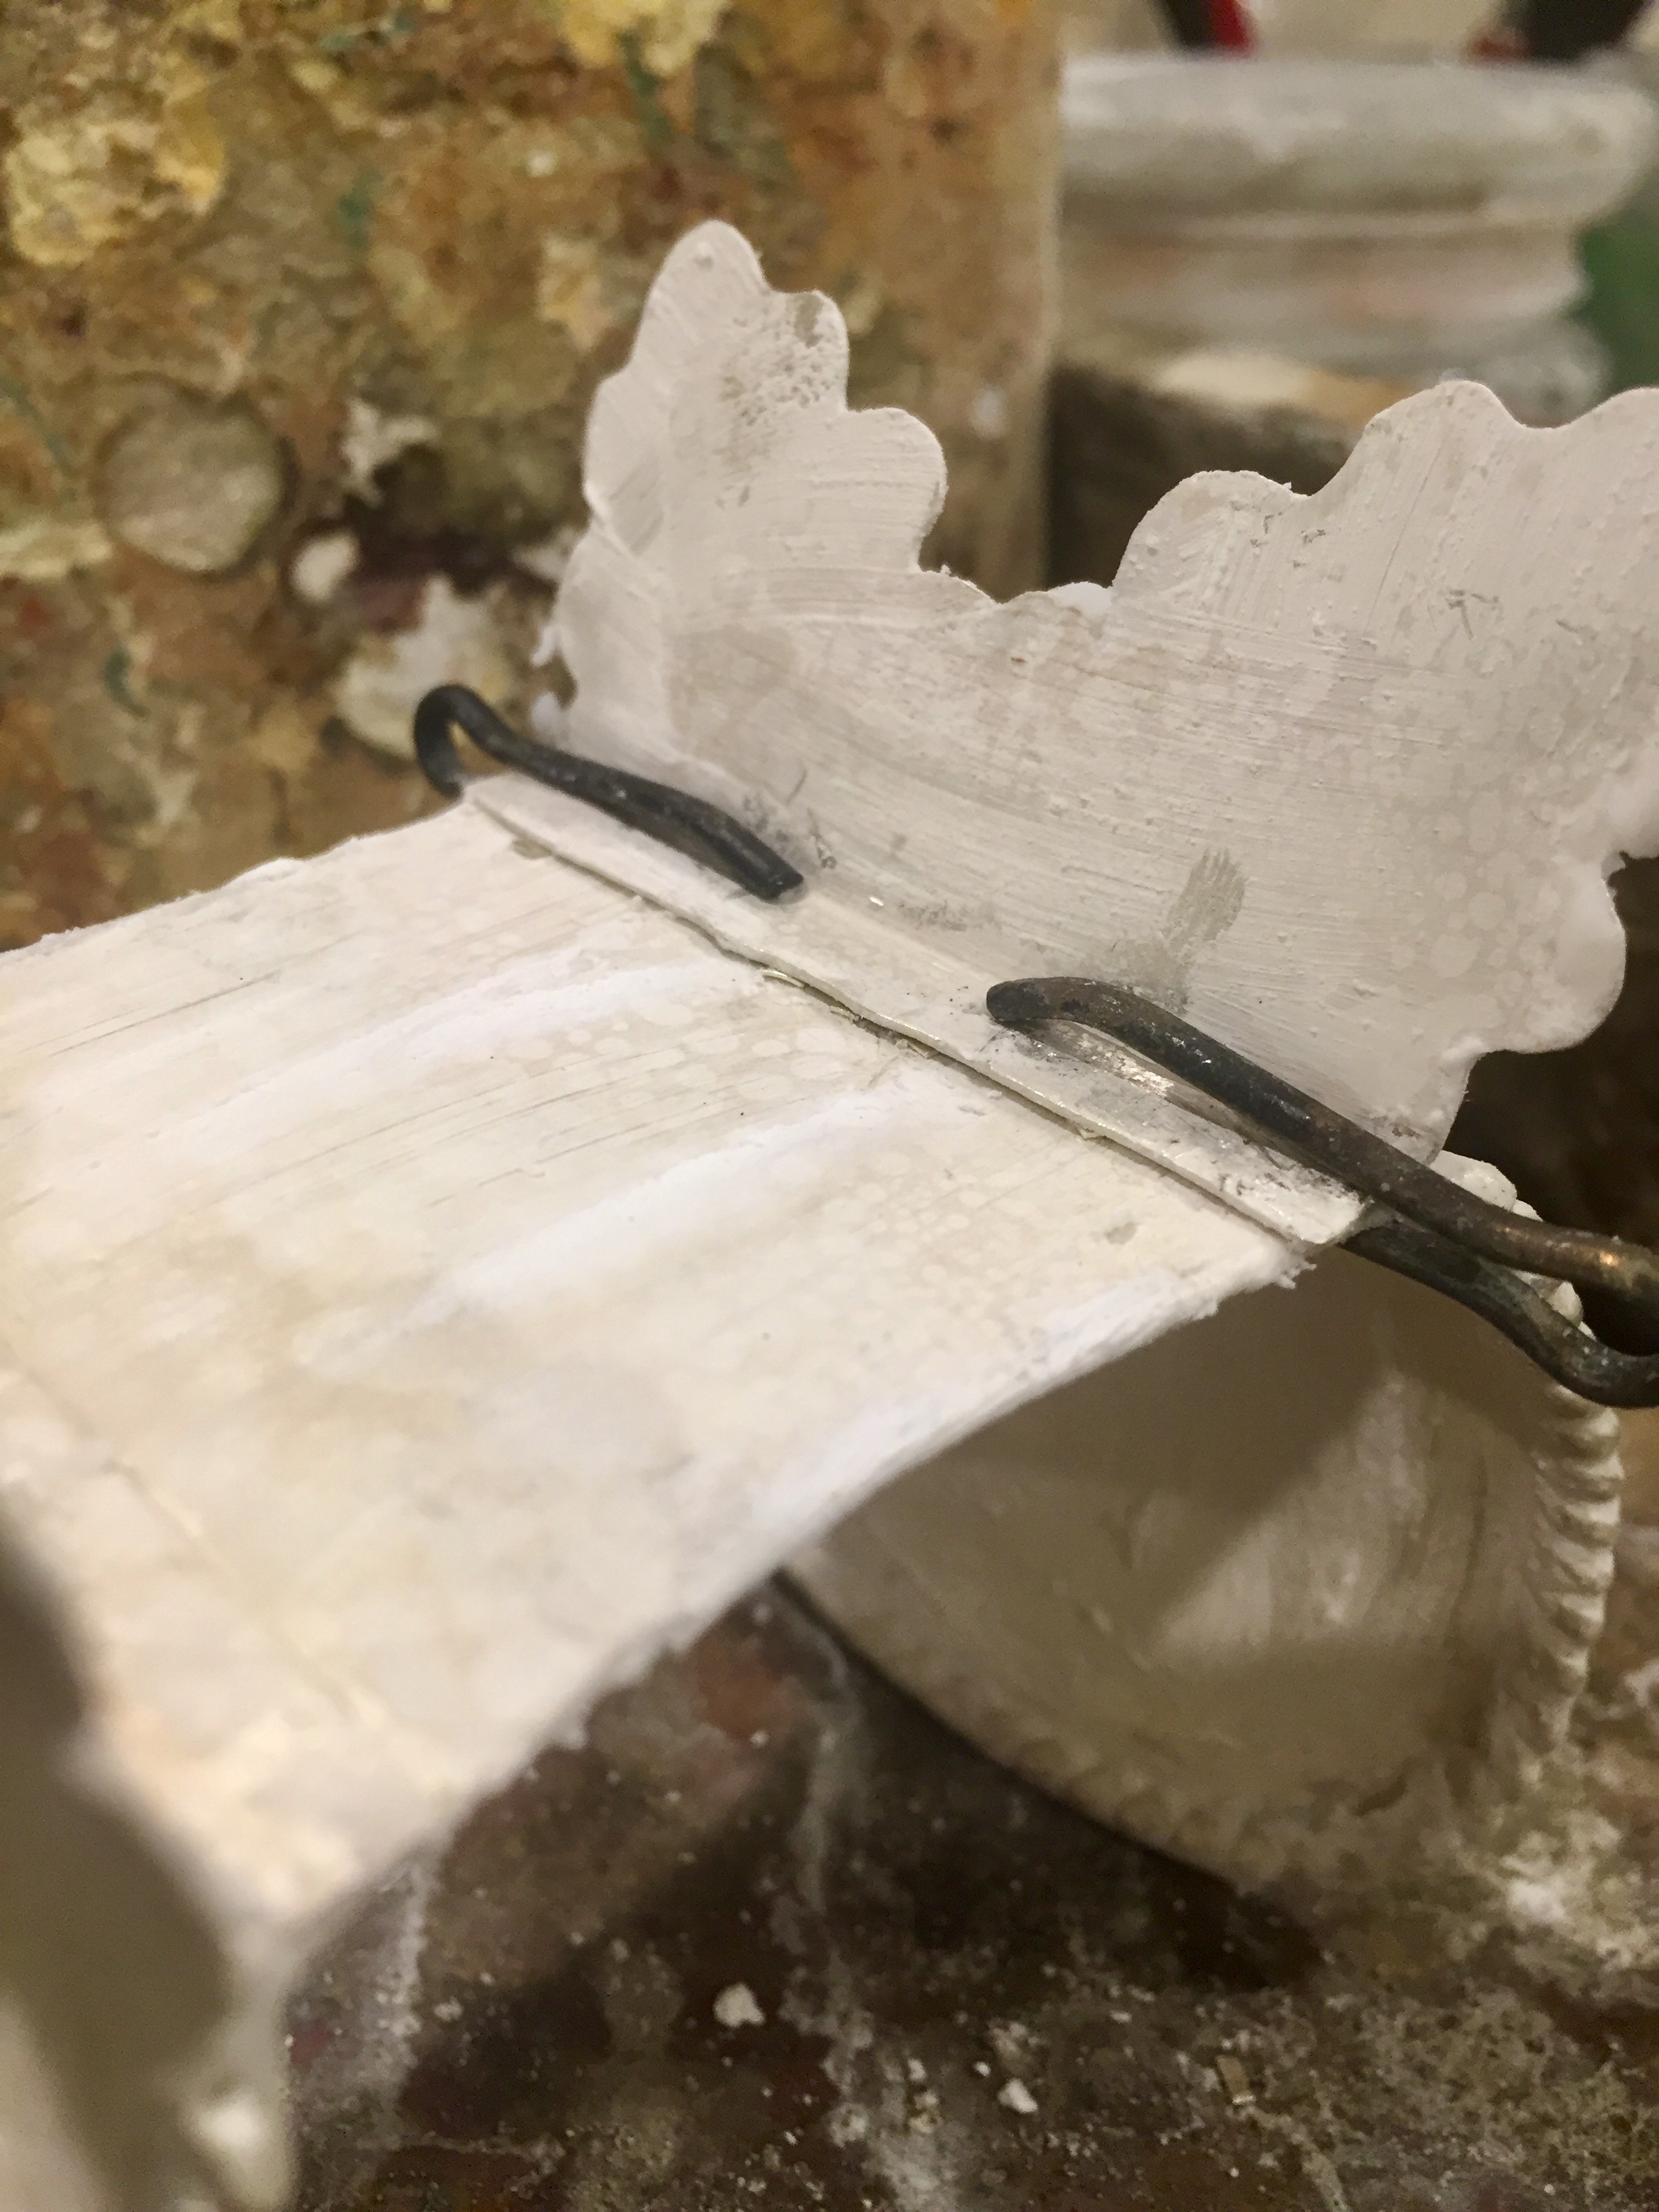
Thanks, everyone, for your help so far. I have switched to medium solder and as you can see from the attached pictures, one piece on one side appears to have taken hold. However, close inspection shows that the solder did not flow all the way across the two pieces and some solder did not even melt. The first picture is of the two pieces, cleaned, before fluxing. The second and third are the two pieces held together with cotter pins and thoroughly fluxed with Handy Flux paste. I have also tried sweat soldering–didn’t work–after this attempt, I will try pick soldering as suggested above.
Is it possible that the flame from the torch is either too far away or too close to the area I’m trying to heat? I’ve just started using this Rosebud tip and am not sure how to determine the hottest, most effective point of the flame.
I use a piece of charcoal on one side and direct the fire from the torch on the other side. The charcoal provides a leveling of the temperature throughout the area of intention of the weld.
Thanks, Carlos. I tried that and also making a sort of cave with two solderite pads, which also reflect the heat. Neither method helped. Also tried pick soldering and the solder just balled up when touched to the metal and did not flow. I tried thinning the part of the smaller piece that sits on the larger piece and heating from beneath. No luck.
I’m becoming more and more frustrated and have developed an awful swearing habit. Good thing there are no children around.
I make a lot of heavy cuff bracelets. I have been using medium solder almost exclusively for years. More recently, I have been using wire form solder and touch soldering joints where appropriate. I let the shape of the joint dictate the shape of the solder snippets when I don’t touch solder. I think that you need a larger, bushier flame that gets the entire piece or at least area that you are soldering close to flow temperature. Touch with the wire solder and it will quickly flow. Use your flux to indicate when you are close to flow temperature. The flux will become glassy. Obviously, make sure that the piece is very clean and you might want to spray the entire piece with a coating of boric acid and alcohol first. I do this more an more as it not only reduces fire scale, but also seems to make the solder flow easier. You still should flux the solder joint with whatever flux you use. I use borax and water or handi flux. You can also roll the wire solder if it is too thick for the joint. This is a tricky job, so don’t let it get you down. Walk away, take a break, drink some of your favorite beverage and then come back. I sometimes completely clean my bench and renew all my chemicals and rinse water when I have these problems. Good luck…Rob
Aside from Rob’s excellent advice, the only thing I have to suggest is that you solder them one at a time.
Thanks, Rob. I have medium sheet solder and since I’m working with time constraints, don’t have time to order stick and wait for it to arrive. I’m using this Paige Tools Rosebud tip on my Little Smith…can you explain what you mean by “bushier flame”, please? For some reason, I’m having difficulty determining what the flame should look like with this tip.
I’m thinking it’s got to be the flame–too hot, not hot enough, too far away from the piece, too close–I’ve tried the gamut of possibilities.
I do soak the pieces in denatured alcohol and borax and then touch the flame to them. Prior to that, I wash both pieces with Dawn dishwashing detergent, hot water, and a brass brush. After the alcohol and borax, I thoroughly coat everything with Handy Flux. I watch for the flux to become glassy, and it does, but nothing happens with the solder.
All my solder is from Rio Grande and I’ve had it for awhile. Could it actually have gone bad in some way?
Yes, I’ve walked away, started drawing some new designs, took the dog for a walk, etc. So I’m back to try it one more time.
Thanks again and could you possibly address the flame issues?
Thank you, Elliot. Yes, I’m doing that. One is soldered poorly; one not at all.
Hi Martha,
The more I read the more I am convinced it is a heat issue. Do you have the space and the time to experiment on some scrap?? I would give that a try.
A flame with defined edges and a point that is precise in the blue centers is a very hot flame. The sound of the torch will be harsh almost angry and if your hearing is good, unpleasant. The bushier flame will be a softer flame with smallish feathers off the the points of the blue centers. The sound will be much less harsh and less piercing. The over all flame will flow over the work rather than be concentrated in a small area. I set up my torch with a Paige Rose bud but unfortunately the photos from my phone don’t show enough definition to be any help.
Don (Rob’s Brother) Meixner
Thanks, Don. From your description, I believe I’m producing a bushy flame. I’m beginning to think as you do that the heat, or lack thereof, is the problem. I note that when using the Rosebud tip, the flame seems to fan out at the tip and brush over the whole top of the piece. Also, I think my hvac system may be contributing to the problem. The fan in the central heating system is blowing through a large vent just to the left of my soldering station so I’ve now built a little solderite enclosure on 3 sides of the cuff. I did try thinning the part of the smaller piece that needs to be soldered to the cuff, as you suggested, but I got a little too aggressive and it split. So I just finished making a replacement and now I’ll see if the suggestions everyone has made will finally work. Thanks so much for taking the time to help me with this. I’ll let everyone know how it goes.
I think that you are on to a solution. I use a Meco torch for most of my work. I do have a Little Torch and an EZ Torch too, but the Meco is my go to. I can’t always get it as bushy as I want, but I have learned to adjust. After reading your posts, and those of others, I have to agree that you just aren’t getting enough heat to the joint in a way that will allow all the solder to flow. Remember that the flow point of solder increases after it has flowed, so the old solder left behind, while originally the same flow point as new solder, will flow at a higher temperature the next time that it is heated. Others will have to tell you why, I just know this to be the case. I don’t know as solder will go bad. I have used solder that is 30 years old. You do need to clean it before you use it. Keep on trying to solve the problem…Rob
SIlver has high thermal conductivity. That means that wherever your little rosebud flame is hitting, the heat is being sucked away into the rest of the piece. Working in silver, you have to bring the entire piece up to the melting point of the solder because the solder should be melted by the parts being joined–not by the flame! So, ideally, the flame should envelope the entire piece.
For the size and thickness of your piece, I would use a propane torch (no oxygen) with a large, bushy flame that covers (or almost covers) the entire piece. This is what a large, bushy flame looks like: Harbor Freight propane torch. - YouTube. [Ignore the end of the clip where the flame goes all yellow/orange–that’s when he’s turning it off. You need the big, soft, blue flame.]
My torch (an ancient Sievert) has many heads. On your piece, I would use one perhaps a bit smaller (but not much) than the one in the video. If you still have trouble, your parts are plenty thick to use Easy solder if you use this kind of torch i.e… heat the whole work evenly. In the US, these kind of heads seem to be made for weed-burning and ice-melting…:-)… The only problem is that they make the torches for them with real long necks. I use these big heads on a torch with about a 6" neck. Also helps a lot to have surfaces around the piece reflecting the heat back to it.
For a bracelet with that much metal, you need to work more like a silversmith doing holloware, not like a ‘jeweler’ doing small, delicate items…
.
Janet in Jerusalem
PS This would be perfect:
They seem to have them at Walmart with 3 heads:

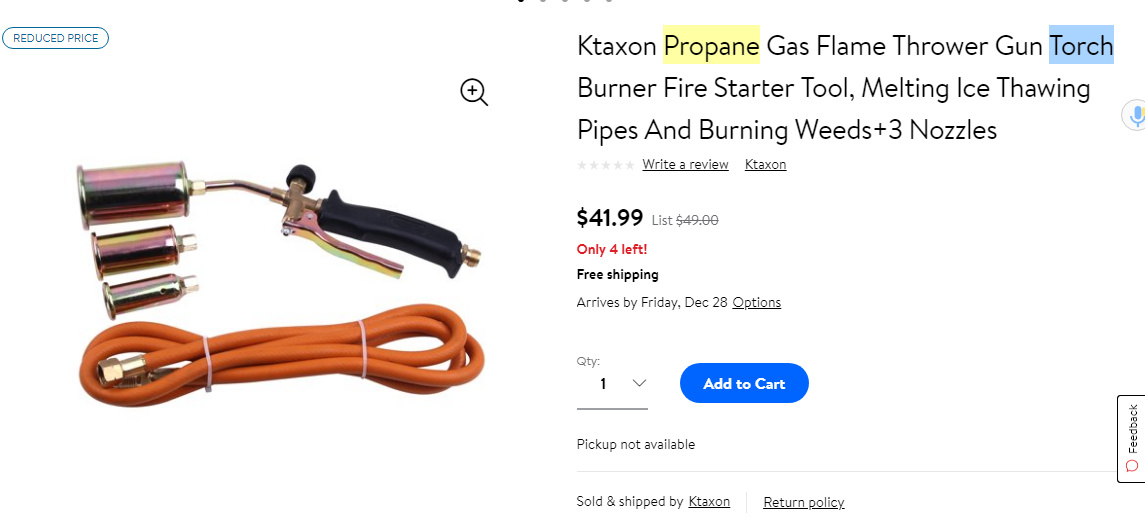
Both are from www.walmart.com.
Thanks, Rob. I’ve just about decided to buy a Meco after I get paid for this order. This is the second time I’ve had this problem and the first time I had to give up the order…I couldn’t get it done and it just about drove me to sell everything in my shop and give it all up. However, tada, I finally got this one to work…solder finally flowed with so much heat I set off the smoke alarm and as a last resort, I did clean the solder thoroughly.
Thank you
Many thanks, Janet! I’ll look into these “flame throwers”! (Although I hate buying anything from Walmart). I did finally get my solder to flow. I only have 4 more small pieces and 7 bezels to solder to the piece.
Martha, Just another thought. I didn’t realize how big your pieces were. This could be a little tricky, but use two torches. If you have a larger one like the Meco, use that one to heat up your piece by going in a circular motion around and around your piece. When your piece comes up to the proper temperature and your solder resting in the joint area, introduce another flame from a small butane torch to the joint area where the solder is resting. All the while you are rotating your larger flame around your piece.
Martha…I need to be more specific when I say Meco. My Meco is a standard Meco handle, but it includes Paige tips. For me, the Paige tips made the difference between a so so torch with common one hole tips and the mutli orifice tips from Paige Tools. Talk to Richard at (www.paigetools.com) for more information. I also run my torches (Meco and Little Torch) on O2 from a medical O2 generator and propane from small 1 lb. camp stove cylinders. You can buy the cylinders filled or refill them from a 20 propane grill tank. My tanks are designed to be refilled. This arrangement serves me well, but it is the result of a lot of research toward the goal of getting as much compressed gas out of my shop as I could and still run my torches to serve my needs. You can look at my website (www.robmeixner.com) for pictures of my shop to see my torches. They are behind the “Shop Shots” tab There is also a lot of information in the archives about this type of torch. Good luck…Rob