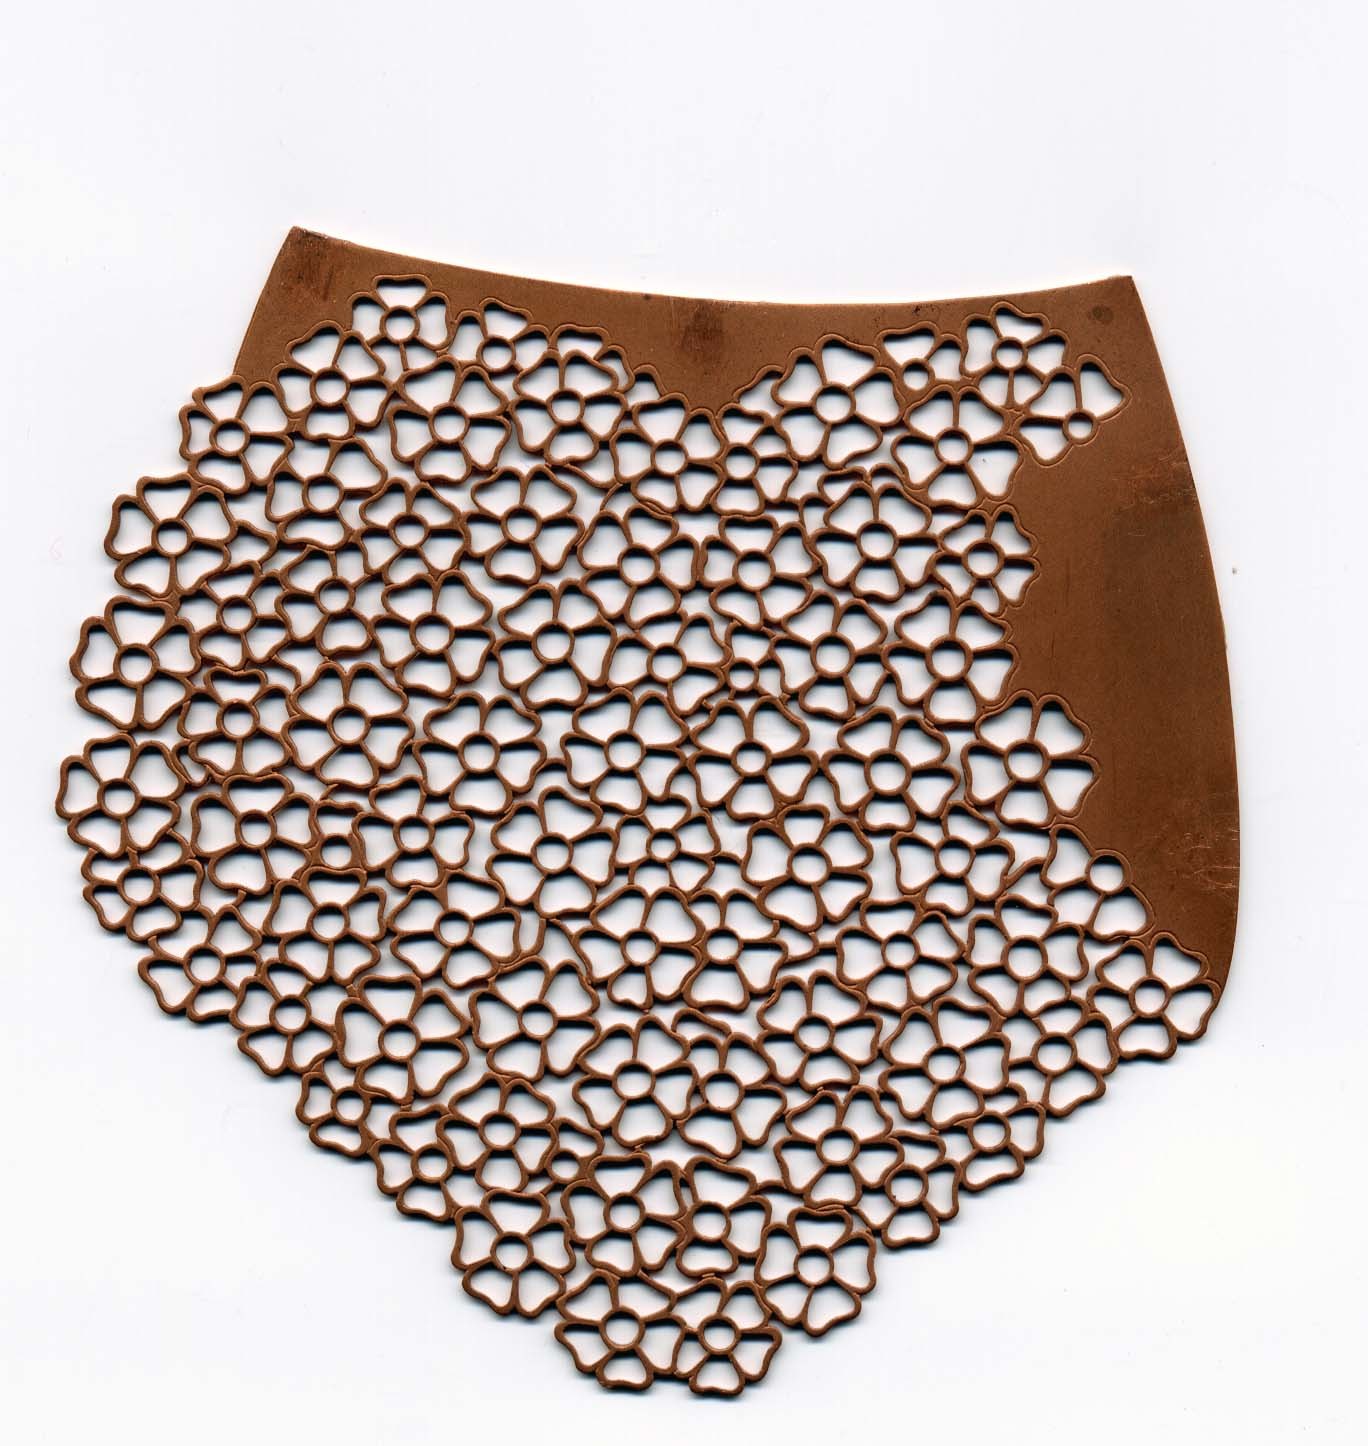
So I really want to saw out some words in cursive and have the edges crisp and precise.
I want to stack solder them for layering.
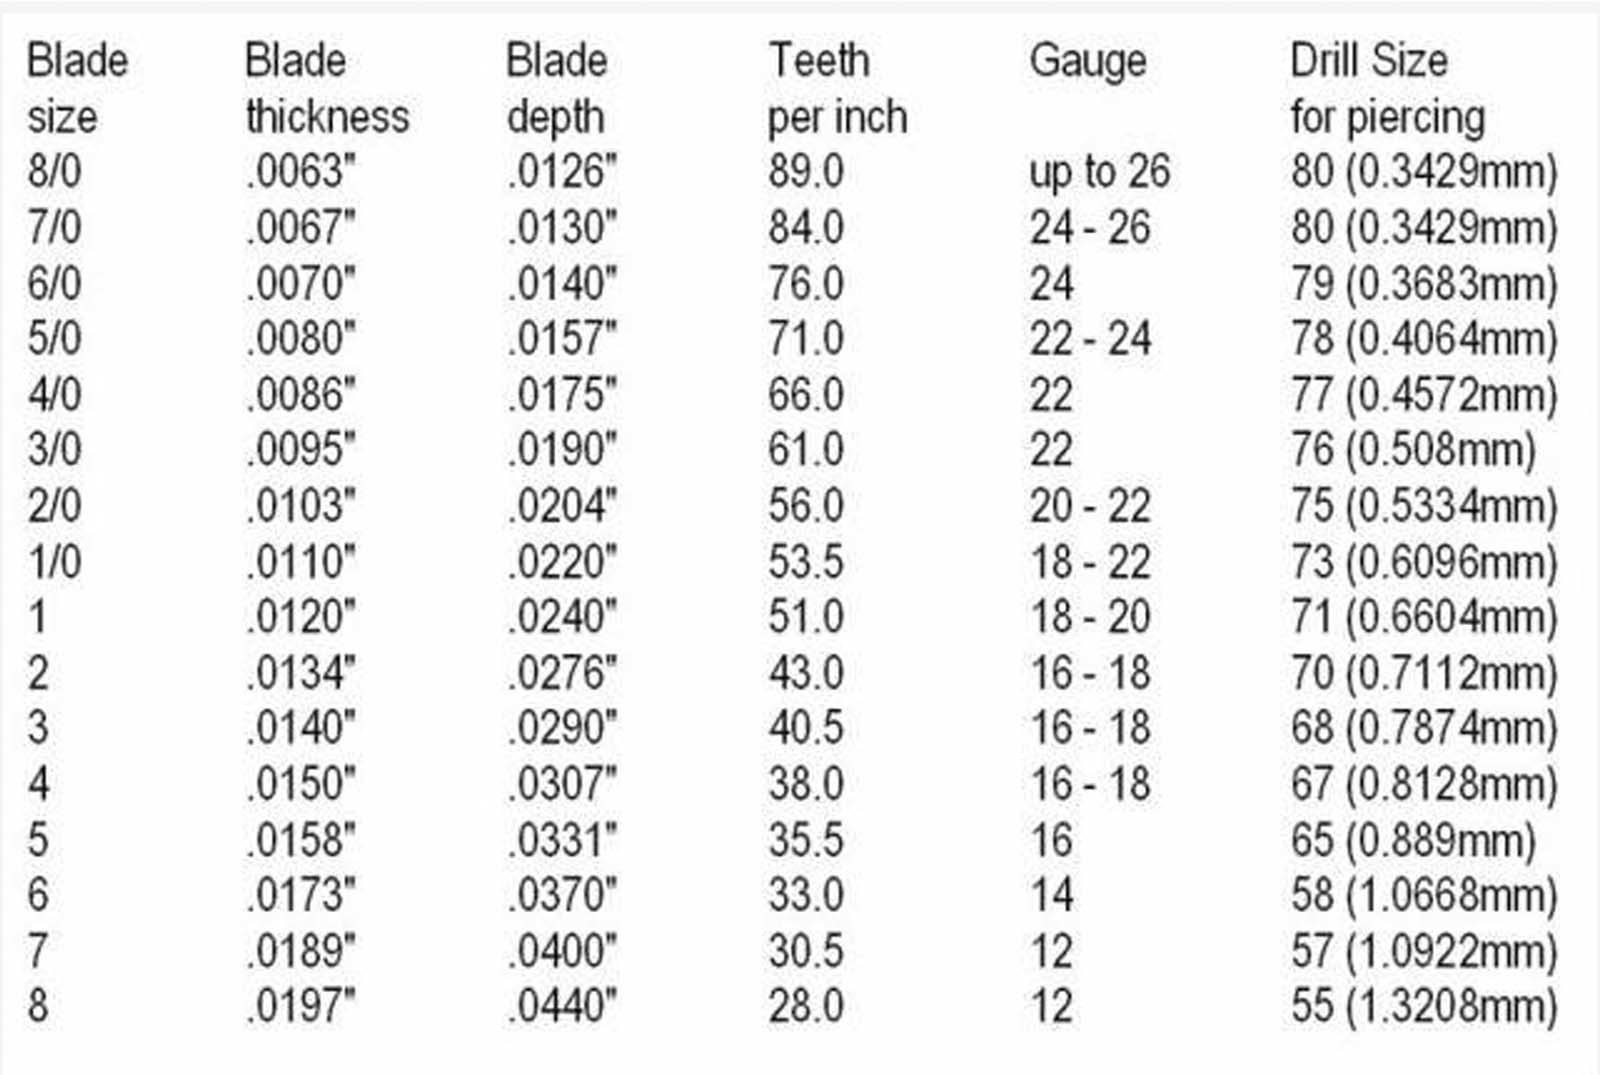
I know that in time with practice I will get better at sawing (for me I think the main hurdles are learning what blade sizes are the best for which jobs and blade tension) - but is there some trick to sawing letters other than just simply being THAT skilled?
Any tips on ways to get better skills with the saw other than merely random practice? Like are there exercises or things to practice or do routinely to build up skill, or does just sawing any old thing suffice over time?
What were the things that helped you take the next big step in skill with your saw work?
What things helped you overcome a major personal hurdle?
I want to do precise piercing and saw work - but it feels sooooo, oh I dunno, like I’m just shooting into the dark forest without any real goal or target and I’m just stumbling around and missing the mark, rather than going about it with intention and purpose.
What things should I be aiming to do or achieve to become truly a master with my saws over time outside of just aimless practice?
And then how does one achieve a smooth edge in say a cursive script on the inside of the letters? When I try with my files, I just mangle, well, everything.
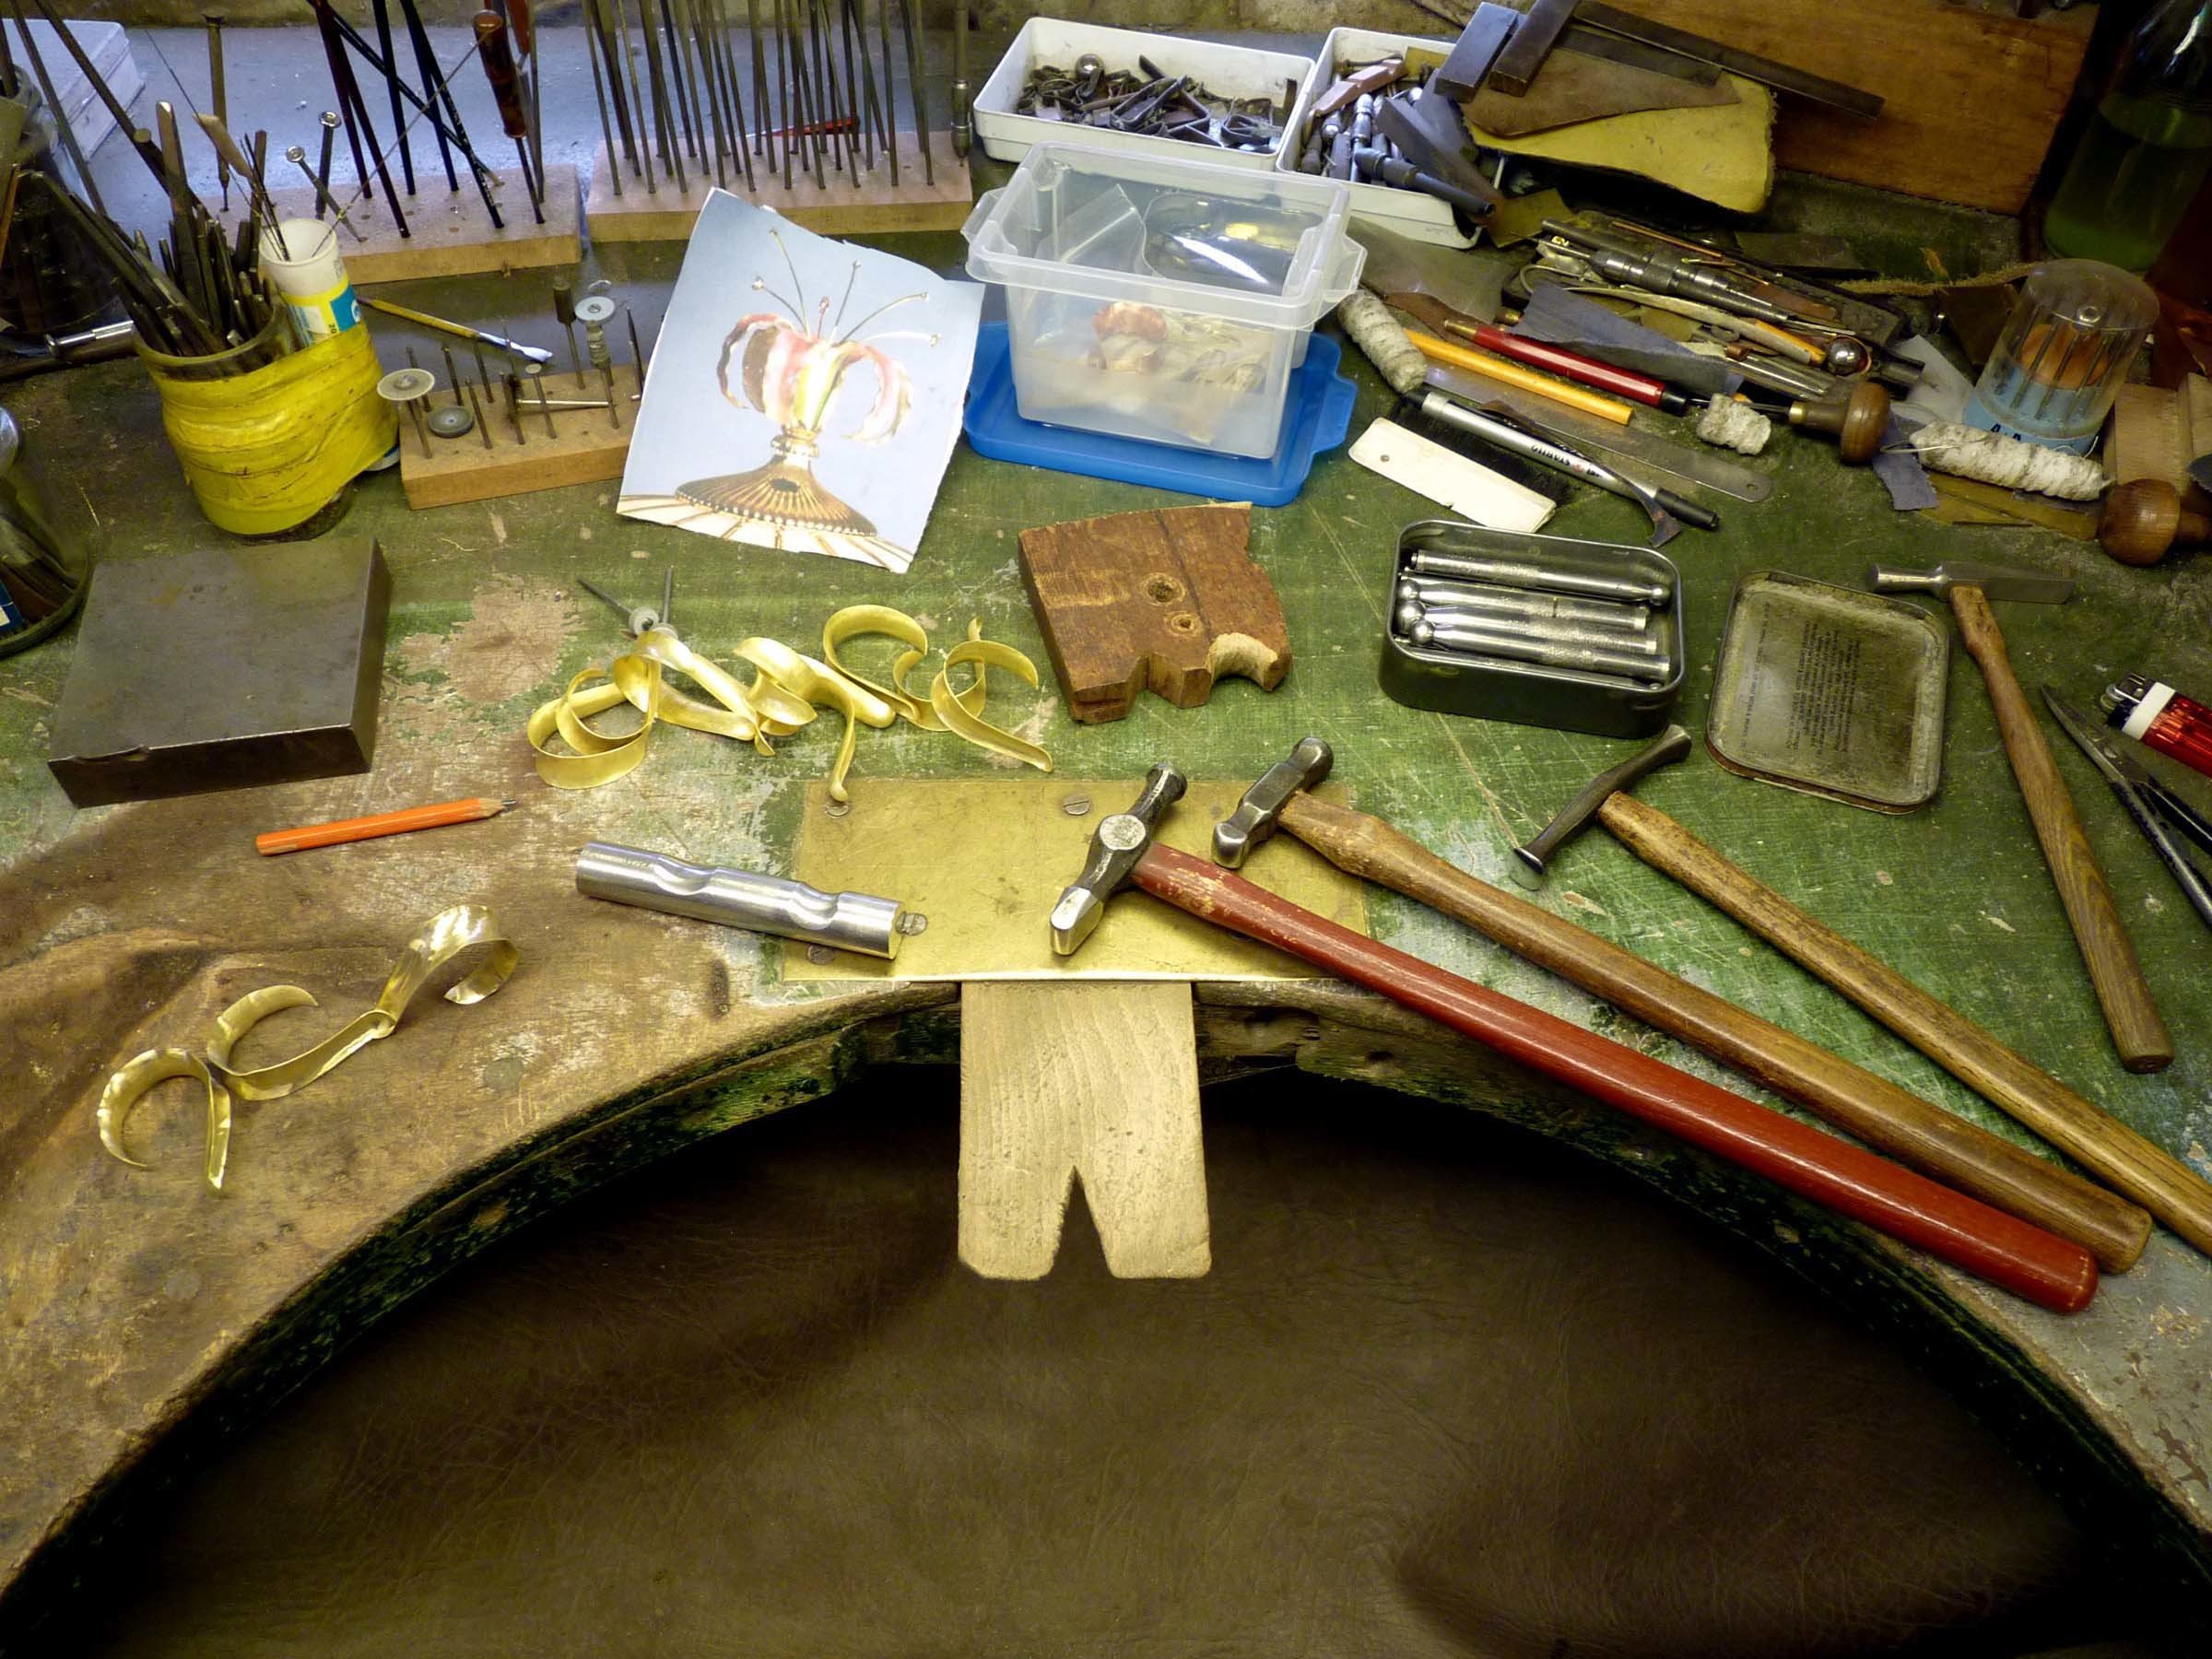
When piercing one of the most important tips is to have a flat and steady bench peg to pierce on, also to have your seat at the correct height so that you can see the cutting line clearly and comfortably. When I pierce flat items, being right handed I cut across my bench peg, cutting from right to left, holding the saw frame a right angles to my eyeline. When I was an apprentice I was taught to pierce this way and told that it is better to see where the blade it going, rather than where it has been. So many teachers these days teach their students to cut straight down the bench peg, cutting away from their face. I am told that this is a health and safety instruction, so that there is less risk of them cutting their fingers or stabbing their hands if the blades break while piercing.
I do lots of piercing of letters. The best advice I can give is to lube your blade. Manny folks use bees wax. I like Tap Magic Cutting fluid. I put a little piece of sponge in a tin and wet it with the fluid. Then i touch my finger in it and rub a tiny amount on the blade. I refresh it regularly.
a helpful tip I got out of the Oppi book was that a blade tension that is too tight will cause the blade to veer off to the side…
I was so intent on trying to properly insert my blades and get the ping sound, that I was actually over tensioning the blade
the saw would keep pulling to the side when I was trying to saw straight…
so I pulled out the Oppi book and read up on sawing again, and voila! there was the answer! Love that book!
Also, using the correct blade size for the thickness of the metal is helpful in getting smooth cuts…the above chart is wonderful!..you will get a “feel” for the right blade size by how it is cutting the metal…not grabbing it…not sliding over it…just right.
Also, using the blade as a file is sometimes helpful…I sometimes go back over my sawing by gently running the blade up and down along the cut and using it as a file…I usually will use a finer blade…this is probably how I most often clean up inside curves…
Also, be mindful of the blade angle…relative to how you want the cut to be…ie: perpendicular…for straight lines I will angle blade slightly forward
Also, be mindful to not choke up on the handle, and not make short choppy strokes, but rather use the blade length…and get into a smooth steady rhythm…
Also, lube, lube, lube
Also, in some instances, you can use strips of sandpaper (backside taped for strengh) to clean up edges. there is also sanding tapes and strips and cords available (google dental supplies!)
Also, kind of on topic, kind of off topic…I use lots of different wood things to wrap sand paper around…to help with sanding…sandpaper taped around toothpicks…sometimes by hand, sometimes used in the flex shaft…,craft stores sell tubes of assorted sized hardwood wooden dowels…popcicle sticks…and balsa wood square profile sticks that can be shaped first…
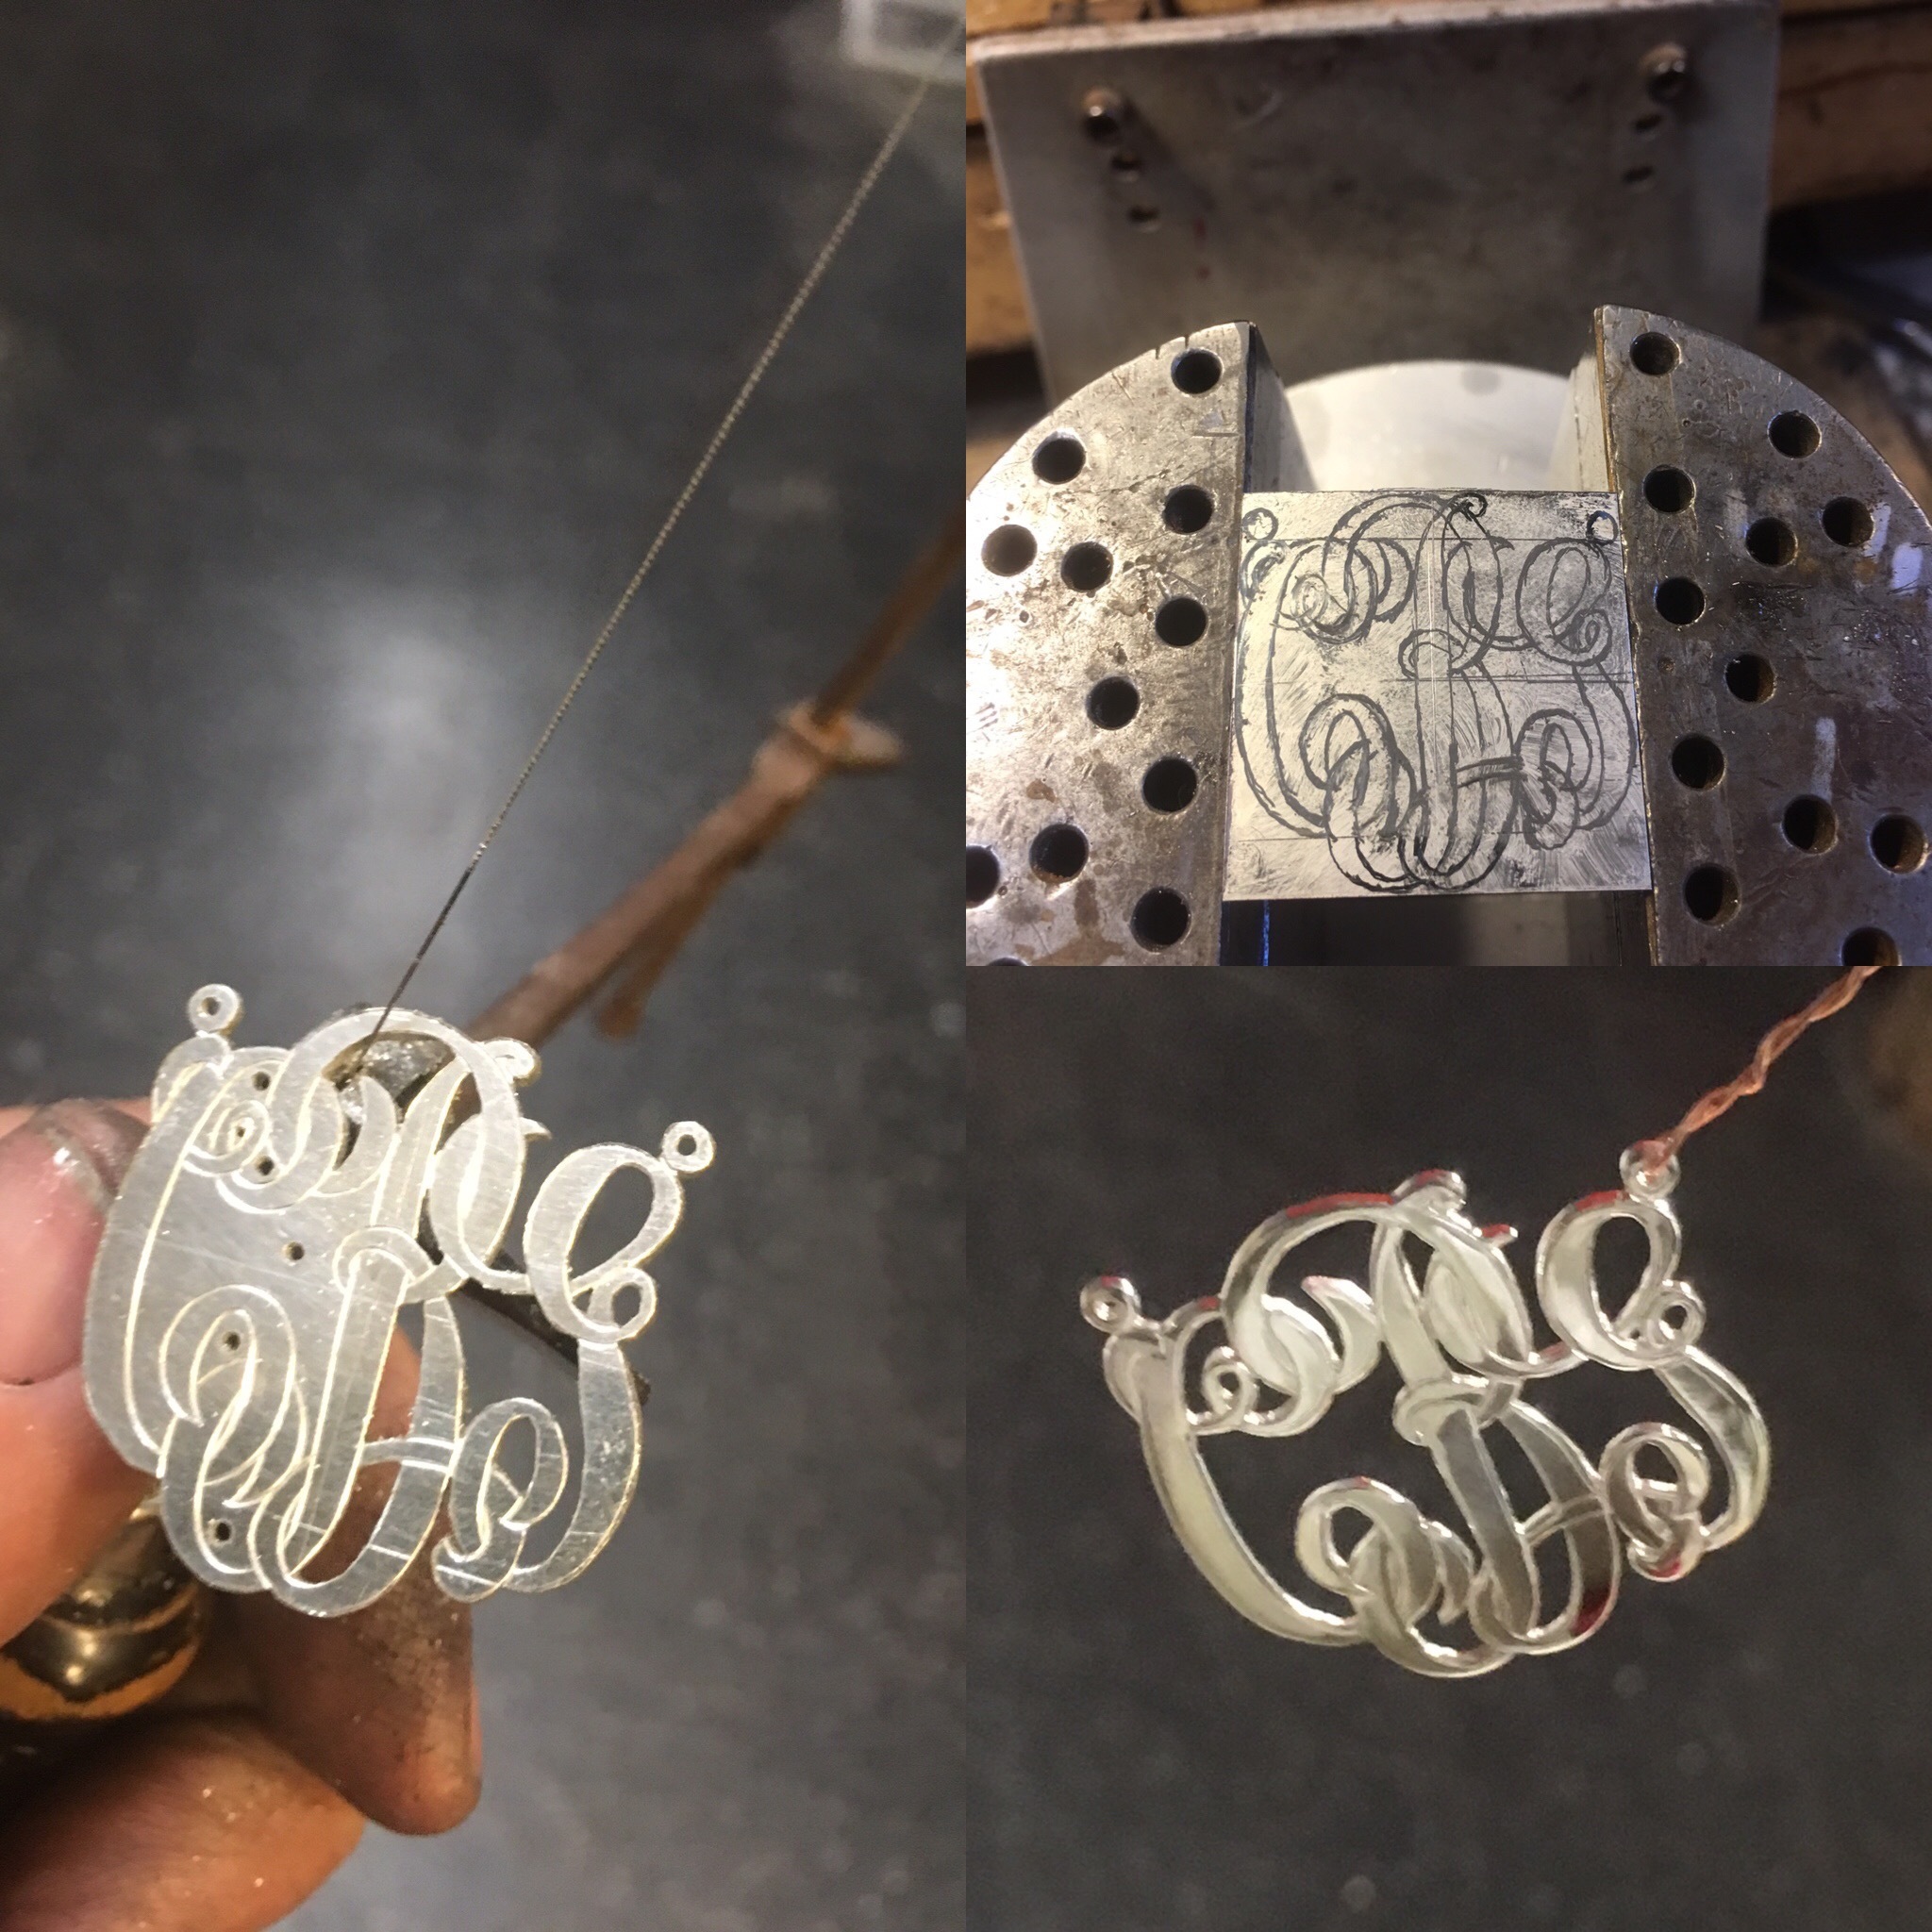
I’d like to add one more suggestion. Planning your cuts is very important to getting good results. This is something I’ve learned through (good and bad) experience. Ideally, you should work with as much support from the surrounding material as you can.
For example, while cutting the “9” in the attached photo, it’s important to cut the inside curve first. Otherwise you can end up with a tiny bridge of metal supporting the force of the blade continue cutting the shape.
Also, after taping the reverse side of abrasive paper, you can use a razor blade to cut very thin strips.
I will use shaved toothpicks, slices of chopsticks, tongue depressors, and even Stuller’s famous candy pop sticks to reach and finish in hard to reach edges and curves.
I forgot to mention how I tidy up my piercing, I have certain fine needle files that I grind the backs down on their points, to give razor sharp edges on the files which makes them good to clean up interior pierced holes. These are mostly old safety back and crossing shaped, cut 3 or 4 needle files. Using files leaves you with sharp edges to your piercing while removing any saw cuts from the pierced edges. This is an example of one of my piercing jobs a pair of table lamp shades that will be plique a-jour enamelled.
YOU are one of the people that made me realize that it was possible to be EXTREMELY precise, and I want to try to learn to have at least half of your skill with a saw! <3 I do not think that I truly understood what you meant though when it comes to this:
certain fine needle files that I grind the backs down on their points, to give razor sharp edges on the files which makes them good to clean up interior pierced holes. These are mostly old safety back and crossing shaped, cut 3 or 4 needle files.
I have super small files - but I cannot envision what you were describing at all.
Also wasn’t sure I understood this:
Using files leaves you with sharp edges to your piercing while removing any saw cuts from the pierced edges.
I use my files to remove sharp edges so that they don’t cut people, are you saying that you leave them sharp? Wouldn’t that wind up cutting someone?
Alyssa, I think he was being very efficient with his words, so I’ll give you my lengthy interpretation of his description, and then maybe he will come back here and correct me:
He uses fine needle files. I think the most commonly available needle files are usually cut 2, which is not finely cut.
Cuts 3 and 4 are more finely cut and are therefore less abrasive (and are not available everywhere needle files are sold, off the top of my head I want to say maybe Otto Frei has them, and I think they are sold individually, not in sets).
He mentions the word old, meaning that these files have been used and their abrasiveness has been worn down. Therefore they are less abrasive than when they were new.
He mentions safety back, meaning they have one abrasive side, and the other side is not abrasive (so that they can safely be used in tight spaces). He grinds down the non-abrasive side so that they become more thin, so that they will fit into very tight spaces.
The face of the files have lines that cross, meaning that the abrasive lines are not all going in the same direction.
When he describes sharp edges, he means that your filing has not reduced the crispness of your design.
You are only removing the tiny bit of rough evidence left behind by the saw’s teeth.
He is using the least abrasive files so that only the visible ragged part of the sawed edge is all that is removed, meaning don’t round-off those crisply sawed edges with overly abrasive files.
I just wanted to add that you can also use escapement files, which are smaller than needle files…I rarely use my needle files…I find them too big…
escapement files come in cut 2,4,6,8…they are somewhat hard to find in all the cuts…
I find it helpful to make my barette files safety backed as well, by grinding down the ridge on the back as well as rounding off the top of the side edge as well…so that these sharp edges cannot cause marring if they make contact, and making the file overall thinner and finer pointed
I find it helpful also, to polish one side of some of my square and triangle files…to create a safety face that can run along a surface without cutting…
I made a piercing bench pin out of a hardwood…it is just a rectangle with 3 thin slits in it…it provides a very flat surface to pierce on, and the thin slits allow me to saw small things without them tipping over, as they tended to do with a larger slit or V cutout…also, I sometimes “pin” my blade between the piece and the wall of the slit when I want to use the saw to file one edge…it keeps the blade against the edge I want to shave…(if that makes sense)…or I use my finger!
Oh wow somehow I missed your post, you do lovely work and YES - that is what I would like to do, be able to cut out script fonts precisely!!
I noticed you have what appears to be a drawing affixed to the metal and held in a ball vise … and it looks like the metal on the image to the left is scored … are you scoring the metal with a graver or scribe first?
If so, why? Does it help guide the saw blade if it has been pre-scored?
Are the liquid lubes better than the stick versions?
I was going to try beeswax but then heard it can build up and get sticky and gummy and drag the blade, and I don’t need another obstacle LOL.
I forgot to mention something else…I tend to move my piece rather than the saw…the saw blade kind of marches in place…I sort of spin the blade instead…and the saw frame is angled…I guess this is why the thin slit works ok…
I am not an expert piercer, but I find these things helpful…
BTW, I looked up that video and am very confused - on Amazon a review said not to buy the DVD on Amazon because it doesn’t come with the exercise patterns so the video was useless - and then when I went to his site, I got confused because there seem to be lots of “kit” versions.
I am sure that ALL of them would assist me GREATLY and likely in time, I will own all of them - but sadly I’ve been in and out of the hospital and ER rooms a few or more times a month for the last 6 or 7 months, so my excess mad money has been used up on co-pays and I’m still “finding my voice” in jewelry so sales are not a regular thing for me (and as an artist that has been selling in other mediums for the past 30+ years, I know how fickle the buying public can be until you find your audience that responds to your work on a level where it also engages their wallets lol) … so I just am hoping to invest in something that will allow me to progress my level of skill in this area.
Just hoping you might be better able to guide me to which one might serve me the best all around until I can afford to invest in the others as I will need to stagger things for a while most likely.
So that was about the video you suggested … so I am sort of lucky in a few ways compared to most others that start on this jewelry in that I am tool and equipment HEAVY. It’s a not short story (lol) but i inherited my dad and granddad’s tools and then I invested in buying an estate storage shed of a jeweler (sight unseen, talk about taking a risk! LOL!) soooo I have TONS of files. Bags and bags. Problem is - I don’t know how to tell what file does what, if they are good or not (the jeweler did mark some of hers as being “BAD” or “NOT GOOD” which I figured would work as stamp making material when I get around to that) but there are files of allllll sizes, shapes, cuts, and both hers and dads are jumbled together willy nilly.
I knew I wanted to buy escapement files as they were I am told super tiny and small - then I was going through her drawers and bags again (I keep finding hidden treasures) and I think I found what I am assuming are escapement files - they are SOOOO tiny and are in different shapes - but I am thinking those might not be what you are talking about when you say “needle files” as I ave sets of those where that’s what the packaging says but they are much larger than the tiny ones.
I don’t know how I would determine what cut these tiny little files are, or even if they are escapement files - maybe they aren’t - I wouldn’t actually know since I’ve never seen any that I am aware of. I have a literal treasure trove of things to use but not the knowledge (YET!!) to know what it all is, or how to use them.
I had recently learned about some files having a “safe” side so that they do not hurt stones - I read something somewhere about some jeweler saying that they dress the edges of those to prevent them from scoring stones even more so.
As it is there are SO many files that it’s like saws … how do you know what file to use for what job other than banging your head against the wall or having someone teach you?
I’d love to have a teacher/mentor, but I work a full time job for now, so my time is not all mine and I can’t afford to buy lessons, so just kinda blindly fumbling around until it occurred to me that I could perhaps ASK, lol, so there I am, being a pain in the ass asking dumb questions. LOL.
And thank you ALL that have contributed to this thread, for taking the time to share and answer my queries - it is deeply appreciated more than I have words to express.
I recently have fallen into the mindset that drilling on bench pin not so wise - use another block for that but I hadn’t thought of making one like you did! That is an AWESOME idea! Especially about making the slits. THANK YOU for sharing!
Did you use your jewelry saw to make the slits or a regular woodworking saw?
Not sure how to tell the difference between escapement files and needle files … maybe I should take a pic of the ones I have, LOL.
Betty2 explained what I meant to say very efficiently. I use Vallorbe needle files, yes what I called a safety back file is a Barrette file, the Crossing file has an eclipse shaped profile which has a smaller shape than a half round file.
This is my bench and bench peg.