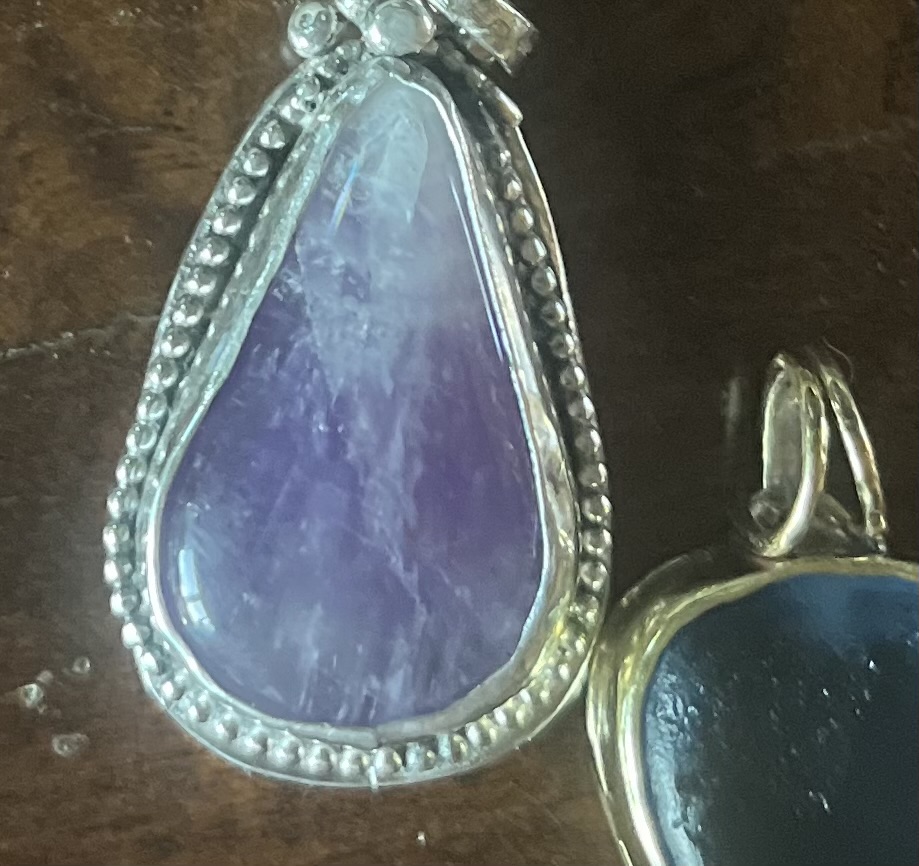
Hi all. Ive been improving with bezel setting. The bezels are pretty snug to the stone. Still room for improvement. But the edges are ragged. How does one get that cleaned up—- or avoid it altogether?? Any suggestion
Thanks , bebe. Rhe suggestions everyone had re getting the bezel up against the stone were so helpfulstrong text
Some jewelers do what they call a “bright cut” which is using a graver, often custom ground to fit the shape they want. Essentially they cut away a bevel from the inside edge. You can make one out of a flat graver by polishing a safe side that can glide if it touches the stone. I’ve seen jewelers use a variety of shapes. There are some videos online available, Lucywalker on instagram, metalsmithsociety go over this several times, there are some older videos up on youtube somewhere too.
Personally I prefer to keep them as tidy as possible when pushing the bezel, then burnish along the inside with burnishers I have made from various alloys to fit the hardness I need. If it’s a hard stone I will use an agate burnisher. I’ve had too many instances of me scratching the stone with a graver
technically, you can captivate a stone in a bezel with only 3-4 points of contact…think as if 3-4 prongs…
it there is “any” coverage/ narrowing of the top of the bezel, it will captivate the stone…you do not need to have a whole lotta metal wrapping over the side top curvature of the stone…
next time try less height on the bezel…you shouldnt have to fold/ wtinkle/ compress too much metal, to hold the stone…the minute that bezel starts to roll over the narrowing curve of that stone, it is captivated…
Bezels can be tricky. You need to finish what you have to as you build it and leave until later what you can’t finish. The initial bezel seam should be finished in some way so that you can’t see it when you are done and ready to move the bezel. This is tricky because you can actually remove solder from the bezel seam as you add other elements to the piece. The initial bezel seam should be soldered with hard solder to avoid this problem. The bezel height should be just enough to capture the stone and secure it in place. If you leave the bezel too high relative to the stone, you will get waves and folds when you move the bezel over the stone. If, in your design, you want a high bezel, then figure out a way to shim the stone up. Many will use cardboard, rigid plastic, saw dust and other non-metal shims. I prefer to use metal shims of the same metal as the piece that you are making for a bearing. I like a wide bezel that is moved over the stone with a hammer and punch (either brass or steel), to make sure that the bezel is tight to the stone. This works well under magnification and with an engraver’s vise if you have them. Finishing the bezel edge between the stone and the bezel may require that you figure out how to bright cut it as described by others responding to this post. Making sure that this surface is finished and polished before you move the bezel over the stone may help. However you move the bezel, you will need to do some cleanup. Abrasive wheels work well, but they can damage the stone. Put masking tape over the stone to reduce any damage from the abrasive wheel. There are pumice stones that are less likely to damage the stone. Tripoli can also damage a stone, so be careful; when you polish out the bezel. Practice makes this work, so practice and have fun. Good luck…Rob
Bright cutting is hard for me to do well. I tend to get a wavy surface rather than a flat / level one.
Instead I use #4 and #8 escapement files that have a safe edge to protect the stone from being scratched. Then I will burnish to get a bright finish.
One time I used a bench grinder, and another time a diamond file to remove the cutting teeth on one side of a file and then polished the smoothed side with black polishing compound. Either way works. It is worth having a file or two with a safe edge.
as an alternative to bright cutting with a graver, you can possibly use a very slim burnisher, very sliwly and carefully rubbing the inside edge of the bezel, to make it smooth and shiny…
They make a flat file that has no teeth on the side. Go around the set stone with the file flat on top of the bezel. I use match book cardboard to build up stone backing, it coushins the sone a little from being damaged when struck against something. And if you have a translucent stone put aluminum foil as your top layer and it reflects that light giving your stone a glow. The bezel can also be given a petty coat edge with a small triangle file, start the first cut on the solder joint which should be on the side of piece of work. Count the number of strokes you make with the file so that the depth of each is uniformly the same. When you go to the next spot to file try to judge the distance that will make the up and down teeth look uniformly even. This type of edge will help with a bezel that is a little bit too big. When casting, a square can be turned to a diamond shape and fit the stone into a pocket made of wax on one corner then that will be part of the design, the opposite corner can be added in a number of ways, I soldered a piece of round silver stock onto a bubble of silver created from pouring molten silver into a bucket of water.
I then drilled a hole the size of the round silver and I braded it over to set it so it would hold the corner of the stone. Stv
Neil…Bright cutting eludes me too for the same reasons. I also don’t always want a bright cut surface. I do a lot of bezels that are textured in some way, as you can see in the attached picture. I need to buy a small burnisher. I think that it would be a good tool to have for many reasons. I do have several small needle files that I have ground and polished safe edges into. I need to learn to use them more. Thanks…Rob
In your picture every place that the the bezel is curved up next to the stone (even a little bit) is a place that it’s not in close contact. If you file sand or grind it in those places it will probably be a thin spot and will look thin when finished. It would be best to make sure that the bezel is flush against the stone in all places before doing any filing, sanding or grinding.
Before I say some tips about how to do that, let’s first talk about what’s happening as you bend the bezel over toward the stone. Part of the metal bezel will be stretching and part of the bezel will be constricting in on itself. Jeweler’s metals for the most part don’t mind stretching, but they don’t really like to constrict in on itself. They will, but it’s more of a struggle. The most amount of constricting and stretching in a pear shape stone is at the point. In your case that’s the area where the bezel is the most ragged, which makes total sense.
My favorite bezel setting tool is called a bezel rocker or bezel roller.
To get started most recommend bending the bezel over in some key places to hold the stone in place. (sort of like a clock face, 12-6, 3-9 are common, you can’t do that with a pear shape though so you’d probably have to do 2-10, 5-7) I hope that makes sense! The goal is to lightly set the stone so it doesn’t pop out before fully setting.
One of the things that I often compare this process to is hammering a nail into a piece of wood. If I was super strong and accurate, theoretically I could hammer a nail into wood with just one punch. Or I could accomplish the same thing with 15 lighter punches. The bezel roller is kind of like a hammer. I recommend rather than trying to bend your bezel over with one push, to go over it with a series of smaller pushes along the entire circumference. This also gives you more control.
The next tip is that the setting process will be substantially easier if your setting is securely mounted. I’ll often use super strong double stick tape for this shape pendant on flat clean metal. I use a gravers ball, but if you don’t have that, a steel bench block works well.
Or sometimes I’ll use Jett Set Basic. Personally, I prefer Jett Set Basic. It’s a little stickier than regular Jett Set or Thermo Lock, but that’s my personal preference.
If a bezel isn’t bending over easily with the bezel roller, I’ll often use a setting punch and a chasing hammer or a hammer hand piece. That takes a lot of words to explain, but there’s several threads about hammer setting bezels on the forum.
For finishing the bezel before final polishing, I’ll often use a pumice and silicone grinder. Pumice will grind metal slowly, but won’t harm most stones. (That’s most stones, not every stone. You can do a test on the back to see if the pumice will hurt your stone)
Others have mentioned bright cutting or burnishing. That requires a fair amount of skill and hand control. You’ll have to practice. But it’s a great skill to have.
There’s a lot more that I could say, but this is already long, so I’ll stop here.
I think you’re doing a fantastic job! You’re on your way to being a master bezel setter!
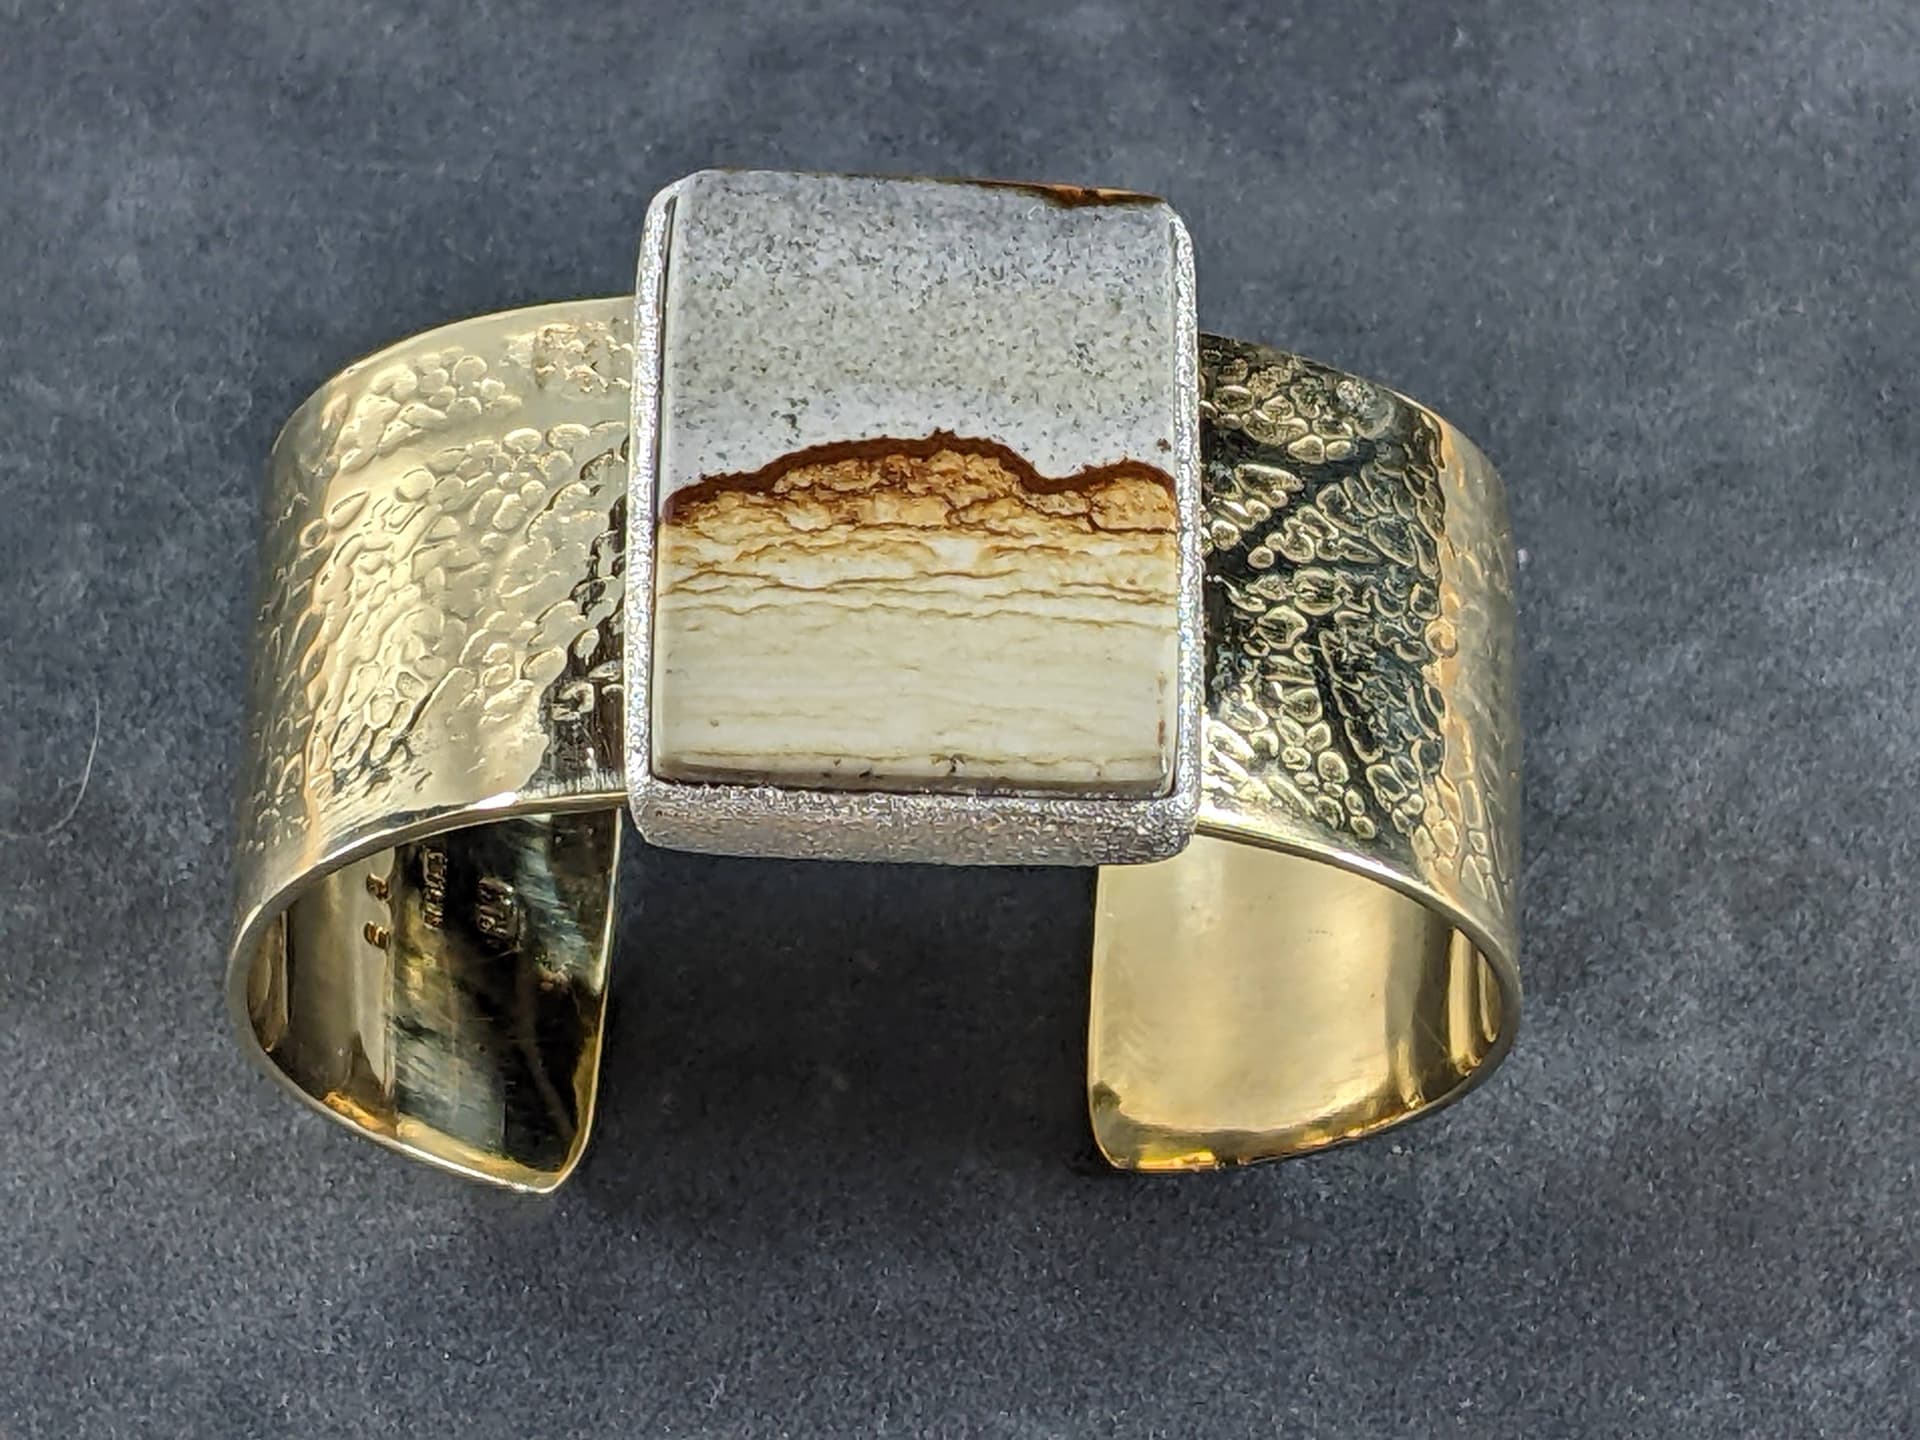
Thanks! I was actually trying out a new way to keep the bezel square and aligned to the bracelet base when I soldered them together. That’s why the bracelet is brass just in case I screwed it up. I drilled three holes through the bezel back in a straight line. Then after forming the bracelet curve and filing a flat in the middle of the bracelet that would match the line of the holes, I set the bezel on top of the bracelet in such a way that I could see the flat through the holes. Then I lined everything once more and tacked through one hole with my PUK to keep everything aligned. Finally I fluxed the holes, dried the flux and then placed solder chips in each hole and heated from under the bracelet. It worked well and everything is aligned. I think that the stone is called Chicken Track Jasper, but I am not sure. I have several slabs and will be making more pieces with this material…Rob
jett sett basic is my favorite too, for holding small, delicate parts, because it is stickier than jett ballistic and thermo loc!
thermo loc is my second favorite…it is pretty consistent to heat up and get nicely pliable in the microwave, before metal is embedded of course (meaning not to put it in the microwave with metal!)…it to gets pretty sticky…but not too sticky…it works nicely for 2 part holding fixtures…and the saran wrap method!
i have a hard time with jett ballistic…i cannot seem to get the water temp right, to get it pliable/ moldable for small parts…it is not as sticky…
does anyone have a temperature they recommend…?…i follow the directions but…
when i say “sticky”, i guess i mean that it does not seem to want to “hug” the small parts and stay put…i almost think it pulls back slightly…
but i like jett ballistic for making tool handles, hammer heads, forming tools, etc…
they are all great products…each a bit different in working properties…