I’m about to pull my hair out. I’m trying to set a faceted stone in a stepped bezel and, no matter what I do, I cannot get the stone to sit level in the bezel. The step part of the bezel is level; I’ve cut a hole in the back of the bezel (the bezel is already soldered to a ring shank). At first, I thought that the hole I had drilled was off-center and that was the problem. So I enlarged the hole to match the circumference of the bezel wall and that didn’t solve the problem. I don’t know what I’m doing wrong or how to correct and your help would be most appreciated. Thanks.
1 Like
Perhaps the stone’s girdle is not cut evenly all round. It may be thicker on one side than the other, making it sit unevenly. In which case, you’d need to lower the “step” on one side to match.
Helen Hill
UK
Hi,
sometimes I will use a thin sharpie marker, to mark the stone and bezel, so that I make sure to make my fit adjustments consistently in the correct location on the setting, after examining both…to see where/how stone is making (or not making) contact with the setting…and how the stone girdle and pavilion are shaped…
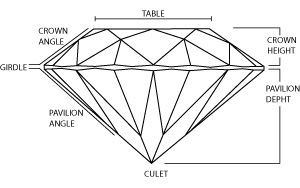
is your step beveled/angled/ cut to accommodate/ match the pavilion angle?
(if it is not, and you do bevel it, note that the stone will drop down lower than it is now…)
(if it is not, then you have a straight sided seat and an angled stone, and the stone may want to rock/shift/tilt…as it is not seated in, but rather resting on, the corner edge of the step/ ledge,)
(I hope I am making sense…)
Julie
1 Like
Here is a nice youtube video by Annie Pennington, where she walks thru the process of cutting a seat into tubing, to create a tube/ bezel setting for a faceted stone.
(although she is using a tube, for smaller stones, the philosophy carries over to larger stones…you would just be using burs that are smaller than the setting, and controlling the bur around as well as up and down…to cut the seat…)
Julie
1 Like
Dentists have a spray to adjust fine details and Rio Grande carries it too it’s called seat check I believe it’s a green spray paint that barely sticks to metal so you spray you’re setting , place you’re stone and remove it , there will be fine marks where the stone is making contact so just cut them out with a round but and repeat until it sits flush ( I’ve also used liquid paper but “seat check “ is superior)
1 Like
Yes, you are making perfect sense. The step is not beveled to match the pavilion angle. I didn’t even think of having to do that but…of course. Since the bezel is already soldered to the ring shank, how do you suggest I create that angle in the step and how do I figure out how to match the angle of the step to the angle of the pavilion? Sorry for so many questions and thanks very much for your help.
Hi,
is the stone round?
what is the diameter?
is there enough bezel depth to accomodate the if stone does drop down a bit?
if there is not enough depth then you can still set the stone on the straight ledge/step…it just puts pressure on the facet junctions…never a good idea…
is the bezel a nice tight “pop in” fit? or is the stone loose?
is this step bezel wire? or did you fabricate bezel?
julie
You have become my heroine, answering all my questions! Yes, the stone is round. The diameter is 8.94mm. Yes, plenty of bezel depth–in fact, I will have to reduce the bezel wall height. The stone fits tightly until I push it in and then one side sits lower than the other. I fabricated the bezel and the step inside of it. Could I add an additional step on top of the one already there, thereby raising the height of the stone and eliminating the need to file down the bezel wall and at the same time, angle that second step piece to match the pavilion angle?
I feel so stupid not being able to figure this out myself.
Martha
Hi,
you do not really need to get into the math and angles…
you could try using a setting bur (90 degree setting burr) to slowly, methodically shave off the corner of the seat, creating an angle into the seat…this also opens up the hole…and the stone will begin to move downward…you want to remove the metal that is “holding up” the stone from seating level
the largest size i see in my rio catalog is 8mm…
not sure if/what sizes you have…
i have used round burs, bud burs, setting burs…bigger is probably better surface area coverage for larger radius curve of 8.9mm diameter bezel seat
you want to go slowly and deliberately, and remove a very little amount of metal at a time, checking fit often
do you have a wax stick? beeswax on a toothpick…or just a pointy glob of beeswax?
(andrew berry uses the red wax covering from thise little cheese discs!)
just start by beveling the rim (the corner of the seat)…ever do slightly, and then check the fit…
my friend used to tell me “burr a little, look a lot”!
either the hole of the seat is centered but the stone is not (side to side), and, or the girdle thickness is not even all the way around…which means fatter area wants to sit lower down…but cannot…
examine the stone carefully…sometimes i have to draw it out rough sketch on paper to get a visual understanding…
julie
1 Like
Hi,
omg, I should also mention that you can try visiting Gerrys website to see if he has an essay on setting a facetted stone in a bezel.
He has written tons of masterful essays on stone setting!
"gerrysdiamondsettingessays.blogspot.com "
here is a link to results when I searched bezel setting…there is one for a marquis, but the information is relevant!
https://gerrysdiamondsettingessays.blogspot.com/search?q=bezel+setting
Julie
1 Like