johnson Matthey destinguish their different grades of silver solder
by thickness and width.
So if like me I too no longer have the attached labels, I go to
their list of solders and identify what it is by dimension. Are yours
similar?, can you get back to where you bought it ? and trace it that
way?
If you were playing the flame directly on the pieces of solder
you’ll have trouble getting even heat. Lacking a kiln with good temp
control this is what I’d do.
Cut a small piece of sterling no bigger than 25mm on a side, or a
similar sized disc. Place it on an enameling tripod or some similar
platform where it can be heated from below. Put a snip of each of
the three solders on the sterling piece. Heat slowly and evenly from
below. The solders should then melt in sequence.
I’d mark the sterling platform to make certain you don’t forget
which snip came from which coil. Also, if you flux the piece, I’d
leave unfluxed areas between the solder snippets, so that when they
melt they do not run into each other. Make sure that the flame does
not touch the solder directly, to ensure that they are receiving
equal heat at the same time.
I bent a shape into the back of my wire, but forgot what each symbol
meant (yep noob mistake). I just bought new wire, and left the other
wire until a solution came up… fingers crossed.
These days I keep my solder in zip lock bags with labels on the
bags.
For the futuRe: the idea I got from one of the better teachers I have
had was to take different colored sharpies to the solder. I use red
for hard, blue med, black easy. I apply this to one side of sheet and
best I can on wire. I find no mater how small I snip I can usually
tell which is which and I can loose my labels without worry.
A simple solution for the future, cut your solder in even length,
like 20 inch I do, bend one end once, like L shape 1/2 inch from the
top for soft, two times like a U shape for medium, and 3 times for
hard solder like a box shape.
Since I had this advice, I never had a problem with mixing up the
solders
In our studio, we use sheet solder. It is easy to cut up small
squares to sell to students, and a stamp is made on each square with
a letter stamp. E for easy, M for medium, and H for hard. Very
difficult to mix up. Unlike wire solder which forms a small wheel
when cut, the sheet solder forms a very small flat square, and stays
where you put it. Cutting “fringe” on a piece of sheet solder, I can
cut extremely tiny bits off the fringed ends, which are needed in
many tiny solder repairs or soldering work.
Wire solder also has issue with identification. A “code” is required
for bends in the end of the wire ( what bend is hard solder again?)
and labels can slip off.
Wire solder is improved by running a length of it through the mill
to flatten it, but then you have sheet solder, right?
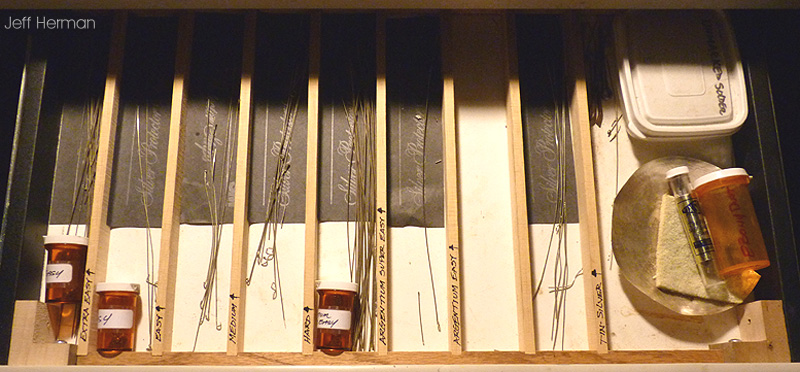
This is my solder drawer which is directly below my soldering bench: http://www.ganoksin.com/ftp/solder.jpg. I labeled every slot and did
something special to the ends of each solder grade should any of the
wires sprout legs and wander into another slot. I also keep an
anti-tarnish strip in each slot.
I bent a shape into the back of my wire, but forgot what each symbol
meant (yep noob mistake).
When I got my wire solder, I bent letters E, M, H into the ends,
nothing to get lost or confusing. It wasted a little solder but can
be used when you need that last bit.
May I add to Eric’s advice. You should color BOTH sides of the sheet
solder. Should your little solder snippets be spilled, you do not
have to turn over the shiny bits to see which color it is. Cross your
fingers, eyes, legs, etc. that the spill never happens!
Re: marking wire solder. I make a little loop in one end and fasten
a ring tag (“shark skin” type) with the appropriate info written on
the tag. So far there has been no mix-up… ooooh wait! Use that
colored sharpie to color the tag appropriately to match your sheet
types. That will really make finding the right solder easy.
Judy in Kansas, where the tomatoes are coming on and so are the
cucumbers. Still conducting squash bug patrol every morning and the
numbers are declining. Yea!
I just put my solder coiled in a plastic pill container with a hole
drilled through the lid and the wire poking out. I label them with
PVC electrical tape green for easy, blue for medium and red for
hard. I used to use film canisters but for some reason they are
rather hard to get now.
people, put away your scalpels, marking silver material isn’t brain
surgery. here is the method (no scalpels involved) that works for
me: for the solder material i put each batch into a different color
plastic envelope from the dollar tree; silver wire goes into
supermarket ziploc envelopes labeled with a different color Sharpie
for each gauge and the Sharpie dragged across the coiled wire; sheet
material all goes into the same drawer after each piece is marked in
several places on both sides - don’t forget to erase the Sharpie ink
with lighter fluid/etc. before soldering - if you cut off the last
gauge mark on a sheet, before you do anything, mark the remaining
scrap again.
good luck -
ive
think more now, regret less later.
I’ve never had to wipe Sharpie ink off any items of solder I’ve
marked for different grades of solder. People, don’t worry about
having to go thru any other steps in marking your solder. Sharpie ink
will burn off with the heat of a torch.
Once you know which solder wire is which, leave easy wire as is,
turn one “L” in medium, and two "L"s in the hard. Obviously you turn
up the end you’re not using.I also the same notation on the plastic
baggie each is kept in. In case I forget. Which of course I do.