Can anyone explain to me why some saw blades will track left or
right while piercing. I use Glardon Vallorbe Swiss made round back
saw blades, usually size 3 or 4. When starting with a new blade they
are usually true and saw straight. Every now and then I get a blade
that seems to have a mind of its own straight out of the packet.
Sometimes a tracking tendency so pronounced that I have to change it
out. Is this a common manufacturing flaw? (or me, perhaps ??) it can
be most annoying when cutting precisely measured scribes for rings
and things. They always seem to track off in the direction where I
have least dimension to spare… Its not breaking the bank but
perplexing and annoying…
Can anyone explain to me why some saw blades will track left or
right while piercing.
Most likely is improper tightening.
Saw frame can do it, but in your case it is only from time to time,
so saw frame is unlikely. But check the screws. If clamping slot is
worn, It may hold the blade under normal condition, but if you sawing
a bit faster, blade can slip and here goes your tightening.
Can anyone explain to me why some saw blades will track left or
right while piercing. I use Glardon Vallorbe Swiss made round back
I do a lot of saw work usually with 6/0s and yes I’m convinced that
they don’t all come out of the packet perfect. Vallorbes and Pikes
are my favourites but they all have their own quirks. I’ve learnt to
cut slower with ones that don’t want to go straight and hope they
break soon. Occasionally I’ll throw it away after a few attempts. I
have speculated as to why. Maybe they are hardened unequally and the
teeth wear quicker on one side or the other. I’ve got some Lazer
Golds and while they cut fast on the straight seem to lose teeth
quickly with lots of turning corners.
My Two cents worth, but I’d almost have to think that the “set” of
the teeth isn’t uniform. i know from my experience woodworking that a
poorly “tuned” blade will wander. It has to be difficult at an
industrial level to insure a uniform set to the teeth 100% of the
time. Willing to bet they make it out of the factory in “batches” too
as I would assume there are multiples created in that particular
run… similar to a recall in the auto industry, it is never just
one, but multiples that cause the grief… maybe they were made on a
Monday!!! :-} peace.
I’ve encountered this in various brands and sizes; sometimes
sporadically, sometimes in what appears to be an entire
manufacturing run. Looking through a microscope at 35 to 45 power,
the problem can be easily seen. In woodworking handsaws it’s usually
a matter of ‘set’. In jewelers’ saws it’s more often a failure to
remove equal amounts of metal from both edges of the blade during
finishing. One remedy is to very lightly draw the ‘proud’ side
between a lightly-pressed index fingertip and a very fine translucent
Arkansas (novaculite) honing stone. One or two strokes should do it.
Other hard surfaces will also work, too, such as an unpolished piece
of jasper or an unglazed portion of a porcelain dish. My favorite
hone for this and many other tasks is the frosty surface of a split
synthetic sapphire boule (around 10 USD on eBay).
Also, blades that are mostly uneven in the teeth (as above) will
veer noticeably off straight lines. Blades with uneven trailing edges
saw unevenly on curves, and are harder to tune.
It somtimes happens that a saw blade is skewed. I buy saw blades by
the gross and they are divided into 12 blades per bundle. Frequently
if the first blade that I use from a bundle does not saw true I find
that most of the other blades in the bundle do not saw true.
I was taught that you should draw the blade between two of those
diamond sharpening pads that they make for knifes or fishhooks. It
not only removed burrs but helped to true up the blade.
I do think that most of it is uneven tightening in the saw frame.
I try to go for the same pitch each time.
I was taught that you should draw the blade between two of those
diamond sharpening pads that they make for knifes or fishhooks. It
not only removed burrs but helped to true up the blade.
Occasionally, there might be a reason to do this, such as needing a
narrower cut. but you essentially are damaging the blade. Saw blades,
including jewelers blades, have a slight “set” to them, with the
teeth thus cutting a very slightly wider kerf than the body of the
blade. This allows clearance for the blade so it doesn’t bind.
Without it, the blade will bind more, and will be more difficult to
get to turn or saw a curve. As made and packaged, if the blade is
good, and properly tensioned in the frame, it should saw straight
without adjusting. If it won’t, replace it. With a brand new blade,
this indicates a faulty blade. If the blade has been cutting a bit
already, cutting skewed to one side is usually because you ran one
side of the blade against something harder. Sawing next to stones, or
hitting hard inclusions or bits of flux or casting investment can
take the set or sharp corners off the teeth on that side, and then
the blade will cut towards the other side. The fix is to replace it.
Blades are intended to be replaced when damaged or dull. That’s why
they don’t sell them one at a time…
I do think that most of it is uneven tightening in the saw frame.
I try to go for the same pitch each time.
Good advice. too loose, and it won’t cut straight and well. Too
tight, and it breaks… But note that the proper “pitch” or tone of
the blade when plucked depends on the size of the blade too.
I was taught that you should draw the blade between two of those
diamond sharpening pads that they make for knifes or fishhooks. It
not only removed burrs but helped to true up the blade. I do think
that most of it is uneven tightening in the saw frame. I try to go
for the same pitch each time.
Can you please provide more info on “those diamond sharpening
pads”… what are they and where can one get them.
I’m not sure how one can tighten “unevenly” in a saw frame…
providing that is that the teeth are all facing forwards and
downwards. Can you please explain what you mean by “pitch” in this
case. Does that mean the “tension” in the blade?
I saw mostly with a very rigid powered saw - both vertical and at an
angle.
I use a fixed but variable speed. I don’t vary it in a cut I have
done a lot of testing blades testing on steel. I get them to break at
the predictable hardest place now - at the start of a downstroke at
that point.
Brands are hard to separate out since so many blades seem to be sold
private label.
They will dull faster on steel than soft metal. I think the
universally best blades are the highest grade ones from Switzerland.
Some of the best German ones may be almost as good. The rest can be
junk - usually too hard or too soft. I don’t have problems with
blades pulling to one side. I put a lot of tension on them. They ping
but I don’t hear the different pitch sounds well.
I have pulled blades apart tensioning them but not the best ones
yet. The Grobert type clamps work for me. I think most problems are
skill related.
A hand held saw gives more opportunity for sawyer mistakes.
I don’t know if anyone has mentioned this, but it may be worth adding
to this thread. If a saw blade isn’t absolutely taut it will wander.
Very simple I know, but we pick up lax habits sometimes and need to
be reminded.
There are two main methods by which piercing saw blades are made and
anyone who is used to one type will not get on well with the other.
The method which was often used in the UK at places such as Eclipse
here in Sheffield in the 1970’s was to take a stack of steel sheets -
about 5in x 4in and load them onto a milling machine - not a normal
milling machine but one which had a sloping table. A knife edged
cutter was then used to mill undercut teeth right across the edge of
the stack of sheets. These were then removed from the machine and
replaced by another stack and the stack just cut was broken apart and
the blades cut off the edge of the sheet with a guillotine. The teeth
on these were then set to alternate sides and the blades were
hardened and tempered. The sheets were stacked up again and a new lot
of blades was milled across the edge…
In Europe at the same time, a different method was used where the
starting point was steel wire which was fist flattened. The machines
I saw took four spools of wire and fed these between guides. A
special file was used to file teeth across the four wires at once and
the blades were then cut off to length and hardened and tempered. The
teeth were not set as on a normal saw but the bur left from filing
was used as the set. Therefore, the set was all on one side and the
blades tended to cut in a circle.
Surprisingly, it was the UK made blades which were hardest to sell as
they were the newest on the market and old-time silversmiths who had
been used to using German and Swiss blades and had developed a
natural bias to counteract the turning effect of the Continental
blades, couldn’t get used to blades which sawed in a straight line!!
Another ‘problem’ was that, as the UK blades had alternately set
teeth (one to the left then one to the right), they cut as though
they were coarser than a Continental blade and jewellers would say
that a 6/0 Eclipse blade cut like a 3/0 German blade. The latest
European blades I bought were made from flattened wire but did have
alternately set teeth, so maybe this is becoming more universal now
but it would be worth looking at blades you have to see if they are
different to the ones you usually use.
Whatever the cause for drifting blades, I find this works pretty
well. Instead of a continuous forward pressure, that is the blade
never stops touching the metal…I use a hacking motion (yup Neil the
Hack). I withdraw the blade slightly on the upstroke. What this does
for me is allow me to see exactly what the last down stroke did,
whether its on line or not, so you can make adjustments. You can’t
get gorilla with it, but if you use a smooth gentle motion, it seems
to do the job.
I guess it might be the same as filing, you’re not really suppose to
let the file drag on the backstroke, of course tho, I always do.
Piercing takes a gentle hand where you can cut metal with only two
fingers holding the saw frame. RELAX. I’ve watched hundreds of
students squeeze wood juice from sawframes while trying to force that
little blade to do so much work.
Here are my guidelines:
Select the right size blade for the thickness of your metal. If
you are using an 8/0 for 18 ga metal, you better be good at piercing.
For an 18 ga piece of metal, I would use a #1 or 1/0.
Let the blade do the work. Hey those things have lots of little
teeth to do the job. Let them!
For straight cuts, tilt your sawframe about 45 - 60 degrees. Use
the whole blade, not just 1 inch.
A lubricant will help such as a wax stick type.
Move the work not the blade. For tight corners, you have to move
your metal around and keep your blade absolutely perpendicular to
your work. Think of a band saw. A band saw goes up and down and the
work moves around the blade. Same principle.
Ping! When your blade is taught it should make a nice “ping”.
Guide cut. To start your piercing, I make a slight guide cut to
get things going. Do this slowly with an up stroke.
Up or down. I can’t tell you how many times and how easy it is to
reverse the order of your blade. Teeth should be pointing down as
the cut is on the down stroke not the up.
Threading through metal. Mark your impending hole, hit it with a
center punch, drill, unlock one end of your blade, thread it through
the hole and reattach. Saw away!
When I teach adults, I give them a dozen blades in their beginners
kit. They unwind the little wire that contains the pack and pull one
out and look at me like I have landed from the planet Zeon. Their
eyes screw down looking at that little blade in absolute horror.
Relax. Close your eyes and feel the blade. Your fingers can read much
more than your eyes.
Different metals, different vibrations. Copper cuts differently than
brass and differently from silver. Copper is sticky, brass hard and
silver and gold, yummy.
Practice, practice, practice. Give yourself some practice pieces.
Pierce out a 2 inch image of a tree with big branches. Then cut out a
quarter.
This question was originally asked by John Bowling last month. I have
been away for a week so I am just catching up on reading the orchid
posts that I missed. I also use Glarden Vallorbe saw blades and find
them the best for my purpose. Yes sometimes you will get a bl;ade
that runs untrue that is why they are sold by the gross. If you worry
about bad blades or breaking the blades then you will not be thinking
about your piercing quality. When I first started piercing, as an
apprentice, I was very conscious about the amount of blades that I
broke, but when no one told me off for breaking blades, I soon forgot
about blade breakages and thought more about the quality of the
piercing. In my experience most blades will suffer breakage or
distortion when the piercer is turning the blade in an interior tight
angle or corner. I taught my apprentices to cut into the corner or
angle twice, the second cut with the blade held at a slight sideways
angle which widens the first saw cut and enables you to turn the
blade easier in an angle. Also when sawing larger sections it pays to
check the wing nut tightness regulary. If one of the blade securing
wing nuts become loose the blade will cease to be taught and then
will distort while you are piercing, also a loose blade will wander
off the desired piercing line.
I read one contributer named Jesse, who suggested that using a
mechanical saw might be better for sawing with less broken blades.
Well mechanical saws are OK for piercing flat sheet, but I am sure
that a mechanical saw is not as adaptable when sawing shaped items.
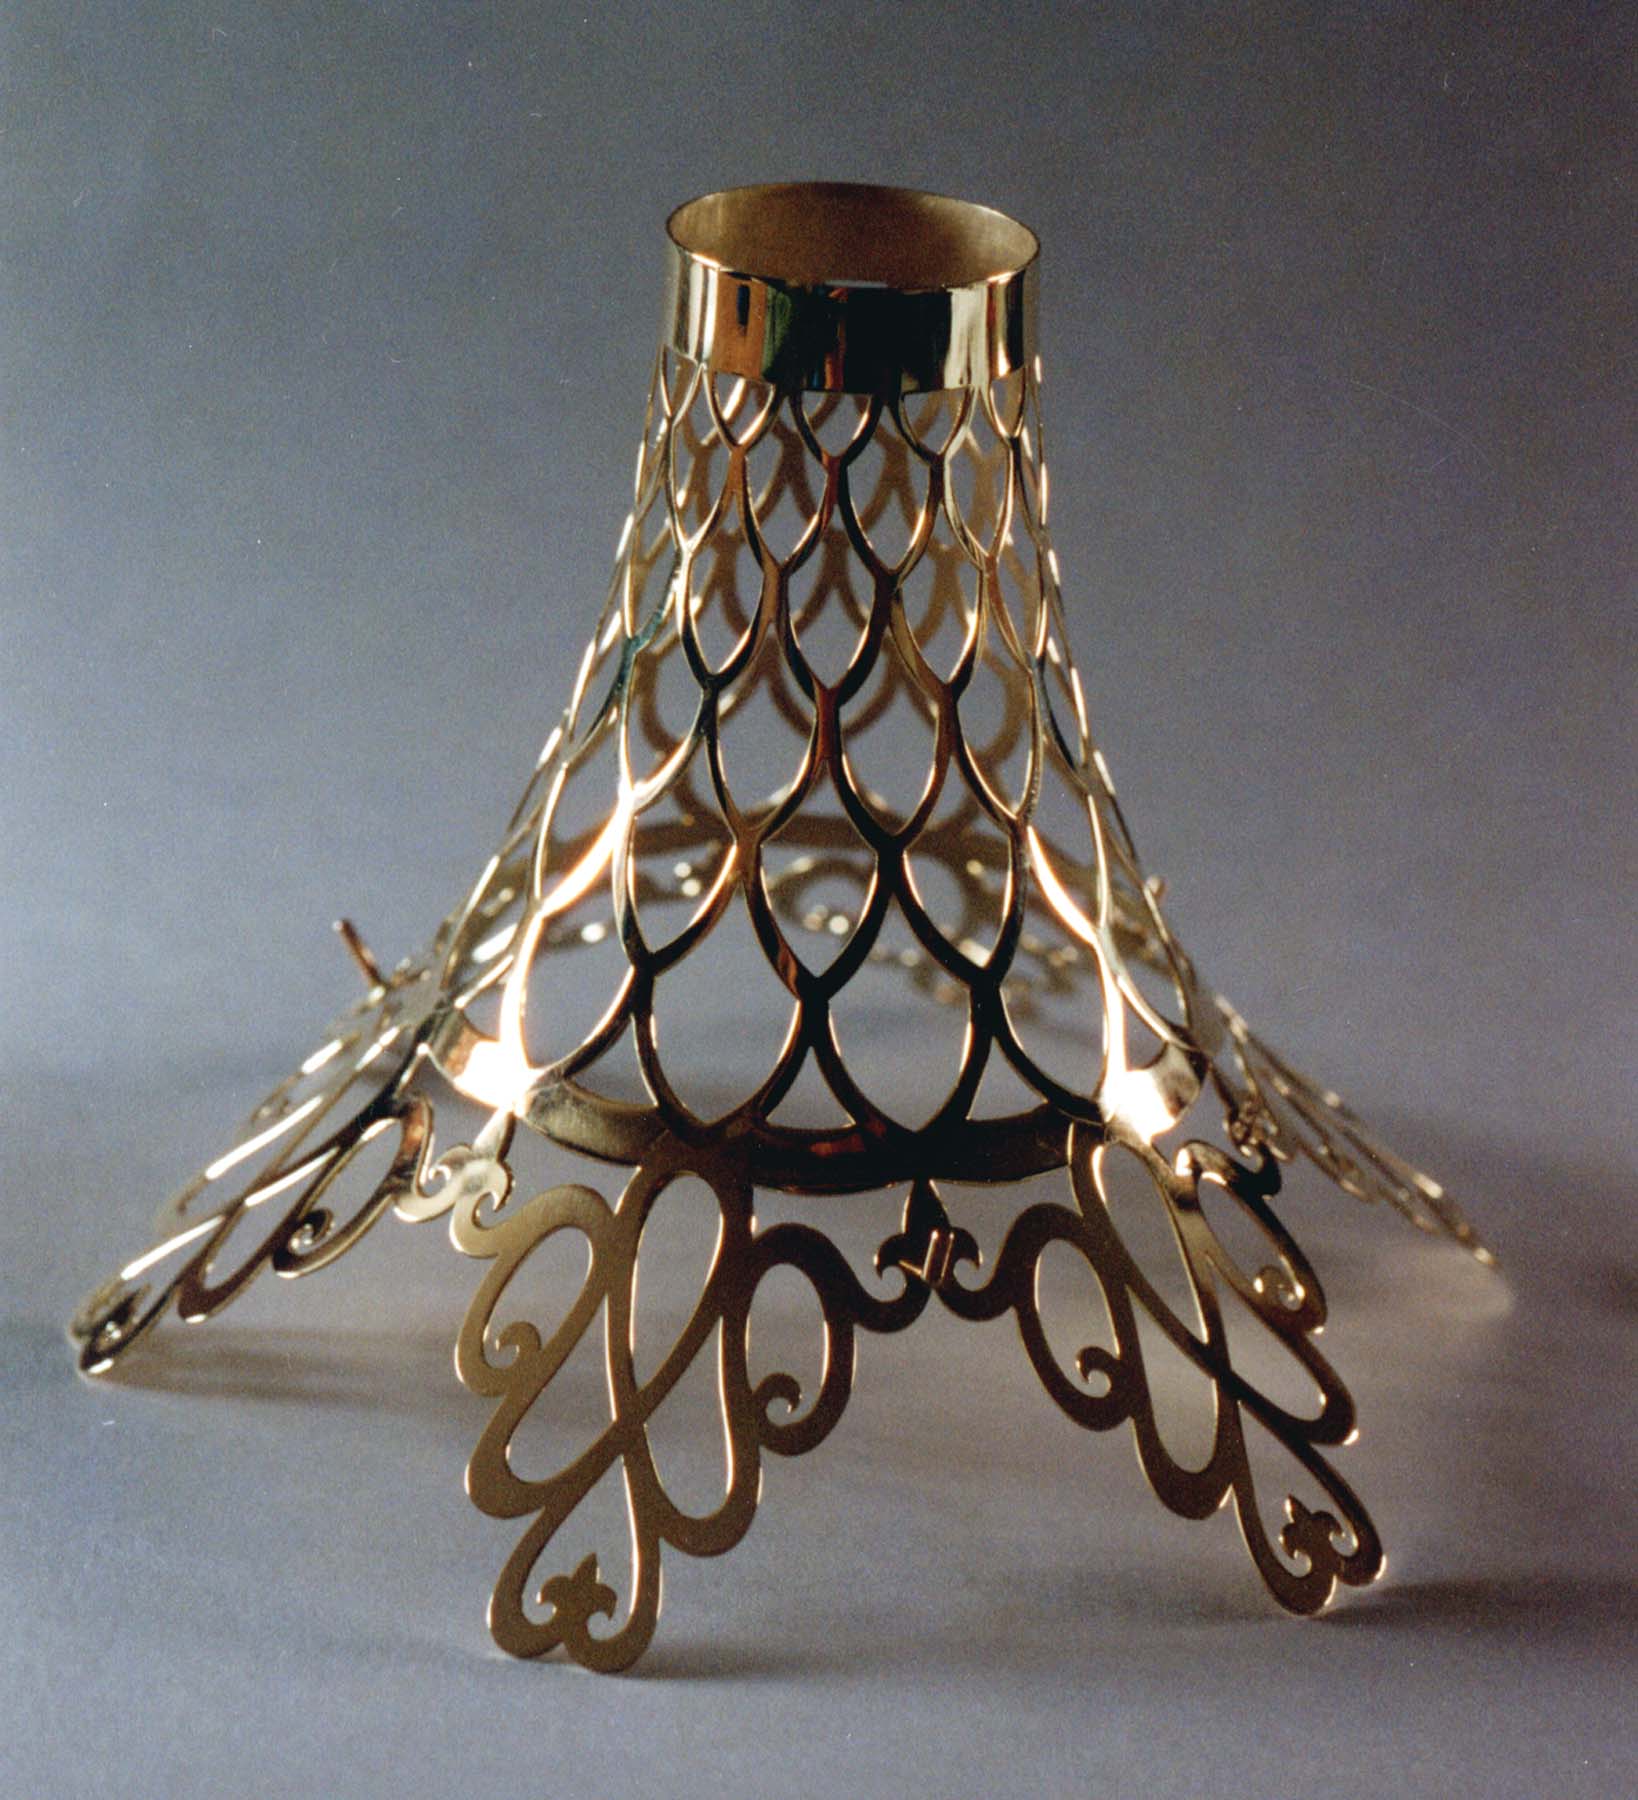
Take a look at some of my piercing here;
The pierced cone was 8 inches tall and made of 18ct gold, the actual
labour time for me on this cone was 24 hours and that included
drawing and engraving the outline pattern, then finally piercing and
filing the design, although I must admit that the filing was only to
remove any saw cuts on the metal edge. The piercing fitted over a
cone of guilloche enamel and was part of the job that is shown on my
Orchid Gallery, titled Rock Crystal Bowls.
I don’t think that this type of piercing can be achieved by using a
mechanical piercing saw.
One final comment, I have been looking at some of the videos about
saw piercing that are posted on You Tube. I find them very misleading
and amatuerish, even the ones made by so called experts. I have seen
some by Art Jewelry Magazine and one by Rio Grande and I am surprised
at the lack of skills when handling a saw frame. Sorry to be negative
but I was hoping to see some skilled craftspeople at work. Over here
in the UK, the Goldsmiths Company are producing DVDs entitled
Masterclasses, I have bought a couple and am impressed by their
quality. If anyone is interested please let me know and I will post
some more details, the DVDs are made and sold by the Goldsmiths
Company as tuition aids and only cost 15 UK pounds each. So far they
have produced five which include silversmith raising, diamond setting
and polishing and finishing.
Please give us the we need to order these DVDs. What a
great resource, even for those of us who have been at the bench for
a long time. There’s always a new or better technique to learn.