I have been wondering if anyone here has any good alternatives for a rolling mill stand that would be well anchored and stationary that does NOT need to be bolted to the floor. My studio floor is tile, and I wouldn’t want to drill holes in it or remove a tile. However, the mill is currently attached to one of my workbenches, and moves when I roll something that requires some muscle.
I figure out community here would have some great suggestions!
Thanks in advance!
Edie
How about, attach the mill to a base. Attach the base to a piece of 3/4" plywood large enough that you can stand on while cranking the mill.
1 Like
Hi,
to clarify…does the mill move? or does the workbench move…?
i have my rolling mill bolted to a piece of wood, and then the wood is clamped to my workbench
(i have my vice, and flexshaft holders clamped this way as well…did not wanna drill holes in the bench, or! commit to positions!
 ).
).
julie
Hi Edie,
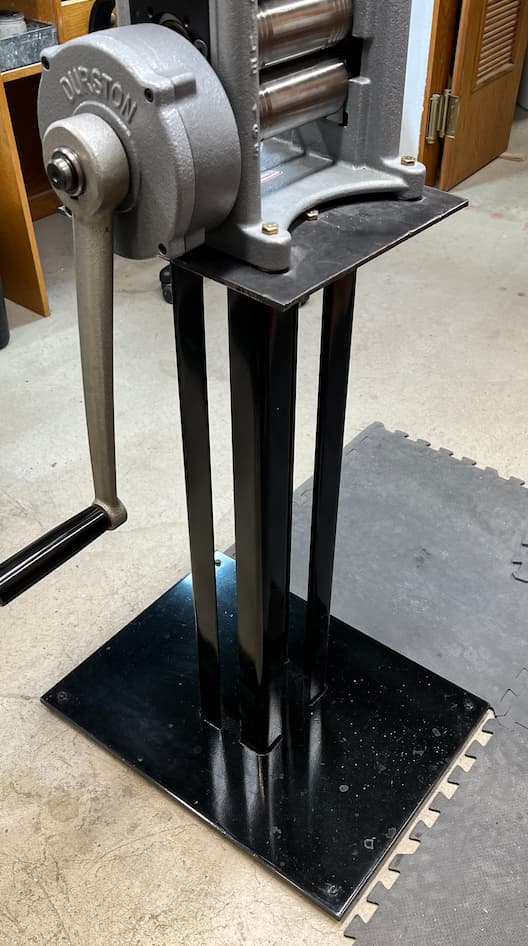
If you are looking for a rolling mill stand alternative to the ones sold by various vendors, then your answer is to get one made by yourself - if you are a welder - or by someone in your area if you aren’t.The cost to have one made and pay someone to build it vs the cost to buy one from a jewelry tool supplier and paying to have it shipped will probably be a wash. The advantage of having one made is you can get it engineered to meet your specific needs.
I have attached a picture of the one I have that was made by a friend of mine out of plate and angle steel. The stand weighs +/- about a hundred pounds and was designed so it could be moved with a hand truck to different spots in my shop at will. It also has rubber adjustable feet on the bottom because my shop has a cement floor and is not perfectly level. It also has an extra wide base for stability, but more importantly, when I use it, I am standing on it which adds (ahem!) another 190 lbs. (more during the holidays. Less during the outdoor cycling season). Hope that helps.
Mike
2 Likes
I attended classes at a school that had the mill attached to a larger sheet of plywood. Everybody tripped on the plywood.
1 Like
To answer Julie’s question, yes, it’s bolted to a piece of plywood then clamped to workbench. This works for rolling small pieces, like flattening wire, but to roll down annealed sheet, the whole bench moves, which makes the job harder.
Thank you everyone! I am not adverse to getting a commercially made stand at all. (My son is also just starting school in welding so perhaps a bit of patience…)
I had thought of attaching the stand to a base that I could stand on, but really wasn’t sure if that would work. Sounds like it might! I don’t weigh 190 pounds (anymore) but think my slimmed down 150 would be adequate. So long as I don’t trip! The photo of the mats next to the mill and base are a great idea!
Thanks as always for all of the responses! So helpful!
Edie
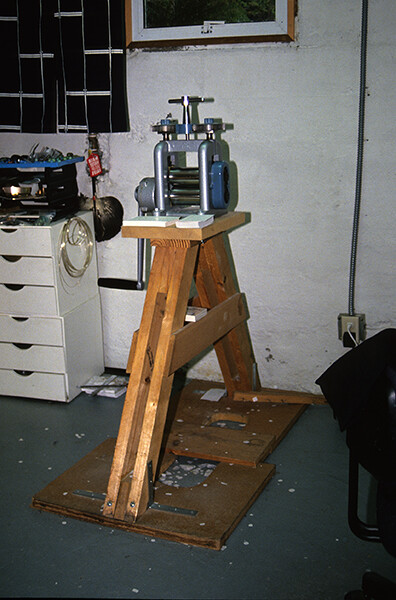
This may be helpful. Years ago I taught a workshop on studios, setting them up, basic ideas and solutions. I went all around the Seattle area snapping images. This was my friend’s solution to your same problem (cement as opposed to tile).
The two key features are the flared legs and the platform. The legs are spread in the direction of the force exerted as you roll. While you roll, you stand on the platform, that weight keeps it more or less in place. She used to drag it around her basement studio as needed. Nifty solution. Hope this helps.
Andy
3 Likes
My rolling mill is bolted to the top of a large sturdy workbench that I built out of scrap wood. The workbench is more of a cabinet… that also happens to hold my safe. So between the weight of the safe, the cabinet itself, the vice and other heavy tools stored in the cabinet, it’s not going anywhere.
Also, if you can’t bolt the stand to the floor, can you screw the stand to the studs in the walls?
Putting 60 pounds of steel on top of a stand the is 30" tall that weighs less than the mill is a recipe for injury. Especially when you add the applied weight of yourself pushing on an extension that increases leverage. Floor space in our shops is precious so I understand the need for a stand that takes up little space. I attacked this problem from a different direction. I use a 28" by 40" rolling cart with locking casters for my mill. The cart is a storage unit that holds spare anvils, motors, marblr slab for leather work, and a portable expanding wheel grinder. The top of the cart has my mill, shear, arbor press and other long handle implements’ bolted to the top. It is rolled out of the way but can be rotated in the room when I need a different tool. The weight of the other tools help with stability. The width of the bench is already assigned floor space and except for the swing of the lever a mill requires very little floor space, in my shop at least.
Don Meixner
2 Likes
I purchased an antique beat up butcher block table and metal legs from a print shop. I refinished the top and painted the legs. I put 40lb tent weights on the legs (10 lbs x4 ) + 70 lb accu cutter shear and a heavy rolling mill.
Works great. I had the same issue because the table was not heavy enough.
Down sizing into a very small bedroom from a larger two person shop where I did the whole gambit of work was a challenge. Because of lack of space and I just didn’t feel like it, I decided not to do my own casting, but I definitely needed my rolling mill. Having little floor space to set the mill up, this was my solution. It’s definitely not the best, but it does work for me.


I used the 3/4s Plywood to anchor into the studs and support the L- brackets. The base was from an old Ikea desk, 1” (30cm) thick.
Not very fancy for sure.
2 Likes
Depending on your tile surface, smooth or rough , on mine I simply took some Goop glue and glued the legs to my tile floor. When I move if ever I can cut the glue with a razor blade or sharp thin knife then can scrape the remaining off the tile.
Just guessing, but I assume you mean 30mm, a bit more than one inch. 30cm is about a foot.
I made my own stand using 2 X 8’s left over from a home remodeling project… the 2X8’s were doubled up for the sides and base, with the base being made like a box… with a single board for the top… it sits on a tile floor and but is heavy enough to resist movement… I have a heavy vise attached to it also for holding a draw plate…both the rolling mill and vise are bolted to the top… it’s portable but not without two people.
I also made my own bench with 2X4’s, with multiple shelves for storage, the bench top is made out of concrete board… hardibacker is fine grained and smooth… although heat resistant, it will gradually burn up if directly soldered on… I have small scrap pieces of hardibacker that I use to solder on, throw them away after they get burnt up…
Thanks again everyone! Lots of great ideas!
I’ll post an update when I figure out what exactly I come up with.
Edie
While I have the room and large heavy benches to put my mills on, I like the shelf solution. I might beef it up a bit. Looks like a safe in the background. You could use that as a base…Rob
I like the shelf wall mount too. Having it near an adjacent door way makes for more access. And I think I would beef it up a bit too. A couple more brackets and maybe another inch of thickness on the shelf itself. I keep my handle loose so I can take it off and put it out of the way. It can be a knee breaker in the right circumstance.
Don
hi,
i recalled that Andrew Berry’s workshop has a worktop mounted to the wall which also has 2 front legs
here is a video on rolling mill placement where he discussed this wall mounted surface
At The Bench” youtube channel

julie
hi,
in a related note…i have always wished my rolling mill was equiped with a “groove marker”…i even looked on line for “after market” versions…
i just had an epiphany…
can make a rod, and tension fit it into position
(metal, wood, delrin rod…
i can make the groove marker
(metal, wood, delrin, etc…
very excited!
when i get past the 5th groove, i always have to count grooves to make sure i am on the right one…
julie