Ive had several ask me how i like my F1. This guys video is great at explaining what all we use it for. I do everything hes explaining in this video. Having it for stencils for my engraving and cutting has saved me so much time.

Ive had several ask me how i like my F1. This guys video is great at explaining what all we use it for. I do everything hes explaining in this video. Having it for stencils for my engraving and cutting has saved me so much time.
Thanks for sharing Kimberly! This is super interesting. It’s very impressive how many ways this tool can help a jewelry artist.
How was the learning curve for you to learn how to operate it? Difficult? Easy? Somewhere in between?
Thanks again.
Jeff
I think calling this tool an engraver is misleading. It is a marking tool as it does not have the power to cut deep enough for the marks to be considered engravings.
I have done a lot of research into lasers as they might be applied to the kind of work that I do. You are correct in that this tool probably does not engrave, but rather vaporize a very shallow area to create a mark. Part of my research included sending one of my bracelets to Stuller to see how well their Laser Pecker 4 did at marking my jewelry to replace the stamping that I currently do. The Laser Pecker 4 and xTool f1 are similar tools. The marking done by the Laser Packer 4 polished off with a few passes on the tripoli wheel. I am not sure how well the xTool would do as I don’t have a way to try it out. What I have concluded is that, if you want to actually remove metal as in engraving or do a deep mark as in stamping, you need a fiber laser in the 30 - 50 watt range. What the xTool f1 and Laser Pecker 4 will do is apply an image to be later cut out with a saw, engraving tool, chasing tool or some other operation that starts with a sacrificial image. They both may also cut out templates from heavy paper and card stock that could then be used just as a template or to roll print. As far as I can tell, a fiber laser won’t cut paper, it just burns it. The laser world is huge and very confusing. I wish that some of our suppliers would research this class of laser so that they could be more helpful in selecting them…Rob
The following was a quick test of cutting and small shapes. I am too busy working on my house to have much time to explore the ComMarker and Lightburn in particular so far.
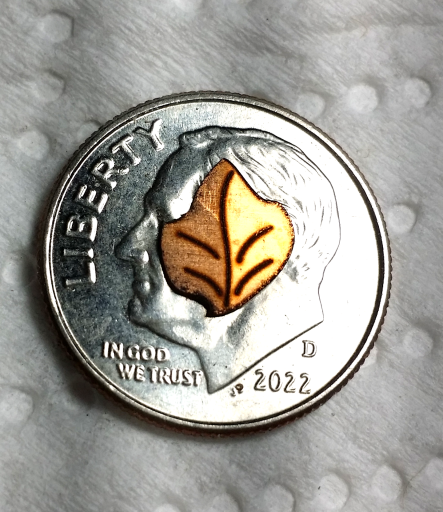
The leaf is as-cut with no cleanup at all.
This was cut out from 26 ga. copper, so metal was removed to a depth of 0.4mm. I’m testing on 26 ga. copper to not waste more costly metal at this point.
The veining on the leaf was ‘overexposed’. You can vary the power by percentage, or the effect by the number of passes. The veining and cutting were at 100%, with fewer passes for the veining than for the peripheral cutting, but even fewer would have been better. Frequency can be modified to change the color from black, and some basic texturing can be done (cross-hatch, diagonal lines…).
Much heavier metal can be cut through by just running more passes.
One other point of this test was …the point at the stem of the leaf, which is in shadow. It is quite sharp and tiny. That would have been rounded off if milled with a CNC machine . No biggie in this case, but for some things even the tiniest bits are going to leave rounded outside and especially inside corners, where the much smaller laser beam will allow sharper detail.
Something to be aware of, the software matters as much as the machine. I can do some things via CNC milling that I can’t do with the laser because the CNC CAD software I use can do things that Lightburn has not implemented.
The ComMarker works in two axes, X and Y. If it also worked in the Z axis (raising & lowering the beam) it would be possible to cut 3D details, such as the shapes of heads on coins, rather than just different levels of profiles (2.5D).
Word to the wise to anyone who gets a laser, do not leave the lens cap in place by mistake. Neither the cap nor the lens survive the experience. You don’t have to ask how I know.
Neil A
One of the first Lightburn setup tests was to cut paper. It cut a very narrow line. I don’t know what the power setting was, but the user can control the power (say just 1%) and the speed (fast), so the laser spends almost no time in any one spot, plus the number of passes.
I can’t swear that a 60 watt laser can cut heavy paper templates for roller texturing, maybe you’d need to try different papers, but from what I’ve seen it seems doable to me.
Neil A
O.K., um…
After many tries, either I got a lot of nothing with low-power settings or two fires after I lost patience and dialed it up a lot, so getting it to work is tricky, maybe not possible, and not worth the bother. It is much simpler to use brass, which is also cheaper than 300 lb blotter paper, or at least the paper I bought.
It worked until an area got too dark, presumably absorbing more of the laser light and reflecting less, until as they say when launching rockets at the Cape, “We have ignition!”
Neil A
Neil…Thanks for experimenting. Best I can tell, you are going before us. All that I currently know to be true is based on research. I prefer to find out first hand what is true, but I don’t currently have the opportunity. In my mind, I would love to be using my 60 watt JPT MOPA fiber laser to create 3D pieces via Lightburn or EZCad. In reality, this isn’t going to happen for a long time if ever. I like the idea of adding a laser to my shop, but it has to be for a practical reason that makes what I already do easier and more efficient. Once I get to this milestone, I might look for more creative ways to use a laser. Thanks…Rob
Rob, so far, if given the choice between a laser or a CNC mill I’d go with CNC mill as being more capable (and less expensive). Part of that is due to what CAD software can do that Lightburn cannot, but there are more options with milling.
Vectric’s CAD software is very powerful. I was able to create this random pebbled texture, which Lightburn cannot do:
You can also mill carving wax very quickly and with almost flawless smoothness using a 0.3mm ball bur for a finish pass, if you want to cast.
You can cut seats with a setting bur as I did in this small test for 3mm stones:

Setting the stones to all flash together is another issue…but that was down to me, not the mill - the seats were uniform.
Lots of ways to have fun, do some useful things.
Neil A
Rob, you sold me on the laser so now I’m turning it back on you. ![]() This has real possibilities.
This has real possibilities.
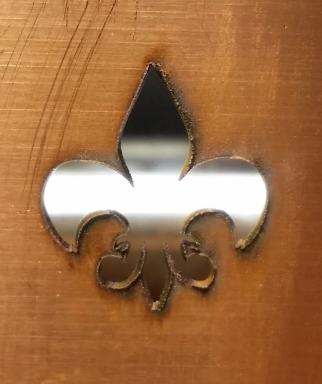
This is just copper. I have read that MOPA lasers can etch colors on stainless steel and titanium, had no idea it could do this on copper. Depending on the angle of view it looks black or silver.
It looks like the design is raised, but it is engraved. The size of the fleur de lys is just 8 mm tall and 7 mm wide.
My intention is to engrave this on each side of an Argentium signet ring with a green chrome diopside cab on top. Bright white would be nothing special on silver, but an iridescent green might be nice. It looks like my next tests will be engraving color on silver.
Neil A
Neil…I have read the same thing about MOPA and stainless. I am not surprised about titanium. I color niobium and titanium with a rectifier and have tried to weld both metals with my PUK. They weld, but they also change color too. How thick is the piece of copper and how many passes did it take to cut it out. The ability to cut out very precise shapes is another plus for fiber lasers. I don’t know if you need MOPA. There is a premium for MOPA lasers, but if you aren’t coloring stainless steel, I am not sure if it is necessary. This option is based solely on research and not experience, so let me know what you think. Thanks for keeping us posted on your laser journey…rob
Yeah they actually say in advertisements that its not going to engravecas deep as deep as a fiber, but it does go in a bit w jewelry and even deeper w the other 300 materials.
Its so easy to use! The app is easy to use and we have lpts of groups and help youtubes.
Yes, xtool were very honest anout what it could and couldnt do. I went w them becase it does great w so many other materials.
Thanks for shedding some light on the world of lasers. Is that from a fiber laser?
I have been exploring adding a laser engraver to my shop for the primary purpose of engraving the inside of rings. So silver and gold only for the most part. The engravings from my diamond tip are deep but limited in size and font/customization.
To answer some questions…
The copper was 26 ga. 0.4mm thick/thin.
The engraving was done at 100% power, 150 mm/sec, frequency 35 kHz, 20 passes. The cut was almost all the way through the copper. In this case 10 passes would likely have been fine.
I believe it is the changing of frequency that creates the color effect. I will explore that next, maybe this evening.
I was struck by how smooth the finish was.
Disclaimer, I don’t have a clue what I’m doing in Lightburn, I’m just trying things. I did purchase a file of settings from an etsy shop that imports many different material settings into the Lightburn Library, so the seller did all the trial & error, sparing me that!
One of the things I really like about the XTool is that the machine is fully shielded. Mine is not. The laser is fully exposed, so a reflection off silver, bouncing off who-knows-what in my shop can get me in the eye, and the light is way beyond the visible spectrum so it cannot be seen. I want to have an aluminum box (for light weight) made to enclose the laser while it is working, so I can do other things in my shop while the laser is doing a long job and not have to wear dark glasses.
Mine is a 60 watt JPT Fiber laser. The particular model is physically larger than I need, meaning the head can be cranked up very high (@ 20 inches) so the beam can cover large objects, while I almost exclusively work small, generally 2" or less. To that end I ordered a 70mm lens rather than using the 110 and 200 it came with, so the working distance is with the laser head is @ 4.5". The beam from the 70mm lens is also narrower and more powerful by not being spread wider.
ComMarker will be offering or has a new machine called the B6 that will auto focus. Given that it will then have powered movement over the Z axis, perhaps software will some day be able to make use of that the way a 3-axis CNC mill does.
A thing to be aware of, at least with Lightburn and also with the Z axis focusing, is that while I have 3 lenses, changing lenses also means changing imported settings in Lightburn (no big deal) but also that the red dots that converge as a focusing aid when raising / lowering the head for different material thicknesses will need to be physically adjusted with each lens change. That means setting the head to the proper height and then using a hex key to loosen, move the lights, then tighten them each time you change a lens. So either you stick with just one lens or use the provided steel ruler to set heights if you change lenses much.
The focusing lights on my machine are set for a 110mm lens so until I take the time to adjust the focusing lights I use the ruler.
I have the rotary holder for doing rings or bracelets, it works, but I haven’t used it yet.
I use CAD software by Vectric to do most of my designing. One can use other programs that have greater facility than Lightburn, some of which are free, and import files from them into Lightburn.
That’s about it.
Neil A
I’m sure Neil A has this figured out, but for the absolute beginners out there reading this post it’s important to note that an unshielded laser can be extremely dangerous. The laser light can bounce off of all kinds of shiny and reflective things. If the laser goes in someone’s eye they can suffer permanent eye damage or blindness in a millisecond. You not only have to protect yourself, but everyone in the room and everyone who might walk into the room. It could also theoretically start a fire or an explosion if the laser hit something like a torch’s rubber gas line. If you use an unshielded laser you must take all necessary safety precautions.
Thanks! Jeff
“One of the things I really like about the XTool is that the machine is fully shielded. Mine is not. The laser is fully exposed, so a reflection off silver, bouncing off who-knows-what in my shop can get me in the eye, and the light is way beyond the visible spectrum so it cannot be seen. I want to have an aluminum box (for light weight) made to enclose the laser while it is working, so I can do other things in my shop while the laser is doing a long job and not have to wear dark glasses.”
I have never used a laser for cutting or etching, but I’d like to add that whether a laser will do this or that depends not only on the power (watts) but also on the wavelength. MOPA lasers have power amplifiers (the PA in the name), so in this case the technology also makes a difference, but whether it’s a fiber laser or not doesn’ matter by itself. It’s the power output and the wavelength that make the right combination. Wavelengths longer than around 800-900 nm are infrared, so they put out pure heat, invisible to humans. Very effective but dangerous.
I have had a third ‘anomalous incident’ with my laser and have revised my practice accordingly. Others might want to consider doing the same, even with a fully shielded machine, unless the machine shuts down automatically if the shield is lifted or if a door is opened.
After finishing a test I used the Lightburn Preview tool to check what the runtime was, clicked OK and walked by the laser. It was doing another burn. I’m not sure how that happened. Possibly I double-clicked on OK and hit something under that when that dialog closed?
In any event, in all cases now, when a job is done I am going to hit the red Stop button to turn the machine off.
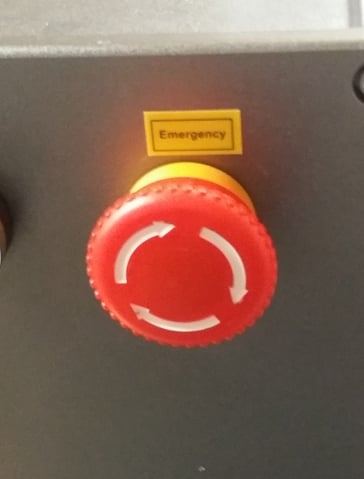
This would be especially important if I was going to stand in front of the machine to set up another job.
I’ve learned safety practices with a lot of different tools. There is not a lot of specific carry-over. The generalities are you need to know what can go wrong and how to avoid them, and lasers are in a class of their own in that regard.
Neil A
I took an advanced laser welding workshop at LaserStar headquarters once. At the end of the class, they gave us a factory tour. It was super interesting to see how the laser welders were made. They make welders for all sorts of industries. While most of their lasers are fully shielded some manufacturers need more space, so you can remove the shielding. At that point they recommend a fully light fast curtained work area, like is used in arc welding.
They said that one of the reasons that unshielded lasers can be so dangerous is that the unshielded lasers can bounce off of multiple shiny surfaces throughout a room, which can make the dangers be potentially unpredictable.
Again Neil A, I’m sure that you have your situation figured out. I mention unshielded laser safety issues for beginners who are following this thread.
Jeff