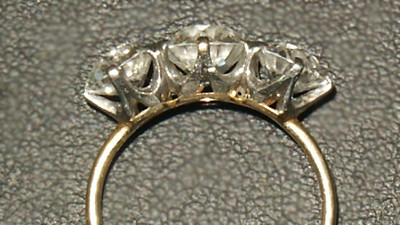
Does someone have first hand experience making one of these? Its the
type you’ll find on 3-stone rings (center is 6 prong, sides are 5
prong) from the early 20th century. where there are what essentially
are 4 common prongs that have the look of a Vprong ‘wedged’ between
the stones(hence ‘inverted’). Obviously the prong tip is stretched to
grab the two stones rather than compressed like on a pear shape. I’m
wondering what accommodation needs to be made for the metal to fully
stretch at its apex.
The worn out ring I have to duplicate survived the Titanic (well,
that’s what I’m told anyway) which makes it fun.
Thanks much
I have some experience with 3 stone rings, but your description is
not clear. Can you post a picture ?
Leonid Surpin
I have some experience with 3 stone rings, but your description is
not clear. Can you post a picture ?
Yup, here ya go fingers crossed that he did this right,
teckno-no-know that he is

you can see in the underbezel shot there is a common wall between
the settings. I’m thinking this helps facilitate the formation of the
V, which I guess is really a fishtail. But having never done a
fishtail, I dunno. The basic making of the settings I have figured
out but as I mentioned before its the folding over of the V that I’m
uncertain of. Should I treat that area as just a section of a bezel
and hammer it over the girdles?
I’m aiming for a faithful recreation.
Thanks, Leonid, for your input.
I think I can help.
Start with making 3 conical collets. Each of the stones must fit
inside with 1 mm of metal protruding above the girdle. The thickness
of the metal depends on stone size. I mm for 6mm stone is fine.
Take center collet and file flat areas on the side approximately
half of the thickness. The flats must be opposite each other. Side
collets only get these flats on one side only. Solder collets
together. The bottoms must form an arch fitting the shank. You can
file it precisely after soldering, just have extra height.
Important to keep collets aligned. The centerline of collets must
form a straight line.
Next is under-bezel, which is metal strip fitting the bottom of the
head ( three collets soldered).
In the picture it is made of yellow gold.
Take triangular file and file notches in the bottom of each collet.
You also have to remove metal from between the collets on the
bottom. This is done with jeweller’s saw. On the picture each collet
has 4 notches. 2 aligned with the shank, and 2 perpendicular to the
shank. If we look at the first picture, we see 5 notches total. 2
formed between collets, and 3 notches in the center of each collet.
Notches should as deep as 1/3 of the height of the collet (
personally I like a bit higher ). File channels with triangular file
running from the top of the notch to the top of the collet. 1/2
thickness of metal. You should have now what you call inverted "V"
only with inside still filled with metal.
Give them good shape and pre-polish ( only areas inside notches ).
Solder head ( 3 collets ) to the under-bezel at this point and
solder in the shank. This would give you means to hold the whole
thing
for the next step.
Holding ring in the ring clamp, cut out metal from inside the
"inverted V" with jeweller saw. You must make sure the prongs
resulting from this are strong. Take you time with this.
After sawing is done, smooth it with files and you should have it.
When setting stones, the areas between settings is split with fine
jeweller saw ( #8/0 ) and turn prong over like usual.
Leonid Surpin.
I forgot to mention in the first post that, while cutting out metal
inside “inverted V” the saw must held 45 degrees to avoid cutting
the opposite side of the collet. This also give slanted surface which
when polished becomes a reflector which direct light towards the
pavilion of the stone.
Very important feature of this setting.
Leonid Surpin
