Good Ingot Casting Instructions?

I’ve had THE worst luck casting ingots! Use a good oxy/propane melting tip. Get the mold super hot and got good at the quick one motion pour but always had some slight fold like appearance that always cracks when rolled out…. Use a two piece Durston mold, sizes from say 3/4” wide to 1 1/2” wide. Tried soot and old motor oil to coat. Tried the rounds for thick wire….

Used clean no solder scrap. I think I even experimented with some virgin sheet (back when silver was ~$10oz) just to make sure contaminated silver wasn’t the issue……Same problem. Used different ingot molds too!

Used Revere’s book as a reference. Used a variety of flux, even that Auropuriflux stuff and never got one good ingot that didn’t crack.

May as well try one more time before I sell off my scrap.

Thanks!

1 Like

Can you describe what is wrong with your ingots. They can look pretty ugly before you work them into a shape that meets your needs. Once I have an ingot, I grind/sand off the flashing and then try to soak out any flux that might have embedded itself in the ingot. For me, the best way to remove flux is to put the ingot into a small pan with the ingot covered with pickle. I heat the pan, pickle and ingot until the pickle boils and the flux get dissolved. Then I forge the ingot from one end to the other with a chisel type forging hammer. Go in the same direction on all sides. Anneal, pickle and then start rolling, forging or whatever it takes to get to the shape that you want. Anneal often and roll or forge in the same direction between annealing steps regardless of what side of the ingot that you are working on. If you get splits in the sides, gas bubbles or areas that look like something is embedded in the ingot, you can cut them out with a drill or a saw. I usually leave the bubbles as they tend to disappear or I can work around them. I generally grind, sand and pe-polish the finished ingot because it is easier to remove any firescale at this stage than it is when the ingot has been cut down and part of a piece of jewelry. There is a lot going on here. It sounds like you are doing most of the right things, you just have to trust the process. Good luck…Rob

4 Likes

A very small amount of borax and maybe a warm mold. Coat the ingot mold with a bit of red sprue wax. That’s all I’ve ever needed to get well formed and shiny ingots. I rolled a lot of stock and pulled miles of wire back in the day.

3 Likes

I think that a hot mold, if it is made from steel is real important, especially for a small pour that doesn’t have a lot of its own heat. You want to keep the metal from solidifying too soon. I pour a little 3 in 1 oil into the mold and then make sure that it is well coated. Then I burn it off to create a soot layer. As jraymond1 suggested, there are lots of ways to create this soot layer. I just gently heat any charcoal or graphite mold. Also as jraymond suggested, add a touch of borax once the metal melts and then a stir with a graphite rod to mix it well and look for any pieces that don’t belong there. I found a clasp spring once this way. Lots of fun. I am looking outside at about 2 feet of snow that has to be moved before we can go anywhere. This has been a winter so far, at least here in Central NY. Happy New Year!…Rob

5 Likes

Be sure and check out the forum search function. This is a common topic that goes back for many years. There’s many posts and lots of information. Turning recycled silver and gold into usable stock is harder than it sounds. There’s zillions of variables.

I’ve found that problems with turning ingots into usable stock often arises from not doing enough anneal, forge, anneal, pickle courses before ever touching your rolling mill. It’s really important to strengthen the metal before rolling. A lot of folks say that you need to do a series of anneal, forge, anneal, pickle courses to reduce the metal 20% in thickness before touching the rolling mill. I’ve found that means at least 5-8 anneal, forge, anneal, pickle, courses before rolling. Being very patient and gently forging for the first 2-3 courses and adding more force after that works best for me.

Know you’re not alone in having troubles with this!!

Jeff

5 Likes

Thanks! Yeah…I probably run out of patience in the forming department!

I’ll give it one more try before I just recycle my scrap.

1 Like

I just reread your original post and the comment “had some fold like appearance” caught my eye. If you have any flashing or little pointy places on your ingot, and you forge or roll them into the ingot, they will reappear at some time later in the process as a sliver or small crack. Be sure to sand or fine file the ingot after it is poured to remove any of these areas that might fold over when processing the ingot. I use a 220 grit belt wet on a lapidary expansion wheel. Don’t give up, just find your way. Happy New Year!…Rob

5 Likes

Sigh. Not what I was hoping to hear.

Some ingot casting tips would be appreciated as it has never seemed worth my time to make my own sheet before (O.K. I also can’t pour into those narrow stand-up molds) and I’d like to avoid trial & ERROR and wasting scrap.

I have a lot of clean scrap and do not want to pay near $100/OzT for Argentium sheet, so just bought 2 open, rectangular cast iron molds that I can pour into without missing (one hopes).

I will be pouring from an electric furnace crucible.

One mold is quite large for when I want a wide, large piece of sheet. The inside base measures 5.5 inches by 2.25 inches and it weighs over 5 lbs. So,

Question 1, is an oxy-propane Meco with a large (MA-2) tip but not a casting tip capable of heating that mold enough to be cast into?

The other mold I’m likely to use more is a lot smaller and has a rectangular bottom of @ 3 inches by 1 inch and weighs just over a pound so I’m sure that can be heated enough.

Question 2, how thick should an ingot start out if I want to end up with, for example, 18 ga (1mm) sheet? My thinking is that too thick an ingot would mean a lot more passes in the rolling mill, possibly leading to more irregularity / defects, but also a lot of boring, repetitive milling.

Wishing everyone on Orchid a healthy and productive 2026!

1 Like

Neil…I have missed my share of narrow ingot mold openings. You just collect it all and hope half of it didn’t roll under the bench. Clean it off and start over. I use my Meco casting tip to heat any of the molds that I use. I think that heating the mold is more important for a closed mold than an open mold as you are concerned that the pour stays liquid while it makes its way into a small opening. I don’t heat an open mold for very long. I do treat all metal molds with a bit of 3 in 1 oil that gets burned off and changed to soot (whatever that is). You can also do this by waving just a propane flame along the mold surfaces or even a candle flame. I am not entirely sure what the soot does. Add a little borax to the melt and stir it with a graphite rod. Heat until it is liquid and shimmers (there’s a technical term). Pour fast and off you go. Depending on how deep your open molds are, you might try slapping a flat piece of hard charcoal on top of the pour before it solidifies. This evens out the ingot. This works for me when I am melting scrap in a depression in a piece of hard charcoal, but I am not sure the the melt would stay liquid long enough in an open metal mold to do it. Yes, this activity does take time, especially the forging and rolling. When silver was $5/punce I didn’t bother. At $80, I save every piece of scrap and reuse it. Jeff made the point that you have to anneal and forge several times. This prepares the metal crystal structure to survive being rolled. Once rolling, I anneal a lot more often than the 50% reduction in thickness guidance that you read in books. I basically go by how it feels going through the mill, usually once per mm of reduction. My ingots typically start out around 4-5mm thick because that is the thickness of the mold. Reducing down to 18 gauge is a pretty easy run. Keep me posted on your progress and Happy New Year!…Rob

2 Likes

Thanks Rob, that’s something I never of heard before.

These are deep molds probably intended for casting bullion bricks. I may rig up a test tube clamp to hold the Meco flame over the mold, pour through a reducing flame and then cover it as you suggest.

Regards,
Neil

2 Likes

One thing that helps me with the ingot pouring process is to practice by going through the motions repeatedly with no metal involved and all the parts being cold. With an electromelt furnace, that means setting up my ingot mold and furnace exactly where they’re going to be. Then opening the furnace, pulling out the crucible with the tongs and then do pretend pours. If I’m using gloves and safety glasses when pouring then I’ll have those on when practicing. I’ll do an entire pretend pour at least 10 times from start to finish. I’ll practice as many times as I feel is necessary. My goal is build up my muscle memory, so when it’s time to do the real pour, my hands and brain intuitively know what to do. I’ll do the same practicing process if I’m using a torch, crucible and ingot mold.

I don’t cast ingots every day, so practicing before helps me get the metal into the mold more efficiently.

Jeff

1 Like

Yes, practice is good with an electric furnace to work things out as well as for muscle memory. One time I tried pouring into a large vacuum casting crucible quickly and in haste didn’t raise the graphite crucible out of the furnace enough. The bottom brushed it against the top of the furnace, tipped, and almost spilled the melt.

Since I have to raise the crucible a bit over 4 inches before I can pour, I now keep the furnace lower than my target so there is no up and then down. With the top of the target crucible around 5 inches higher than the furnace it is all lift and pour, not lift, lower and pour. At least with my furnace the melt loses heat and starts to solidify very quickly, so a fast pour is necessary.

It is probably easier to use a torch to melt so you can keep the flame on the melt as you pour and you do not need to be as quick.

That and a lot of practice would probably still not help my aim with those tall, skinny clamp-together molds. To use a Clint Eastwood line: “A man’s got to know his limits.” :face_with_diagonal_mouth:

1 Like

Neil…I doubt that the Meco will melt what you need melted to fill that big a mold. It may get the mold warm, but not hot. You need a bigger torch. Have you seen the way induction furnaces work. I have a blacksmith friend who bought one and he said that it completely changed his work flow. He no longer has to wait for the piece he is working on to heat up in a propane furnace. Keep us posted…Rob

Rob, things went fairly well so far.

I did a trial melt of 200 grams of Argentium scrap in an electric furnace. The pour went well enough but you are right that the cast iron molds need a lot of heating. I have a clamp on order to hold my torch on the mold for an extended time, and maybe I will embed the large one in rock wool for some insulation. I had coordination issues trying to heat the mold with the Meco while dealing with the melt. Having a third hand to hold the torch would be nice.

With even the small mold not being really hot, the pour solidified quickly rather than spread out. I have an ingot that is shaped more like a Hot Wheels car (Camaro? No, Firebird.) low in the trunk and hood and higher in the center, rather than an even rectangular brick.

Otherwise, this ingot has a nice smooth, shape. There are just a few tiny pits and some roughness on the bottom. Does the silver need to be sanded down until the pits are removed?

I will start forging and rolling tomorrow.

As to induction furnaces, that sounds $$$ for just occasional use, and there would still be a pour into the mold, right? I wonder if there are induction hot plates that could heat the cast iron mold and maybe the metal it it as well. Or just the mold.

I wouldn’t be against having a larger torch but wouldn’t that require a fuel supply larger than the 2 lb. camping propane canisters?

After a long spell of doing other things it was nice to be doing metal work again.

1 Like

Neil…If you have a kiln, put the mold into it until you are ready to pour. Then you will need even more hands. An important step prior to rolling or drawing is to remove all the sharp edges and any flashing. Then you should forge the ingot. This changes the crystal structure and makes the metal more conducive to drawing or rolling. This may be a challenge for a 200 gram ingot. I just did a 40 gram pour today the same way that I always have. Following is a description of my process.

Make sure that you have a fire extinguisher and smoke alarm nearby and open a window or start an exhaust fan.

Check the scrap for magnetic material that doesn’t belong there. Put it into a container that you can seal and shake it with a small magnet.

Do a visual for anything non-magnetic that doesn’t belong there.

Set up you flame proof area and collect all the tools and materials that you might need during the process so that they are nearby. This should include as pair of tweezers or some kind of metal probe in case you need them.

Open your mold and oil the surfaces that might be in contact with the melted metal.

Burn off the oil until it smokes. Be sure that any surface that has condensation on it dries off. You don’t want melted metal and water vapor together in an enclosed space.

Assemble the mold if it needs to be.

Check you crucible to make sure that it doesn’t have anything in it that shouldn’t be there.

Put the crucible and mold next to each other and heat them together.

Once the crucible is heated a bit, add the scrap a little at a time.

Sprinkle in some Borax

Once the metal melts, stir it with a graphite rod to mix it well and collect whatever will stick to the rod. I have thought that everything was melted only to find a piece of fine silver that hadn’t reached the melting point for fine silver. So take you time and stir until everything is melted and mixed.

Go back to the mold and heat it, then back to the crucible.

Now the hard part. Point the flame at the melt, but also the path in the crucible that it will follow to get to the mold. Keep moving the flame back and forth and when you are ready, do your pour.

Real important - have a couple old cooking mitts handy to open the mold if you have to touch anything that was heated during this process. I learned that from experience.

Open the mold if it is closed.

Remove the ingot and put it on your anvil for a while before you quench.

Grind/sand off any flashing or raised bits.

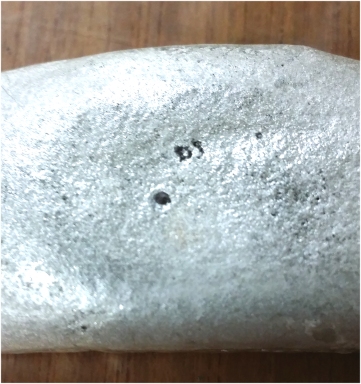
I am not sure about the pits. As long as they aren’t sharp, leave them. My only concenrn is that they may be big enough to roll over and create a bur later in the process. I have never had pits like you describe and I worry that there may have been foreign material in the bottom of the mold or it was slightly damp.

Forge the ingot from one end to the other on all sides moving in the same direction on each side.

Anneal, quench and dry.

Repeat the forge, anneal, quench dry process a couple times. You are changing the crystal structure prior to rolling or drawing.

Start your roll (either flat or square to eventually be drawn into wire)

I usually anneal, quench, dry after each mm of reduction. That’s one turn on my mill.

When you get to where you want to go, anneal, quench, dry and then mark the stock with its thickness or gauge and what type of metal it is. Sterling and fine can look a lot alike.

If I have made sheet and I know that it isn’t going to be reduced anymore, I will often sand it to remove firescale and prepolish the piece of sheet. It’s a lot easier to do this to one big sheet than a bunch of little pieces that you have spent time cutting, sawing, forging or whatever only to change the shape to remove firescale.

I am sure that I have missed a step or two, but this is pretty much how I recycle scrap.

Good luck…Rob

1 Like

Rob, these are the pits I mentioned. The largest is just over 1mm across. Other than these, there are no other pits, no sharp edges at all, and no flashing, probably because the mold has rounded edges at the bottom.

In the event there’s some grime in those pits I’ll drill them out to clean metal first.

For scale, that piece is just 24mm top to bottom at the widest as seen in that picture. The ingot is small, like a Hot Wheels toy car.

Hi,

perhaps you are not getting the melt quite hot enough?

are you keeping the heat on the melt and mold while you are pouring?

perhaps you are not pouring swiftly smoothly enough? hesitating mid-pour

the “fold” effect seems like the metal surface is cooling before “the rest of the metal” hits it…?

julie

Hi Neil,

also…remember, the forging, and rolling down, an subsequent annealing…is beneficial to the metal structure after casting an ingot…

julie

Hi again Neil,

also, i am thinking…it is probably more about how many ounces you can successfully and efficiently melt, with the oxy/ propane torch…and then based on that, what size mold you use…?

i have melted up to 4oz ingots…but with my presolite oxy- air torch…and it it can take A LOTof time…

i would say 2-2.5 oz would be more manageable…with a smaller flamed oxy/propane torch…?

i suggest don’t make the ingot/ sheet too much bigger than you “need”…bigger can have more unneccessary issues…

julie

Hi Neil

..,i am gonna try to explain the pits in non technical. layman’s terms…because i cannot recall the specifics…they are in the brehpohl book…and i am too lazy to get up and look right now…i kinda know this because i suffered for 3 years trying to get answers and solutions…regarding purchased! milled! sheet!…

and then i bought and read the brehpohl book, and it was explained clearing…(while all my suppliers “never heard of this issue before”…)

anyway…there is cupric(?) and cuprous(?) oxides moving around in the melt…

they create surface and sub-surface inclusions…

some are uncovered…appear… after you spend much time finishing a surface…as you are removing surface it reveals what is beneath the surface

some have migrated to the surface…in the form of pits…think gas bubble that bursts…think of a desert floor…sand…now dig a hole in the sand and make a brick lined well…now sweep the sand with a broom…the sand sweeps away…the brick lining does not, as it is “harder” than the sand…which is why the pits are tenacious and hard to sand down/ away…

some are not pits, but rather raised, sandlike crystals…also harder than the surrounding silver…which create buffing “tails/ trails” undercutting…

with pits and inclusions…you can often “feel” them when trying to file them…weirdly hard like tool steel…

then…i was told that in sheet production, the ingots used to be “planed” first, before rolling, to remove the top layer where oxides migrate to…but that the planing stage was eliminated after the advent of using an oxygen reduced atmosphere during production…which is supposed to eliminate the oxides migrating…

but…my experience begs to differ…they are not eliminated…bring back planing…

the subsurface inclusions are unpredictable…

being unable to eliminate them completely, my solution was dealing with the pitting after the fact…is: hand or rotary burnishing.. filling in with a laser/ welder…solder…sanding/ filing down…or starting with thicker sheet (assuming that the inclusions migrated to just under the surface)…

julie