Hi,
I do a lot of shows and want to be accepted to the next tier which would be ACC and shows like that. I also am on !stdibs and have a website. I’ve been taking my own photos. It takes me a long time to take them and then edit them. My lighting never seems to be just right.
I got an estimate from a Bay Area jewelry photographer and if I have photos taken of just the pieces I have now it’ll cost over $5600.
I’m thinking of buying the Gemlight Box Pro.
Anybody have any experiences they can share with me?
Would it be worth my money?
Thanks,
Lynn
LynnKDesigns.com
Hi,
i have heard that jewelry photography is among the most challenging…shiny objects…transoarent colored stones…translucent stones…emphasizing edges…communicating rounded surfaces…glossy surfaces…
i learned of a photographer in youtube…he has since moved in to his own website with online photography tutorials…some free…others not…he has jewelry photography capsules
he emphasized “lighting”…
he talks about cameras, lenses, etc
do you have a macro lens…?
also, being farther away from the objects can help eliminate shadows and reflections of the camera…
with all my photography equipment, i can also say that my iphone takes great pictures…![]()
check out his older youtube videos, and if you like what you see, perhaps invest in some videos from his website…
also, i found these two books helpful
a very visual book:
a more textbook type book:
with all that said, when using a white lightbox, the shiny objects will reflect the white fabric…and it sort of softens/ flattens everything…
think of a car hood reflecting the sky on a clear day where everything can be seen sharply…and then on a cloudy day…the cloudy sky is like one big white diffuser…with the sun as the light source
a tricky photigy uses is to wave a small flashlight around and see where and how the light hits the object to help determine where to position your lights…or wave the flashlight on the diffusers to see how that is reflected
the object is like a mirror reflecting its surroundings
you are not lighting the object per se
oh…Vadim Chiline is another great product photography on youtube…EpicMind Studio
he has courses on Photigy too
julie
1 Like
Hi,
i was also thinking that professional jewelry photos have gone thru post production editing…the shots werent captured on the camera that way…
julie
Hi,
and something else i realized while exploring photography…i just thought about…in addition to learning “how” to get the photo shot…one needs to learn “what” you want to get in the shot…what you want to emphasize, etc…and then think about the technique you should use, to get it…if that makes sense…
like if the object has graceful curves…how do you capture that depth…if the object has crisp edges…how do you show that…if the object is glossy or matte brushed…how do you capture that…
if that makes sense
may i ask?…how many objects does $5600 cover?…perhaps you could edit down the objects? how many do you need for the applications?
photography and post production editing is an art form and skill…expensive equipment and post production software…learned expertise…
julie
I’m thinking of buying the Gemlight Box Pro.
Before you buy, ask if there is a single light source or if there are multiple lights, are they covered with semi-translucent glass / plastic for diffuse lighting. If there is a strip of many bare LEDs then you are going to get multiple hot-spots / specular highlights all over the jewelry which can be very distracting / undesirable for silver and gold.
In addition, find out the color temperature of the lighting, and if LED, if the LightBox is returnable if it doesn’t work out for you.
I bought a fairly expensive and very well made box from Gesswein, but it had a dozen or so bare LEDs in a strip which might be fine for photographing wood but was awful for jewelry, and in addition the light was purplish. It was nearly impossible to correct the color in the photos, and not worth the time it took.
Neil A
2 Likes
Hi,
another thing…with diffusion material or papers…when the light source is behind them, you dont want to see the light as a sharp hot spot…or that hot spot could be reflected on the object…rather you just want the panel lit up…
julie
Neil A,
I don’t know if this is the Gesswein light box that you’re talking about, but we bought this last year, because in our new studio we needed a compact jewelry photo set up.
I love it. It has lots of lighting zones to customize. It took a while to figure it out, but now that I’ve got it dialed in, like I said, I love it.
Two things that have been helpful. I created my own floor and fixtures with clear plexiglass that I frosted with a random orbital sander. I’m able to make these fixtures disappear in photo editing, so the object is floating in space. The other thing is that sometimes I’ll cut a hole in printer paper the size of my camera lens and tape it to the front opening to diminish exterior reflextions.
My guess is there’s better light boxes out there, but for the price, I think this is a good one. We bought the large Gesswein light box, but there’s different sizes and prices.
I do have to tweak every image with photo editing, but I’ve always had to do that with every jewelry photo set up.
Jeff
If you look at the Shop Shots page of my website
you will see my photography set up. 4-5700 K bulbs on a home built rack, camera mounts made from 1/4-20 nuts, and dome made out of translucent mylar. This works for the type of pictures I need for my website. The most expensive piece, other than the camera, is the bulbs. Learn how to use the various settings on your camera, especially white balance, f stops for depth of field and a macro setting or lens if you have one. I just bought a Pixel 8 Pro. It takes pictures almost as good as my SONY a6000 with a lot less setup. Good luck…Rob
1 Like
Jeff, the box I bought might be that or similar (possibly an earlier incarnation). Mine is a medium, which is not ideal for setting up pieces in it with large (read ‘clumsy’) hands.
As to tweaking the image, if you are getting the results you want that’s great. I found dealing with the purple cast of the LEDs’ “white” light to be a royal pain, and was never satisfied wth the results. I believe the LEDs in my model are not full spectrum to start with, and if it isn’t in the light source it’s not going to be in the photo. I have read that “white” LEDs do not generate full-spectrum light but can’t verify that.
I have been a dedicated amateur photographer since 1970, with a stint of doing professional portrait and commercial photography. So maybe I’m old school. I have a 4x5 color enlarger, a Mamiya RB-67 and a full set of lenses, camera backs, (including Polaroid), extensions, etc. and it breaks my heart that all of it is now essentially useless. That’s another issue…
What I have reverted to using for my jewelry photography, because I have the equipment, are a 1,000 watt and a 500 watt quartz halogen studio lights. What that gets me (along with a sunburn on my hands when adjusting the jewelry) is the ability to stop down my Nikon D3500 macro lens (they call it ‘micro’) to f-25 for maximum depth of focus. The lighting in the Gesswein light box was way too weak to allow that.
The Nikon white light balance is set for ‘tungsten’ and I get true color, with all portions of the spectrum, without having to do the least bit of tweaking in a photo editor.
If I didn’t have the equipment that I do, I’d make a setup like Rob’s. If one does not have the space to dedicate for photography then a light box might be the best remaining option, but the light source(s) in the box matter a lot.
All of this may be moot if one has access to Photoshop with AI, and / or one of the AI programs. I have seen many, many photos on JCKOnline and other online sources where the photography was either way too good to be believable or quite clearly a computer rendering. Perhaps one can now take a mediocre shot and turn it into something stunning just with software.
Anyway, the original poster asked about using a specific light box and the points I wanted to make were to be informed before spending serious money, and being able to return the box if the results did not satisfy. I wish I had saved the box the Gesswein came in because they’d have had it back, and it wouldn’t be a waste of money sitting in storage here.
Neil A
Hi,
another thought i just had…contemplate what type of photos you would like…ie: some people say white backbround is best for online product photography…which is what the light box seems to deliver…or, you might want more dramatic photographs…?
one of my favorite jewelry books, is “The Splendor of Ethic Jewelry”…the photography is diverse and yet all of one eye…amazing in my humble opinion…i aspire!!
light grounds, dark grounds, gradients…the photography makes simple bone, fiber cord, metals, wood…all look amazing!
julie
That may not work very well with silver, white gold, white stones, because edges can be lost in the background.
I tend to use a lighter-to-middle gray for neutrality and so the item stands out from the background. Black works too. Gradients are nice.
Other colors, textures etc. are fine as a matter of artistic judgement, personal style, especially if it is a one-off image. For a whole website I’m more inclined toward uniformity of background, but again tastes differ.
I think color accuracy is most important for web sales, which is why I like gray. If the gray is neutral then the colors are rendered well.
Neil A
Hi Neil,
i too prefer other than white…interesting that some say that though (even for jewelry)…i am not sure what analytics back that up…
julie
I have photographed my jewelry extensively for years and have decided that a dark to black background, possibly with some texture, works for me. My website is black and white by design. As a result, most of my photographs are black. Those that are not are just waiting until I can take them with a black background. …Rob
Nice, Rob! There is a place in this world for easy and quick for somewhat more money and then there is also a place for innovative solutions which may take some thought and some time and maybe even a lot of research that are cheaper. Your rig is nice and I guess cost less than a purpose-built, manufactured light box.
Many years ago, during the film era, I was a photography buff and I still have medium and large format cameras and developing equipment. I even have an enlarger that I may or may not use again in storage. I studied portrait and macro photography and lighting assiduously for a while. One day I was at my in-laws house in the country with time to kill, I had my camera and tripod and was attracted to some antique silverware…a wonderfully shaped seafood fork or some such and a couple of other odd pieces. I didn’t have a light tent of any sort. I had a lamp on a side table in front of a 36 inch wide, tall sash window. It was cloudy outside and I found that by moving the silverware around a lot I was able to arrive at a pleasing composition with pleasing reflections. I thought it looked as good as anything in a light tent. So there’s more than one way to skin a cat. I’ve also used rolled up computer paper to make a cone and put the camera lens at the point of the cone and used a cigarette pack flash on a cord outside that cone. When I needed some specular reflections in addition to the soft “light tent” light, I cut a hole in the cone and placed the flash near the hole so that it gave both the diffused light and a specular reflection.
So just saying that there are ways to photograph jewelry without a light box or tent and ways to make a light tent that works for some purposes fairly cheaply. But there are times when you need a quick and easy way to photograph and the commercially sold light boxes work well for that, esp. if you are not a photography wonk. -royjohn
I never wanted another obsession as I already was afflicted with too many, but when I started taking my own pictures I quickly acquired another one. I too started back in the days of film. I started with fairly inexpensive cameras. Then I paid others to take my pictures as I couldn’t afford the SLR that I really needed. The pictures were crap in addition to being expensive. I got along as this was also pre-internet, so I didn’t need pictures for a website. Digital cameras came along and I was finally able to feed this obsession and did so moving through higher and higher pixel cameras until multi lens DSLRs came along. This was also about the time that I put up my first website. Photographing silver jewelry, especially without a stone or some kind of color is a real chore. I have my system down to something that is repeatable with results that meet my needs. They are not artwork, just fair digital renderings of my work. I have found that when I take pictures of a new piece and then look at it on the computer screen, I often see problems that I could never see when looking at the real thing with my unassisted eye. This usually sends me back to the shop to fix whatever I saw. I do like photography and take lots of pictures. Whenever our grand daughter Sophie comes home from college, she will sit down and look at whatever I have taken since she was last home. She was born in Hong Kong and lived her first six years in Cambodia where her mother is from. Sophie will go back and look at old pictures to remind herself of these times and look at any new pictures of her Cambodian family that we have been able to add to our collection. If you make jewelry, learn how to take photographs of it. Keep the pictures clean. I like a black or dark background, but have a whole series of my work with a white background too. Since my website has a black and white theme to it, black backgrounds work for me. One of my challenges was to figure out how to elevate a cuff bracelet so that the edges don’t get lost in the background. At the same time, I didn’t want what elevated the bracelet to be visible in the picture. I do this with a nail sticking straight up from the base to a height that holds the bracelet in such a way that, when photographed straight down, you don’t see the nail. Lots of fun…Rob
1 Like
I have 40 items.
this woud include straight on and 3/4 views.
I want pictures of all my items because I also sell on 1stdibs.
Julie,
Thanks for all this wonderful information.
Lynn
The 1st year of photo editing is free when you buy the product.
My dad is also very good at adjusting images so editing photos is covered
1 Like
Good thoughts. Thanks
I have been photographing my work for 50+ years. starting out with an SLR, moving to a Canon Sureshot thing. Now I am using a recent model of iPhone. I use a light box ( lights on right and left and above) with a gradated ( white to gray) matte, piece of vinyl that I had a sign maker printfor me that fits in the box and is long enough to cover the level surface and the back of the box. And I can switch it around so the light area is on the table or the dark is on the table. I have a transparent matte piece of plexiglas that I mount on various risers on the table surface if I want to have the piece floating. I find that while the pix are not equal to gorgeous pro ones, they serve very well. If you are interested in using an iPhone camera, go to Craftcast and find the 2 programs that Pam East has put together to show how she gets great shots. While I haven’t done it yet, she also reccomments the Photo Room App for quick tweaking, like in the blink of an eye, removing the entire background of you photo or adding artistic shadows. I have played with the free trial PR app and it is really cool. I will attach a couple of pix that I used the above method to produce:
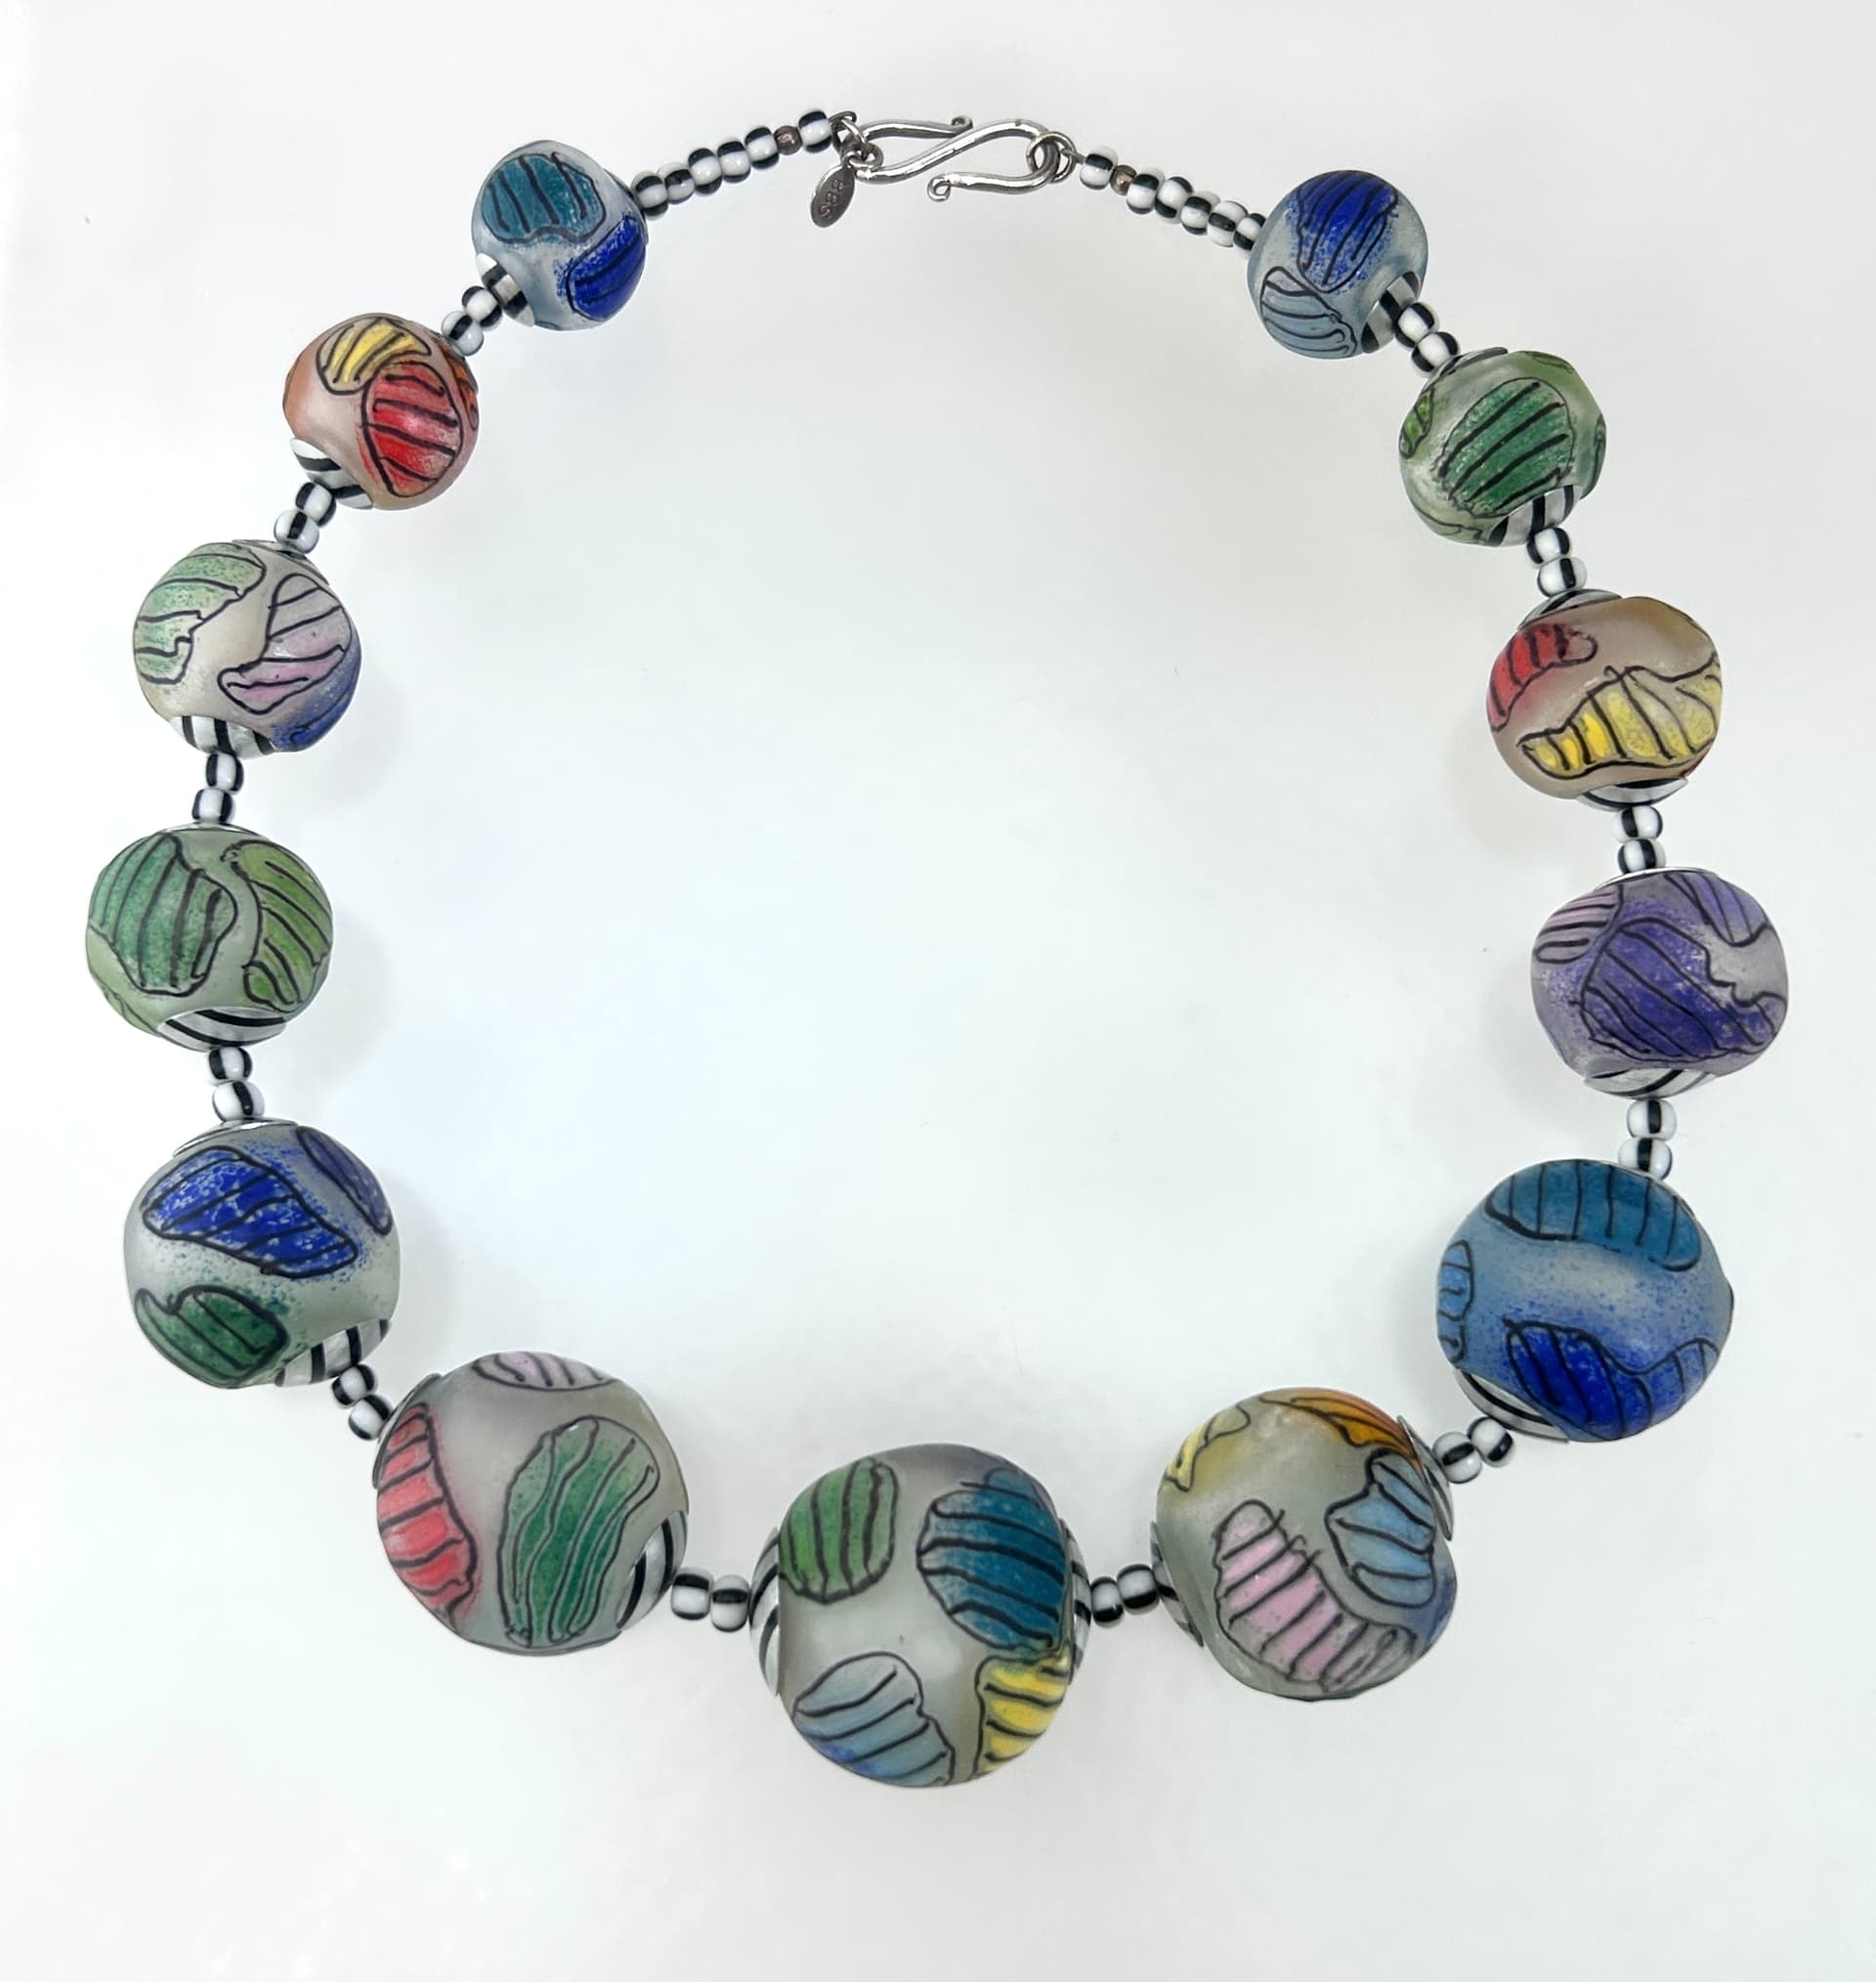
1 Like