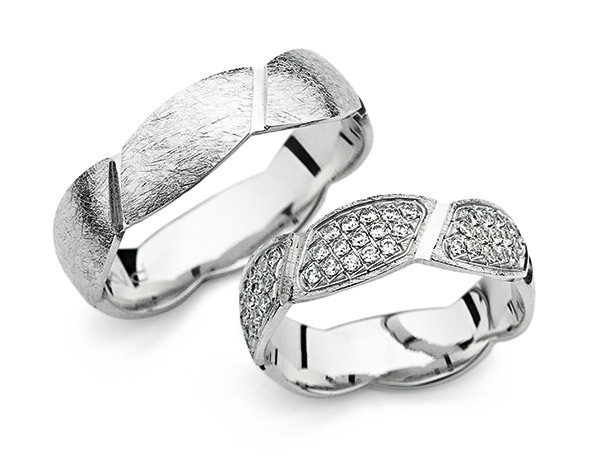
Hello everyone and all the best wishes in the new year. Can anyone tell me how to obtain a decorative surface as shown below?(male ring)
kinda looks like a scratch brush or an 80 grit sanding drum worked from different directions
Is the surface that appears scratched raised or incised into the surface (or both)?
A scratch brush is a tight pattern, incising the surface, 80 grit or similar, again incises the surface, both tend to be a tighter pattern than the one shown and more directional, like crosshatching.
If it’s raised, then the pattern could readily be machined in in cad & cast.
It could all be die struck (the original maker’s piece) if they’re done in sufficient volume.
Makes it hard to replicate as a one off.
I’m interested to see what responses this brings, great question.
Thanks,
Jim
My other thought was that you can do something similar scratched into the surface of a wax pattern.
I think I’d start with one of these small texturing wheels. That would get you a similar base if you change directions.
http://www.ottofrei.com/Store/Texturing-Wheels/
Then go over the whole thing with a narrow, high polished, round graver until you’re happy.
http://www.ottofrei.com/Store/Glardon-Vallorbe-and-EC-Mueller-Gravers/Glardon-Vallorbe-LO0402-HSS-Round-Gravers-High-Speed-Steel.html
You’d need to repolish the grooves afterward using narrow abrasive wheels, finishing with a silicone high polish wheel, then polish the whole thing.
That’d be my Plan A anyway.
Mark
PS Doing some of it in wax or resin with a rounded tool or round graver (if wax) first is a good plan too. It just looks like a pretty shallow finish, so don’t cut too deep.
@WADEDESIGNS1
It makes sense to texture before engraving, but does having a surface texture help to keep the graver from slipping?
Hi Jim,
your right on the mark, with your comment could be die struck,
Withing the limitations of the photo, the ring has 3 textured panels and 3 with stones set therein.
The textured panels look ? as tho the lines are not incised, but raised, with the lower background polished.
then the 3 panels with stones are too regular for hand engraving the depressions.
Both of these surfaces are so easy to make IF there die struck from master designs either with the manual 3d die sinking machines like the Dekel, or the latest comp controlled CNC die sinking mills.
As many here may know, I now do most of my work with die striking and know the die making process and makers intimately, having many dies made to my specific specs.
The ring strip will be stamped/ die struck flat, then formed round . ring sizing being done in the blank places between the panels also with a 2 part die. Or, as you say Jim with sufficient volume then several sizes of die could be made.
Ted.
No it does not, unfortunately.
1 Like
Hi guys and tnx for advice. The same manufacturer has to offer same ring but without any decorative work .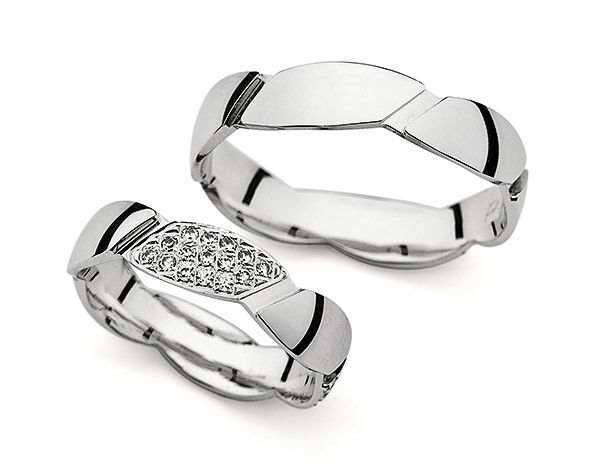
That is why I excluded the possibility of some wax pattern or stamping on ring strip.
IMO,this is some ‘‘brushing’’ work. Lines have no direction but have depth.
Anyway I will continue with research.Also I hope that this topic expand with other ideas on how to the decorate surface of the jewelry (mat,satin or similar…)
The pattern on the male ring appears to be similar to a cloth weave, pressed into the wax before casting, but on this tiny phone screen that is a bit of a guess.
A die struck or cast-in finish would be very easy to remove by the manufacturer through simple sanding and polishing, so the fact that they also sell the set with a high-polished finish doesn’t necessarily rule out the possibility that it is applied early in the manufacturing process and then removed. It looks die struck, tumbled and finally matted to me, but like everyone else, I can’t say for sure without seeing it live.
Another possibility is that it is applied by laser and then tumbled. It could also be milled in by CAD either before or after casting. People are doing some pretty amazing stuff with CAD and lasers these days. At any rate, it doesn’t look as though it’s applied by brushing or any type of scratching process to me. It consists of too many uniform and purposeful but random single lines, for lack of a better description.
I’ve created a similar pattern using acid and resist techniques, but that was long enough ago that I don’t have photos. There are many people contributing on Orchid that are far more qualified to offer advice concerning etching than I am, but if you’re after creating a single piece, acid etching might be an avenue worth considering.
Dave Phelps
Hi – although I’ve been subscribed for more than 10 years, this is the first time I’ve posted! I don’t have the same degree of technical expertise as many/most of you have, so don’t usually feel I have anything to add to discussions. However, on this thread, I’m curious. Wouldn’t it be possible to roller print the ring stock? I’ve gotten very similar surface patterns with a mill…
That’s exactly what I was thinking, Celia. That’s how I would do it if I needed to get that effect, anyway!
I’ve roll printed (rollling mill) a similar texture using inexpensive lace for this purpose.
Hi
That thought crossed my mind too, and would be valid if it were a flat surface. I see a compound curve in the top panels so that, while not ruling out the process, rules it out for this particular shape.
Still thinking…
Jim
Another thought…
Is it possible we’re looking at a Cad render here, notice there are no clean out holes for the diamonds. Not that we don’t see that in the market, (lack of detail and lousy to get really clean…) but just had me take a second glance.
Thanks, Jim
1 Like
The only monkey wrench I see with roll printing is that the ring has fairly complex compound domed shape, meaning that the print die would have to have the same or very similar concave shape and still retain the design. Not impossible, obviously, but a significant complication. Another wrench in the works is forming it into a band and soldering it. Polishing out any dents or flats created in the forming process would ruin the finish. Soldering it could also be a little tricky, unforgiving of error if nothing else. For a one-off, it would probably be easier to make the ring and apply the design than to make a print die. If a flat ring is OK then roll printing could be a really good option.
Dave
My last seems to be a duplication of Jim’s efforts ~
Dave
Hi Celia,
Roller printing would do it, but its easier and cheaper to make a minting die, and more accurate as well than a flat roller printing tool which would need to be at least 1in thick to avoid breaking.( lack of proper support). if a wheel it would be much more expensive to cut the design in the negative on the outside of a roll as die costs in any case run into hundreds to thousands of dollars. Then you would need a special mill to do this, whereas a minting die can be used in a no of different energy delivering machines to move the metal cold. take a conducted visual tour of any of your US mints to see whats involved in making simple things like coins.
Ted,
A die striker and minter,as well as an occasional bench as in brazing up components worker.
in Dorset
UK.