Closing a bezel around a gemstone

Hi

Yay! good to hear!
(I prefer Peter Keep videos…I think there was a way to sort by instructor…but I cannot figure out how now…)

Also, when reviewing video project offerings, keep in mind that although you may not like a particular project design, also consider what fabrication skills will be covered that you might like to learn anyway…if you have the skills then you can make anything you can imagine.

for example a multi swirl ring might not be your style, but the lesson is about multiple solder joints…or soldering a bunch of thin things to a really thick thing…there could be a bunch of great skills to be learned in it…

Julie

2 Likes

Helen, I am sure the earrings will look beautiful regardless. You must post a pic when finished. I am surprised to discover that even advanced silversmiths alter their design half-way through the process. I have to do that all the time as things just don’t turn out as I originally planned but thought that at some point I will get to a point where I would decide on a design and stick to it, but maybe that’s not realistic. BTW, so grateful for the advance to go to Machine Mart. Wow, the stuff I found in there, including a rotating vise (only £15 ) and a pair of eye protection glasses with lights on the side to direct towards your work. Great find! They also had a number of good blowtorches but when I enquired about them I was told they are not for ‘cooking’ but for serious stuff like soldering :):joy: I am guessing not many women go into that branch of Machine Mart :).

Mila

1 Like

Hi Julie,

You are so right -I think I will try to go through as many videos as I can -I want to learn everything. One thing frustrated me though -there was no list of the tools used, I just saw a list of the silver used. Like when the guy uses a file, I would like to know which type exactly so I can buy it, but that’s a minor thing :).

In one of the videos, the guy making a ring drills a hole all the way through the centre of both the bezel cup and the ring shank and puts through both a piece of silver wire and solders like that. Wow, that is a complex way of making a ring. I can see he does it -makes the ring virtually impossible to ever break but gosh, it’s making the process harder. I am guessing it will solve my issue of my rings never being centred properly as when the solder melts it all moves all over the place.

Mila

1 Like

Hi,
yes, I think the bezel ring peg trick is to keep the pieces in place while soldering…that is something I often struggle with…things moving!..holding things in place without too much pressure…

julie

2 Likes

In my earlier days of learning, many jewellers used to bind up the moving pieces with binding wire. Then when finished the soldering they’d just snap the wires off. Voila done!.:wink:

3 Likes

So glad you found some good stuff in Machine Mart Mila! How rude regarding the torches though!!! Reminds me of the time I went into a Honda dealership to buy a particular motorbike and the sales guy just kept ignoring me and speaking to my husband instead - until he said “it’s my wife who’s buying a motorbike, speak to her”. I walked out as he carried on. I bought the bike I wanted, a year old and from a different dealer. The guy lost what would have been a definite sale had he not been so sexist!

Regarding holding things still, I have had some success with binding wire, although I did find it very fiddly setting up a soldering job using the wire.

Helen

UK

2 Likes

I use American nickle coins to hold things in place, stacking or just butting up against pieces. Obviously, somewhat of a heat sink but works well to avoid stuff moving around. I guess other coins would work too.

2 Likes

I have had the most success holding the pieces with a potato but I have done basic stuff only. Can I just say, you think you’ve got soldering worked out one day, the next day you sit down to do something and suddenly nothing’s flowing right. What’s that all about? :grinning:

Mila

1 Like

Wow, you ride motorbikes :raised_hands:. My husband has one and I am too much of a chicken to get on the back. You rock Helen!

Mila

1 Like

Hi Rob,

Apologies to ask more questions but I thought your lapidary knowledge could hold the secret to my question. I finished a ring today and I did marginally better. However, in the process of polishing with emery paper I scratched the stone, which is a particularly beautiful turquoise. It maybe that I can’t do anything to repair that but I though that you may have an idea what I could do. It’s such a silly thing to do and I am so angry at myself.

Many thanks in advance

Mila

I had the very same experience, but with a very large Cabochon Opal. I used a Pumice wheel of #180 grit and this removed all of the scratches. Then I used a Pumice wheel of #1,000 grit and…Viola! There were no marks remaining, in fact the quality-inspector couldn’t find any problems with the expensive stone…:>)

3 Likes

Try polishing the stone and the ring with ZAM if you have it. Turquoise is usually ZAM friendly. If you have a piece of scrap stone, try it first just to make sure. There is always the potential that you will do some damage to the stone by setting it. For me it is always a compromise: finishing the dings and dents vs possibly damaging the stone. This especially a problem for soft stones like turquoise. If you don’t have small needle files that have a safe edge, you should get some, they help you get close to the stone without damaging it. You should also get pumice wheels for your flex shaft as they are less likely to damage a stone than the more aggressive rubber and silicon carbide or aluminum oxide wheels. I happen to like soft stones, but would rather set harder ones. Good luck…Rob

2 Likes

“Wow, you ride motorbikes :raised_hands:. My husband has one and I am too much of a chicken to get on the back. You rock Helen!”

Thank you! We did ride motorbikes for years until health issues led to us selling them and taking up safer pastimes such as making jewellery and playing the cello in my case. I only rode pillion twice and HATED IT!!! Much better to be in control and ride your own bike! I don’t hold with the “women only sit on the back” mentality I’m afraid. :rofl:

Helen

UK

1 Like

No one has suggested my solution, as far as I know. When the stone is in place and I am ready to do the final steps, I tear off scraps of masking tape and layer them any which way to cover the stone right up to the edge. Then if the graver or the wheel slips, the stone has some protection. If things still go wrong, I have a piece of leather glued rough side up to a flat piece of wood (think paint stirrer) which I dampen and rub on a bit of tin oxide to stroke over the scratch. If I’m not sure about the stone I test it on a spare.

Note that our teacher insists on grinding one side of a square file smooth and keeping that smooth side always next to the stone. Good luck.

Noralie

2 Likes

[quote=“stoneflower, post:1, topic:57497, full:true”]
Hi guys,

I am a new member, but have been reading this forum for some time now. I was hoping to find answers to a few issues that I am experiencing that stop me from being able to make wearable jewellery.

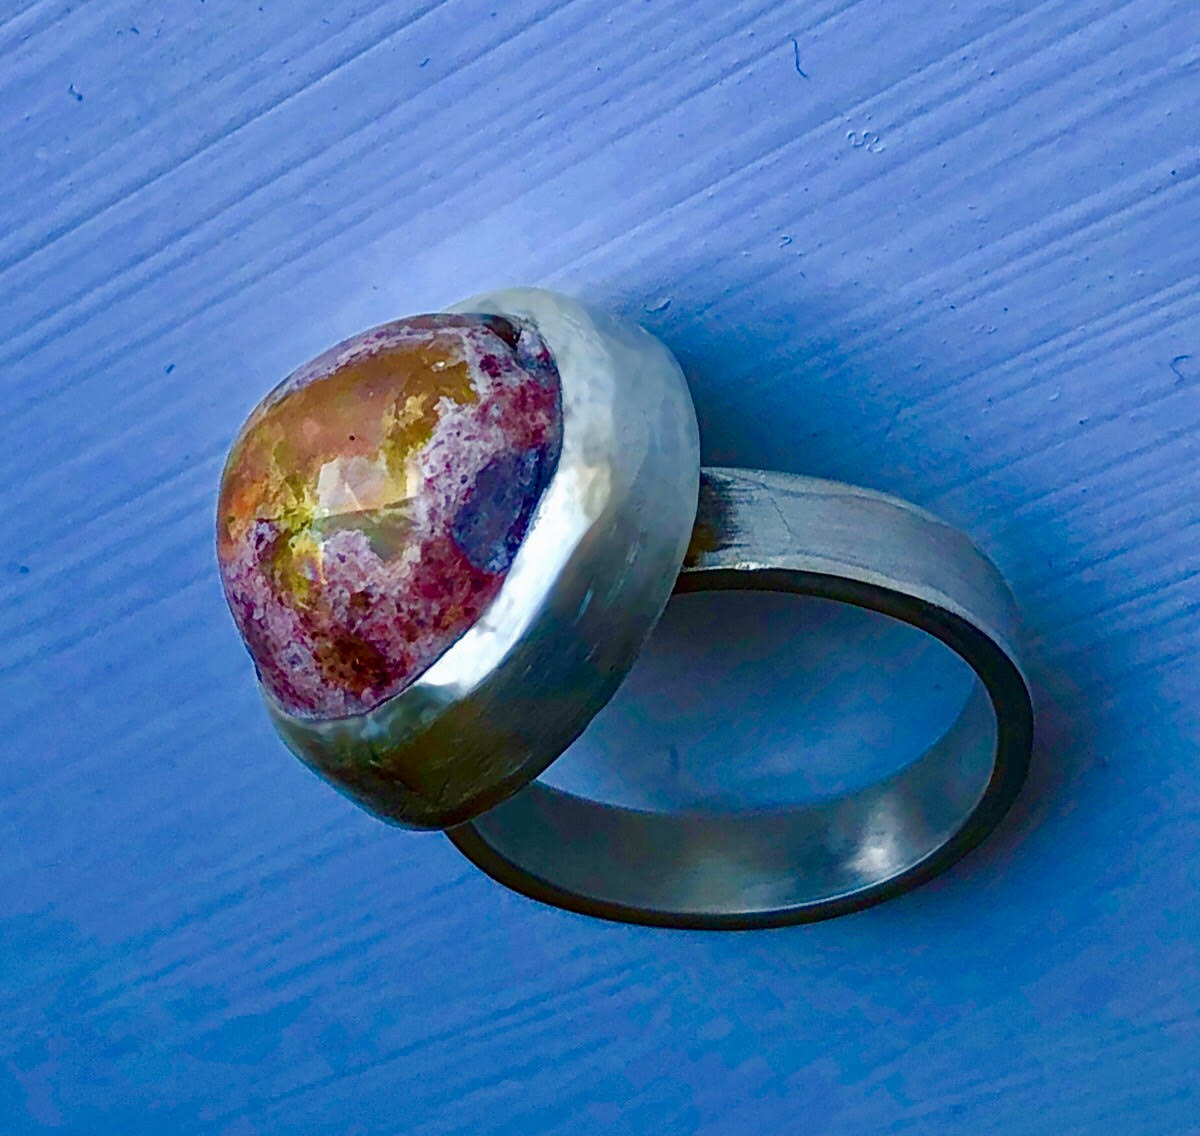
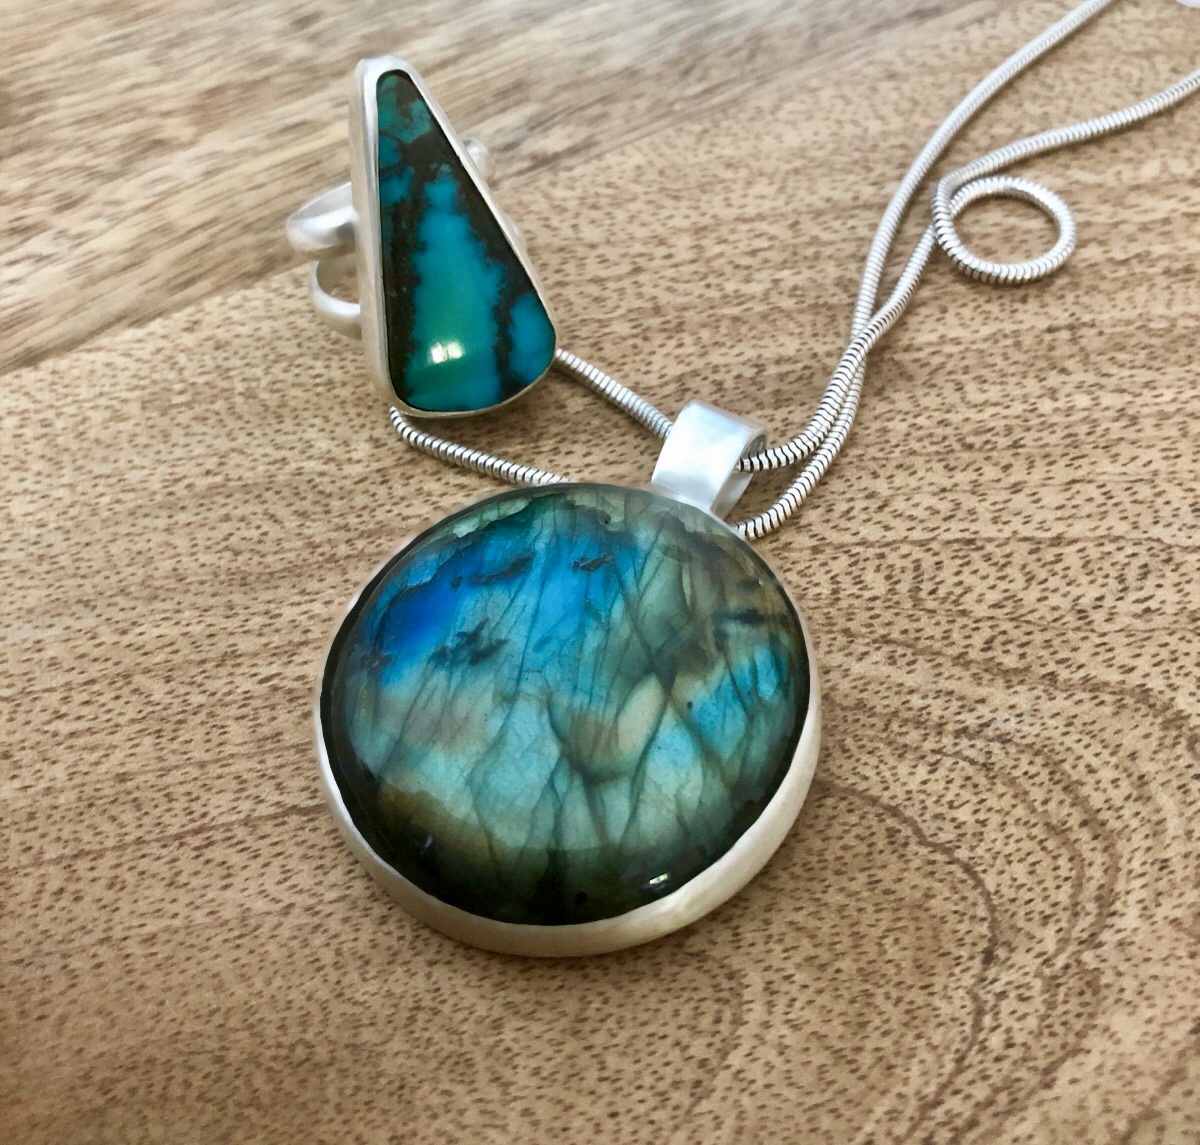
I have only been to a number of silversmithing classes where I was briefly shown the basics of working with sterling silver. I am quite shy so working with strangers is not ideal. So, I didn’t finish the class and started trying stuff out on my own at home. I have made a few pendants and a couple of rings. Generally, what I found the biggest challenge is closing the bezel tightly around the gemstone. I like chunky items, so I prefer if I could use 0.8mm for the bezel. However I found, that when I use 0.3mm the bezel is easy to close around the gemstone. At 0.8mm, absolutely impossible. These two photos illustrate what I am talking about. I tried all I could to close the bezel on the pendant, short of hammering it like a mad woman. It only went as far as the photo shows. With the ring, after trying everything, I did resolve to hammering it, although gently, and even though it looked like it was closing , the stone was still moving around, and eventually the stone broke. I used glue as I really love the damn thing and would wear it at home. Anyway, sorry for the long post, but this is something that is going to really stop me from producing the look and quality I would be proud of, so if anyone can point out what I am doing wrong, I would be really grateful.
I have heard that fine silver is softer, but also less durable, so I really want to resolve my issues with sterling silver. I’ve seen artists on IG who work exclusively with sterling silver and their bezel’s are as tight around the gemstone as it can possibly get. I don’t think it’s a matter of physical strength as most of them are ladies.

Thank you for reading this. I can’t stop thinking about making jewellery so if you have any suggestions, it would really help me sleep :).

Mila

Everyone,
WOW!!!
This has been the best tutorial ever on bezel settings. It was like taking a class. I’m bookmarking all of these replies to Mila’s question because each reply has something in it that is of value. I have struggled with bezel settings and have taken a lot of classes. It took me over a year to make a sterling cuff bracelet for my daughter with 3 turquoise stones, two different shapes, & two small ethiopian opal stones. I had to replace the basic cuff twice,
bought so much bezel wire of all different heights and finally resorted to making my own bezel wire. I have to say, I was not prepared for this challenge but, I got through it. I was terrified of splitting the turquoise as I set the stones. Practice, practice and lots of tutorials, and Nancy L T Hamiltons classes have a lot of info.
And… many sleepless nights. This bracelet was on my mind constantly. As I said, I’m saving this thread. Mila, read and reread what these very fine, knowledgeable, experienced people have to say. They have so much to offer. . Don’t give up!!!

lulutw

Sounds like work hardening the metal & bezel setting notes.
When I set a stone in a bezel I secure the stone down by rolling the bezel tool from the base of the bezel toward the top of stone. The first pressure area would be at 3 o’clock then repeat at 6 o’clock, 12 o’clock and 6 o’clock. after these steps the stone should be securely positioned. Continue moving around the stone between the previous points of contact. Eventually your bezel should be set down or close against the stone. I would then use a curved burnisher pushing down on the bezel and/or to move the silver where I wanted it. If I have work hardened my metal it will be difficult to push and I would resort to use a hammer-hand piece.
Sterling Silver will work harden much quicker than pure silver. Sounds like you are work hardening the metal. I would suggest annealing your work really well before setting. You may even want to anneal it a few times for maximum workability and to bring a skin of pure silver to the surface. Since you are working with Sterling you will need to make every push on that bezel work the way you want it to. Every time the surface of the metal is touched the molecules of the metal become aligned and “work hardened”.

Hi Gerry,

Thanks for the suggestion! I looked online and the ones I found come in fine and medium type, but I am thinking it’s the same thing. I can start with the medium and finish with the fine.

Thanks for your advice again!

Mila

Hi Rob,

Wow, that’s a lot of really helpful info. We don’t seem to sell ZAM in the UK, but I should be able to get it from America. I didn’t know there are needle files with safe edge -for that reason I usually position my nail over the edge of the stone where I am filing and try to keep the stone scratch free that way. However, my nails are now full of file marks which is not ideal and a nit painful :slight_smile: I will definitely buy some pumice wheels. I need to invest a bit of time in educating myself on hard vs. soft stones, but I love lodolite, labradorite and turquoise and really want to learn to work with them without damaging them.
Thank you again for sharing your knowledge !

Mila

Noralie, I’ve been thinking to buy some masking tape but as I only had some plasters at the time, I put some of those over . It wasn’t enough though, so I will order masking tape :). I must say, I’ve not heard of tin oxide -need to google that but if it works that’s great!
Thanks for all the really helpful suggestions!

Mila

I’ve taken the hammer to the pendant and I did get it to close a bit further. Still not ideal, but I was worried the stone was going to break so I stopped. I did make this ring after all the suggestions here and also used the hammer to close it. I think this is the first time that I experienced what some of you mentioned that didn’t make sense to me at the time - the silver actually moving and distributing itself. So if I overfiled one spot, I could hammer a few times behind the spot and the silver will move over and fill the gap. It is so exciting. I would say with the ring, I also couldn’t get the silver completely flat to the edge of the stone. I always chicken out as I am worried I will break the stone.

Thank you all for your suggestions and ideas -I do think one of my biggest issues (apart from knowing so little but wanting to do so much) is work hardening the metal and not annealing before setting (thanks artisansg!!). I stupidly thought that every time I solder the metal naturally gets annealed and was always so shocked to discover, when I start setting the stone, that the sides of the bezel would not move for love or money :). In all honesty, I would rather set a bezel without the use of the hammer as I have to then spend a lot of time removing the marks from the hammering.

Mila

1 Like