Casting Problem on Large carved buckle sterling silver (blister?)

Hi fellow jewelers and Casters Iam a wax carver and caster that cast in mostly sterling silver but also brass and occasionally white bronze.

I recently have had two back to back castings come out with the same problem and I cannot seem to figure out what exactly might be causing it.

Before I get into the problem it might be good to give a quick history and my experience level. I have been casting my own designs for about 7 years now. I am self taught and the first year was a lot of trial and error but for the last 6 years I have been casting with great success and have not had many problems that I could not work out on my own by doing a little research. I cast everything from large sculpted belt buckles to small charms with the only occasional problems on the larger pieces. I vacuum cast with solid flask and have almost always steam dewaxed my pieces before placing in the kiln.

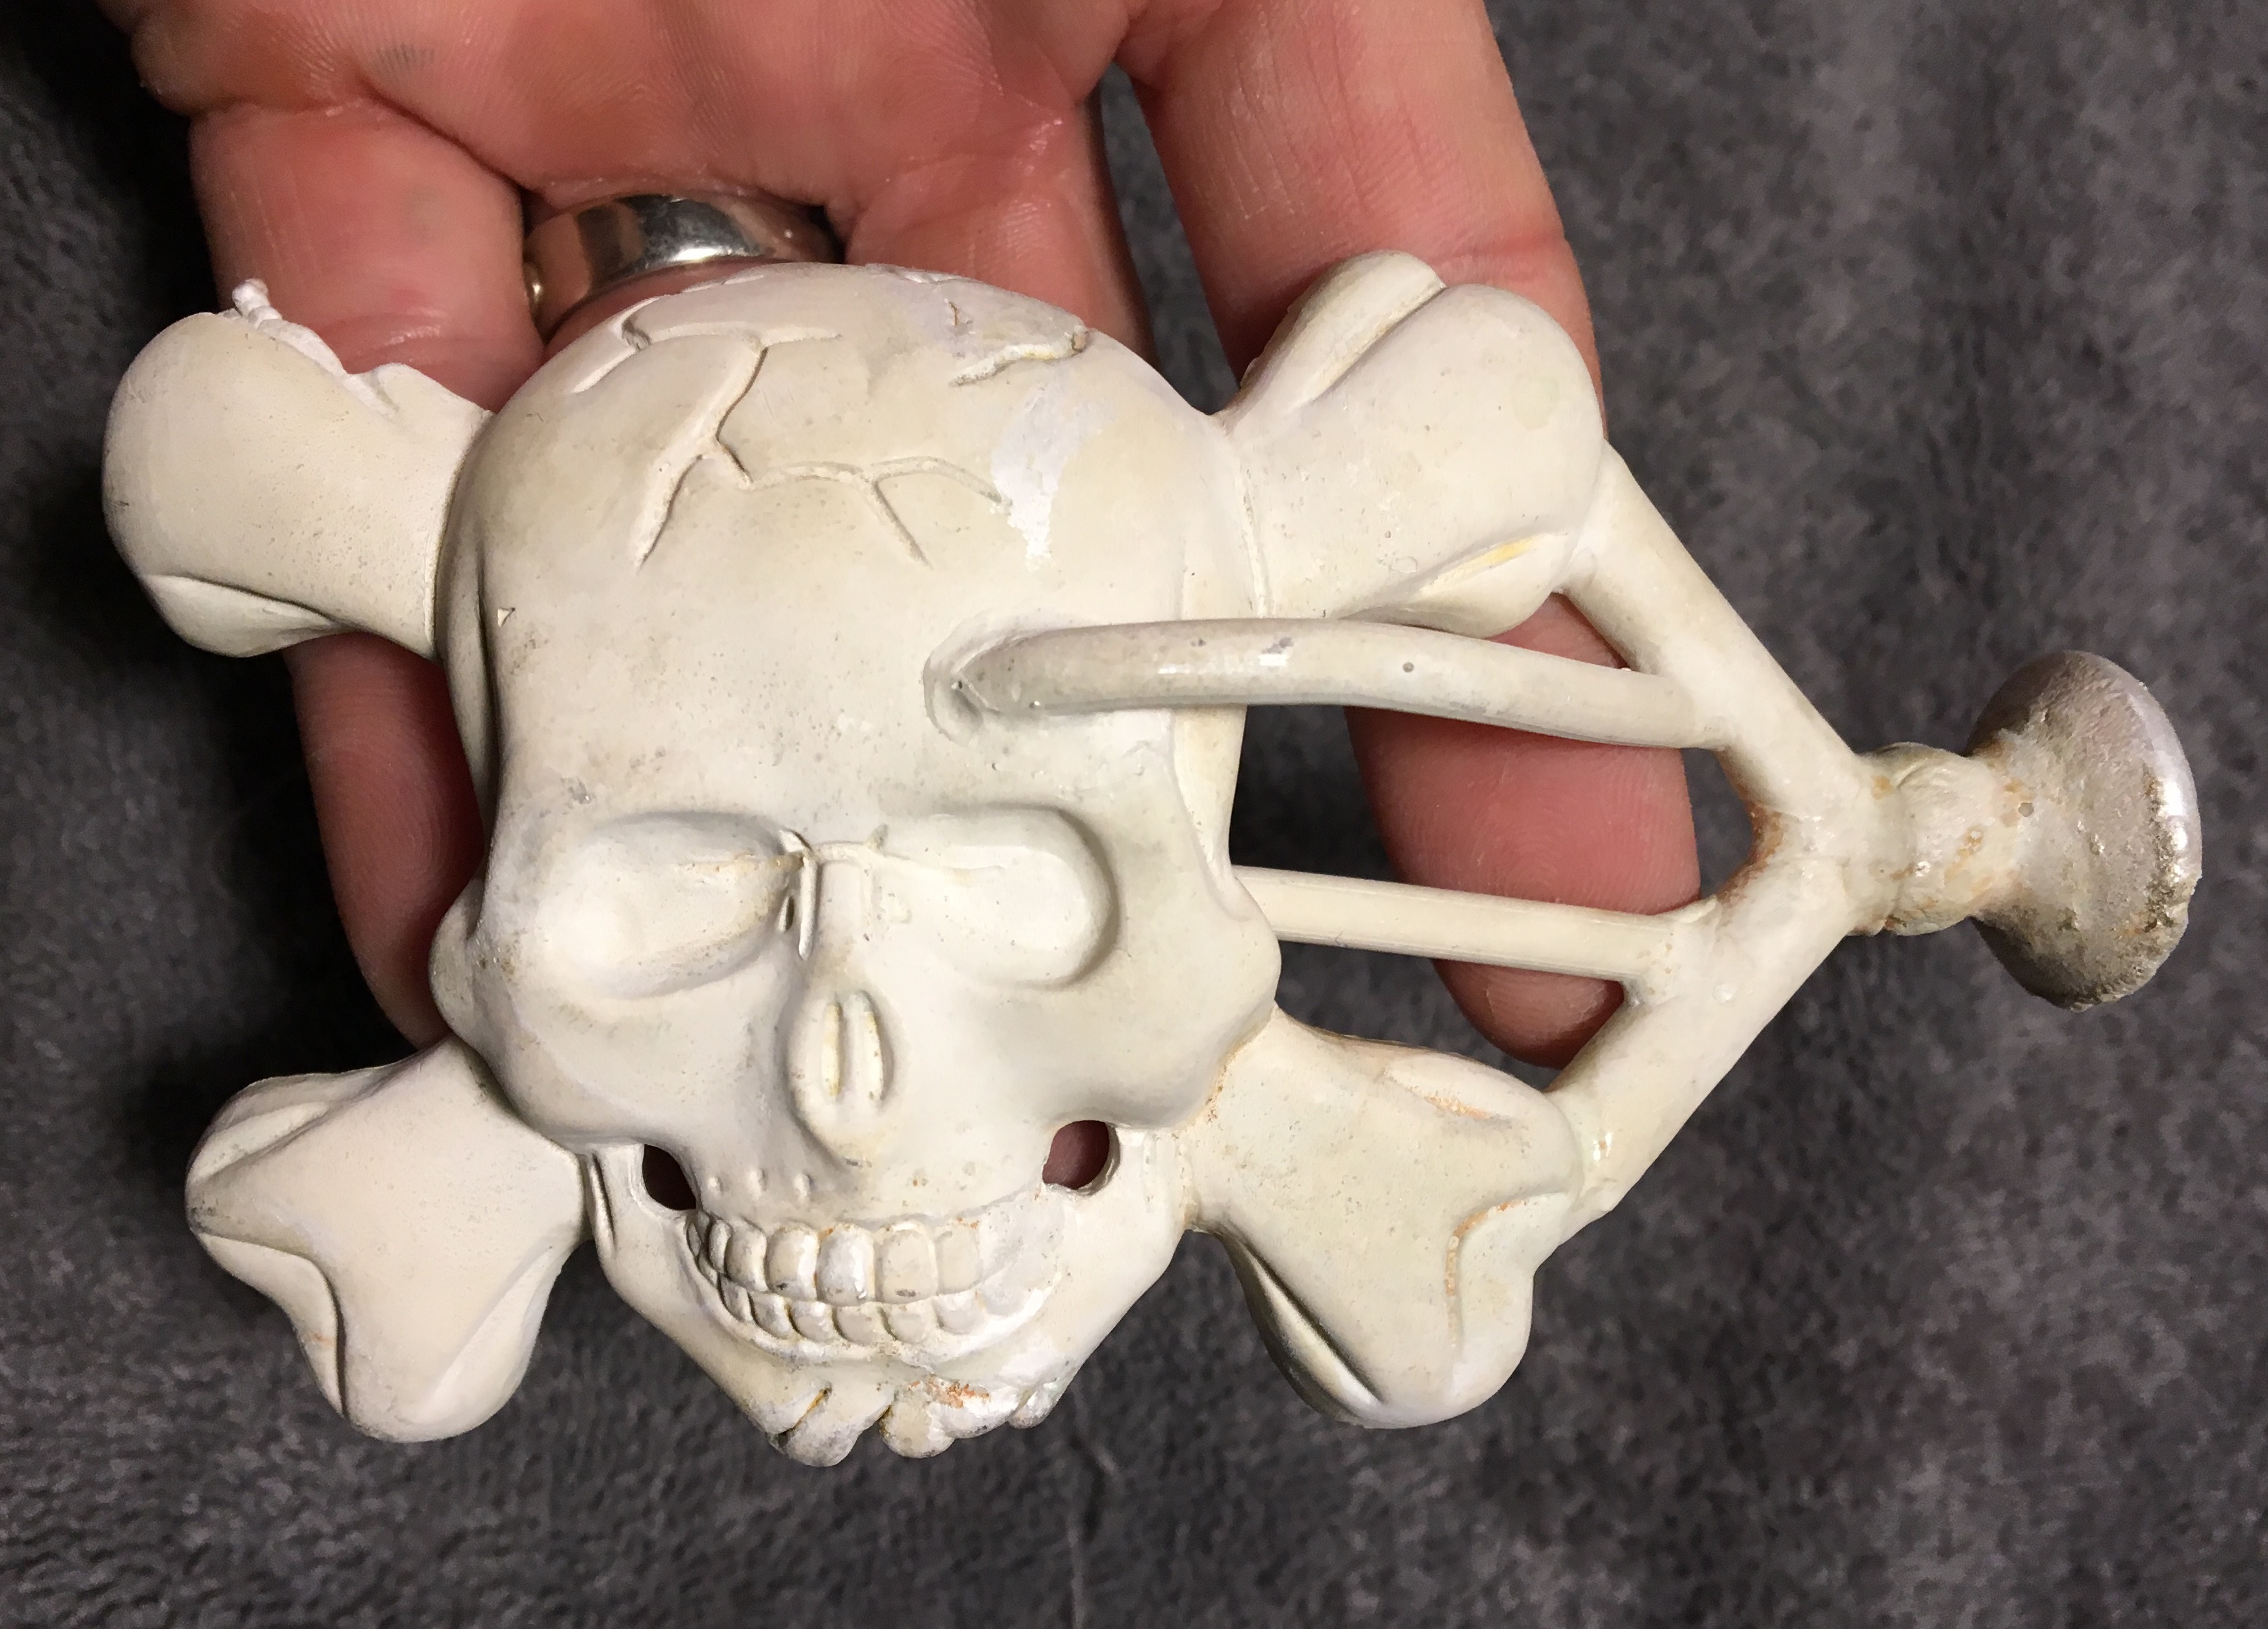
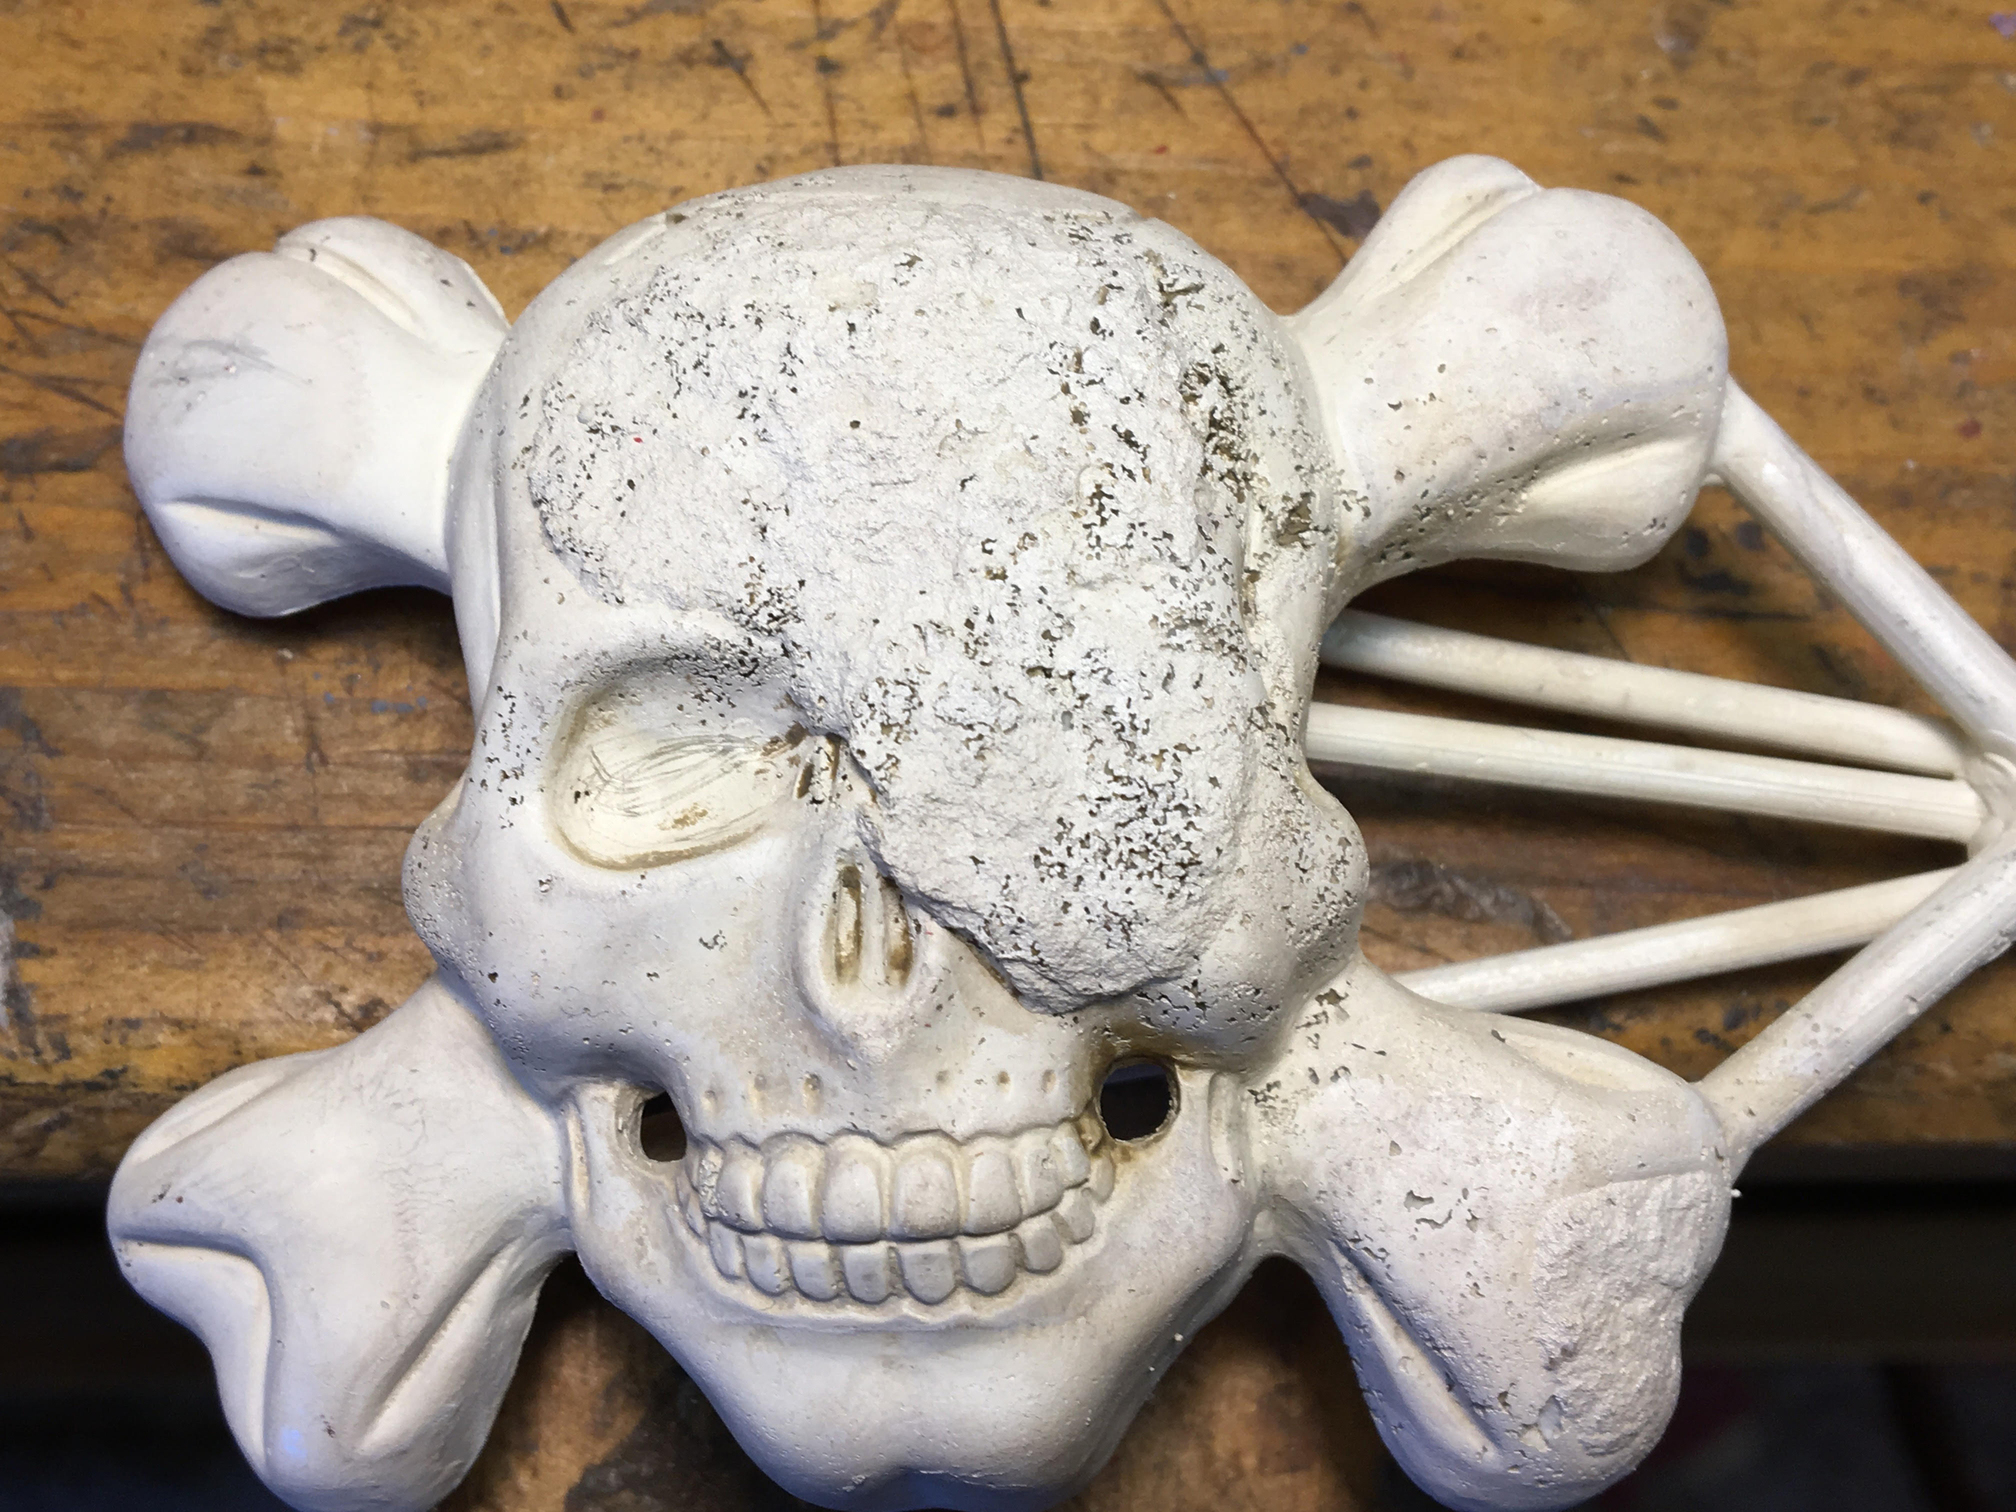
Now comes the problem. I recently received an order for one of my largest sterling silver belt buckles which is a skull and crossbones. Because it is so large and expensive I have only sold 1 other skull buckle in sterling silver and that was one that was cast by a company back in 2010. I have cast several of this buckle in both brass and white bronze with no problems. I have also cast many of my large but a little smaller other buckle designs in sterling silver with no problems over the years.

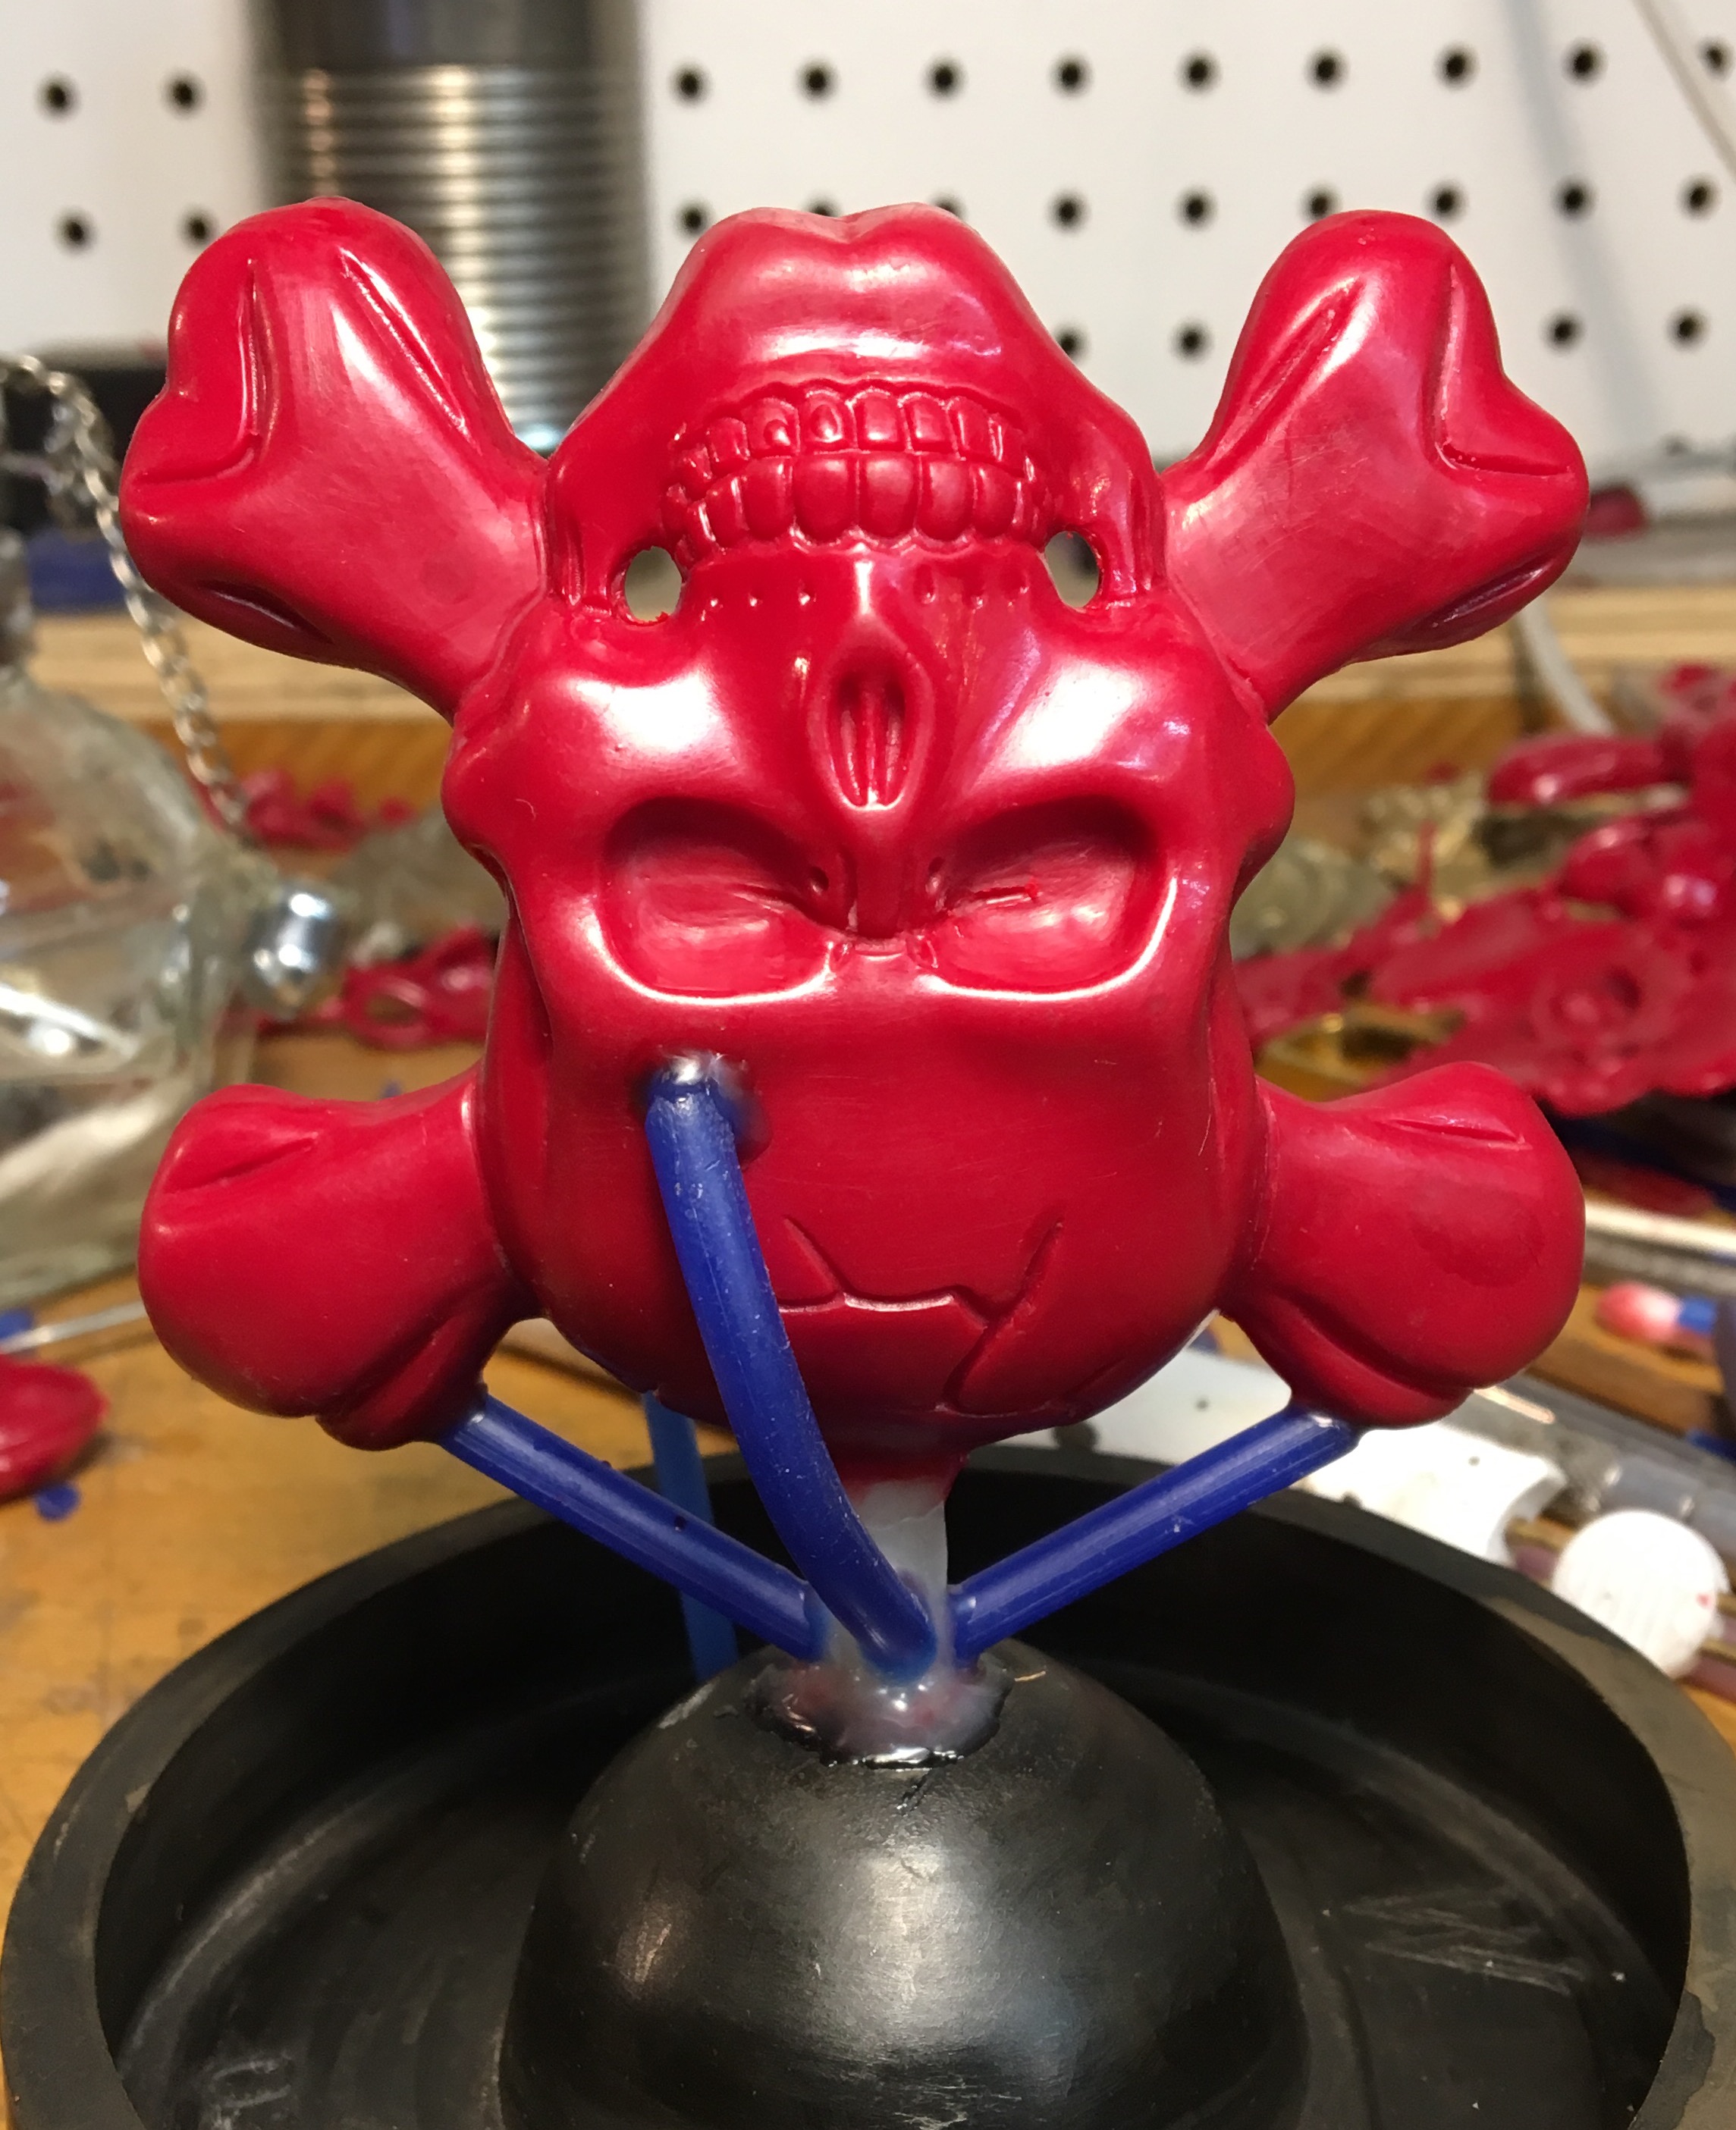
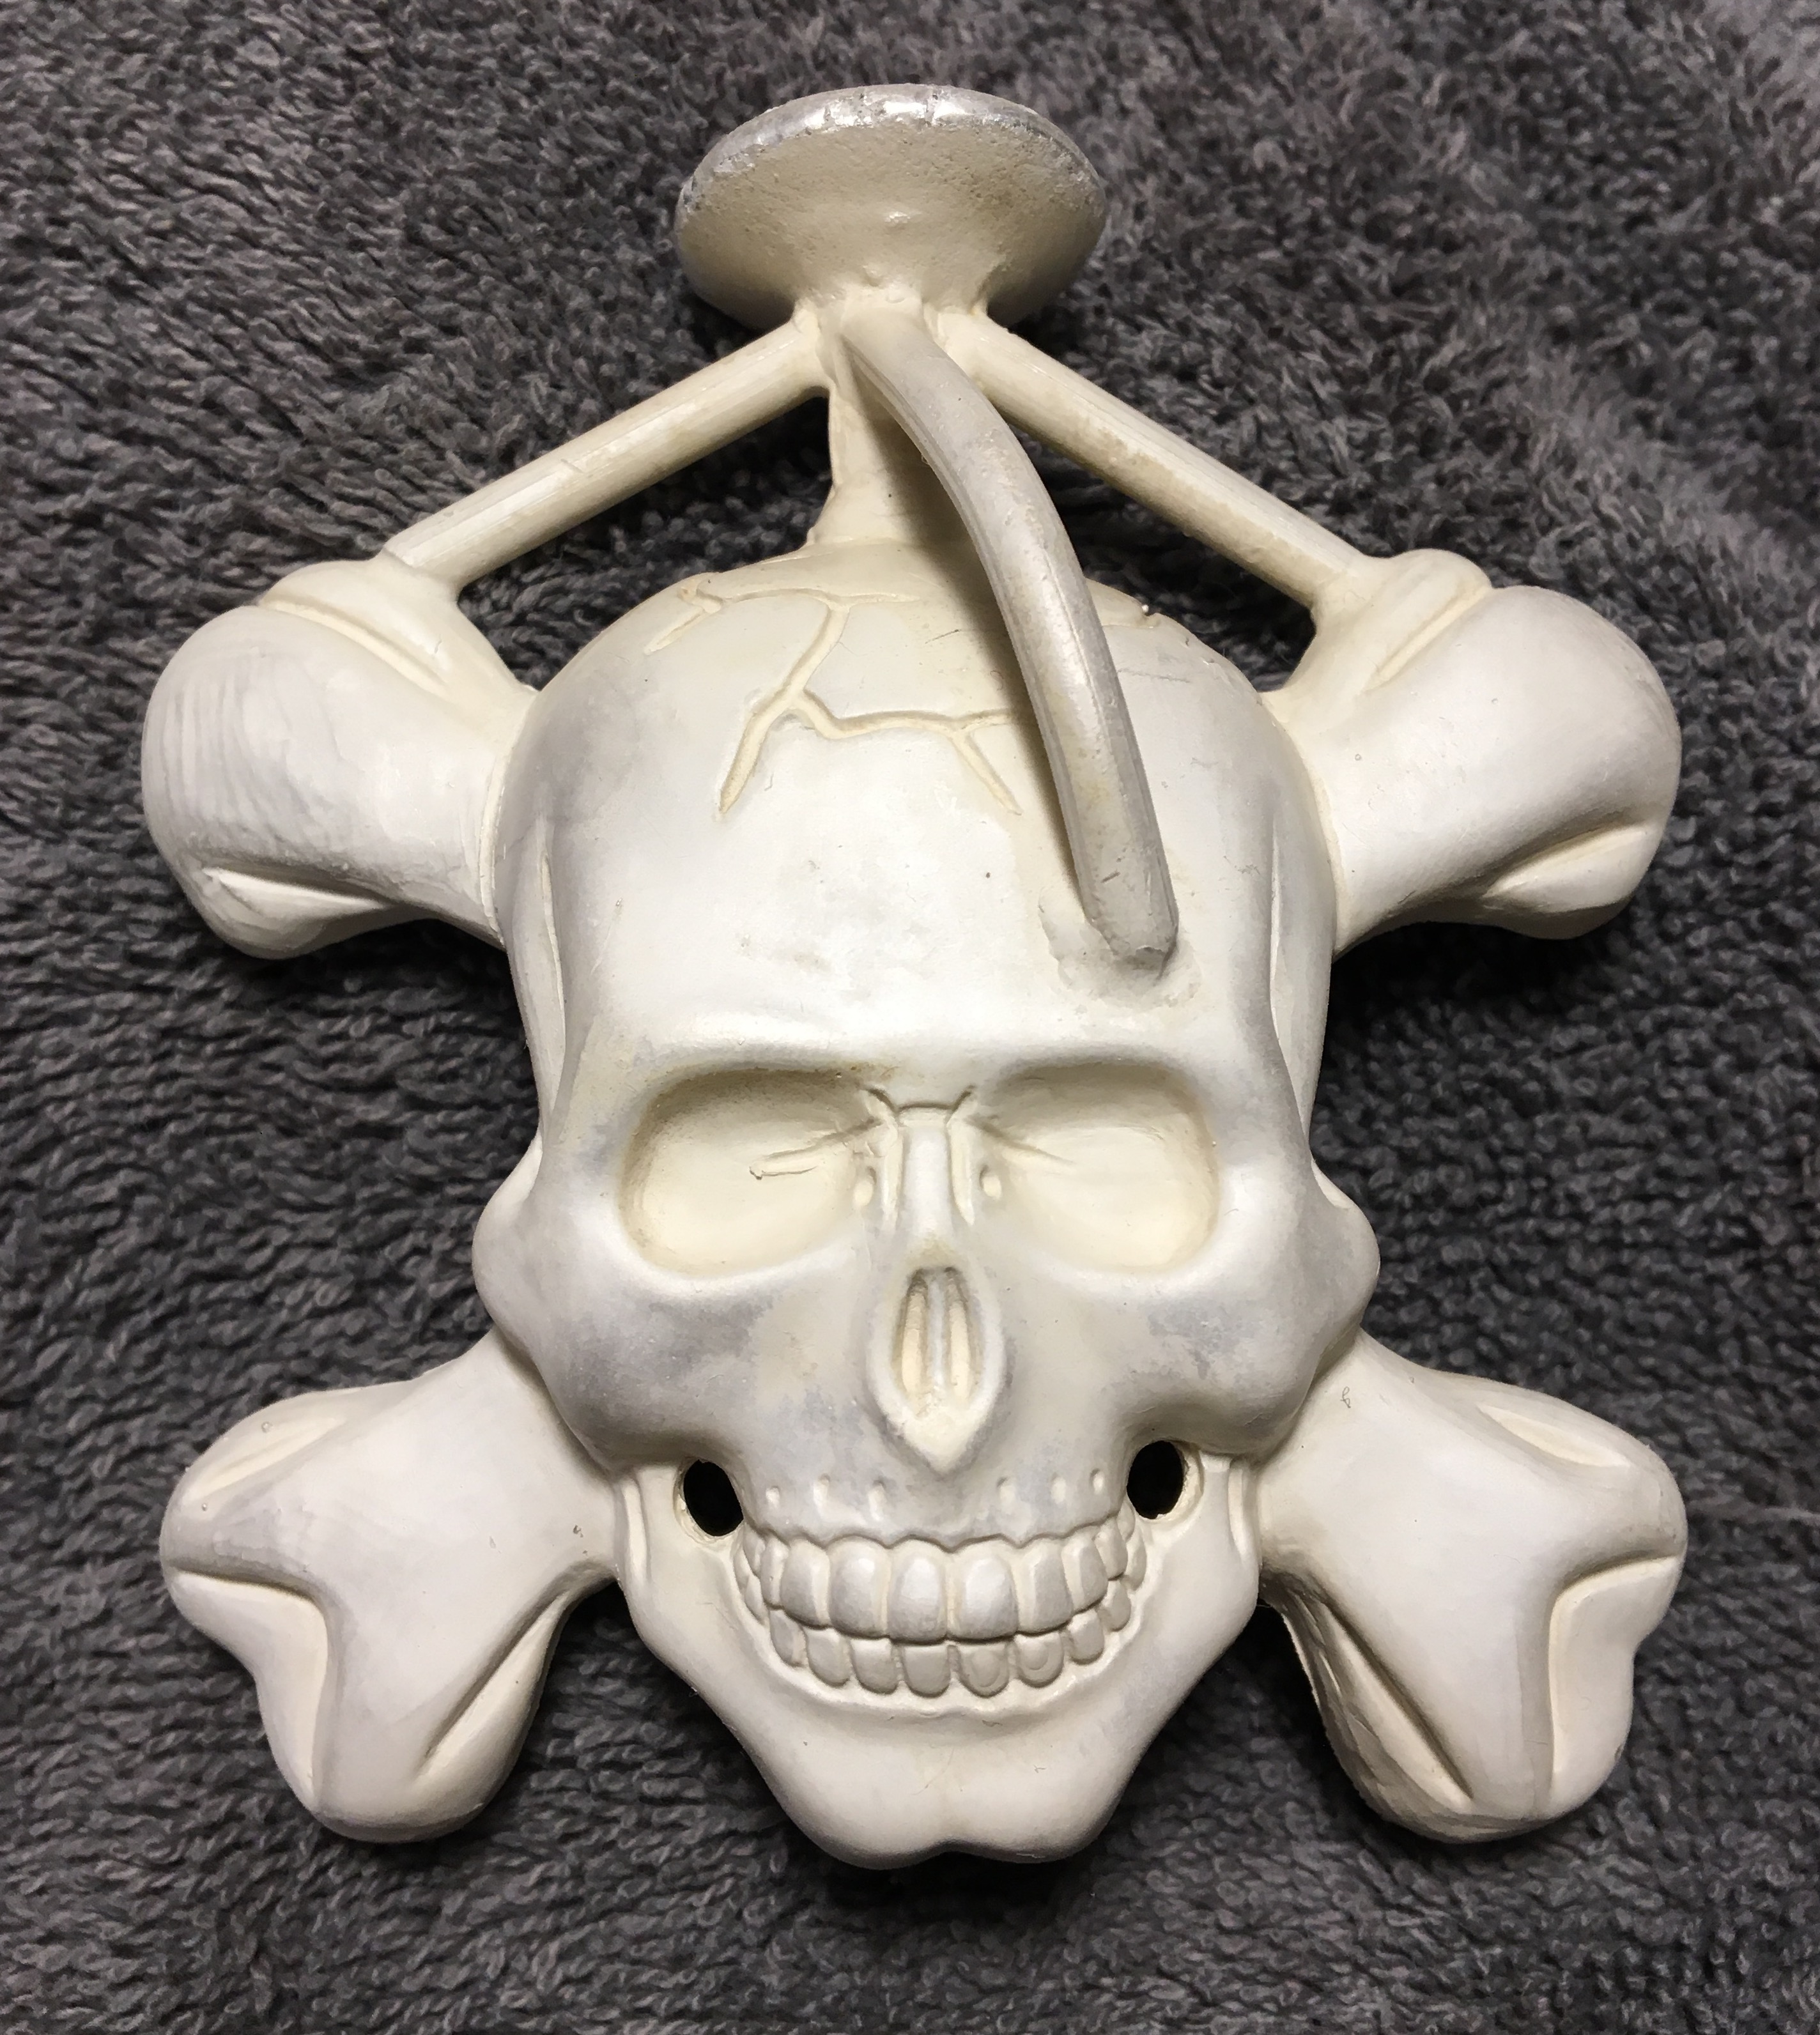
After spruing an injection wax and casting the buckle using the regular method I have always cast all my work and other buckles using, the piece turned out deformed with a blister on its forehead and other problems which could have been caused from the displaced investment. I remember this similar thing happening on a custom belt buckle I did and when I researched the problem it said it could be caused by too high of heat during steam dewaxing. So in that case I think what I did was not steam dewax but melt the wax out in the kiln and the piece worked.
So this is what I did for the skull. I followed a much better and longer gentle burnout of the skull buckle without steam dewaxing and to my frustration the big blister was even larger!

I have now sprued two more waxes in different ways and will be casting tomorrow to try get this casting to work. I am really hoping some others out there can take a look at the pictures and let me know what they think the cause may be so I can get this right. I hate to have to loose the sale and I have already had to purchase so much silver that is now probably contaminated that I am going to break even as it is.

Can anyone PLEASE HELP!! :slight_smile:

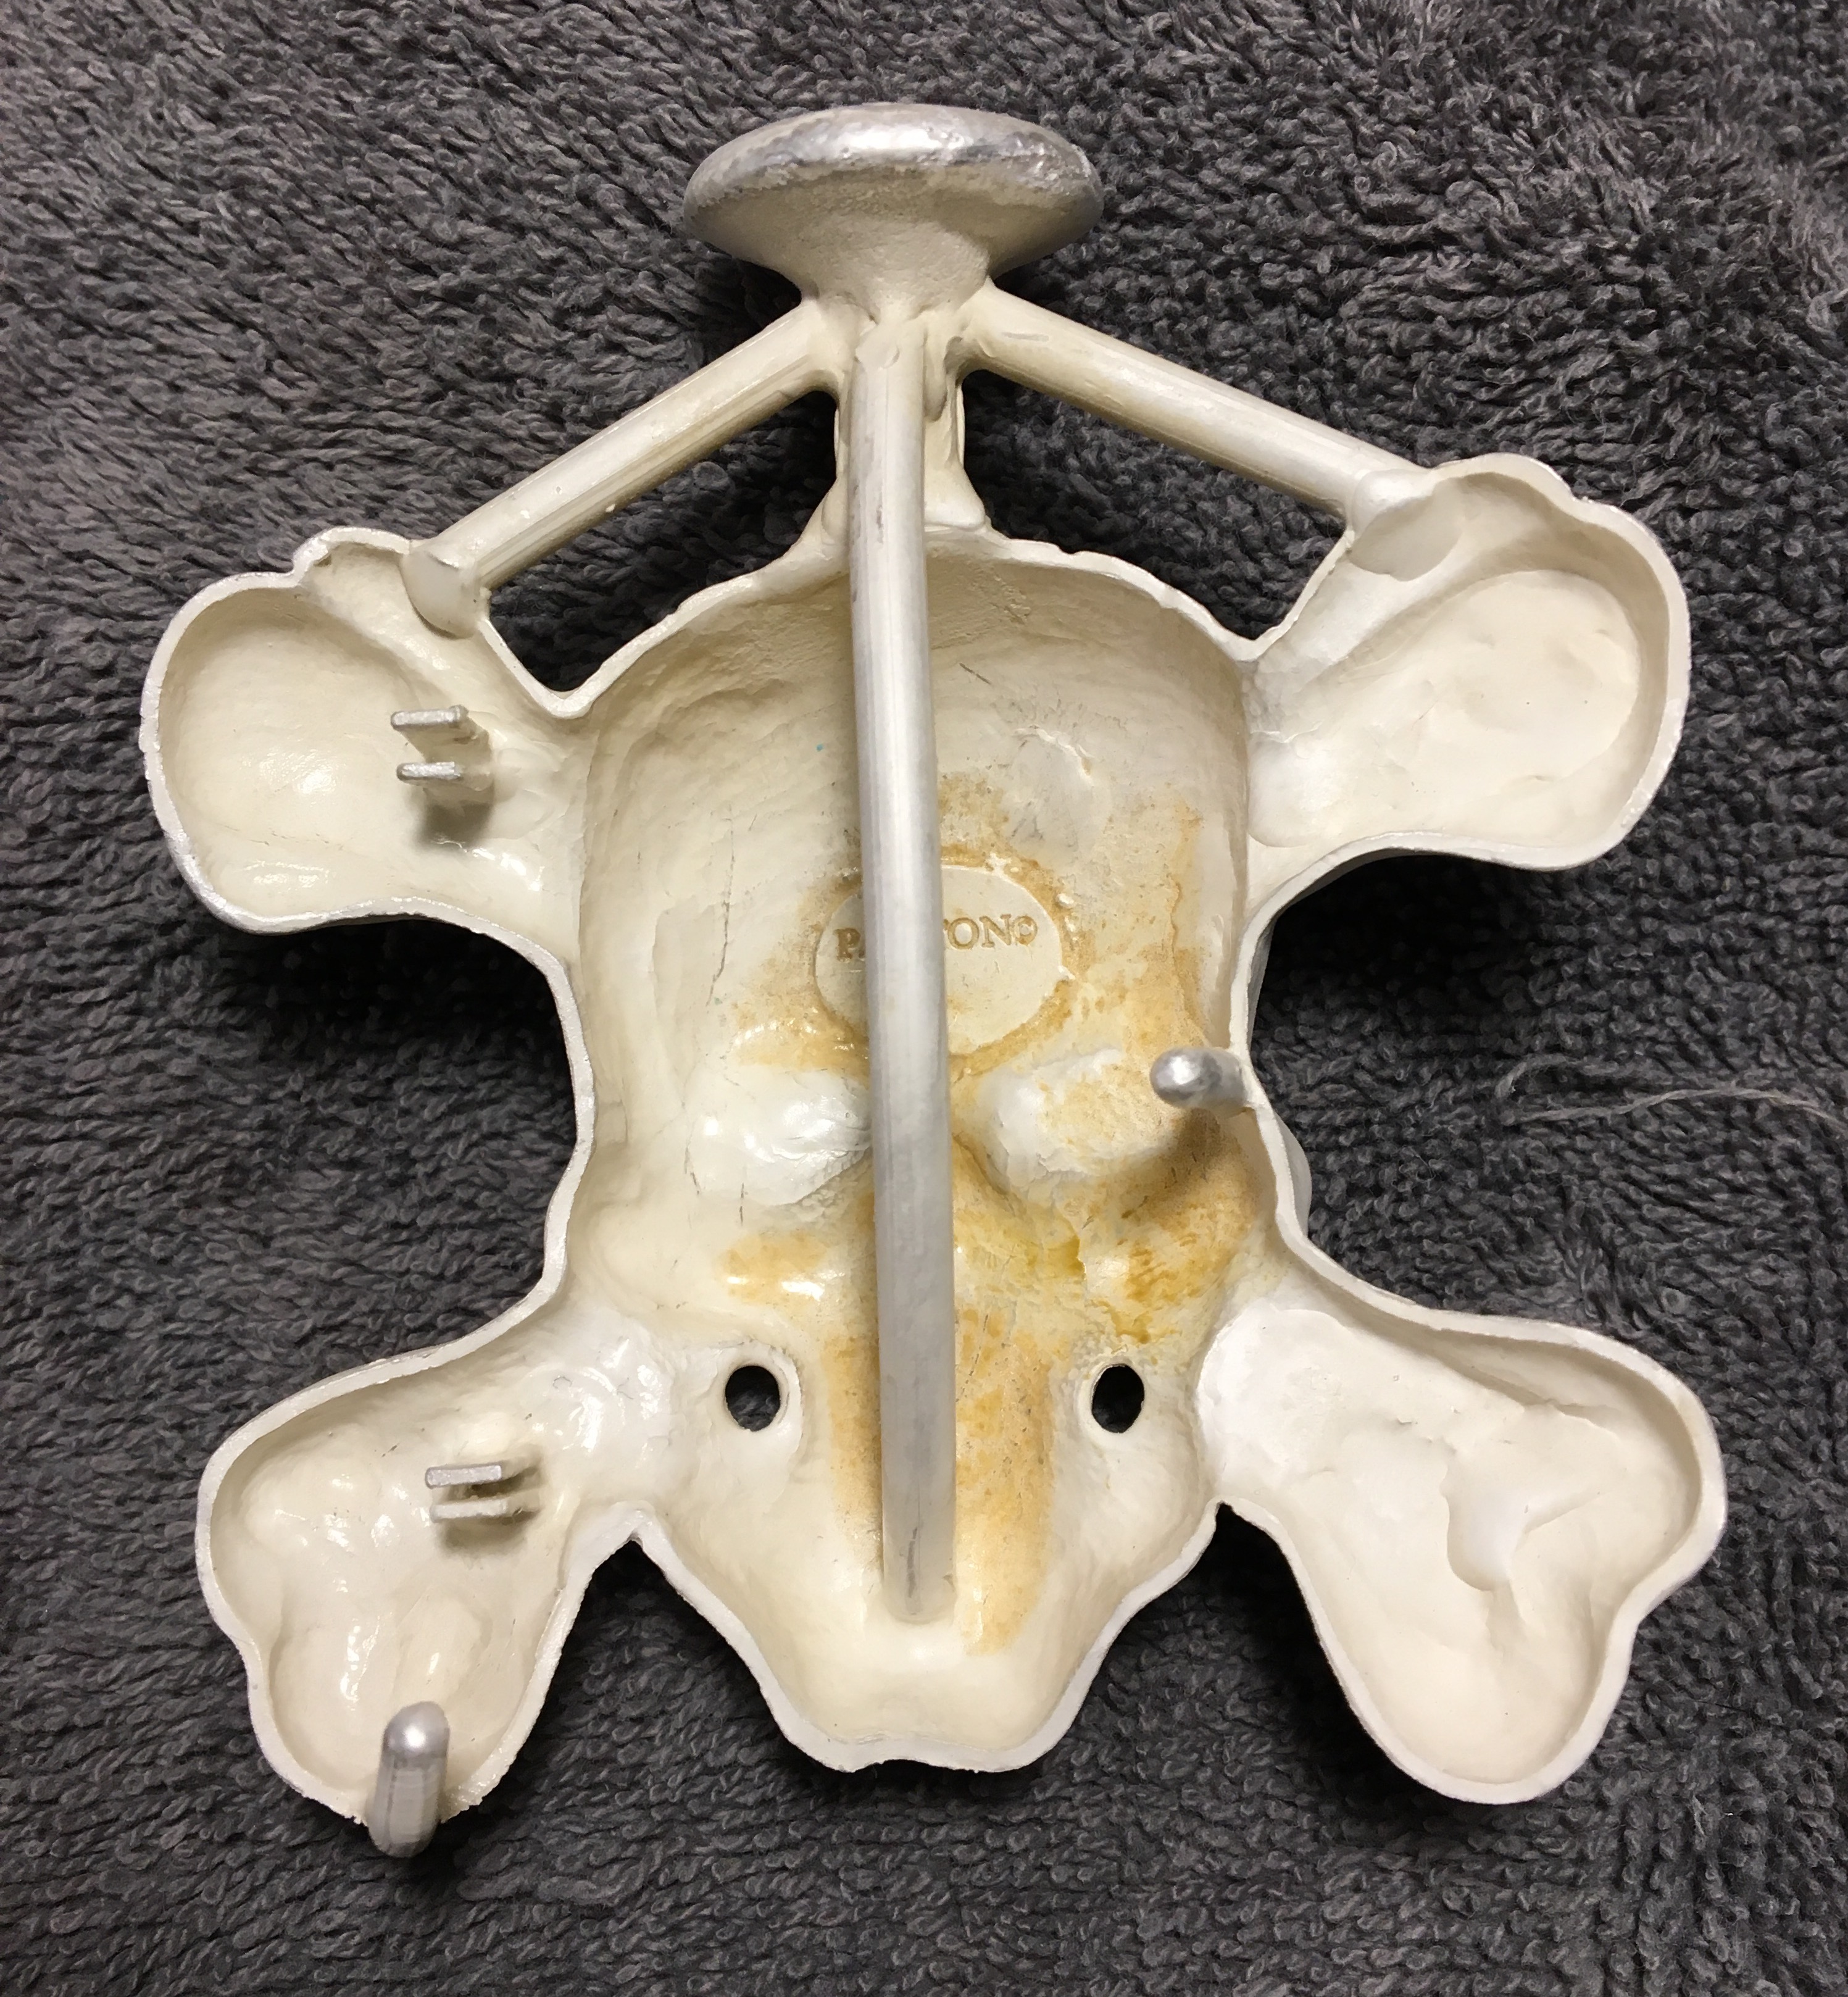
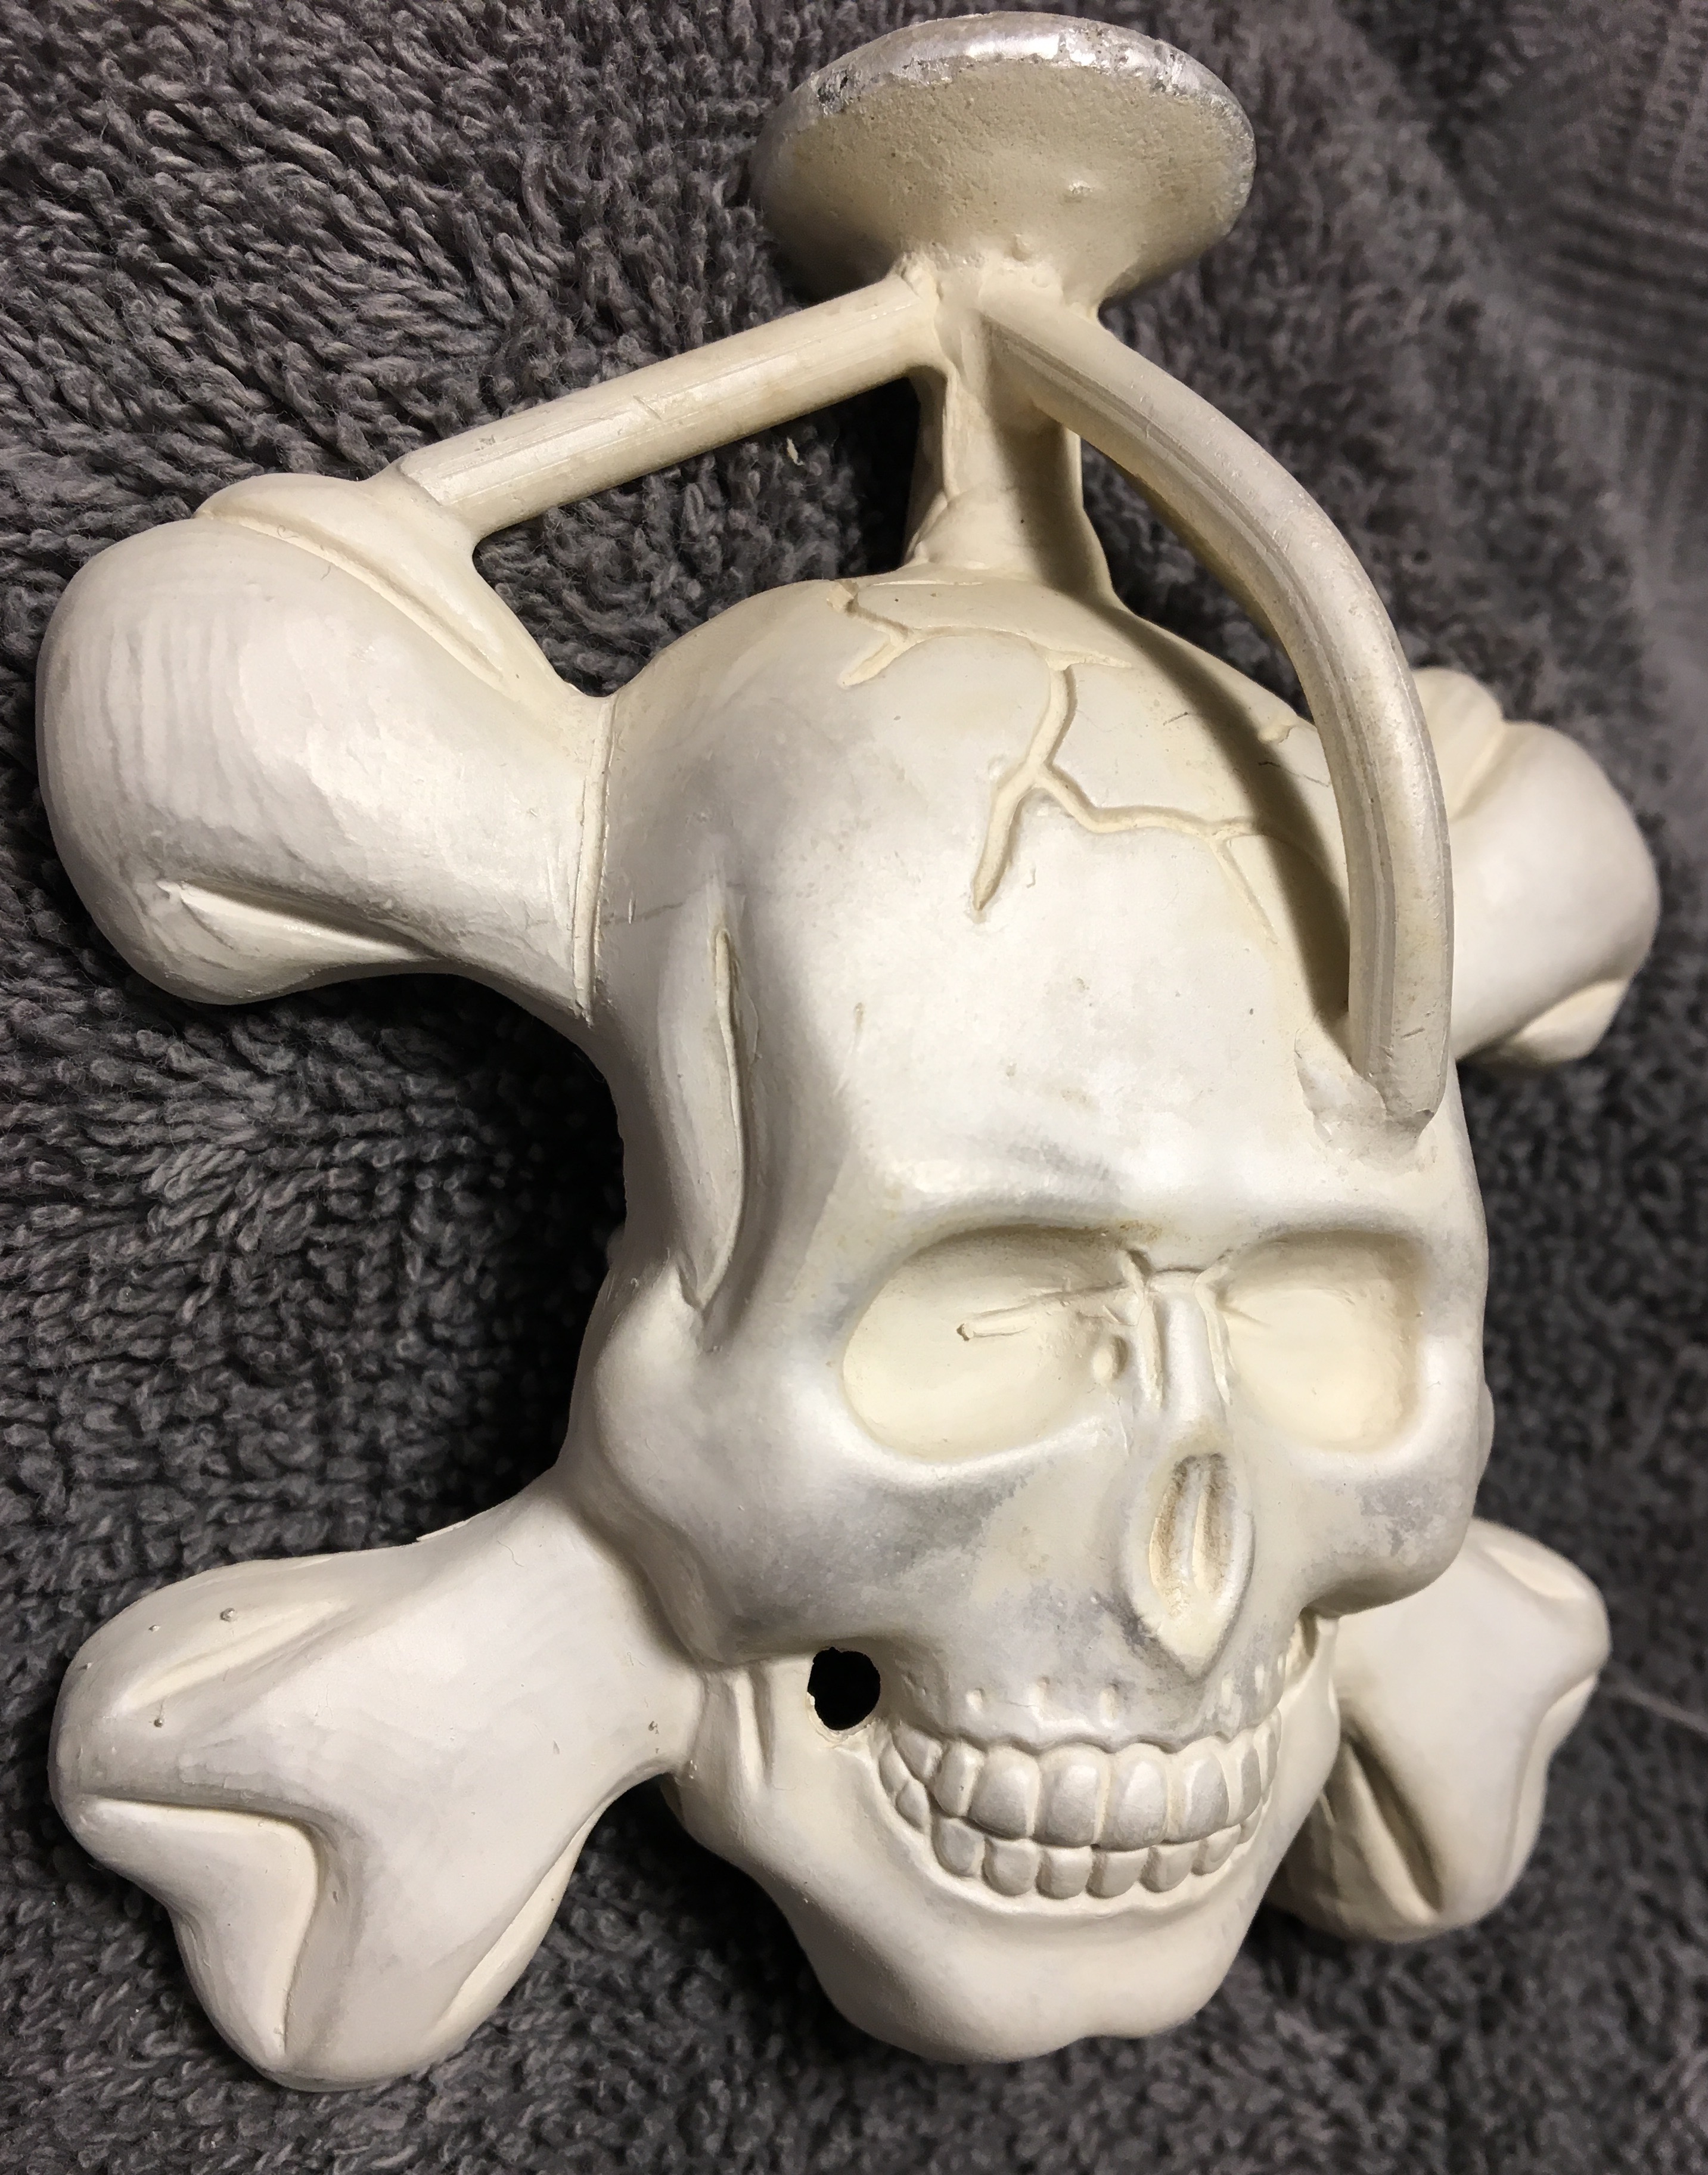
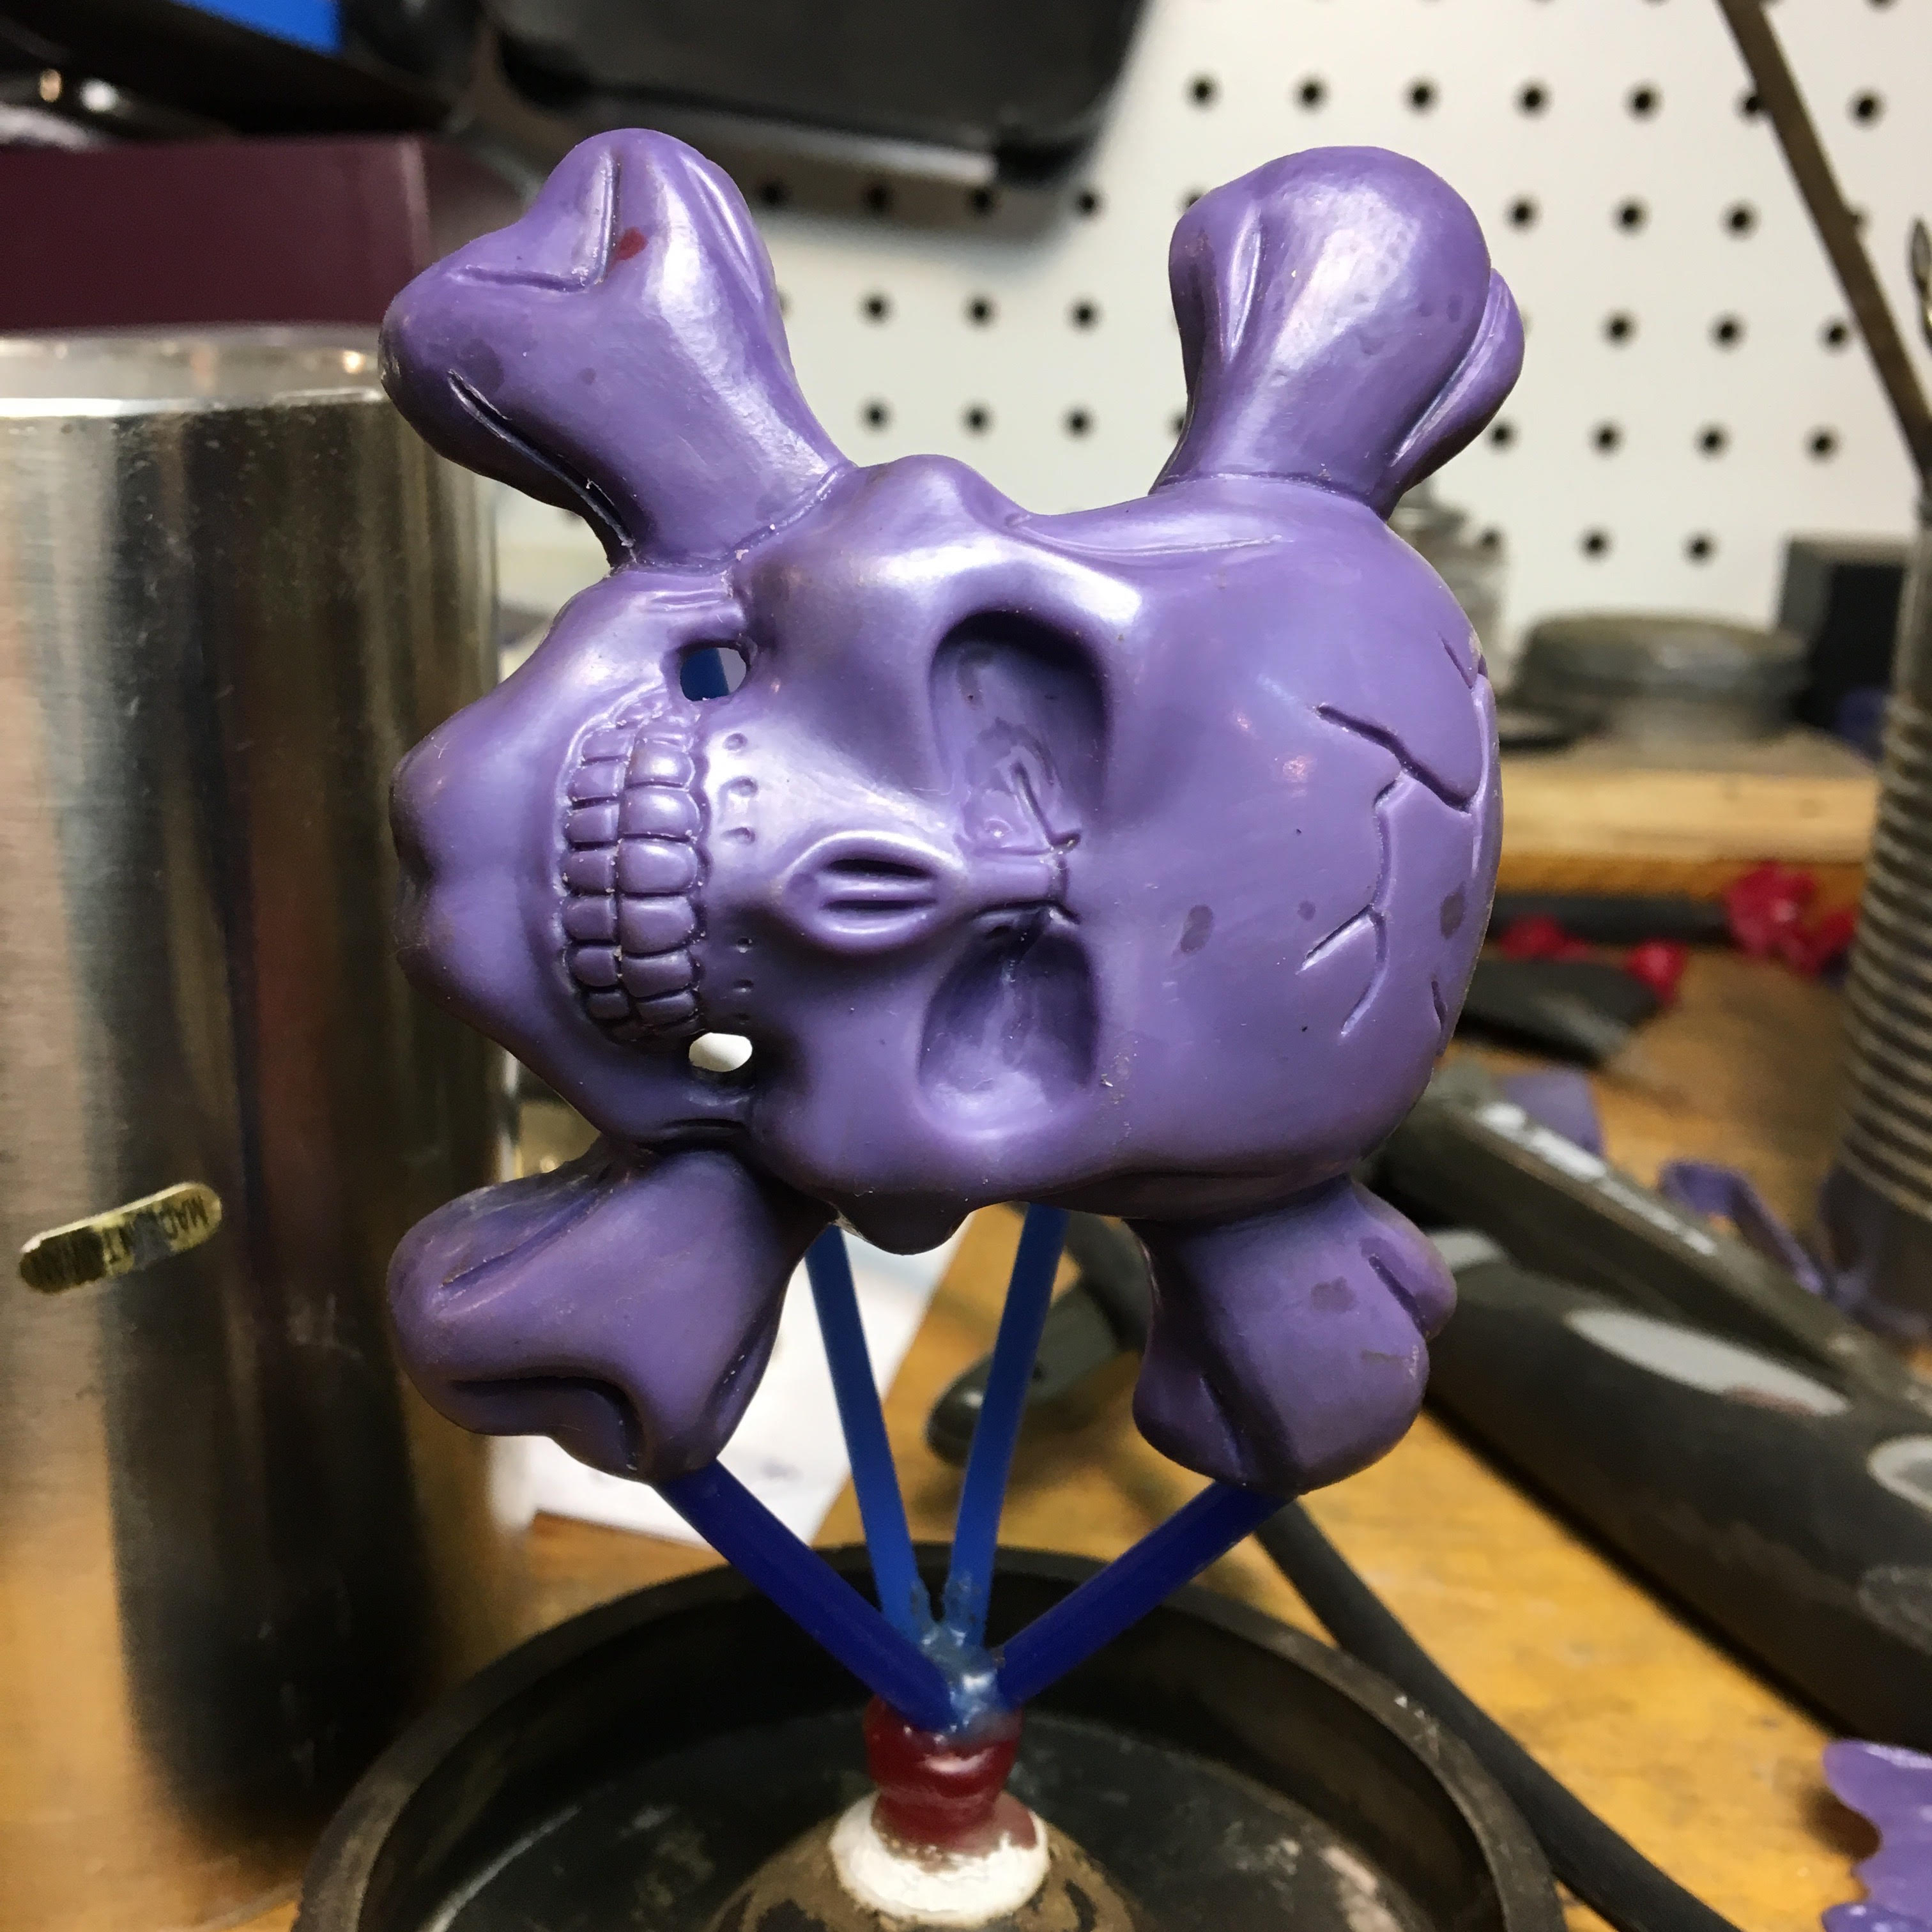
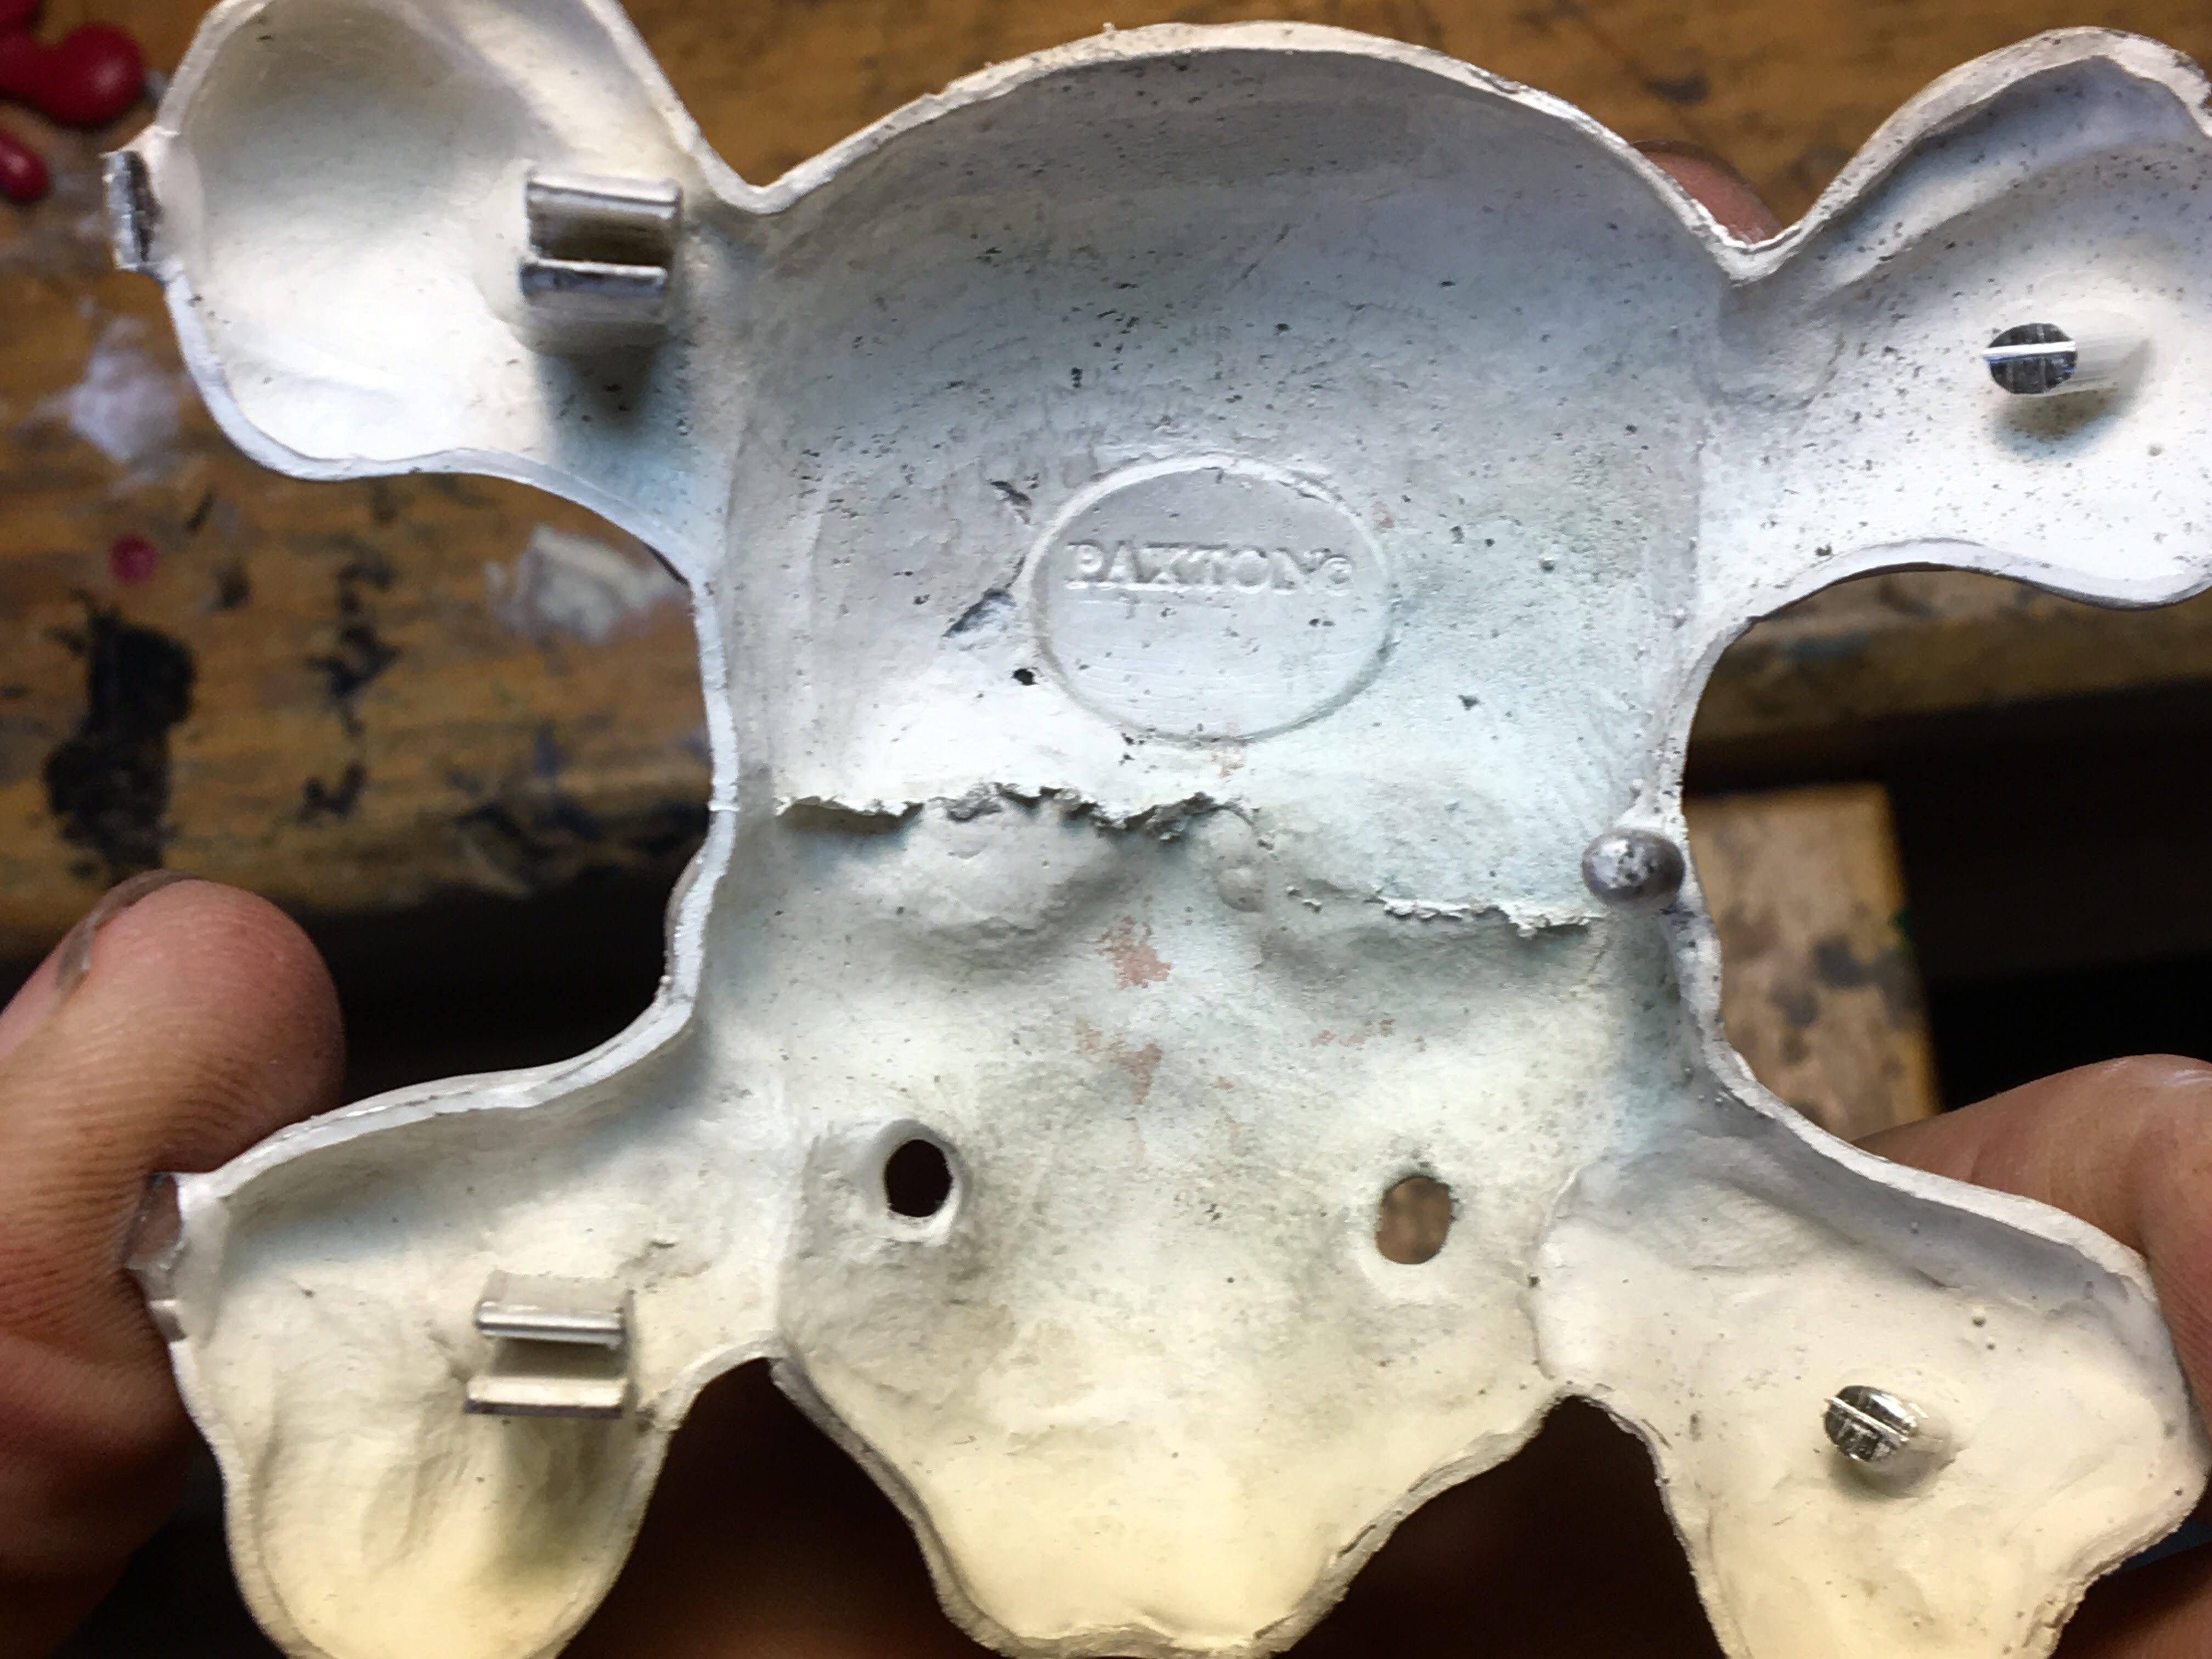
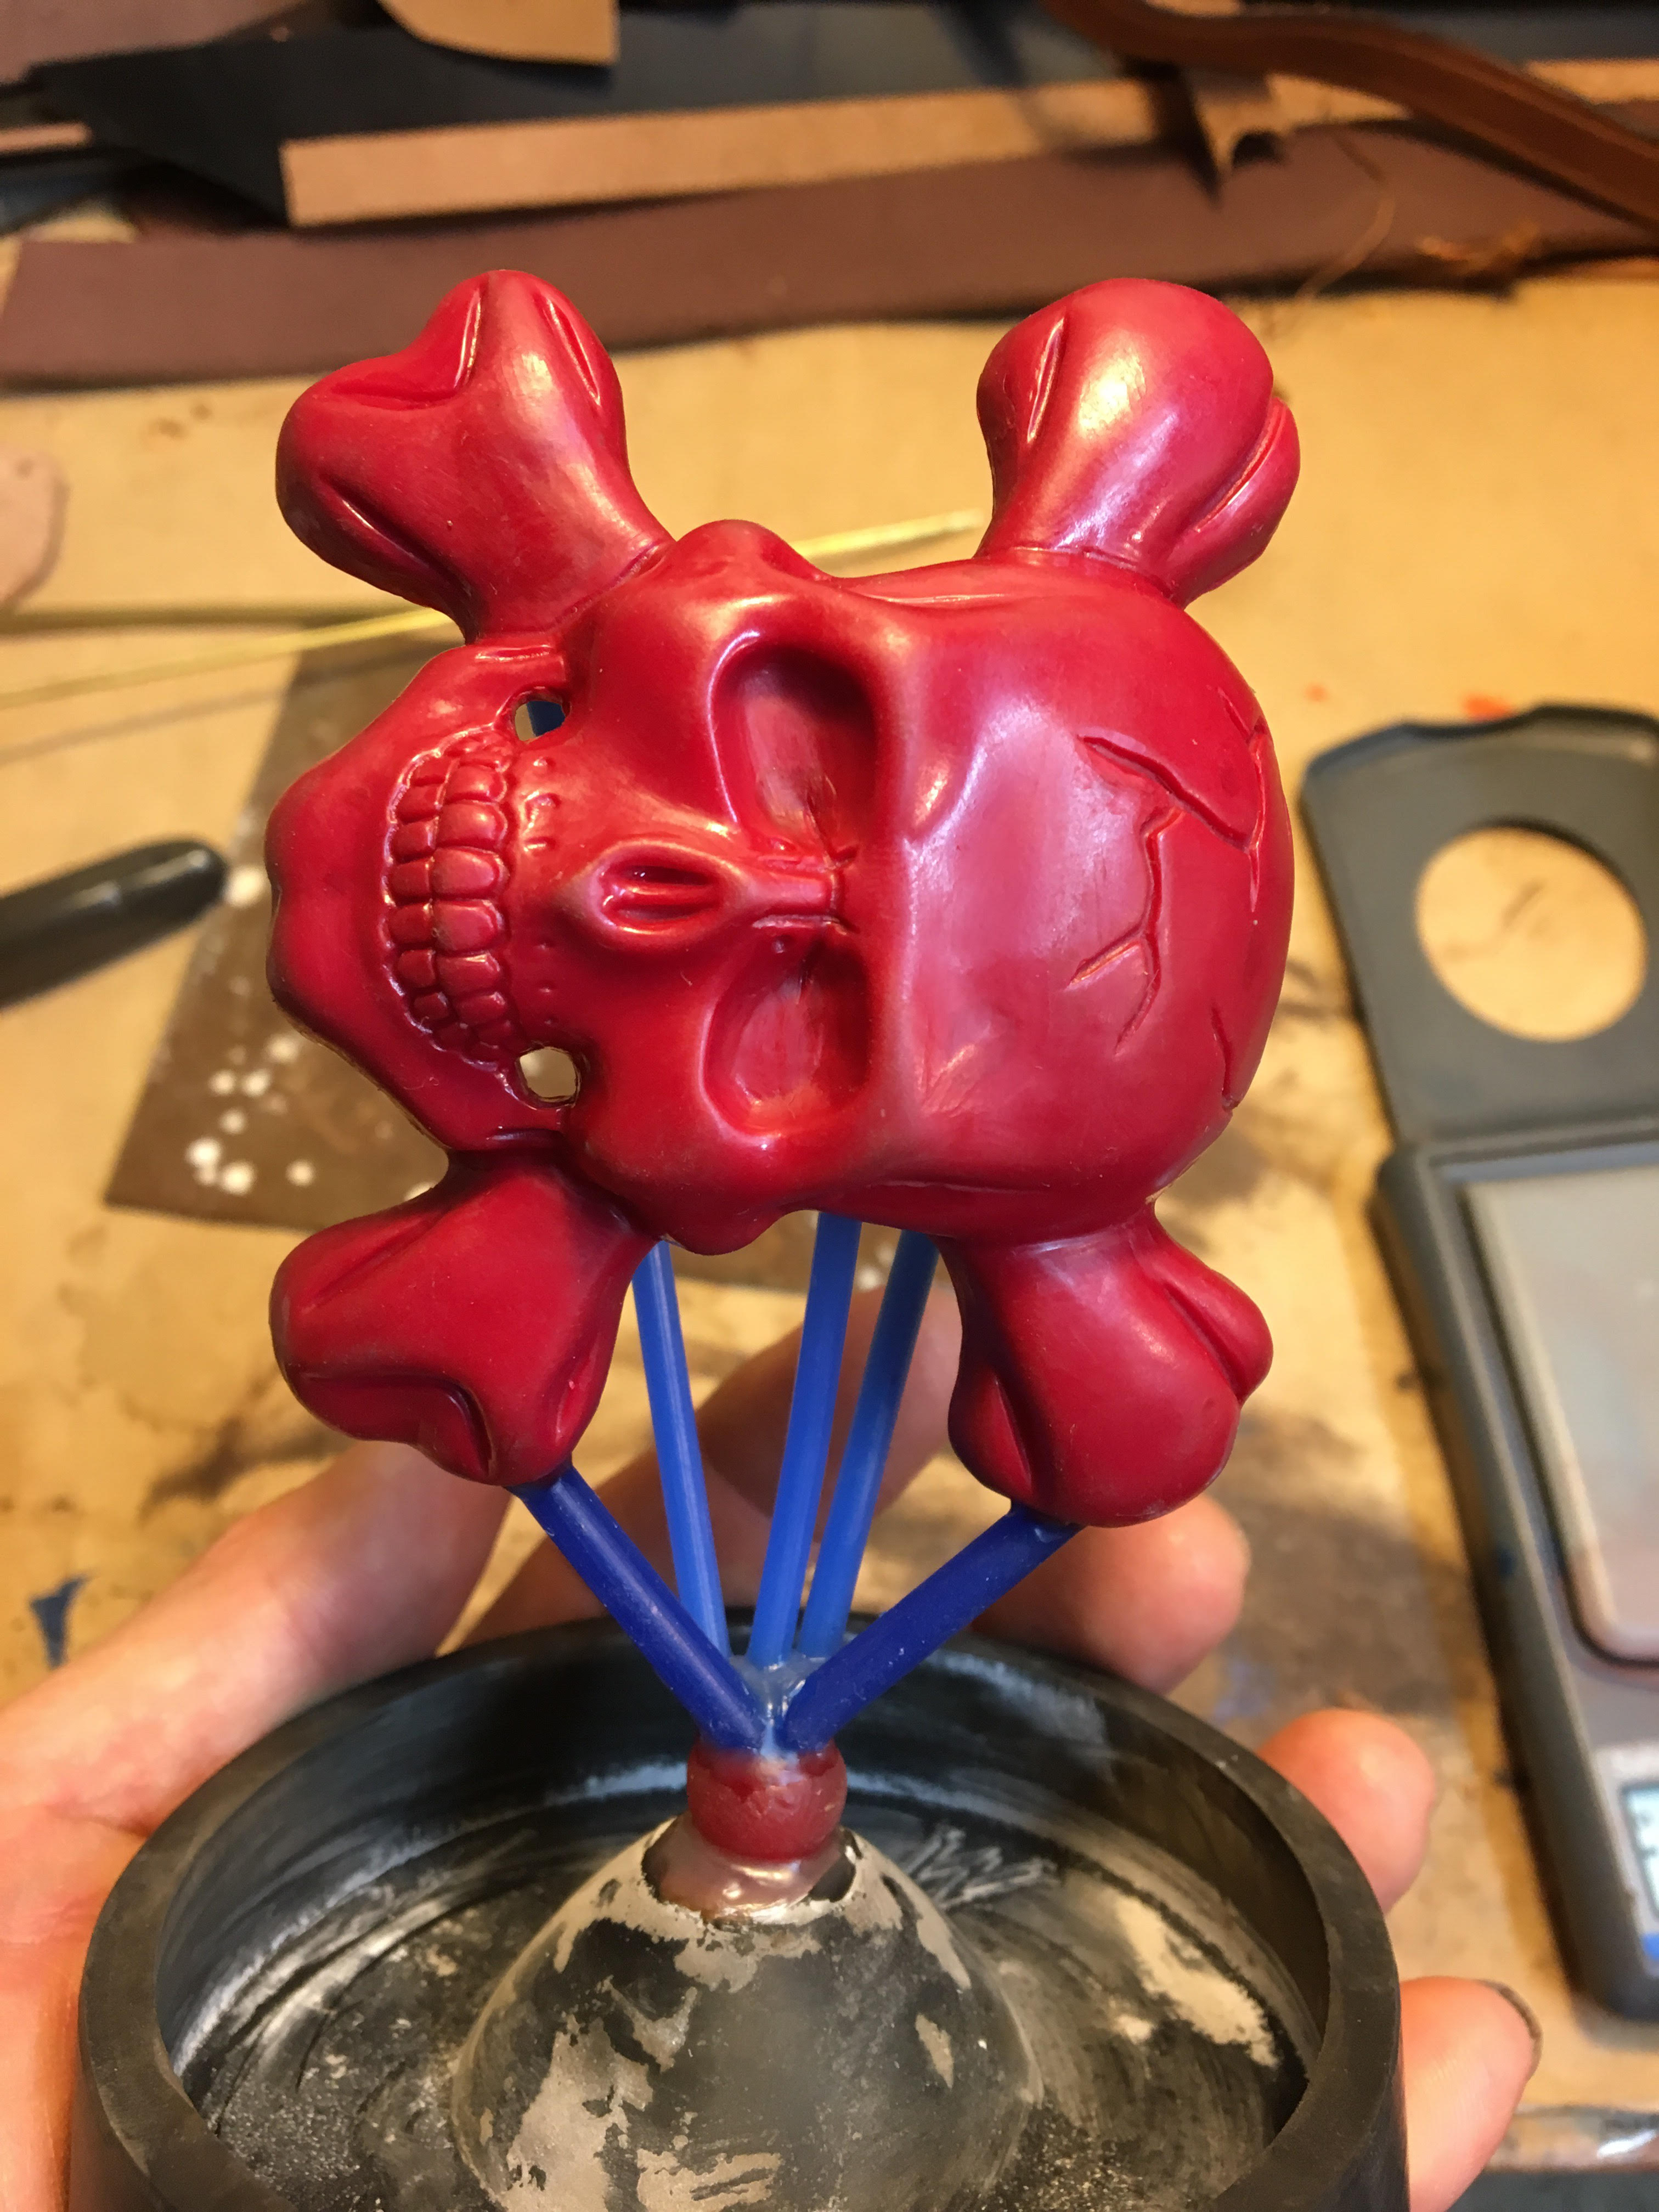
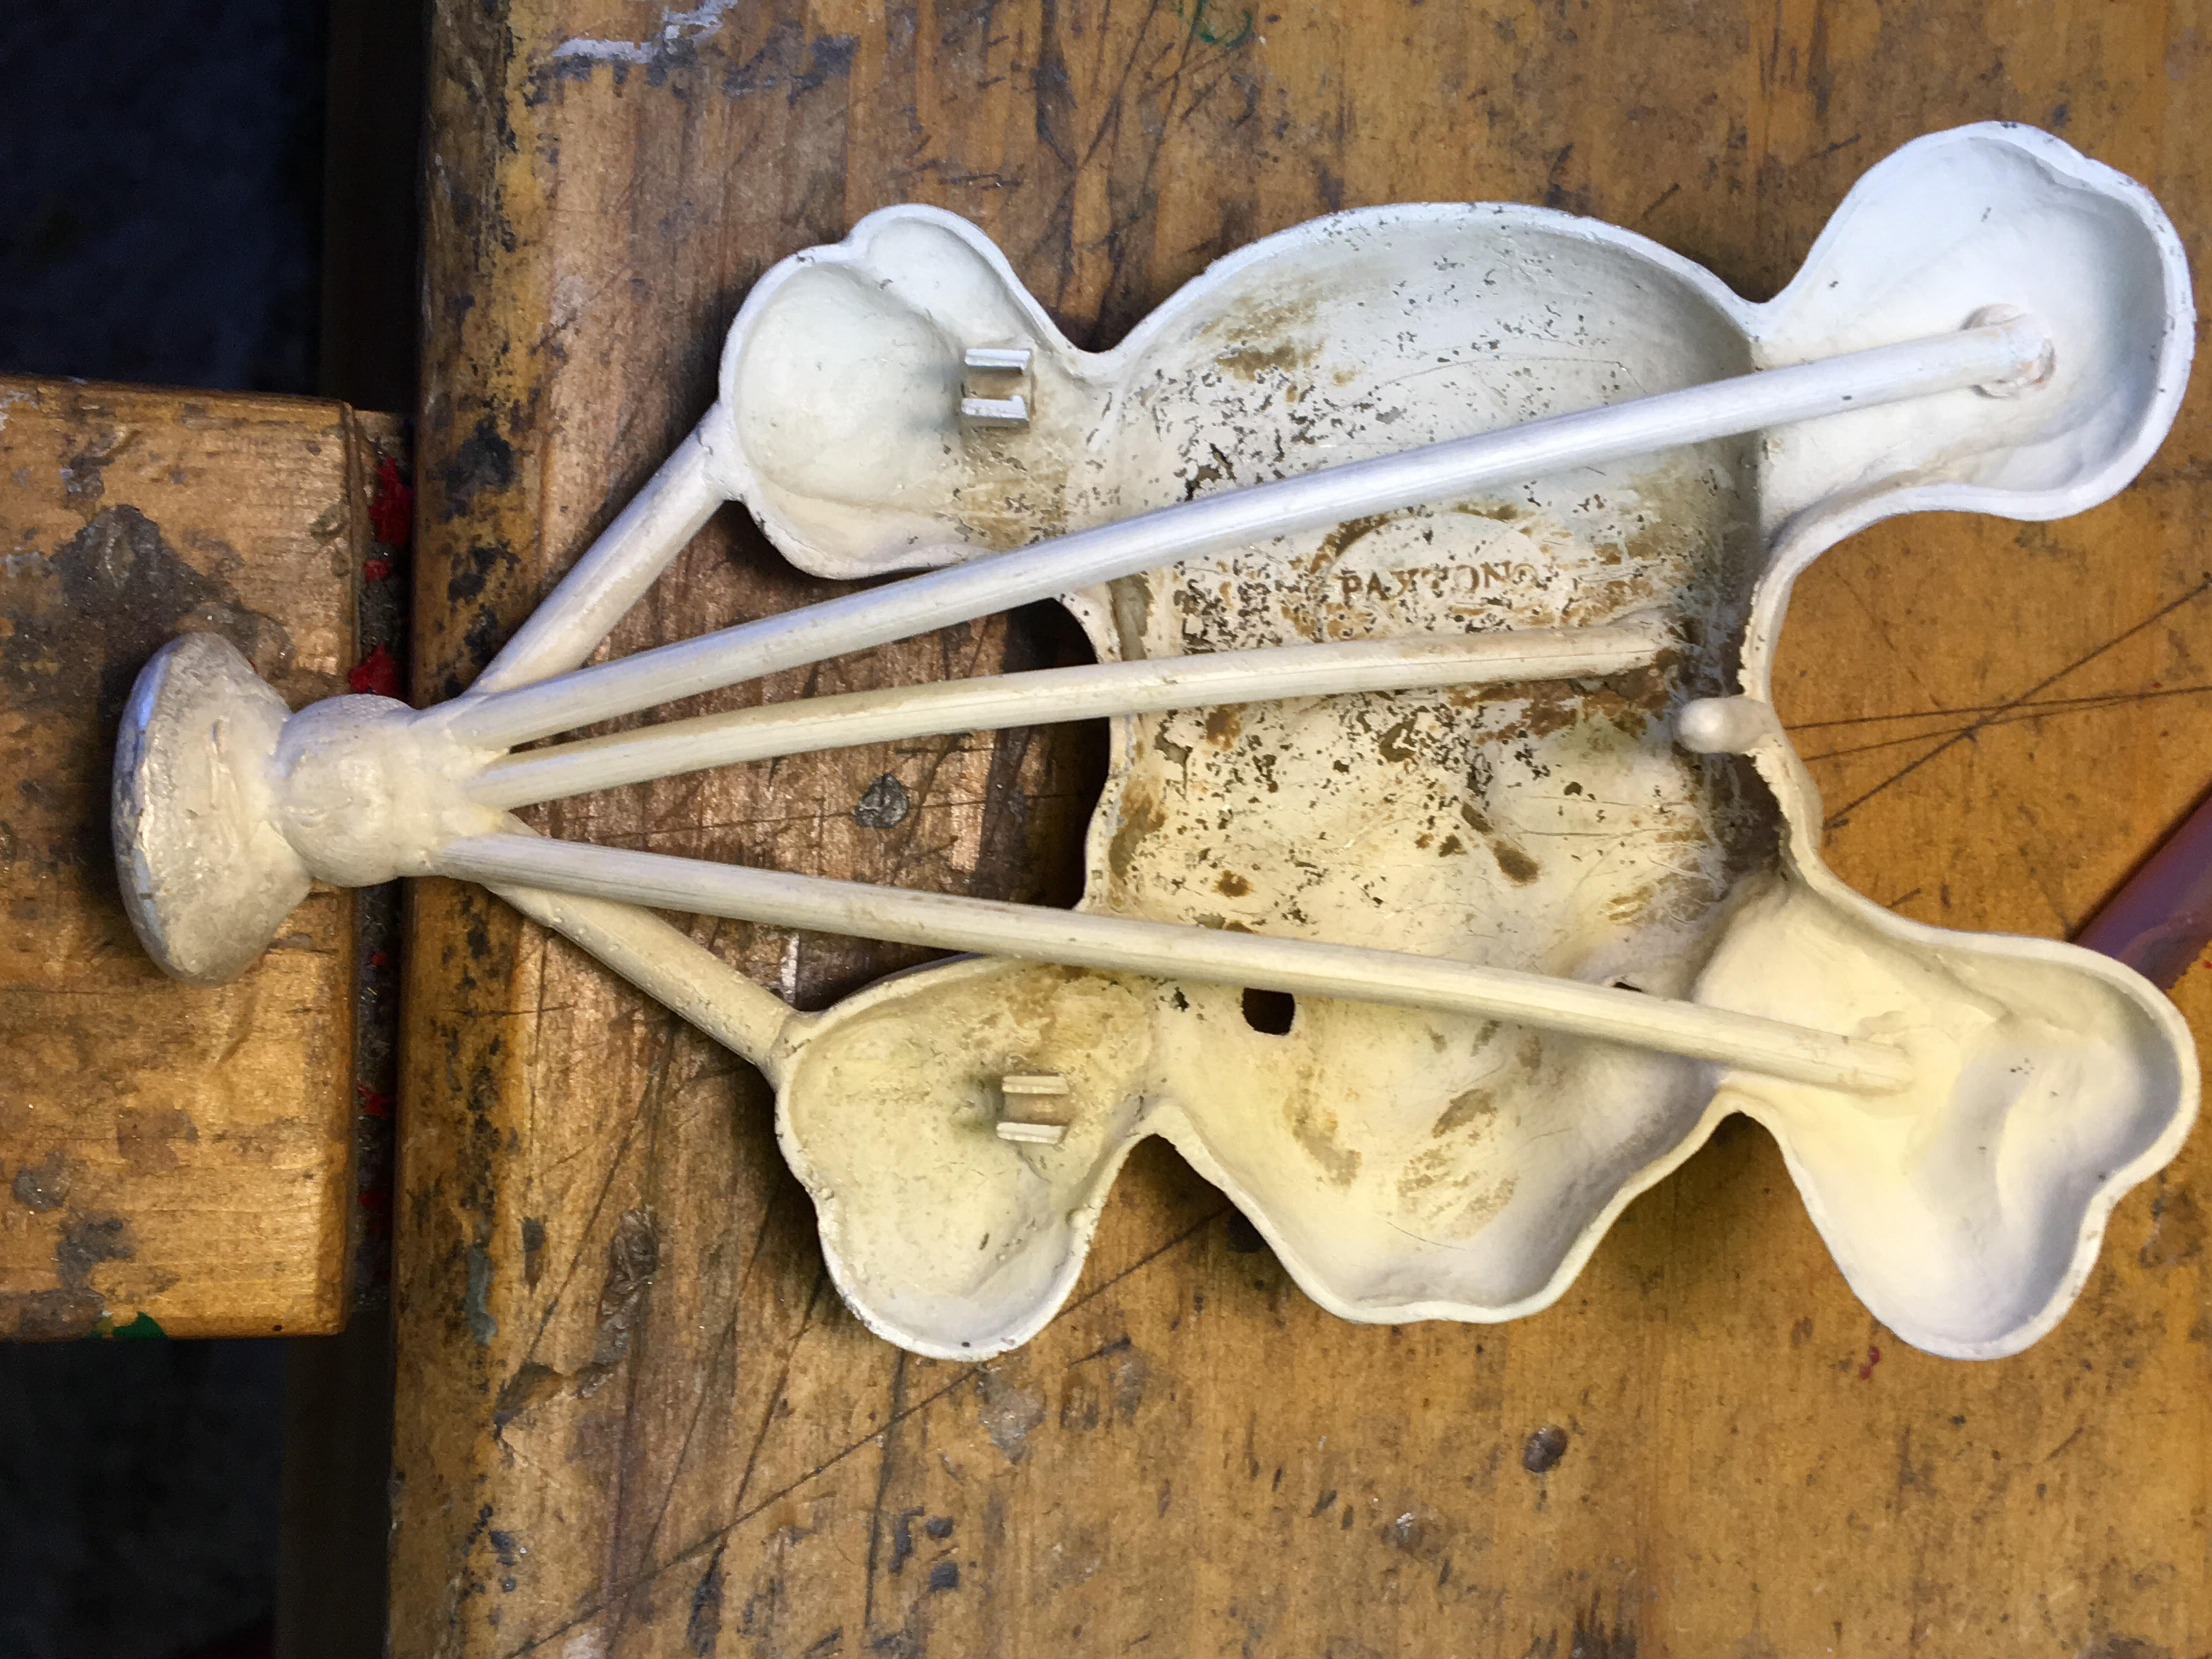
Below are some photos of the 1st and 2nd problematic pieces.
I have also listed below the specs, temps and process I followed on the 1st casting (the way I have always done it except a little higher flask temp) and the 2nd casting (a much longer burnout)

For the next casting I am thinking of trying lower silver temps and flask temp. I use a melting furnace and have always had it set at 1780 degrees and have for the most part always soaked and cast my flask at 1100 degrees. Wondering if this is too high for this large piece?

1st casting (with steam dewaxing and shorter burnout (more specs below on actual burnout cycle) ) Silver temp 1780 flask temp 1150 (I went up from my usual 1100 flask temp) vacuum casting.

2nd casting (with no steam dewaxing and long slow burnout (more specs below on actual burnout) 1780 Silver temp 1110 flask temp (dropped from 1150) vacuum casting.
The first blue wax above was an older wax. This red wax was a brand new wax I injected before casting.

1st casting 3.5” 6” flask
Poured flask night before and kept moist until morning for steam dewaxing
45min Steam dewaxer
1hr in kiln 300 degrees
Slowly ramp up to 700
2hr at 700
Slowly ramp up to 1350
2hrs at 1350
1hr at 1150
Total time in kiln until pour was approximately 7.5 hours with ramp up times and hold times.
Melting furnace set to 1780 degrees
Poured into an 1150 degree flask with reducing flame on vacuum machine (solid flask)
Casting seemed to go fine. Waited till button did not glow and quenched flask.
A large blister on the head of scull had formed in casting. Researched and thought it might have been due to dewaxing too long and wax boiled away part of investment.

2nd Casting 3.5” 6” flask
Decided not to steam dewax but do a kiln burnout of wax incase steam dewaxing was the problem
I also added one extra sprue to the already 4 sprues incase that might have been the problem. Also followed a longer burnout schedule.
Poured flask 2 hours before burnout and let sit undisturbed
Put in cold kiln and slowly ramped up to 300 degrees
2hrs at 300 degrees (wax burnout)
2hrs at 700 degrees
1hr at 900 degrees
3hrs at 1350 degrees
1.5hrs at 1110
Total time in kiln until pour was approximately 12 hours with ramp up times and hold times.
Cast same as before at 1780 silver temp and 1110 flask temp with reducing flame on vacuum machine.

At this point thinking some causes could be:
Flow of metal and turbulence due to bad spruing
Silver melting point set at too high a temp (1780 ) maybe come down to 1770 or lower.
Flask temp too high for the large piece at (1100) come down to around 960
Still maybe a possibility of wax still boiling in mold??
Bad investment (but this is the same investment I have been using for many casting which have been fine)
Contaminates in water (I use filtered water from a good filtration system but it has not been changed in a while) will be using distilled water for next casting.
???

Thanks so much!
If you want to see my other castimngs and work please visit:
paxtonjewelry.etsy.com
main website is currently being rebuilt.

Hi Paxton?
Guess thats your name?
Ted here in the UK.
Im interested in your problem as I do engineering consultancy, that is solving any technical problem thrown at me on a professional basis for agreed fees, as well as being a silversmith of some 50 yrs standing. I dont cast nor fabricate, all my work is wrought or forged or minted. Thats another story for the time being.
So the way I see your problem is this.

There are 2 issues you need to address.

  1. you need to make a flask thats in 2 parts, why? so you can disassemble it and cut the investment through after burn out so you can look and see exactly how the investment has formed where the blister is. After all the molten metal fills whatever shape its presented with.
    If you see after your cutting through to the blister area that the investment is faulty, then its not your melting temps or flask temps thats the issue.
    Its to do with a faulty or porous investment at that point.

2.Your spruing. I look at what you have done and you have used a thicker sprue to a smaller area of the mould than the larger area.
your spruing size should be the other way round. IE the sprue should have a direct relationship to the area it serves. The bigger the area the bigger the sprue.Not more of smaller ones!
also from what I have read about casting the best results are when your metal feed is down one large sprue which bottom feeds upwards the various areas of the mould. you seem to feed from the top to all areas.
Be that all as it may,
My 1st check if I was in your situation would be as outlined in 1.
Suggest you run this trial and get back to us asap so we can think about your results some more.
Finally, can you lay your hands on commercially pure aluminium? after you have got the investment to hold up cast in this cheap metal as a low temp experiment, then work up with brass a 70/30 grade not more than 30 % zinc ever! then your white or I call it nickel brass.
if all these go well, no blisters, ! then finally go with the sterling.
Its always a learning curve you have to tread yourself.If I were to go down the casting route, using the same tech setup id get different results. Its the minute changes that always effect the final outcome…
Ted.

1 Like

This is simply a sprue placement issue.

Hi paxton, Ted Again,
My 1st post was at 3am here, cant sleep sometimes.
Ive had some more thoughts since then.
You may need to consider preparing the mould in 2 parts, like traditiional sand casting in wooden or metal interlocking boxes.
this would need a pattern with a flat plate all around the size of the box using traditional mould making skills. You wouldnt need to use sand, a stiff paste of investment will hold the shape after you remove the pattern from between the 2 boxes.
when hardened the investment putty then can have the casting runnels cut with a chisel or other tool.

Look at steel casting into sand moulds, they pour in one inlet till they see the molten metal rise up out of the air holes. then you know the mould is full.

hope this helps.
as another poster commented, spruing properly can only help matters.
however where the blister is one side of the mould the inside of the buckle is convex, the other side is concave, thats shrinking back making the mould into the blister shape.
also go to utube and look at Rolls Royce casting turbine blades. some useful mould making pictures there.
Ted.

Thanks very much for your comments!

@Ted
yes Paxton is correct :slight_smile:
Thanks for your helpful info. I think if I could manage to crate a flask that could come apart after burnout I would love to cut the investment in half and see whats going on.
I also agree with the spruing tips and will post more below as it relates to both you and the other poster Philip.
I will have to look into the aspects of sand casting as i do not know much about that but hopefully can get this piece to work with my current casting setup.

@ Philip
Thanks for your comment.
Could you elaborate a little more?
Do you think this spruing problem is causing the defect during burnout because the wax cannot escape or do you feel it is happening in the metal pour maybe because of turbulence or something else?

So to give you both a little incite on why I sprued the way I did, it was a few factors:

The first one was spruing this way makes it where I can fit it in a 3.5" flask instead of a larger 4" (if turned 90 degrees) so I was trying to stay a little more manageable by using the smaller flask.

Another reason is the protruding bones are actually one of the thicker wax sections as this is where the buckle hinge are attached so it made a little sense to sprue to the thickest part of the wax model and run other sprues to the other areas.

The other and main reason was that I have cast 5 to 6 skull buckles of this same design over the years with the exact same spruing configuration in 3.5" flask and gotten perfect casting every time in both brass and white bronze. So for this to all of the sudden be a spruing issue when casting in sterling silver still baffles me even though I know the metals are different and the spruing might not be ideal.

I did pull two new waxes and sprued then both differently. One I kept similar to the others but added a sprue to the forehead to see if that would eliminate the possible wax melt out problem or metal flow problem (more of a test so see if I can get this configuration to work with a little tweaking). And the second Iactually turned 90 degrees and sprued to the head as the main sprue and went ahead and used a 4" flask. On both I added vents (form the advice of a fellow caster) which I have never tried before. This is also just a test to see if it will help flow.

They are in the kiln now and going to do a long gradual burnout so I will post back with the results once I have cast them.

The one problem that I am still facing is if this is most likely a spruing problem do I just cast normally at the temps I always cat at?
1780 metal melting pot
1100 flask temp
Or do I also come down a little on both or maybe just the flask temp. Just reading other post I do see people casting at a flask temp of around 1100 but seem to see more casting lower at like 960 to 900. This is only from the assumption that is something too hot with the metal or flask that is causing the breakdown during the actual casting pour?

Since I have two flasks I am tempted to pour one with the same temps quench it and inspect and then maybe adjust the temps a little lower on the second.

The buckle is large but not necessarily a lot thicker than the other smaller pieces I always cast. So kinda on the fence about adjusting the temperature of at least the flask a little lower during casting.

Any other feedback is welcomed!
Thanks,
Paxton

Paxton,

The dynamics of metal casting can be confusing when what once seemed to give acceptable results no longer works the same.

One simple factor may impact on other factors and before long the caster has more than one issue to contend with.

  1. Spruing and thermal dynamics are often the first object lesson to understand prior to looking into other options.

        However, in your case I would contend that it is the major and possibly the only issue.
    
  2. Temp of melt, and distance of travel are issues that could be considered in conjunction with the above. But in your case this may well be corrected when having the first details dealt with successfully.

  3. The compound of other variables that are often at risk may be more readily noticeable afterwards, and therefore I will not go into a long explanation at this time.

The chemistry of the main components with Sterling Silver casting can play a part in the 1st issue.

The impact of the hot metal and gaseous flow at the sprue/item contact area is an important factor as even vac casting systems cannot always overcome the resistance at this point. Metal should ideally flow into the item with least resistance not hit a full stop. At this stage thermal dynamics cause turbulences and this inhibits the easy flow of metal, (sometimes allowing investment to break away), and in turn the metal cools down before a complete filling of the cavity. Those are the basics, but should give you food for thought about your particular problem.

Regards,

Phil.

Sorry Paxton, I forgot to mention that the sprue thickness and position is also why the wax is not melting out easily prior to boiling in the investment. Can’t expect burn-out to make ash of a large pool of wax efficiently within the time/temp allotment.

Regards,

Phil.

This looks like massive spalling —investment breakdown. The fin on the back is further evidence of cracking investment.
When I see a positive, rough “exclusion” on the surface, indicative of plaster breaking away from the wall of the mold chamber, I begin to look for a small white defect which grows larger as I try to file it out. This is the investment that broke away.
The inclusion to the exclusion (my words).
Not sure what caused it but perhaps the metal hit with too much force at that sprue interface. But I wouldn’t bet on it.
I used to cast a lot of sterling and mold/flask casting temperature was dependent on what was inside. This had to do with how the metal cooled and the grain structure and density of the resulting casting.

Wish I could offer more.

Andy

1 Like

Working backwards, the most direct observation is the investment failed, both in cracking, as seen in the fin on the back (this alone could have caused that piece that when broken away, led to the blister) and in the spelling off of that bit that became the blister. I doubt that metal velocity could do it with vacuum casting, as the metal simply doesn’t have enough velocity/force from a gravity pour (which is what vac casting is). So if start with the investment itself. You say this same batch has been used for some time. Investment, if not fully sealed, absorbs moisture and can become weaker over time. You might just need new investment. Or one of the stronger, fiberglass reinforced investments. Examine your investing methods. Are you sure that you are using the correct amount if water to pwder? Too much water can drastically reduce the investement strength. Thicker is stronger. For steam dewaxing, try putting the flask in the freezer before it fully heats up, and be sure the flask is oriented so the wax can drain out. In burn out, remember that silica based investments undergo a phase change at a temperature around 350. You want the flask heating slowly, a ramp of about 100 degrees per hour, in the range from around 300 to 375. My guess is that the crack, and spalling, occurred before the metal was poured, so the type of metal and melting temps weren’t, I think, the cause… i think the most likely cause is the investment, mixing, and burn out sequences.

null

1 Like

Tim and I also both think it’s an investment issue.
As other have suggested try a slightly thicker mix and let the flask dry
out over night.
Good luck.
-Jo Haemer
www.timothywgreen.com

Just want to thank all those that replied with the above helpful and detailed post to my problem. All of them have helped me to work towards solving this problem and I have learned many more things that I didn’t expect. It is kinda funny how you get set in your ways of casting and do not expand much out of that bubble as long as things are working fairly well.

If anything, this experience has taught me that I still need to pay close attention to all steps and not cut corners or take shortcuts. After years of casting you seem to start finding ways to make it a little faster, some of these might be good but some can cause bigger problems when one aspect of the process fails only slightly. I am going to try and do a complete post of what worked in this case as I am sure it will help others who might come across this later down the line with their own problems.

As of now, I am also going with the most likely cause being an investment issue
(possible contaminated investment or even contaminated water).
I think it also could have been compounded by the shape of the piece and the spruing configuration I decided on.

Good news is I cast two copies last night and the last one was a complete success! :grinning: (wipes sweat away from brow) :sweat:
The other one would have also worked if I had not reduced my casting temperatures at first thinking the original problem might have been something to do with to much heat . This reduced flask heat caused the piece to not fill completely.

This was at 1:30 in the morning so i was pretty nervous casting the final one thinking well this is it. It better work or im tossing this design out the window :slight_smile:

So this is what I did differently for the casting that worked:

SPRUING
Wax #1- I sprued one skull the same as the last two fails except I added a sprue to the forehead where the problem blister was on the last pieces.
Changed: Wax #2 - I actually turned the wax 90 degrees and sprued main sprue to the head for a different configuration.

Changed: One thing I have never added is a venting sprue but I added this to both waxes. I have no idea if this even helps with vacuum casting but thought it might not hurt to try.

INVESTMENT
Changed: I went down to a local jewelry shop and purchased some of their investment in case mine was bad (they use the same investment I do which is Kerr Satin cast 20)

Changed: I mixed using distilled water and will do that from now on (I have always used filtered water from a nice sink filtration system I have. But I have gone several months past the filter change and wanted to take that variable out of the equation)

I invested the night before and then stored overnight in my steam dewaxing pot like I have always done (lets it set up nicely but does not let it dry out to much in my opinion)

DEWAXING
Changed: Installed a temperature gauge in the top of my dewaxing pot and monitored the steam dewaxing as to not go much over 200 to 225 degrees while dewaxing for the usual 45 min to 1 hr.

BURNOUT
Pretty much stuck to a good long and slow burnout schedule holding at 300, 700, 900, 1300 then let the flask soak at casting temperature.

Changed: The one thing I did differently was to put the dewaxed flask in a preheated kiln at 200 degrees instead of my usual 300 and slowly come up to 300. I also did little stops and slowly came up through the temps from 300 to 400, 500 and 700. Might have been overkill but I really wanted this casting to work.

I usually soak my flask at 1100 before casting and that has always worked but decided to drop the flask temp to 1000 with the first casting to see what would happen. So I let the 3.5" flask soak at 1000 for 1 hr and cast with metal at 1780 and while the pour looked good the skull had solidified before a full fill around the chin and lower cross bone.

I then increased the tempo to 1100 and let the 4" flask hold there for another full hour. I poured the metal at 1780 again and everything worked great.

So in conclusion it could be several factors that contributed, from spruing to dewaxing to quickly, but it seems the biggest change I made to cause the spalling / blister effect to go away was to change my investment and use distilled water.

Guess one thing I could do in the next few weeks is do two small casting, one with my investment and filtered water and one with the new investment and distilled water and compare the castings afterwards.

Thanks again for all the great help and I am glad to have become a part of this great jewelry resource i’m sure I will be visiting often!

Below are some pics of the way I sprued the final wax and how it turned out.
At the very bottom I also uploaded a pic of the other one from last night that did not completely fill.

For those that think it could have been mostly or solely due to the original way i sprued the first three (2 or which had the defect) here is a pic of the 3rd casting that was pretty much sprued the same way as the others that failed with the exception of a sprue to the forehead. As you can see the pour was actually very good with the exception of solidifying too quickly (this was my fault for lowering the flask temp to much). This again is not an ideal spruing but i do feel if the flask temp was up it would have been a good piece. So again it seems to point more towards investment breakdown for the original problem.

Hi Paxton,
Good to see you got there in the end.
Your 3rd para from the end, running a trial with a small cast, there is a direct relationship between the overall interior surface area of the mould and the quality of the investment.
I predict that this proposed trial , both will turn out perfect for this reason. so smaller area will work better.
Advise how it turns out.
Ted.

Hi Paxton

I would remove the sprue behind the eye that is getting blown out. Keep all sprue feeds to the perimeter of this model. Don’t dewax. Mix your investment a little stiff. If you are using 40 to 100 ratio move 38 to 100. You can increase strength and heat tolerant by adding boric acid to the water @ 20grams per liter. I cast AG-SS up to 5 oz @ flask temp of 850f after soak for 1-2 hours.

Make sure your controler temps and oven are calibrated.

PM me if you need more info.

Regards
Franz

PS Did not see what investment you use?

Thanks Ted I was very glad to get one to finally work.
I totally see what you are saying about smaller casting test not being the best for a true test of the investment. Before the large casting my casting were working fine and they were mostly small Pendant sized pieces. I will have to try two larger pieces side by side when I have a chance as I would like to know what the results might be and if the investment or water I am using was problematic compared to the new.

Thanks for the input!
I will try spruing any extra post to the perimeter. I have always done occasional extras to areas on the backside of the mold. But it makes sense that the force of the pour hitting the back to front surface of the mold might have adverse affects.

When you say don’t dewax are you saying dont steam dewax? Can you elaborate as I have read a lot of information that steam dewaxing is somewhat better than dry burnout and have been doing it for years with good results.

I do tend to mix my investment at the 40 to 100 ratio as I like that consistency but will experiment with the other as I would rather have my investment at a stronger ratio. I will also experiment with the boric acid addition.

I use Kerr Satin Cast 20 for my investment.
You say you cast your flask at 850… why do you think I am having to stay around 1100 flask temp for a full cast?. Seems when I come down from this temp I get solidification before full fill.
I use a metal melting pot and heat the metal to 1780 and it seems like I am good on that but would I need to maybe come up in metal temp and down in flask temp?

What do you see being the best method for calibration? I have heard using the pottery melt cones but is there an external temp gauge I can use also? I would think I need to also calibrate my melting furnace but a temp probe seems best for that.

Thanks again and I will also PM you if I don’t see you reply as you might not get a notification of this post.
Paxton

I have never used a dewaxer and was just trying to remove a possible investment break down cause. I do see the benefit to the environment. It is my understanding that after 1-2 hrs bench set the moisture left in investment will turn to steam during burnout and help with wax evacuation.

I use satin cast 20 also and have been following Hoover and Strong casting grain specs for many years. For SS they list flask temp @850-950F and cast temp 1770-1860F. I cast heavy or thick items @850 and light or fine detailed items @950. Can’t help with cast temp as I touch melt but if you are not getting complete fills looks like you could increase temp.[quote=“Midreal, post:15, topic:55408”]

What do you see being the best method for calibration? I have heard using the pottery melt cones but is there an external temp gauge I can use also? I would think I need to also calibrate my melting furnace but a temp probe seems best for that.
[/quote]

Cones work. You want to make sure that you are reaching 1350 for top end of burn out. Satin cast has been very forgiving for me but is suppose to start breaking down after tha1350. The addition of boric acid will increase it’s heat tolerance as well as making it much stronger. I use both boric acid and calcium nitrate dissolved in water when casting resin prints with a top end of burn out @1425.I aslo use these additives when casting large or very heavy items. It requires a hammer to removed cast investment but is not nearly as hard as Pt investment.

I use a laser thermometer to make sure I am close to temps.

Also Kerr will no longer be producing any investment for the jewelry trade after over 100 years. I noticed that my last 100 tub needed more water to mix correctly. I contacted Kerr with no response and then found they were leaving this market. I have also read on other related forums of other issues related to satin cast.

Hope this helps. Now back to work.

Franz

Hi Franz
I really appreciate the detailed post. So much good information.
Going to be experimenting over the next few weeks with my castings.
One thing I will do first is try dropping my flask temps a little and raising my meltal casting temp slightly and see if I get better castings and pours. Been wanting to do that anyway. Like I said, you tend to get stuck with what your doing as long as it is working satisfactory but I have always felt my temps could use some adjusting to see if I could get better pieces with less finishing or fixing required.
I like those Hoover and Strong casting specs and will use them as a starting point. I am definitely not new to the world of casting as I have been doing it for around 7 years and probably cast upward of 1000 or more pieces with good results but I feel I definitely have room for improvement :+1:
I also heard that there would be no more satin cast 2o produced :slightly_frowning_face:
I didn’t know they would not be producing any investment and was hopping for a similar replacement. Have you decided what brand you will be getting instead? I will be researching this also.
Thanks again and wishing you happy casting!
Paxton

Hey Paxton

I keep a copy of H & S casting grain specs along with other suppliers specs pined up next to my programmable oven controller. This helps for me as I cast for others who supply metal from varying suppliers or their own. As I have learned, it is about being consistent and repeatable. To that end I try to control as many variables as possible.

I have heard from some of my pals that R & Rs ultravest is a very similar to satin cast in formulation if not identical, so that will be my first trial.

Regards
Franz

Hi Paxton, sounds like you have a lot of testing happening. Just a thought that may help provide sure answers. When testing, try to limit the number of unknowns to one. It takes more time, but you can obtain reliable information about whatever it is your are experimenting with. Testing 4 or 5 variables at the same time may get you a satifactory casting, but you really don’t know what influenced your results. Good luck and keep on keeping on. Sunny

You say you cast your flask at 850… why do you think I am having to stay around 1100 flask temp for a full cast?. Seems when I come down from this temp I get solidification before full fill.
I use a metal melting pot and heat the metal to 1780 and it seems like I am good on that but would I need to maybe come up in metal temp and down in flask temp?

You need higher flask temperatures for thin or highly detailed parts in order to keep the metal fluid longer to ensure complete fill. For thicker parts you want a lower flask temperature so the metal doesn’t stay fluid for too long causing other problems.

Your buckle is hollowed out pretty significantly which gives it a large surface area but with low volume and if you do not have enough feeders into the entirety of the buckle, lower flask temps will cause the metal to freeze out too quick in various places. That is why the higher temps work better with the sprue arrangement you have now.

Regards,
Ron