Box Rings and Modifications

Among my favorite books is Alan Revere’s “Professional Jewelry Making.” It’s really helped me improve my technique, as well as given me a better understanding about metal working and how materials respond to force, heat, etc. I’m particularly fond of the “Box Ring” chapter, and have explored this form in several ways. I just finished a very different practice piece, and wanted to share some of what I’ve learned along the way.

For brevity, I’ll skip the basics of a box ring, and assume you either know this form, or will look it up in Mr. Revere’s book.

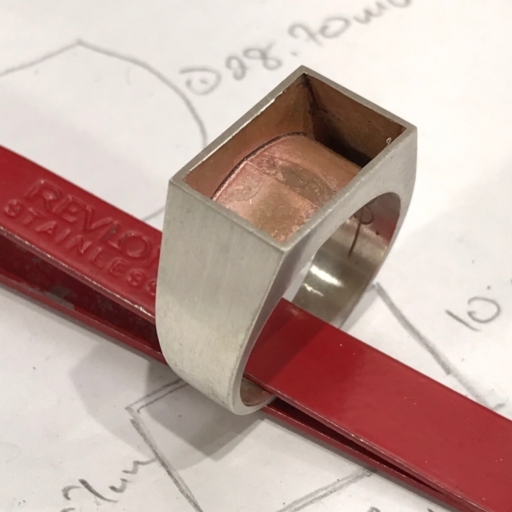
My First Box Ring Attempt
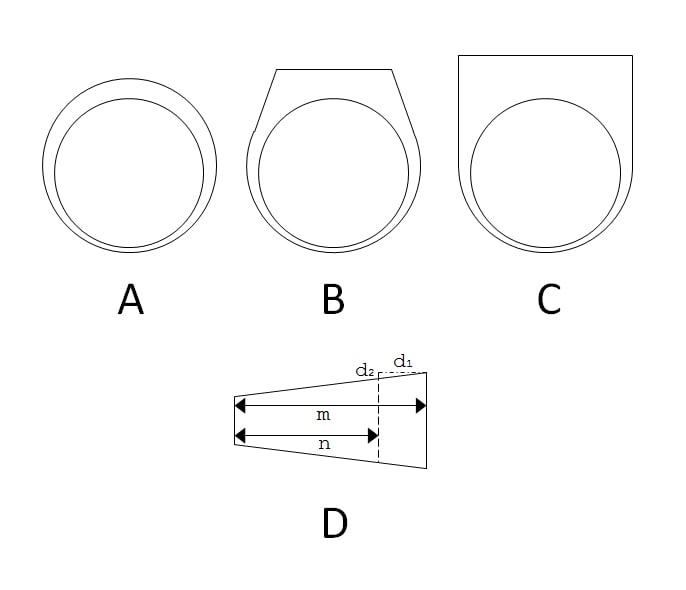
The above is my first try at a box ring, before the face was applied. I went step-by-step, using the Box Ring chapter’s instructions, and everything went pretty smoothly. However, I think there’s a small issue with the shank template as presented in the book.

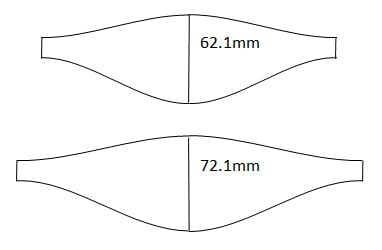
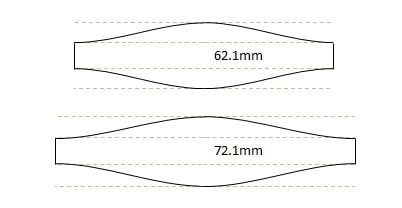
Original Shank Template
When the two wide ends of the inside shank are joined and trued to a circle, those ends come to an oblique point, and the sides of ring don’t define a plane. That point has to be filed off the shank before the sides can be attached. Wider ring faces will have even more dramatic points.

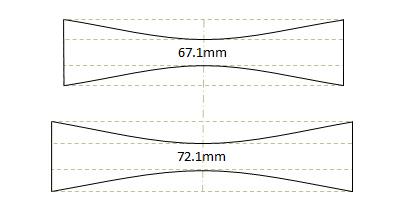
Modified Shank Template
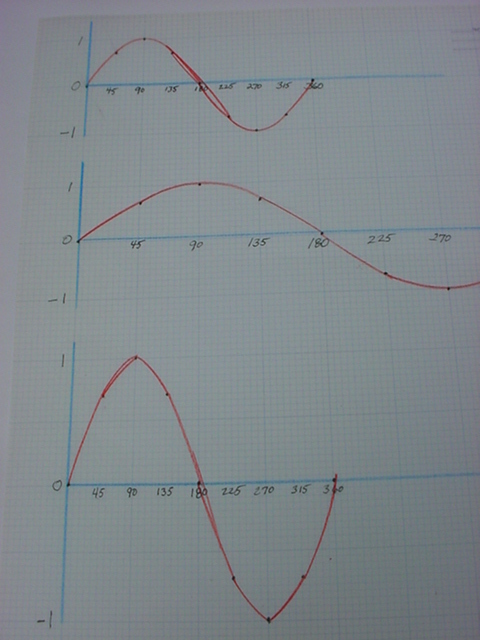
This is my modified template. The shapes along either edge are sine curves (note how the slope of the curve decreases toward the ends and center), and what happens when these are formed into circles is the edges come together with perfection (assuming you’ve cut the shank without error). That means when filing the sides flat, a lot less material needs to be removed.
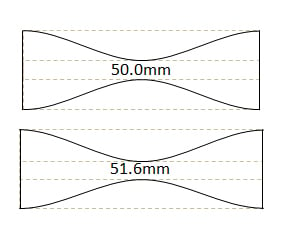
A Narrower Box Face
The sine curves are beautiful things, because their length and width can be changed independently of each other to make different sized shanks or faces, and as long the sine shape is maintained, they’ll always come together to form a perfectly flat side. (Not to be too persnickety, but yes, because the outer shank’s ends are left free, this sine curve rule breaks where the shank diverges from the circle.)

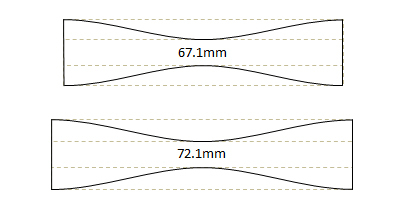
Reversed Shank Template
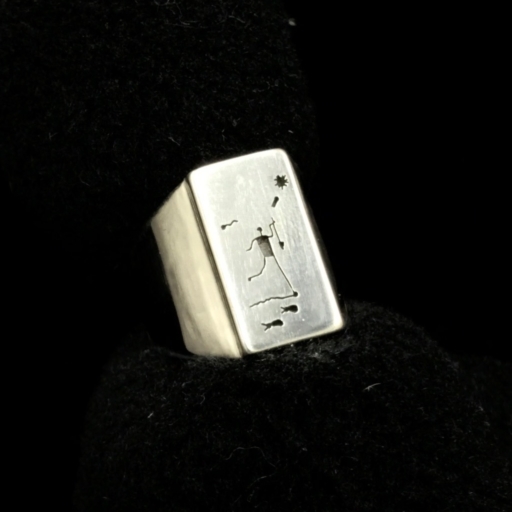
My practice piece, the one I mentioned at the beginning of this post, is a little different. I split the shank templates in the middle, and flipped them end-wise to set the joint of the shank at its narrowest point. I also made the outer shank much larger relative to the inner shank. Instead of adding a flat face, I wanted to raise the face of the ring on a stake, creating a domed surface.

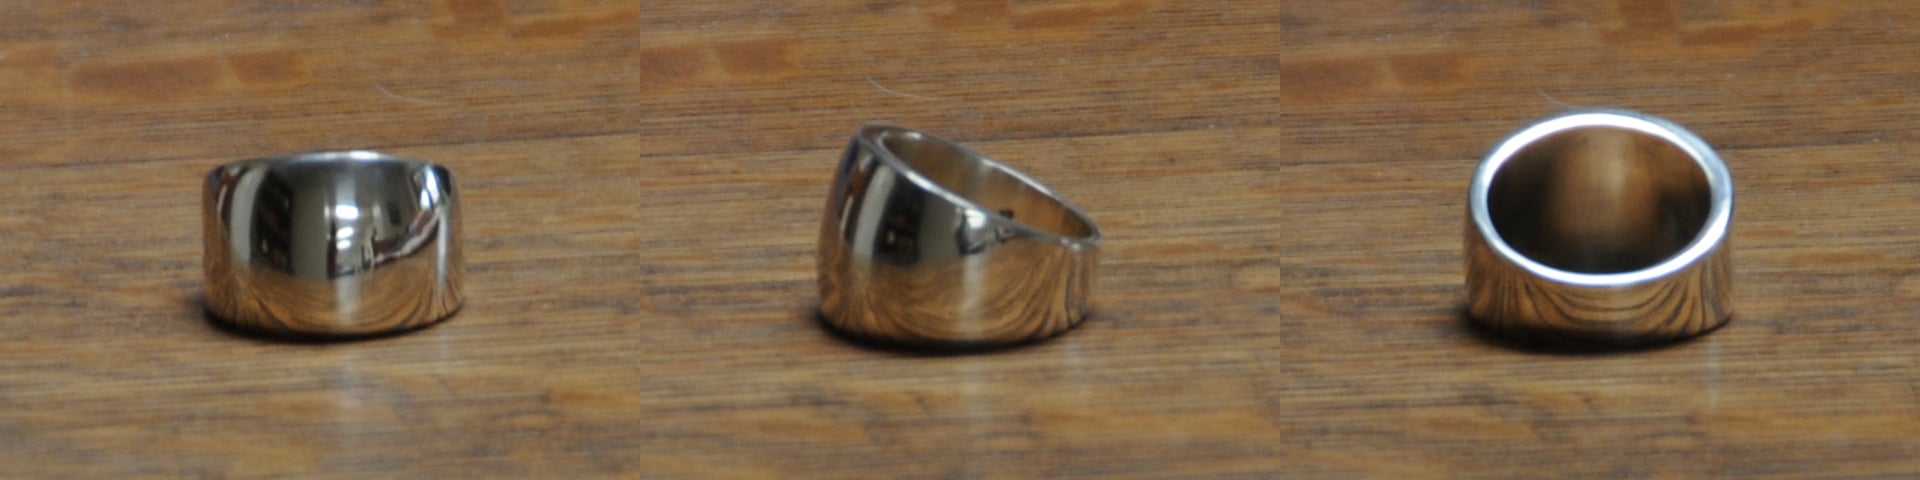
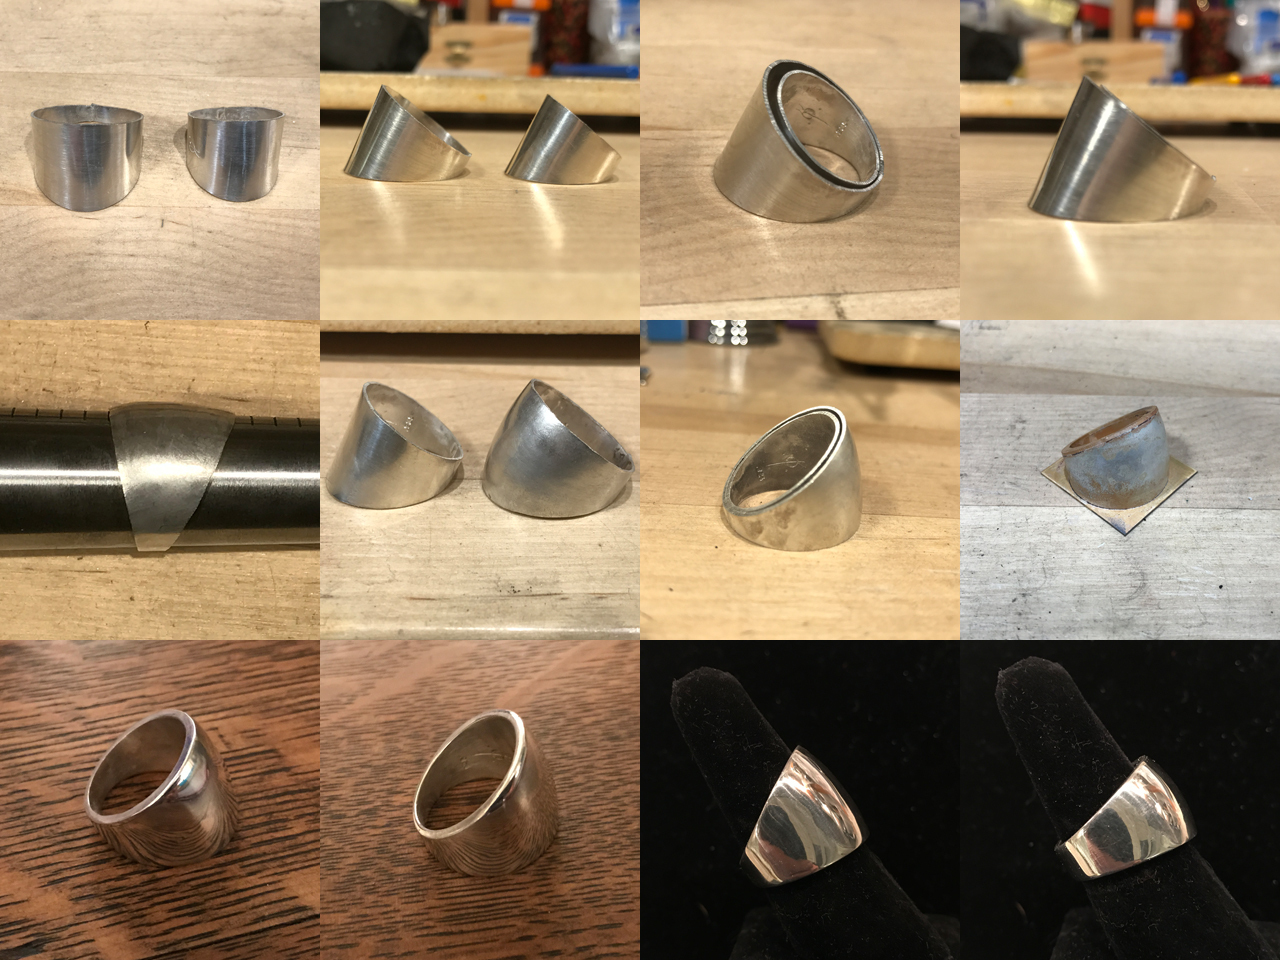
My Completed Practice Piece

I know this is basic for a lot of folks here, but I hope that it gives others who are novices like me some insight and help on shape and form.

Thanks for reading.

Alec

14 Likes

@Alec you are awesome. -Seth

Don’t forget about this one: Hollow Ring Project - Ganoksin Jewelry Making Community

awesome shape alec!

Julie

I have the book, although I have not made the Box Ring.

The width measurements on his shank drawings indicate the inside ends are 12mm, and the outside ends are 13mm, Your drawing makes them appear to be equal widths. Maybe you forgot to show it in your drawing.

If the ring is made with the ends of both blanks having equal widths, the inside point would obviously need to be filed.

Seth, Julie, thank you.

As far as the width of the ends, Betty, I didn’t forget; that just wasn’t the feature I wanted to focus on for the original post. It really depends on a few factors. The height of the face, its width relative to the ring size, the difference in length between the inner and outer shanks, and where you stop bending the outer shank. The sine curve gets you a long way, but if you’re playing with extreme differences, a little more calculation and planning are necessary.

Ring Profiles
Using the same length for the outer shank, but reducing the amount of curve you form will increase the distance between the ring “face” and the inner shank. So in fig. A (which really doesn’t have a face), the distance is small, and moving to figs. B and C, the distance grows. Looking at a profile of the ring from the side, fig. D, as d1, the difference between the distal points of the outer shank (m) and inner shank (n), increases, so to does d2, the difference between the maximum widths of each shank.

I’ll stop there, as I notice that uncomfortable feeling of nerdiness creeping up on me.

Alec

5 Likes

Pro work great pictures

How did you create the sine curve on your Modified Shank template?

Are you using Trig? If so, would you show us how you would plot it on a graph?

Maybe I’m reaching too far for an explanation, but is it possible that the book’s ring pattern is intentionally designed to assure enough metal is available to avoid a gap at the inside shank seam and the sides?

1 Like

An good way is to grab a plain sine wave graphic off the web using google images. Or, just use the graphic in my post. Then stretch and/or compress to your needs. A sine is a sine is a sine. Again, that’s the beauty of it.

I’m not sure why the curve on the book’s template is shaped as it is. I doubt it’s anything to do with a gap. Try this: print and cut out the examples I posted. Tape the ends together and look at the shapes in three dimensions. That will give you a quick and easy look at how this works.

Alec

2 Likes

Incidentally, you don’t have to use the same size curves on both sides of the shank. You can make an asymmetric ring by using different heights (amplitudes) of that sine curve for either side of the shank.

Hmmm, sounds like another practice piece wanting to be made. :slight_smile:

Alec

2 Likes

My efforts to stretch a copied sine curve looked wrong, so I created a sine curve by plotting the angles, and then stretched each axis individually. They look different, but after superimposing one graph curve on top of another, the curves are indeed identical. However, I still would not trust my copied and stretched curve (not shown).

This sort of thing is much easier to do with software. You develop the curve in a vector drawing program using bezier curves and then print it.
Inkscape is an excellent, free vector drawing program that runs on all operating systems. Like all graphic programs it has a steep learning curve, but learning the few steps necessary to do something like this is quick.

1 Like

Folks, seriously, you’re making this way too hard. There’s no need to plot, manually or with software. Just use this as an example:

Squish its height down to an appropriate width for your shank. Stick two together end-to-end and clip that peak to peak. Stretch that to the length of your shank circumference.

That’s one side of the shank.

Flip it over and that’s the other side.

Alec

3 Likes

Are you relying on your eyes and a pencil to squish and stretch?

If so, then why use a sine curve if the angles of the curve are not important?

1 Like

This is all very interesting, but if I were to make a box ring, I think I would make up two templates cut out of paper and glue one together to be sure it fit together right, then use the template I had left to cut it out of sheet. Am I missing something?

I suppose that if I wanted to make multiples of different sizes, generating the curves and printing out the templates might be helpful.
royjohn

I’d like to add a couple of variations to illustrate how flexible this simple sine curve is, and how beautifully it works for these rings. I want to point out that all (all, every one, without exception) of my own templates are derived from the same original sine curve, and are adapted, as I’ve said, by changing the length and height of the curve as needed.

This first shows a very dramatic shape. It’s still a simple sine curve. The photo that follows is the (very small pinky) ring that was made with this template; the face is very tall relative to the bottom of the shank.

Tall Face Template

Bouse Fisherman Ring

This second example is an asymmetric version of the domed box ring I originally posted. The template was created by stretching the height of the sine curve on only one side of the shank. Again, however, this is derived from that same original template. And to underscore how flexible and easy this is to design, I did everything from template to polish in just this evening alone.

Asymmetric Template

Finally, here’s a montage of some of the build sequence for this ring…

Asymmetric Practice Piece

The top row shows the inner and outer shanks after they’ve been soldered and trued, but not yet filed. Notice how flat they sit against the bench top, and how beautifully they line up.

Row two shows the outer shank after it’s been raised, how it now compares to the inner shank, and then a couple photos of how the pieces are attached.

The last row is the completed ring, with a comparison between the asymmetric version and the symmetric piece from the original post.

Again, thanks for reading. I think I’m done obsessing… that is until I think about adding an overlay design to the face, or decide to set some stones, or… okay, nevermind, I guess I’m not done. :stuck_out_tongue:

Alec

4 Likes

Thank you Alec.

Alec - Nicely done. In particular, I enjoyed the photo progression. Thank you for posting.

@Alec

Was the focus of your original post, to end the pattern at the apex of a sine curve?

I’ll have to wait until after tax day to think about your “Ring Profiles” post.

I find it really interesting how you start with a sine curve, but when the ring is formed and soldered, it sits flat on the bench, with perfectly flat sides. I tried making a box ring once and made the template with a series of straight lines. Now I understand why that didn’t work!!! Thank you for sharing this.

Helen
UK

1 Like