I am having trouble getting my bezel edges to sit nice and tight to the stone. I just dont seem to have the hand strength for that last .005 millimeter so theres a slight gap visible. Is there a technique im missing out on?
4 Likes
Bebe,
Good question! What kind of Stone are you trying to mount and in what Metal? Also, can you post a photo of the Stone in the Bezel? This is important information for us to be able to answer your question, as different Stones being mounted in different Metals, will require slightly different techniques to accomplish what you want to do…
Jonathan
1 Like
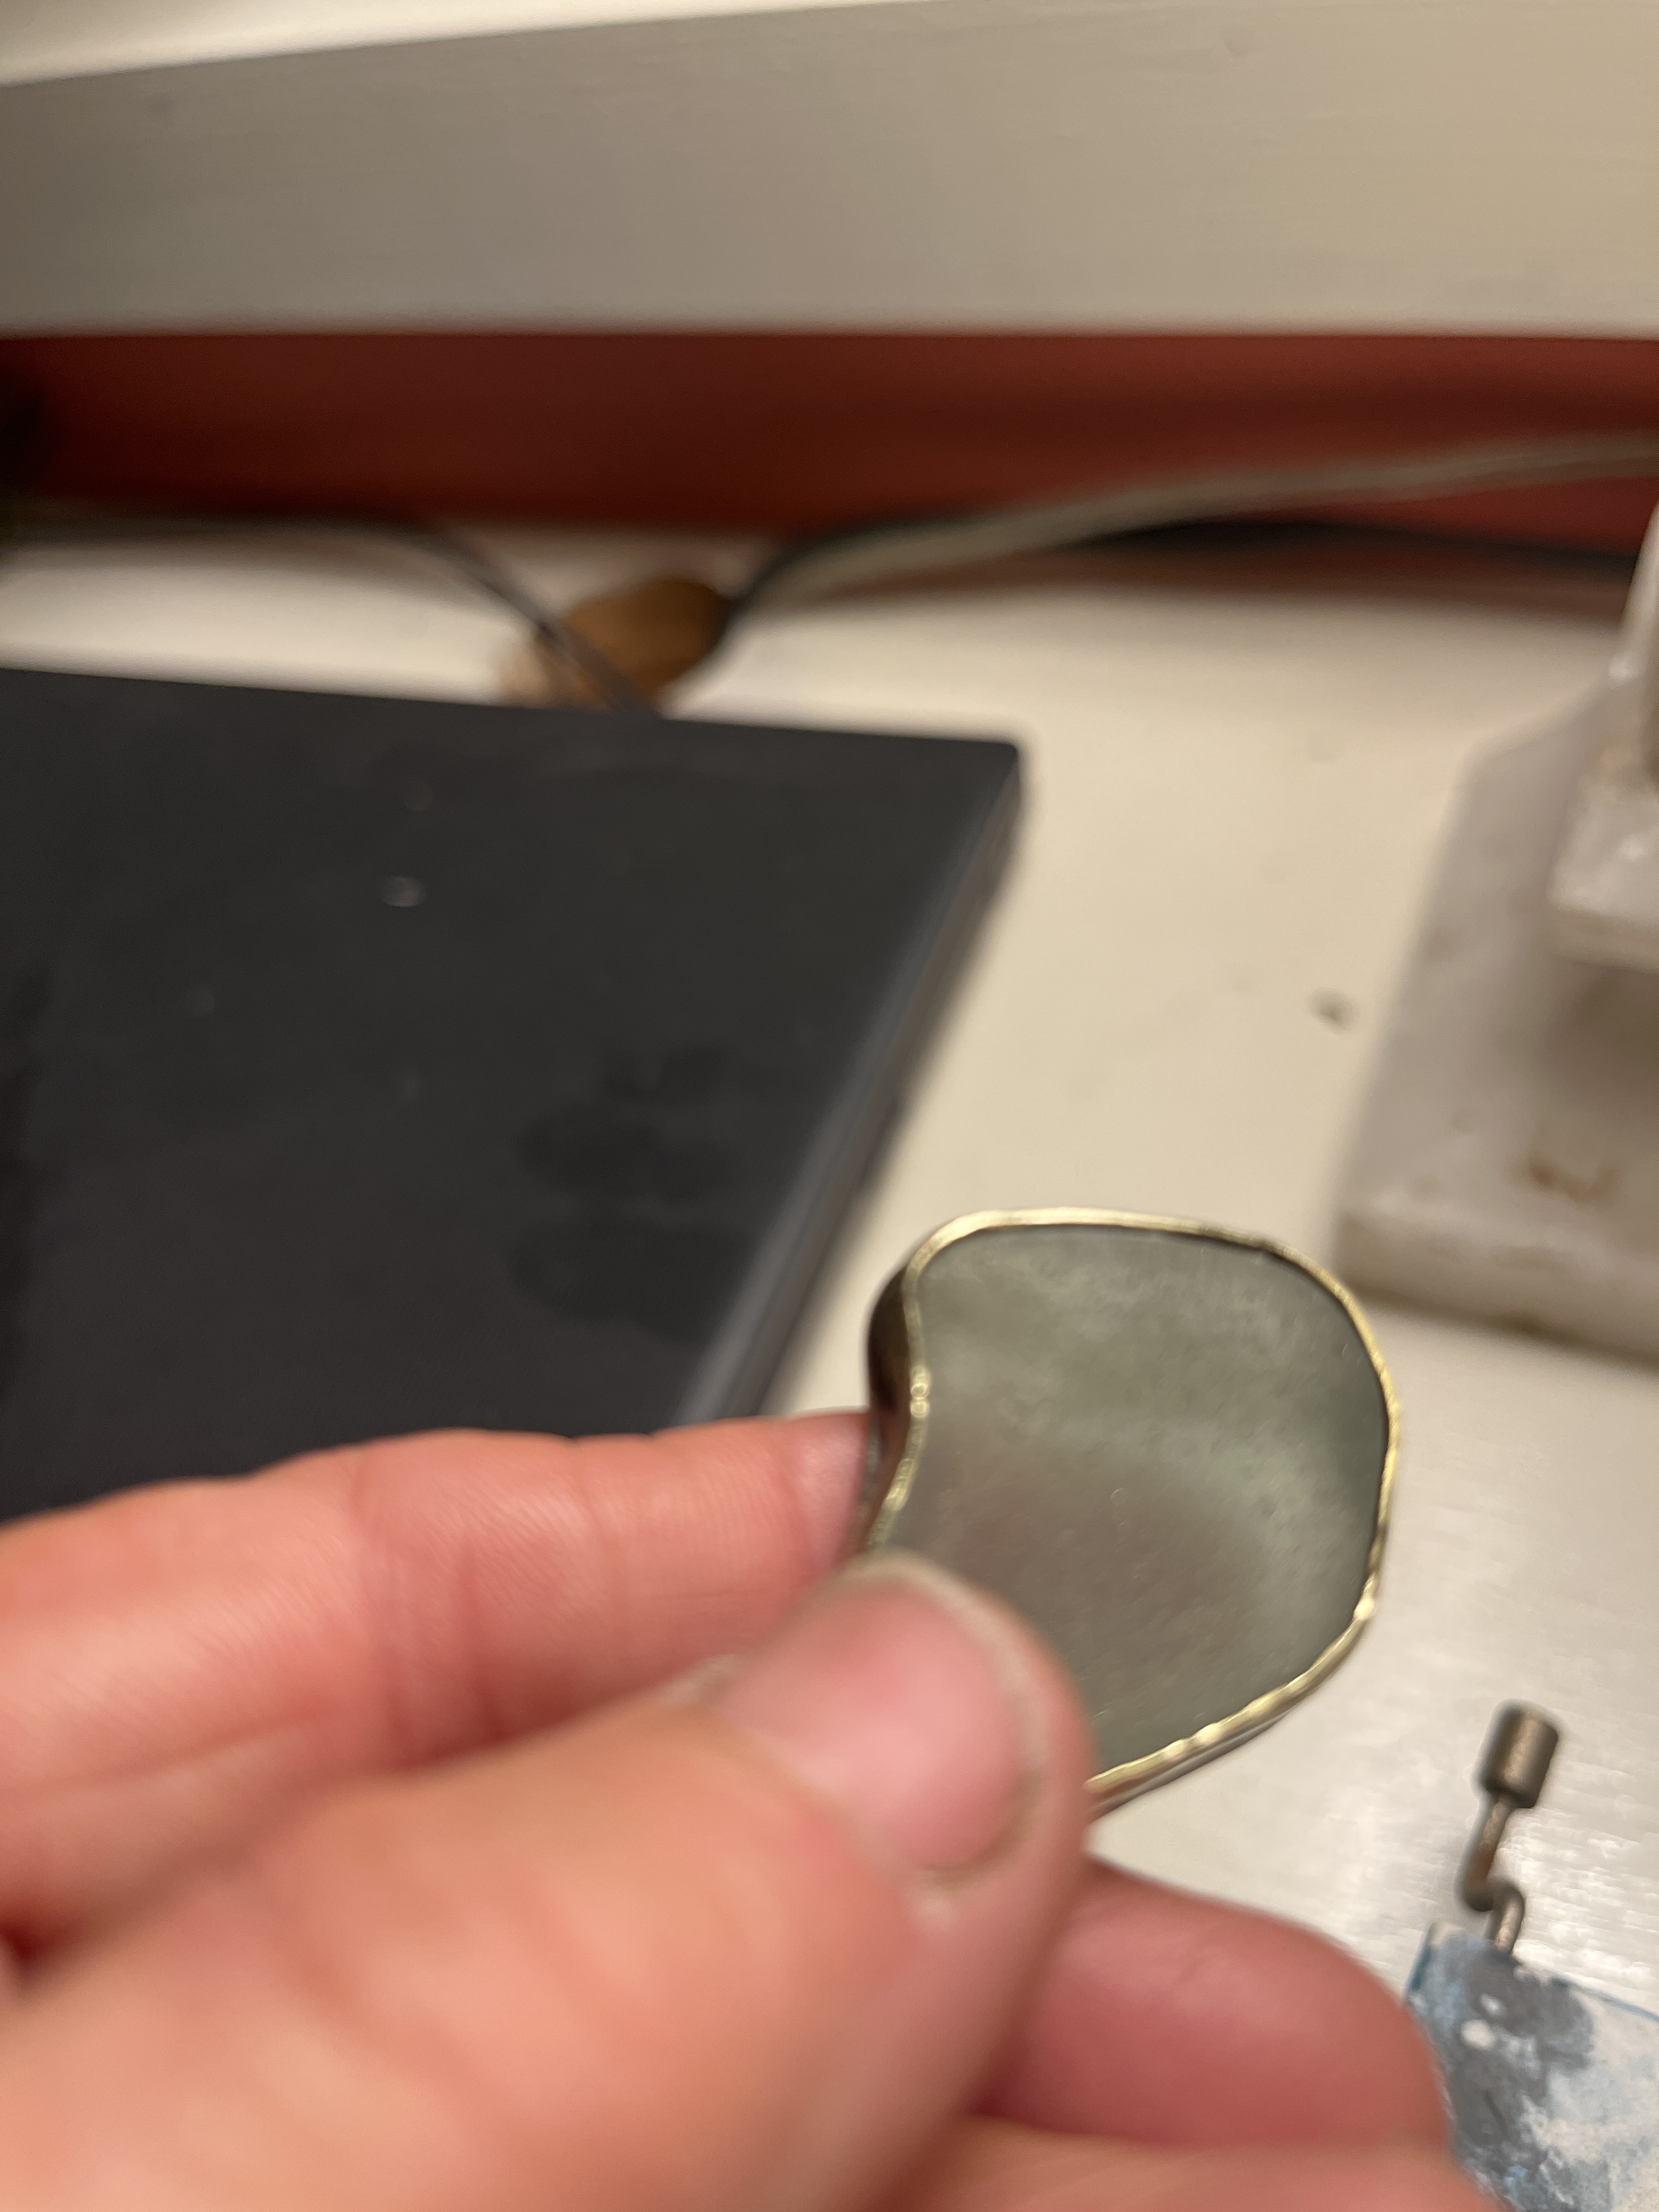
The metal here is jewelers brass and also i use sterling silver. Both 24 ga. I have even more trouble with the sterling
1 Like
Bebe,
Interesting… Usually Brass is more difficult to work with than Sterling Silver is, as it is a slightly harder metal and hardens faster than Silver does. Sterling Silver is typically quite malleable and usually much easier to work, especially when using it as a Bezel material.
I can’t tell whether this piece is a Ring, Pendant or something else, so if it’s not a Ring, do you have access to any Holding Compound, such as Orange Flake Shellac, Thermo-Loc or even Chaser’s Pitch? You will need to be able to hold the Bezel very firmly (not in your hands) to be able to tighten the Bezel any more than you already have.
Seaglass is another issue that we have to consider, as Glass in general can be quite brittle and chips easily, though Seaglass does tend to be on the harder side, but you do still need to treat it like a soft or brittle Stone and be careful not to put too much pressure on it. I imagine that is why I have seen a lot of Bezel-set Seaglass Jewellery that has a slight gap around the Bezel, in between it and the Glass, it’s a safer alternative than risking chipping the Glass.
To me, as long as the Seaglass doesn’t rattle when you tap it on it’s side with your finger and doesn’t move in the Bezel, than it’s probably fine as it is for Pendants, Earrings and Brooches. For Rings, you will need to Tighten it as much as you can, so it will need a little more work for the Stone to be safe. So what is this piece going to be?
Jonathan
3 Likes
Generally silver wire bezels are made with fine silver. It’s plenty strong for the task and won’t work harden as quickly as sterling.
As well, unless you want the thickness of the bezel wire to be a feature you can taper the thickness of the wire in the top couple of millimeters. That way the bezel will have a thinner edge.
Also, are you burnishing or just pushing?
8 Likes
Hi and thank you—this piece is a pendant and i do confess im afraid to crack the glass. I have the thermoplastic as a holder. But i havent gotten brave enough with the pressure maybe? It doesnt rattle around in the bezel though
1 Like
Bebe,
Last question: How confident or proficient are you with a Hammer, when hitting small tools? There’s no right or wrong answer, just what you do or don’t feel comfortable doing, if you don’t feel comfortable using your Hammer around an easily breakable Stone, then Seaglass is not the time to try… Your answer will tell me how you should proceed…
Jonathan
1 Like
Hi. I use a hammer and im just a novice but im comfortable cracking some seaglass in the learning process
5 Likes
Bebe,
Great, that’s the best kind of attitude to have and it will allow you to grow as a Jeweller - we have all broken things along the way in learning this craft, this art, and it is a very important part of the process… You must be willing to break things, to make mistakes, to fail, as all of these are the stepping stones of learning and without taking them, you will only slow your learning and dampen your skills and abilities…
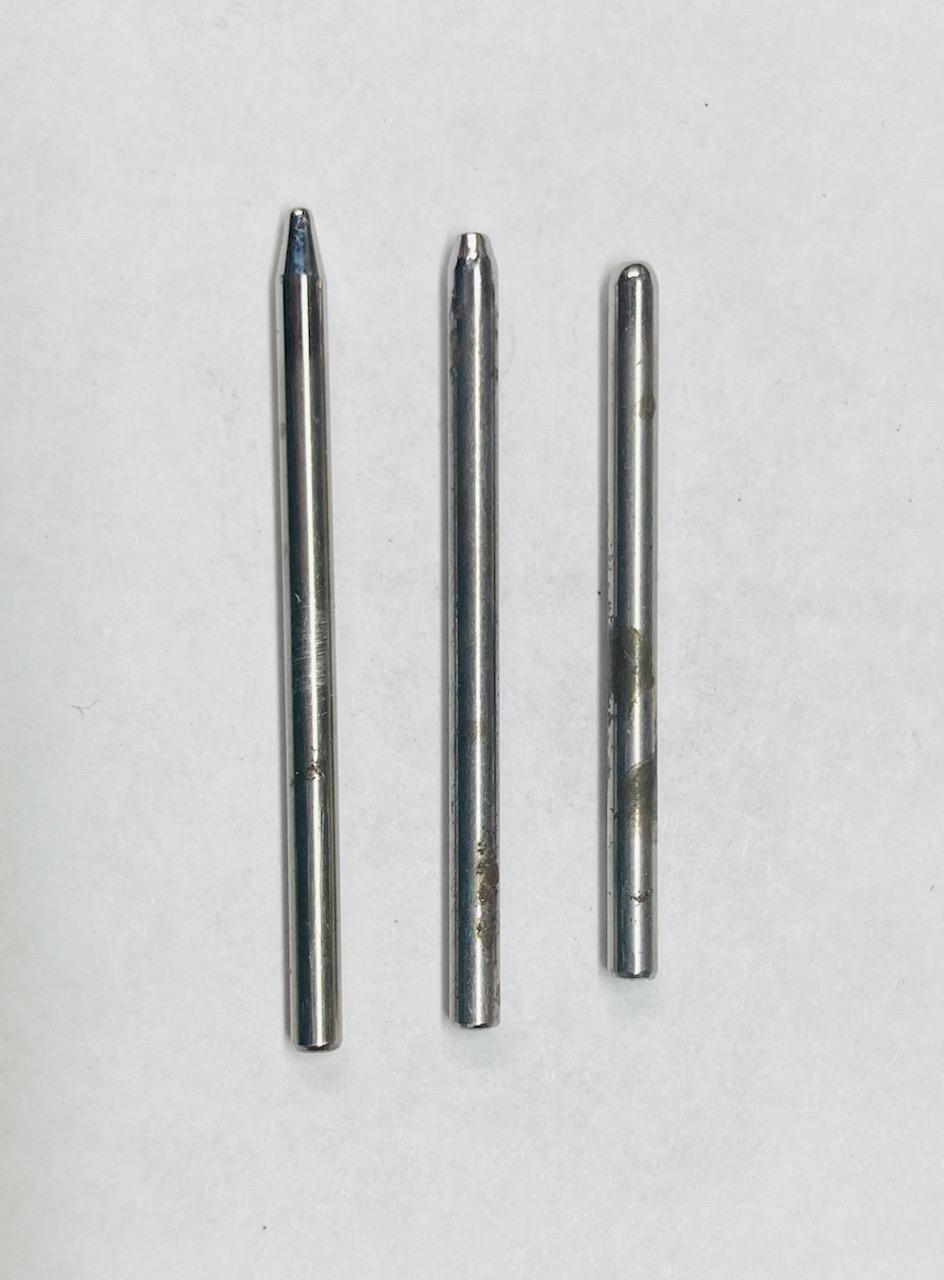
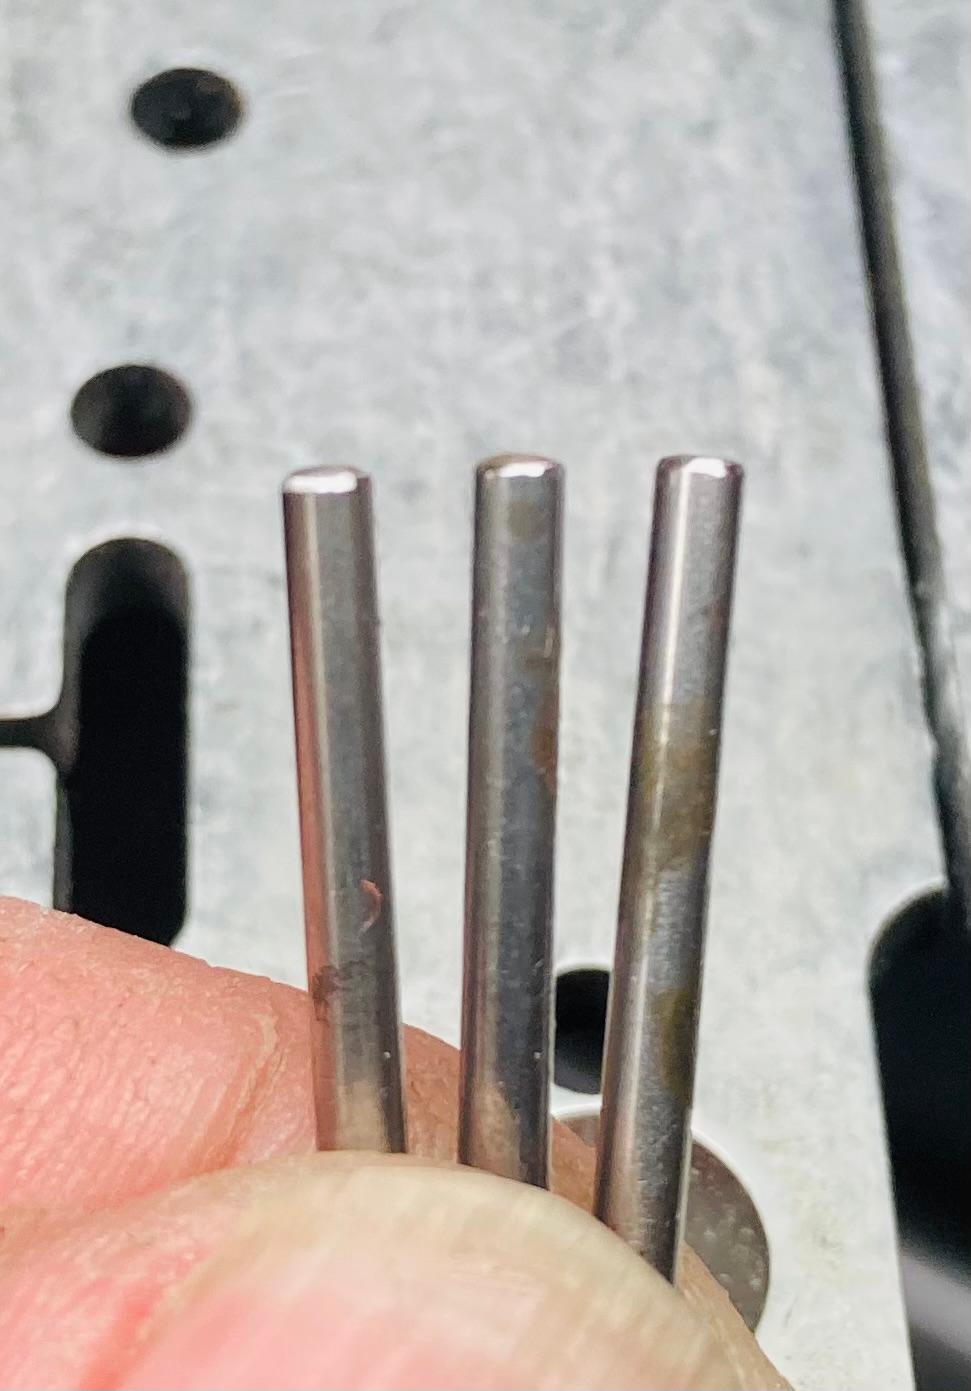
Alright, the first thing that I would like you to do is to find some of your broken Burs (Always keep your broken Burs, as they are very useful in making small Tools), then select a few (2-3) that aren’t tapered or have only a slight taper to the working end (the broken end).
By chance if you do not have any broken Burs or a Flexshaft to use them in, that’s fine, you can also go the a Hardware Store and buy some 3/32" to 1/8" Steel Rod and use that - you just need a short, thin piece of Steel Rod or Bar Stock… Broken Burs are simply perfect for this, as they are typically 3/32" to 1/8" in size and short enough to give you better close-up control over what the Tool is doing to the Bezel…
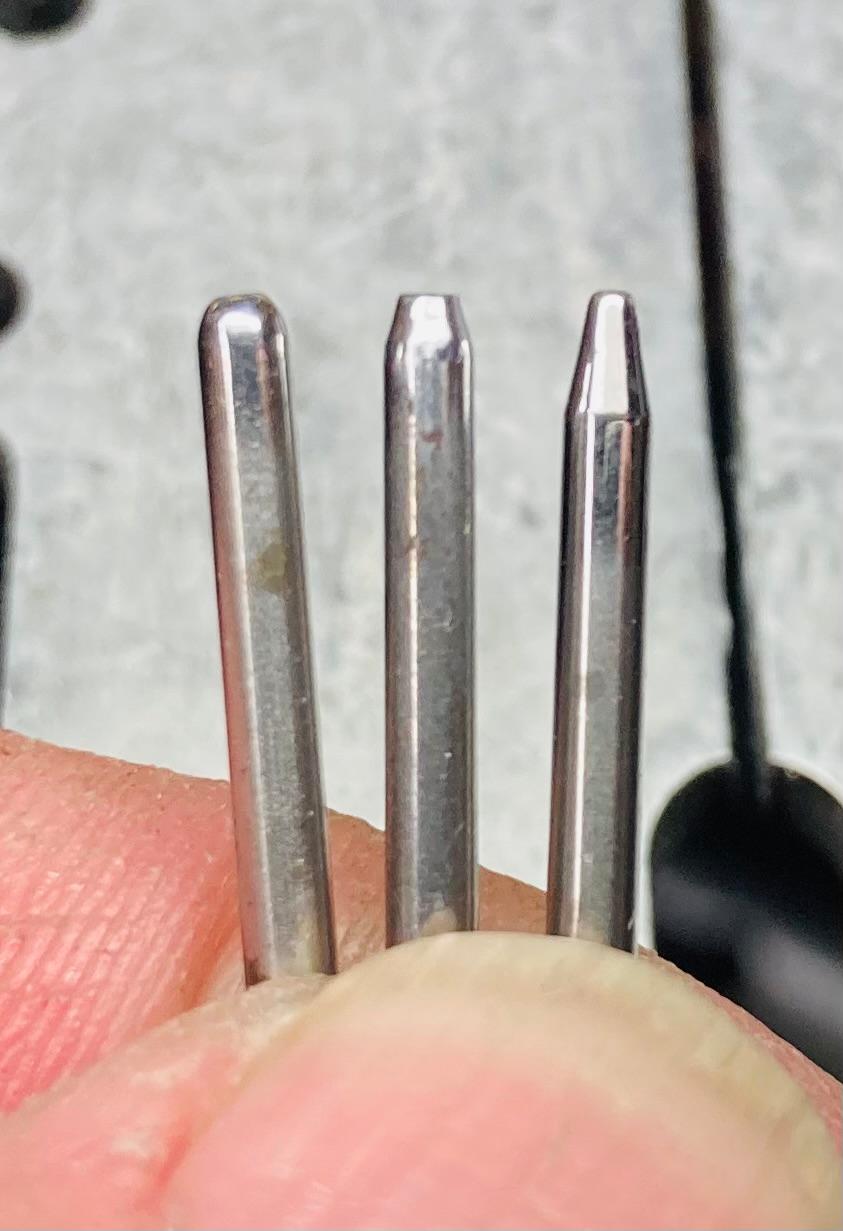
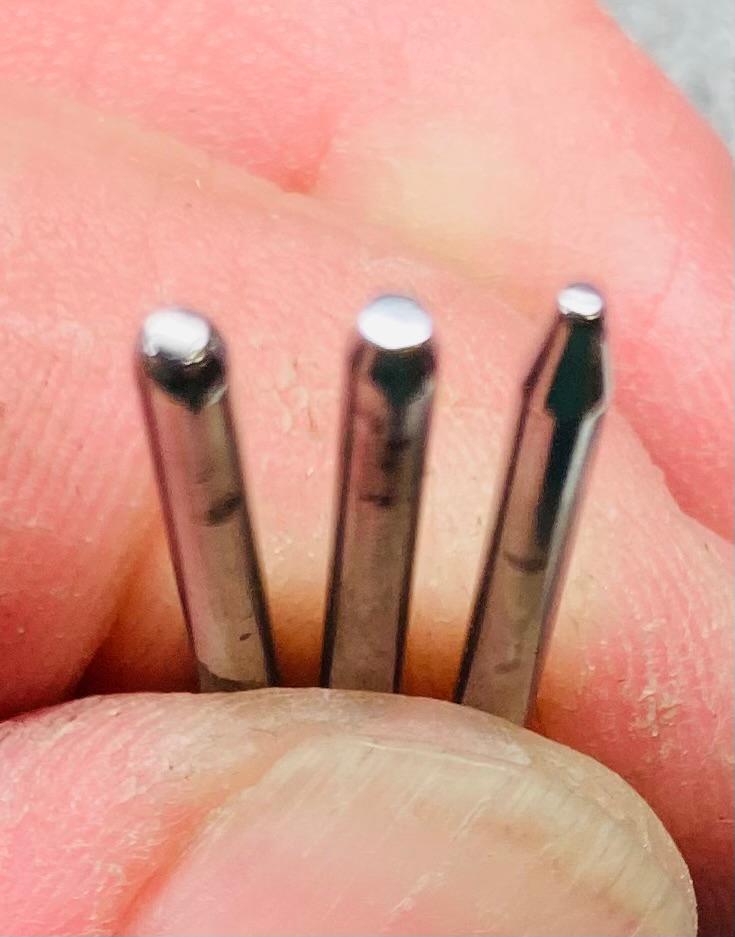
Once you have your broken Burs or Steel Rod/Bar Stock, then you will either saw the broken ends off of the Bur or saw the Rod/Bar Stock down to around 1-1/2" to 2" works best for me, on up to 2-1/2" if you’d like (I find that the longer they are the less control you have for this type of delicate work - Chasing Tools need to be longer), this will give you a nice sized, easier to control Bezel Pusher when using your Hammer. Once you have cut the Bezel Pushers to size, then either use your Flexshaft with Sanding Discs, a Belt Sander or a Flat File and slowly flatten the working edge of each Tool (One End will be the Working Edge and the other End will be the Striking Edge) and also flatten and slightly taper just the edges of the opposite end or striking edge (this will keep the striking edge from mushrooming as you hit it with your Hammer) - I usually make (2-3) with different sized flat areas. After the working ends are flat, then you can use a Rubber Wheel on your Flexshaft or some progressively finer and finer grit Sandpaper and smooth the flat working edge. Then you will polish/buff the surface, either with your Flexshaft, a Spindled Polisher/Buffer or some Wet/Dry Polishing Sandpaper (6,000+ Grit) - you will want as high a polished surface that you can get, this will also slightly round the edges, which is good for preventing tool-line transfer… Now your Bezel Pushers are ready to use! Here are some photos of what a few of mine look like (sorry the photos are a little blurry):
Now to use them: once you have your Bezel securely mounted in your Holding Compound, preferably on a surface that can be rotated around, a GRS Benchmate with a Shellac Pad mounted in the jaws works great for smaller pieces, but a flat piece of Metal or Board around 10"-12" Square/Round sitting on your Bench or on a table will work too (the size of the flat piece is important as your hands & arms will be resting on it for stability), that way you can access all sides of the Bezel without moving your hands, arms and body in odd positions.
Then, select a Bezel Pusher that looks to be about the size of the Bezel’s Edge that you want to push over and take the Bezel Pusher in between the Thumb and Index Finger of which ever is your non-dominate hand (mine is my Left Hand) and place the Bezel Pusher’s working edge on the edge of the Bezel, like so:
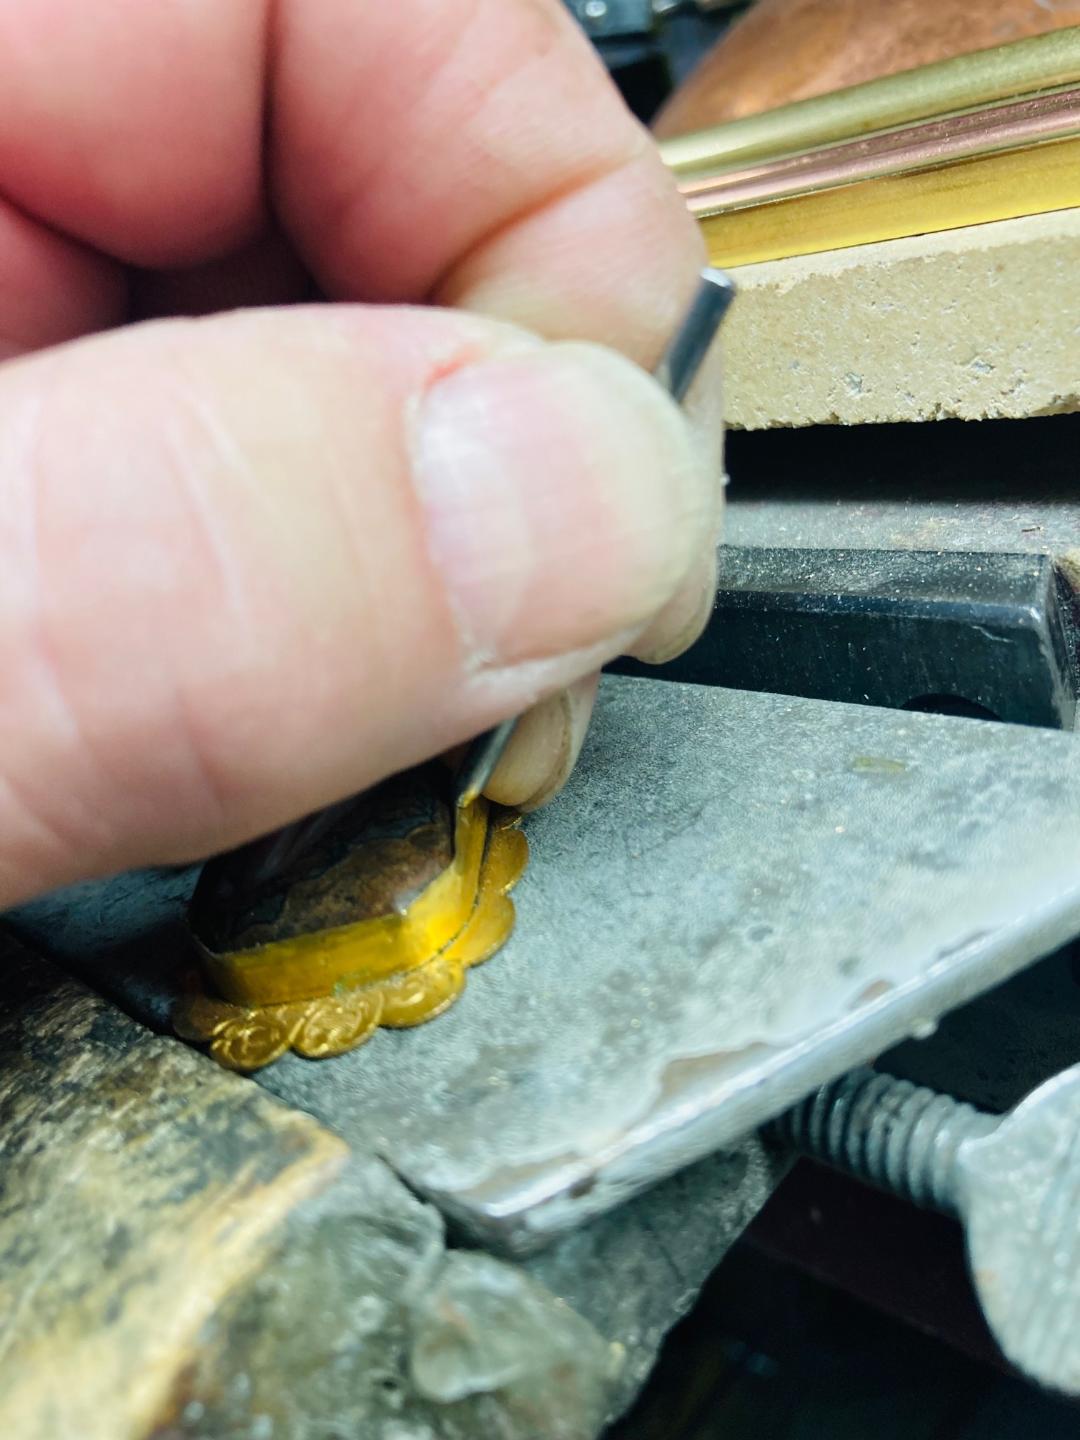
Notice how my Middle Finger curls under my Index Finger and rests on the side of the Bezel and then touches the Bezel Pusher - this will give you compleat control over where the Bezel Pusher sits on the Bezel. Also notice that there is approximately 1/4" of the striking edge sticking up above my Fingers, this is important so you don’t hit your Fingers with the Hammer as you’re Tapping the Bezel Pusher. Once you feel comfortable with your Finger positioning and your Bezel Pusher is consistently sitting on the Edge of the Bezel, I would then practice Slowly moving your Bezel Pusher around the Edge of the Bezel (Obviously staying Off the Stone), Rotate it and then reposition your Fingers and Bezel Pusher and repeat - you will then get the feel of what it will be like to keep your Fingers in that position… Then after you’ve gone around the Bezel a time or two and you feel comfortable with doing so, you can then start to Lightly Tap the striking end of the Bezel Pusher with your Hammer (a Chasing Hammer will be the easiest to use due to it’s wide face, but a Goldsmith’s Hammer or even a small Ball Peen Hammer will work as well, just nothing to big or too heavy).
I typically start by Tapping the Bezel a few times on One Side, then go to the Opposite Side and Tap a few times and then Half Way Between the first two, Tapping on Opposite Sides (this will secure the Stone into the Bezel and keep it from Pushing Over to one side more than the other side, thus keeping it more centered in the Bezel). Once the Stone is secure in the Bezel, you can then start to Slowly go around the entire Bezel, Lightly Tapping as you Slowly move your Fingers and the Bezel Pusher all the way around the Bezel - your goal is to Push the Metal Over just a Little at a time, until it gently rests upon the stone (though if the Metal is heavier weight, you can either Sand or File it down a little to make it easier to Push Over) and the Bezel is consistently smooth and even all the way around - this could take a few times around the Bezel, but always Slowly and Lightly. As you are going, always keep an eye on the Stone to make sure that it’s staying Level and Centered in the Bezel, as it only takes a few slightly harder Taps to Push the Stone out of position.
Once you are finished and have the Bezel looking the way that you want it to, Remove it from the Holding Compound, Smooth it over using your Flexshaft with Rubber Wheels or very lightly Sand or File it Smooth and Polish/Buff it - You Have Just Tightened The Bezel On Your Stone!
I’m sorry that this is so long, but I tried to be as detailed in my Techniques as I could be, hopefully it all makes sense to you and if you have any questions, feel free to reply or contact me directly. Maybe a few other Jewellers will share some of their Techniques as well… Good Luck!
Jonathan
9 Likes
Holy smokes this is so helpful. Excuse me i. Gotta go find some broken burrs! Ill send a picture in a couple days. This is just about the most helpful advice ive gotten!!!
3 Likes
I agree! What a fantastic and thorough post Jonathan! Thank you!!
It’s kind of counter-intuitive, but I think that hammer setting is often the safest way to bezel set stones. It’s my favorite setting method.
One small thing that I would add is that there are lots of potential shapes for these punches. The round shapes that Jonathan suggested are my favorites too, but other shapes are popular as well.
Here’s an example of a setting punch that Kent Raible-Pruitt sells to go along with his jewelry classes. A number of my jeweler friends like some version of this shape.
Hammer setting does take practice, but it’s really fun!
Jeff
5 Likes
What JB Pons said. Especially the part about tapping very lightly. I bloody well hate seeing folks use bezel rockers. One simply cannot control them as well as a hammer and setting punch. And
when done properly one shouldn’t need to file or abrade any marks and go straight to polishing.
I use key stock of various sizes to make my bezel punches. For me they are longer and easier to hold than a short punch thus reducing hand fatigue. I always make sure that the edges of the surface of the punch are softened and polished so that thee won’t be any gouges from the punch edges.Plus I like to use the largest punch I can for the job at hand so that the bezel has a smoother finish.
When setting a stone that has a sharp curve or angle I always take that part down first so that I don’t end up with an annoying puckered bit. And when appropriate like on earrings and pendants use a soft metal such as fine silver or high karat gold. Especially on soft stones.
And finally JB is spot on about making mistakes. Have fun and break some cheap stuff. When teaching the first thing I say to my students is “Failure is not an option in my class. It’s a requirement. The faster you get your first 10 f**k ups out of the way the faster you improve.”
Jo
9 Likes
I found after years of setting using small diameter punches that I developed issues with my thump joints. I started wrapping them with tape to increase the diameter, but I developed an allergic reaction to the tape adhesive. I then added pencil holders over the tape and that seamed to solve many of the issues. I had my favorites ~ I also used the punches with my prong setting.

10 Likes
Jo and Thomas,
I have to agree with you both about hand fatigue and joint pain after holding these small Punches/Bezel Pushers for extended periods while you’re using them, that is the one major drawback of them… Unfortunately for me, I’m starting to develop some arthritis in a few of my Finger Joints, so it’s even more painful now. But, that is also why I use the very short ones that I make, as I am much faster at Pushing Over Bezels with them, than I am with the longer ones - though I guess that’s also what I’m used to using, so it’s just a matter of what you are most comfortable with… Now with Chasing Tools I’m the opposite, I prefer my Tools to be around 4" to 4-1/2" and have a little difficulty in using shorter ones, though I do have 3" to 3-1/2" ones as well…
Jo, you are exactly right, “when done properly one shouldn’t need to file or abrade any marks and go straight to polishing.”, but when a person is new to Hammer Setting, this is very unlikely to happen for a while, though miracles do happen occasionally! ![]() I also like your advice on Tapping Over sharp curves and angles first, though I would still secure the Stone in the Bezel by Tapping on Opposite Side before doing this (before doing corners especially), as you can get into some real trouble, really fast if you don’t. Your Teaching Philosophy is perfect, most especially for learning a Craft, as it’s always truly disheartening when you break or melt something the first time, the second and the third & fourth times too, so much so you start doubting your ability to learn and perform the Techniques - But that is exactly when you start to Really Learn the Techniques, you just have to stop and think about what you were doing when the mistake happened and correct that action, the more mistakes you make, the more Learning Experiences you are having and the faster you will Improve your Technique…
I also like your advice on Tapping Over sharp curves and angles first, though I would still secure the Stone in the Bezel by Tapping on Opposite Side before doing this (before doing corners especially), as you can get into some real trouble, really fast if you don’t. Your Teaching Philosophy is perfect, most especially for learning a Craft, as it’s always truly disheartening when you break or melt something the first time, the second and the third & fourth times too, so much so you start doubting your ability to learn and perform the Techniques - But that is exactly when you start to Really Learn the Techniques, you just have to stop and think about what you were doing when the mistake happened and correct that action, the more mistakes you make, the more Learning Experiences you are having and the faster you will Improve your Technique…
Thomas, I really like those Pencil Holders on the Punches, a very clever idea, can you tell me if you are still able to get another Finger onto the Punch near the striking end, to help guide it or is it too thick and awkward to do that? That is one of the more important aspects to my Technique in using these Bezel Pushers/Punches, that guiding Finger allows me to move pretty quickly along the Bezel’s Edge as I’m Tapping… Just curious, I’ll probably buy a few and do some experimenting anyway…
Jonathan
5 Likes
What a genius idea of using pencil holders! Love that!!
One little thing to add. Sometimes with my setting classes, I don’t have enough old burs for everyone and so I’ll buy annealed round drill stock in 2-3 foot lengths. It’s not very expensive. The annealed stock cuts easily into whatever length I want with a hacksaw or a jeweler’s saw. I could harden and temper it, but I never do. While you can get drill stock in most any width, I often buy 3/32" diameter which is the size of most burs. And like Jo, I’ll also buy square key stock to make punches as well.
Thanks to everyone for these great tips!!
Jeff
5 Likes
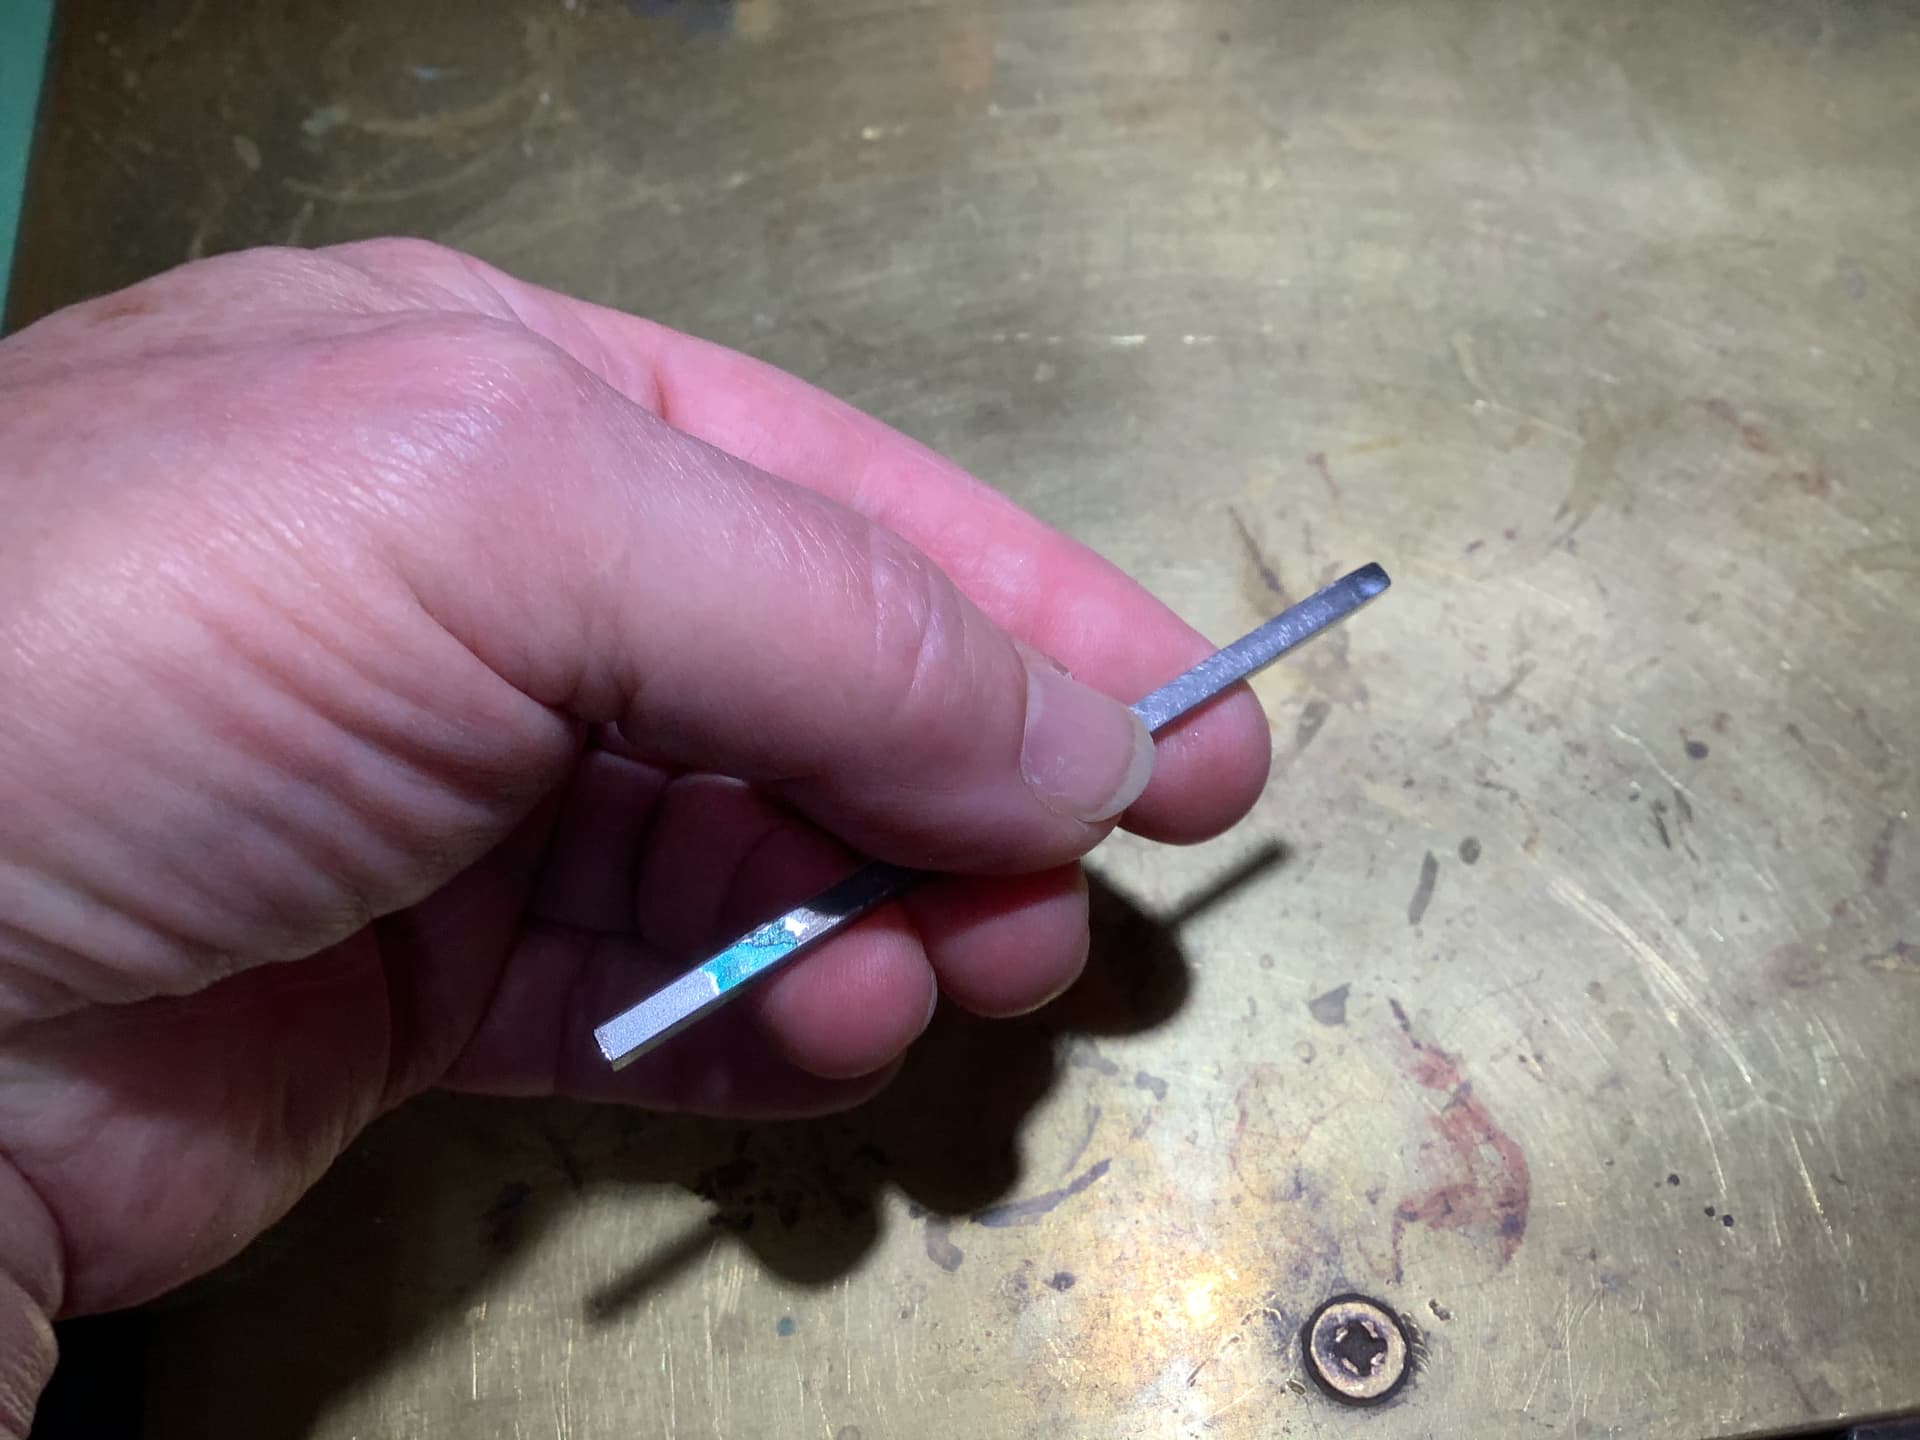
Jonathan, I’m using an old beading tool, approximately 3mm in diameter, I think it’s a little longer then what you use. I don’t temper them, as one can see from the picture. But you can see also my ring finger is controlling the strike of the punch.

3 Likes
I make my own pushers out of brass and soft steel rod, but old burs are a great idea. I modify the ends to follow the shape of the bezel edge to limit the damage. For me the key is a hammer that has a short handle and not too heavy…Rob
2 Likes
Thomas,
Thank You! I was thinking that is what it looked like, that or a nail, especially with that mushroomed striking end anyway ![]() - try tapering the edges like the Japanese do with their Tagane, it will stop that mushrooming. I agree, I would never Temper my Bezel Pushers, though being Burs and Beading Tools they are probably a little harder than we’d like anyway, as the Steel being a little softer is key to not damaging the Metal that you’re moving. I think that I think that I’m going to give this a try, to help to save my fingers some pain, as I can always trim down the length or one edge of the Pencil Holder to get my Finger in there if I need to… Thanks again!
- try tapering the edges like the Japanese do with their Tagane, it will stop that mushrooming. I agree, I would never Temper my Bezel Pushers, though being Burs and Beading Tools they are probably a little harder than we’d like anyway, as the Steel being a little softer is key to not damaging the Metal that you’re moving. I think that I think that I’m going to give this a try, to help to save my fingers some pain, as I can always trim down the length or one edge of the Pencil Holder to get my Finger in there if I need to… Thanks again!
Rob,
I have a few made of Brass as well and like them very much, as well as a few that are like the grooved Bezel Rollers, but I only use them for specific purposes - kind of like a miniature Chasing Tool… Yes, I agree with the short Handle on your Hammer, which is why I use a Chasing Hammer, though I some times use my Goldsmith’s Hammer and just move my hand up to almost the middle of the Handle…
Jonathan
That mushroomed end has probably over 30 years of use, and countless strikes. It’s one of my favorite tools.
There are times that I would use a bezel “roller” prong pusher, but not the commercially available ones. They were way too large for the type of work that I was doing. I’d take a cup bur and modify the cup into a very small L shape. With the small size, it creates increased pressure at that specific location that’s needed in burnishing the metal.

4 Likes