I’m thinking of making a sterling silver belt buckle for my husband for Christmas. What gauge sheet could I use? 16-18? I’ll likely do a border around the edges and a pictorial overlay in 26 or 28g sheet. Also, what should I use to prevent tarnish? I want to patina it as well. Thanks in advanced!
Morning Rachael,
Now, your idea for your husband is lovely.
Im a pro buckle maker and have been for some 45 yrs and know whats needed .
Id might be prepared to help you with this project but id need answers in full from you to a lot of questions.
Also, you would have to do exactly as I tell you, because of your limited metal working experience.
This buckle will be for ever, even in daily use so theres no alternative but to make it a product better than most buckles out there.
All my buckles and the leather attached to them will take the weight of the wearer. whether its a ladies evening dress or a mans industrial wear type.
Await your reply.
Ted.
1 Like
I’m very excited about the outcome now!  I have limited funds, but hopefully I have the supplies on hand (heavy gauge sheet, I do not. Largest is 22g but not big enough for. Belt buckle), but Rio Grande is my go to supplier.
So what info do you need?
Hi Rachael,
So, lets start at the beginning, no questions yet!
A belt in its entirety is comprised of 3 parts
- the leather strap,
2.the buckle back, with its fittings to connect to the leather, - the front which is the decorative part.
Lets look at no 1 first - in your case you need to decide on the leather width, because it has to go through all of your husbands trousers
- its length, which will be the same as belts he uses.
- its thickness. This is best from leather thats off of the center back of beef cattle and oak bark tanned and preservative filled… 3/16ths in thick will last some 20 yrs.
You can specify the colour to the leather belt supplier as well as the width, thickness and length.Tho ive got it here to this spec.
Now look at 2.
1.The buckle back is the basis of the whole assembly.
Its best made seperately and ill show you how after this w/e when ill post up some pictures of what works best. This is not normally in silver tho it could be. Its normally made from bronze or a 70/30 brass sheet some 1/10in thick… - On the back of the body will be 3 things,
ist the hook thats for locking into the leather
then the 2 hinge points to take the rectangular wire that goes through these hinge points.
the hook and hinge point are made from the back itself. The pic will show you how.
The other side of the wire holds the seperate hinge that holds the leather as a simple but very strong attachment.
No folding over thick leather !!
Thats held together as a 3 part sandwich using a decorative nut and bolt.
Again pictures next week. - the buckle front.
this is the decorative bit which will in your case be in sterling silver. This is normally rivetted to the back with 4 sterling rivets.
What design you put on it depends entirely on you, as well as the raised border.
Now as to overall shape.
With a leather width of 1.5ins the buckle should not be wider than 2in for sitting in a car or bending over.
then the length is best at 3in . now I use a 2 by 3in oval as the basis of one buckle design another design uses a 2.25 in dia circle.
You could use a 3 by 2in rectangle. Its up to you.
Id be very surprised if youve the tooling or the material or the know how how to put this all together.
There are a no of my buckles and belts in the US, bought by your citizens who have visited my exhibitions. tho ive not sold any via Ganoksin.
Now, if youd be interested, Id be happy to find out the cost of sending to you a complete buckle back plus fittings via UPS of FEDEX.
Again I wont know till next week, then there will be the buckle back cost. Ill do it for $45.00 plus shipping, thats all at cost.
So, after youve digested all this, and looked at all the pics ill send next week, get back to me with a plan of action and ill ask the questions on how you can proceed.
As a final thought, write yourself a production check list, of what you want to achieve, then tick the items off as you make your choices .
I hope this helps in the interim.
Ted
2 Likes
If you don’t want to fabricate fittings try here http://www.stevesfinethings.com/
2 Likes
Hi Island,
It would be neither right nor fair to comment on Steves fine things. Its up to each and everyone to make up their own mind if what he has to offer meets their needs.
Each to his own.
Ted.
1 Like
I didn’t make a comment… Just offered a source for supplies.
2 Likes
Hi Rachel,
I wouldn’t overthink this…find some silver sheet that doesn’t bend easily and if you think it is too bendy, just put a border of, say, square wire around the outside or reinforce it with some ribs somewhere in the design. You can use a staple (U shape) on one side to hold the belt loop that fastens the buckle to the leather and a tooth on the other side that goes in the belt hole. There is at least one tutorial on youtube that shows belt buckle construction. I know there are a few sketches of belt buckle construction in Tim McCreight’s Practical Metalsmith*, which also has lots of other good stuff in it. This book is available in a lot of editions and I have the first edition and find that the later editions don’t add much…an older edition won’t cost much.
Good Luck,
royjohn
2 Likes
Hi Rachel,
 The replies of professional buckle makers notwithstanding, you don't need all that stuff to make a buckle. I made my first one some 35 years ago with minimal tools, I did it outside and I still wear it. Didn't need a buckle back either. I made it in the style of the Navahos, using silver and turquoise and a small strip of copper. I used 16 g.. silver and the buckle measure 4 1/2x3 1/2.

 The buckle I made iis a large concha (yes it's concha, not concho), with an oval decoration in the center and a turquoise cab in the center of that. First I cut the oval out of a piece of 16 guage silver. I had purchased some small stamps for the surface designs which are available from an indian jewelers supply company, but you can make your own. Using the flat (not the ball) end of a ball peen hammer I domed the metal into a depression I had cut into the end of a small log. Then I used the punches on the face, scalloped the edges using a jeweler's saw and a file. Of course that's not necessary for a flat or curved buckle, and soldered on the decorative pieces. Flipping the piece over I soldered raised copper strip across one end of the depression and a piece of 8 0r 10 g, wire in a semi hook shape at the other end if depression t hook into the belt. That's it. For a flat or curved buckle just cut out the shape you want, solder on decorations. If yo prefer a little more upscale version of the back, you can buy a plate with an attachment for the belt from the same company you get the silver from. I'm pretty sure Rio has them.
Jerry in Kodiak
1 Like
Hi Jerry,
Interesting comment you make to Rachael, that she doesnt need all my stuff.
I wouldnt have written it if I didnt think she needed it. If you have read all the posts shes made over the past month or so, this poor lass hadnt a clue how to put together her gas kit for her torch, then she had problems with her stone mounting on a ring and hasnt a clue how to make a buckle.
Now she is thinking of making a structural item within a very short time frame.
The last thing her husband would want is her work failing in some way when hes wearing her work perhaps at a business meeting. Having his pants around his knees.
So long as she knows whats involved then weve done our bit, so to speak. Cant do more.
Ted.
1 Like
Hi Rachel,
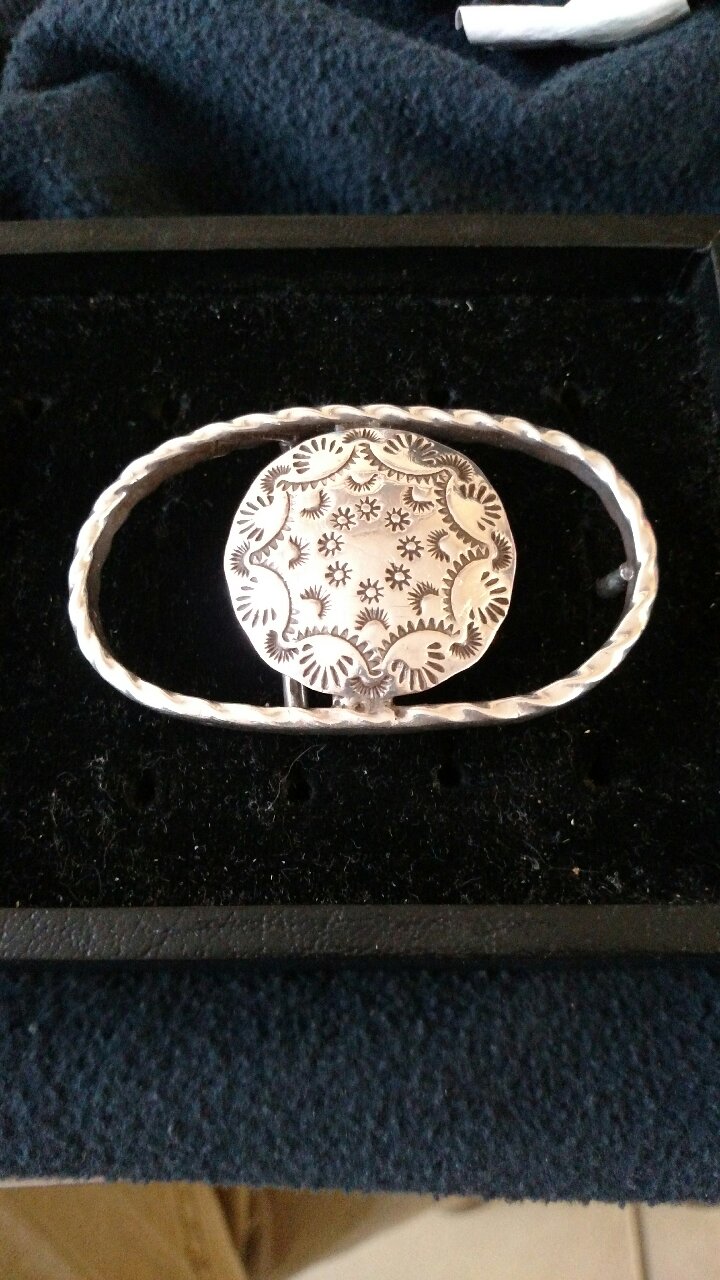
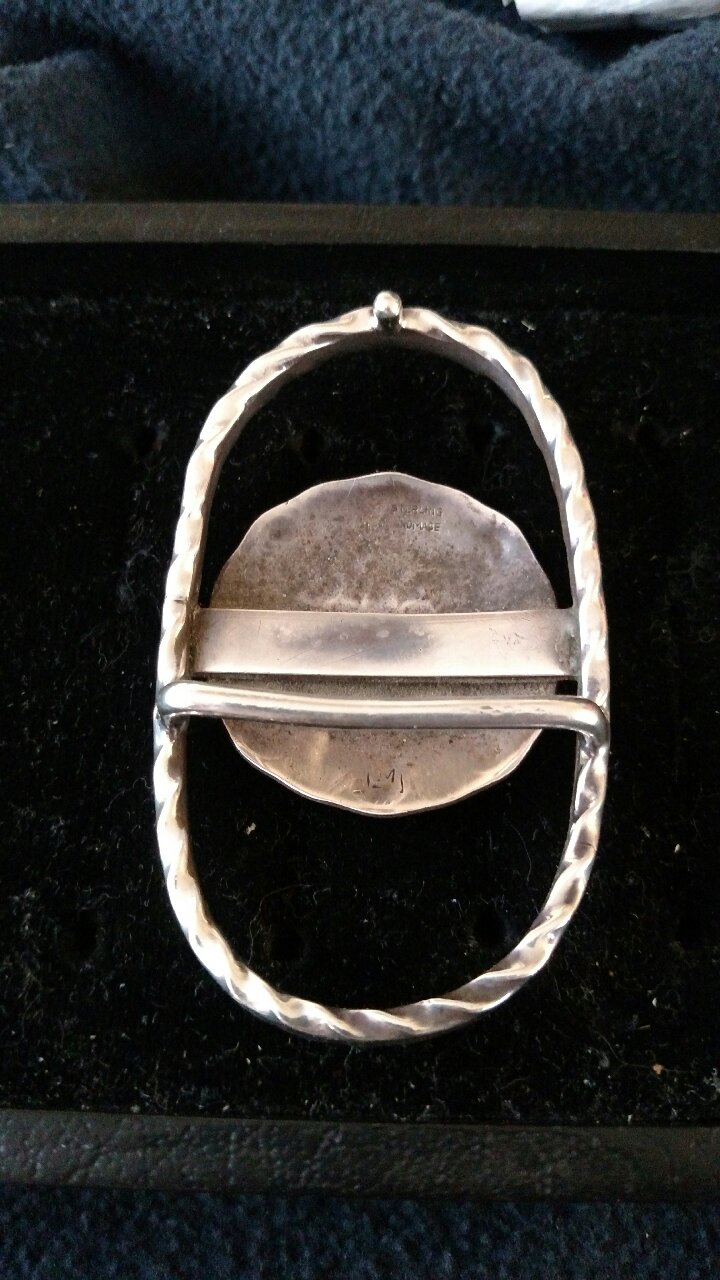
This buckle has been in use in one form or another for what must be 60 + years. As buckles go it is pretty basic but for me it’s sentient is priceless. My Dad made the outer loop some time in the 1940’s . On 28 July 1995 I made the concha and affixed it to the belt buckle and I have work that buckle ever since…
The loop is made of 8 ga. sterling square wire that had been twisted, flattened and looped in an oval… The twisted write is about 8" long. The concha is 18 ga. Sterling, 1 and 3/4" round. Stamped and domed. The post and bar are 10 ga. round wire soldered to the loop. There is a slight arch hammered into the loop to give a radius to the profile of the buckle. The post is 3/8" long and this back about 5 degrees. There is 2" between the pest and the belt bar.
The over all size of the buckle is 3" long by 2" wide and it holds a belt from Tandy Leather that is 1 and 1/2" wide.
I don’t suggest you copy this buckle altho’ you are welcome to. This buckle is a sturdy bit if construction and as Ted says, will last a long time. I sent this along to you so you could one idea that has worked well for a good long time.
Have fun with us your project.
Don Meixner
Sent from my Verizon 4G LTE Droid
jholtak
November 23
Hi Rachel,
> The replies of professional buckle makers notwithstanding, you don't need all that stuff to make a buckle. I made my first one some 35 years ago with minimal tools, I did it outside and I still wear it. Didn't need a buckle back either. I made it in the style of the Navahos, using silver and turquoise and a small strip of copper. I used 16 g.. silver and the buckle measure 4 1/2x3 1/2. The buckle I made iis a large concha (yes it's concha, not concho), with an oval decoration in the center and a turquoise cab in the center of that. First I cut the oval out of a piece of 16 guage silver. I had purchased some small stamps for the surface designs which are available from an indian jewelers supply company, but you can make your own. Using the flat (not the ball) end of a ball peen hammer I domed the metal into a depression I had cut into the end of a small log. Then I used the punches on the face, scalloped the edges using a jeweler's saw and a file. Of course that's not necessary for a flat or curved buckle, and soldered on the decorative pieces. Flipping the piece over I soldered raised copper strip across one end of the depression and a piece of 8 0r 10 g, wire in a semi hook shape at the other end if depression t hook into the belt. That's it. For a flat or curved buckle just cut out the shape you want, solder on decorations. If yo prefer a little more upscale version of the back, you can buy a plate with an attachment for the belt from the same company you get the silver from. I'm pretty sure Rio has them.
2 Likes
I don’t know how that buckle became associated with my email, but I did not make the one pictured. It does however display results of the same procedures.
Jerry in Kodiak
1 Like
I am very grateful for all the incredible replies! Thank you all so much! My question is for Ted. I haven’t done a mixed metal piece yet. I’m kind of set on the idea of using all silver for this piece. I’ve got a plan set out, I’m just wondering about the step of doming the backplate, border wire and decorative layer. Would the standard be to solder all pieces flat then dome or dome everything 1st then solder. I just want to make sure all pieces have the exact dome to fit perfectly.
I’m planning to just make the buckle similar to ones he already uses so he can attach the belt he wears now.
Hi, Vladmir,
I do see your point of view. On the other hand, probably because I am self taught in metalsmithing, I look at it differently. I learned more from doing it myself than I did from sticking manufactured parts together. I expect Mrs. Kawaiidragon would gain a measure of satisfaction and self confidence by using her own ingenuity to solve this problem herself, don't you?
Jerry in Kodiak
1 Like
I was actually going to point that out myself Jerry. I’m completely self taught as well, if my posts haven’t portrayed that already lol
Morning Rachael,
Doming, or curving has to be done AFTER.
How do you plan to do this?
Perhaps shape a piece of wood(end grain) to the concavity you want, then with a soft mallett, leather or soft plastic dress it down into the depression.Wood held in a proper engineers bench vice.If youve not got one your local garage car/repair w/shop will have and they will let you use it for 10 mins.
How will you do this where the loop? and pin? are on the back? Maybe a piece of wood with a groove in it to go over the loop? to act as a punch?
Interesting.
Ted
1 Like
That’s a good idea I’m pretty good at improvising with things I have since I don’t have a lot of equipment. I’m definitely going to make my plan up start to finish before I begin
I don’t know what happened but the only comment of mine that has shown up on this thread is a partial one that I tried to rewrite but could not do so. My final comments were more detailed. If you are famiar with American southwest indian pieces, you will know that most, but not all, conchas have a flange around the edge of the curved center section. First I domed the whole thing, then flattened the flange. Then I stamped the design and scalloped the edge. The center decorative device was applied and finally the bar and hook were soldered on. I don’t know how the Navajo do it however, but this way worked for me.
Jerry in Kodiak
1 Like
I recently made a few belt buckles, the first time I’ve done this actually. It might be helpful for you to make an identical sample from copper or brass first if you aren’t sure on the appearance or how it feels wearing it. I know my samples helped the learning process, making for a better final piece.
The buckles were also all 18 gauge sterling, other than the loop and hook which were from thick rectangular and round wire respectively. The buckles are very sturdy, they have folds or borders to reinforce them so there’s no danger of bending.
Buckles aren’t inherently difficult, they just need to be designed properly so they do the job right. A lot of good info from some (far!) more experienced metalsmiths here, good stuff!
Hi Don, If youd be interested, my IT guru took some pics of buckles ive made from 1974 then 84 then 2000 then 2005 and this year.
Tho buckles are just one of the things I like to make.
happy to post up the pics inc some of the tools needed to form the metal. in the 80’s i worked out how to make them all cold, no soldering at all. Let me know.
The early ones with enamel fronts had the pins soldered, and this year developed my 50th anniversary buckle which has the 4 wire loop holding forms soldered into the buckle back, also the double’ material silver on bronze for the round nuts and the keeper…
The fronts are of course minted from dies cut in the negative.
I tried to make my own silver rivets but couldnt get consistent results . 2 out of 5 were just useable. Finished up getting them made by a rivet co in 999 silver wire I supplied.
nice historical pic you put up.
Ted.