I’m very thankful for the advice and information I’ve been provided in this community. It’s definitely helped me grow immensely. I haven’t had solder issues since using the advice of the many jewelers who’ve offered their expertise. I’ve also been able to create at least half of my Christmas gifts within 2 short weeks of implimenting these new techniques and tips. As well with the belt buckle. I have my design laid out and all my pieces cut, I simply need to even up the ends of my border wire and solder it to the base oval. That’s the only challenging part so far and it’s only because the slot in the wire isn’t completely open to just slide onto the sheet. I’ve been filing and pushing the slot open and making sure its completely flush inside with the sheet. (I’m a perfectionist, so I don’t want to leave any gaps between the very inside of the wire and the edge of the sheet.) Other than that, the rest of the buckle just needs all layers solder on and the components on the back and I can tumble, finish, polish and patina. I’m so thrilled with the design and how its turning out. So, again, thank you to all who have given their time to help me on this project! 
Thanks Ted,
I’d enjoy seeing some of your work.
Don
Sent from my Verizon 4G LTE Droid
Hi Don,
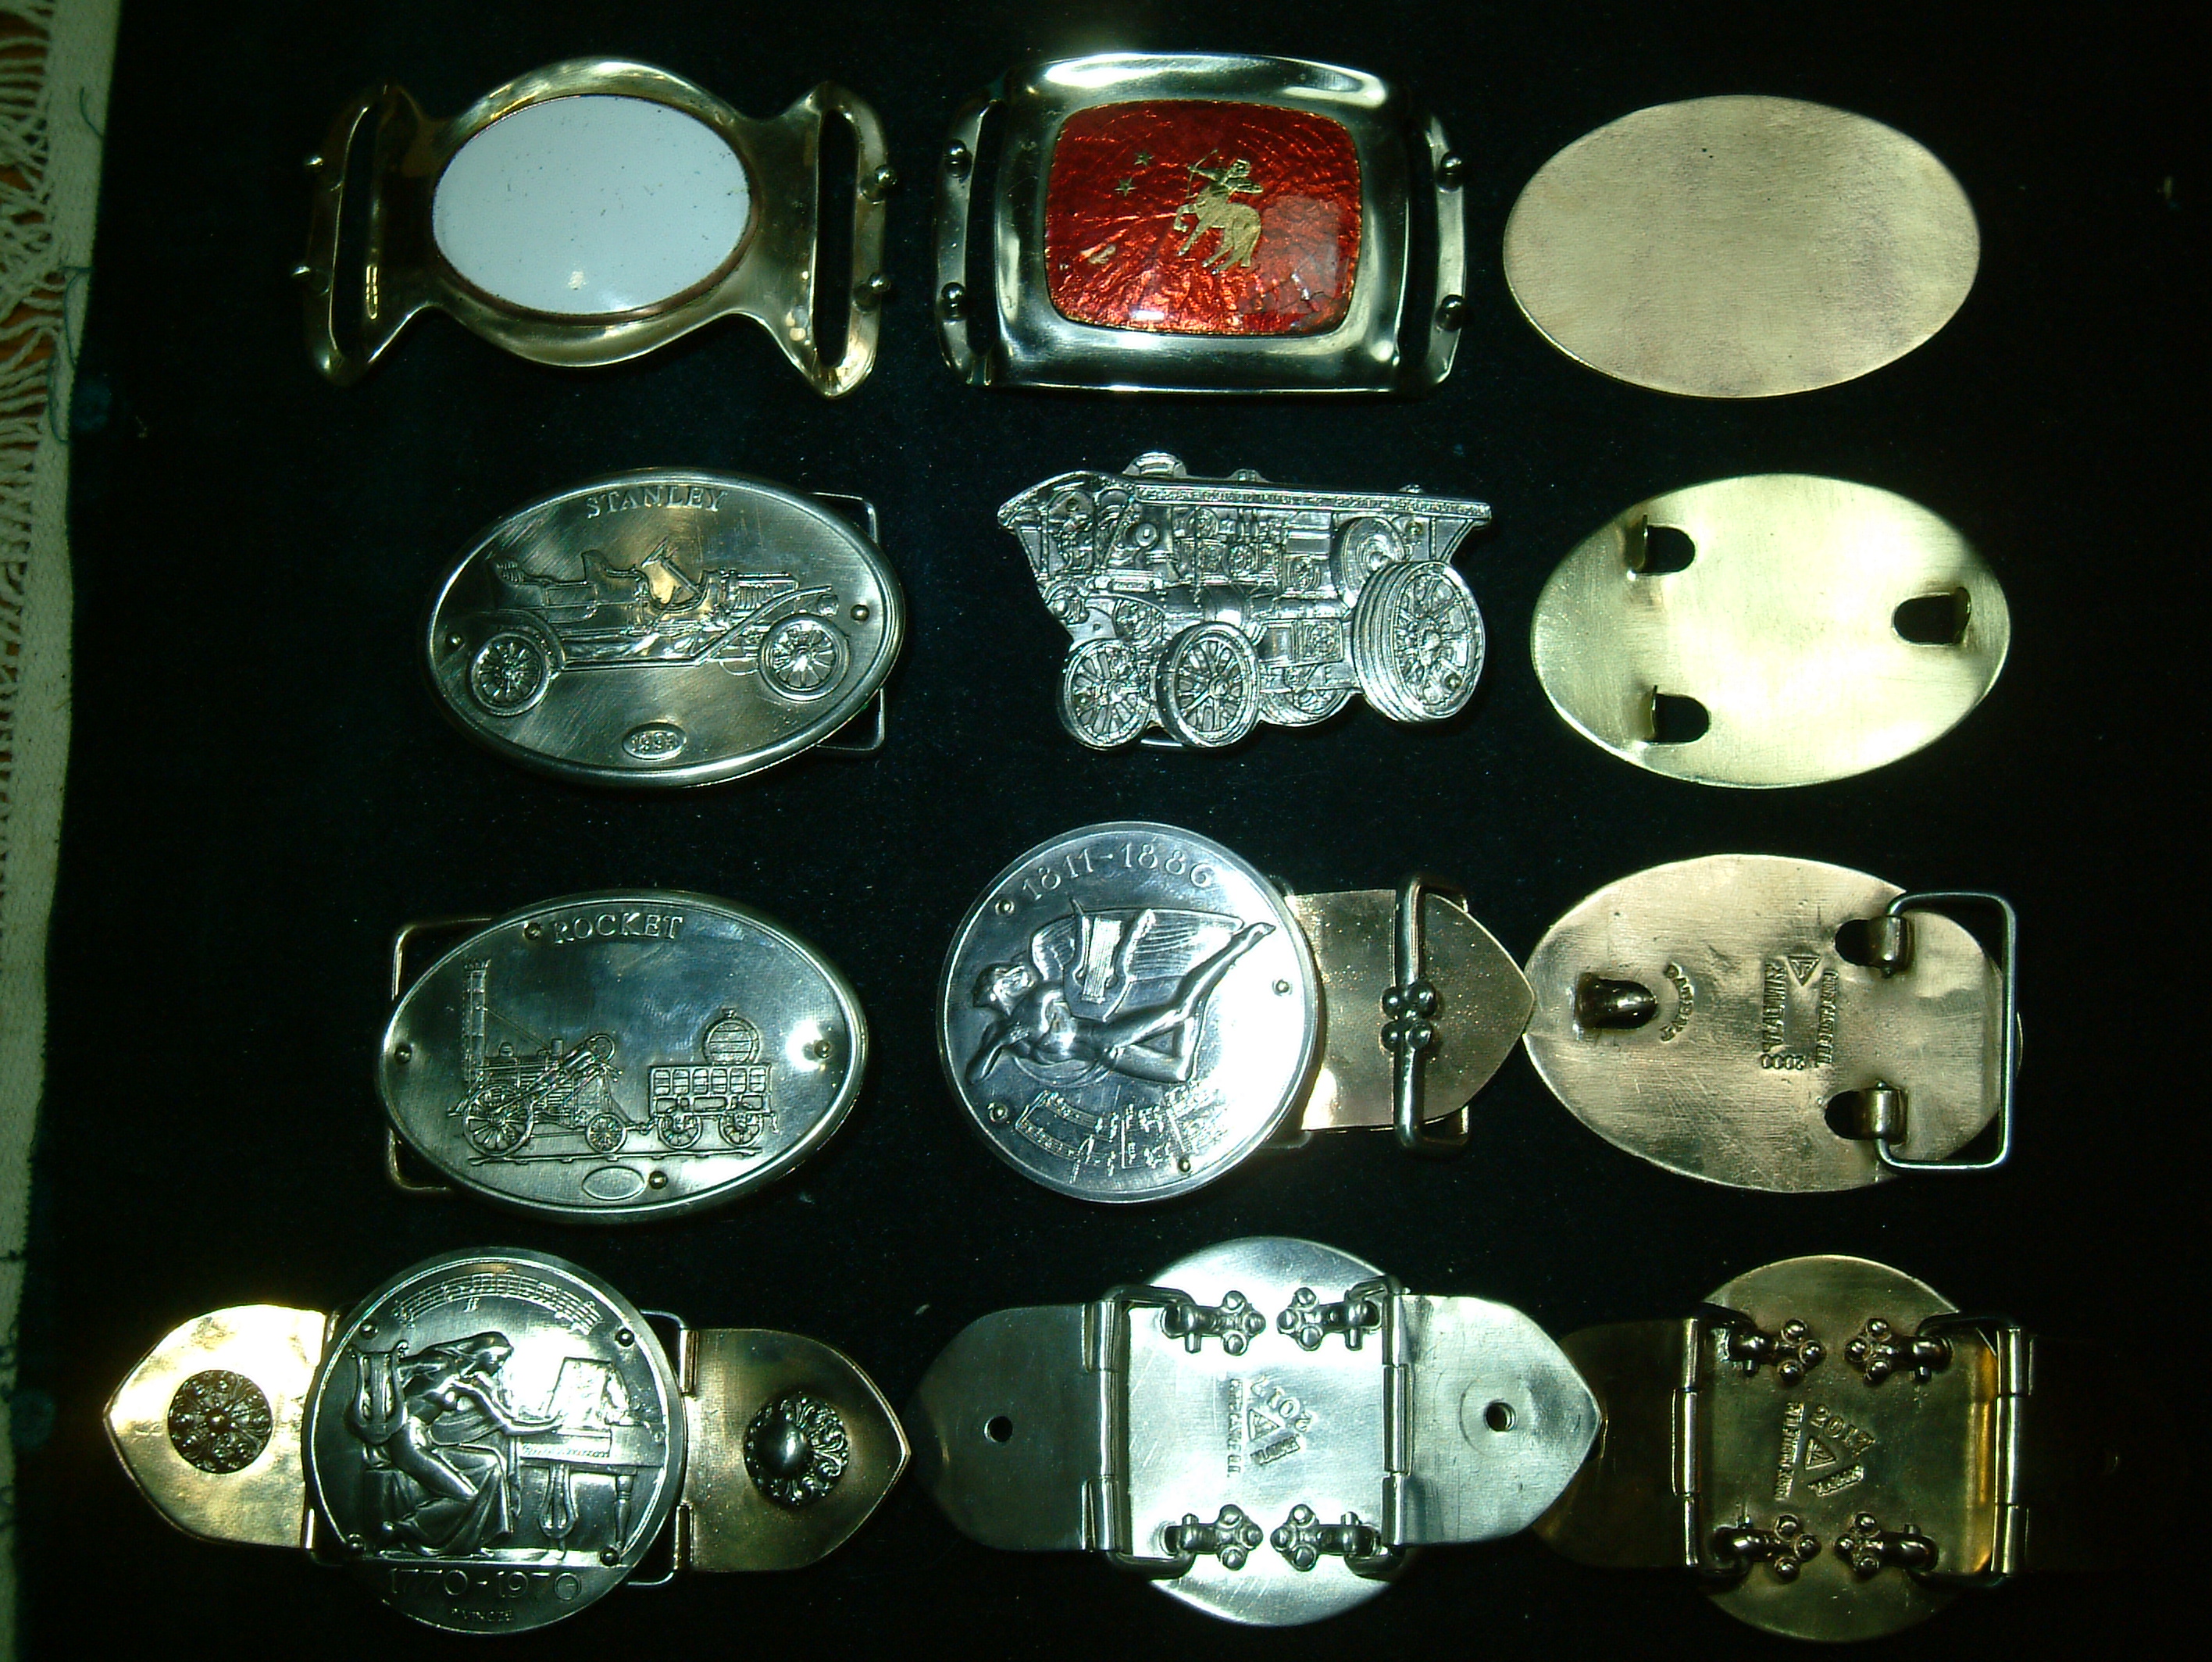
Heres the pic of
- the buckles
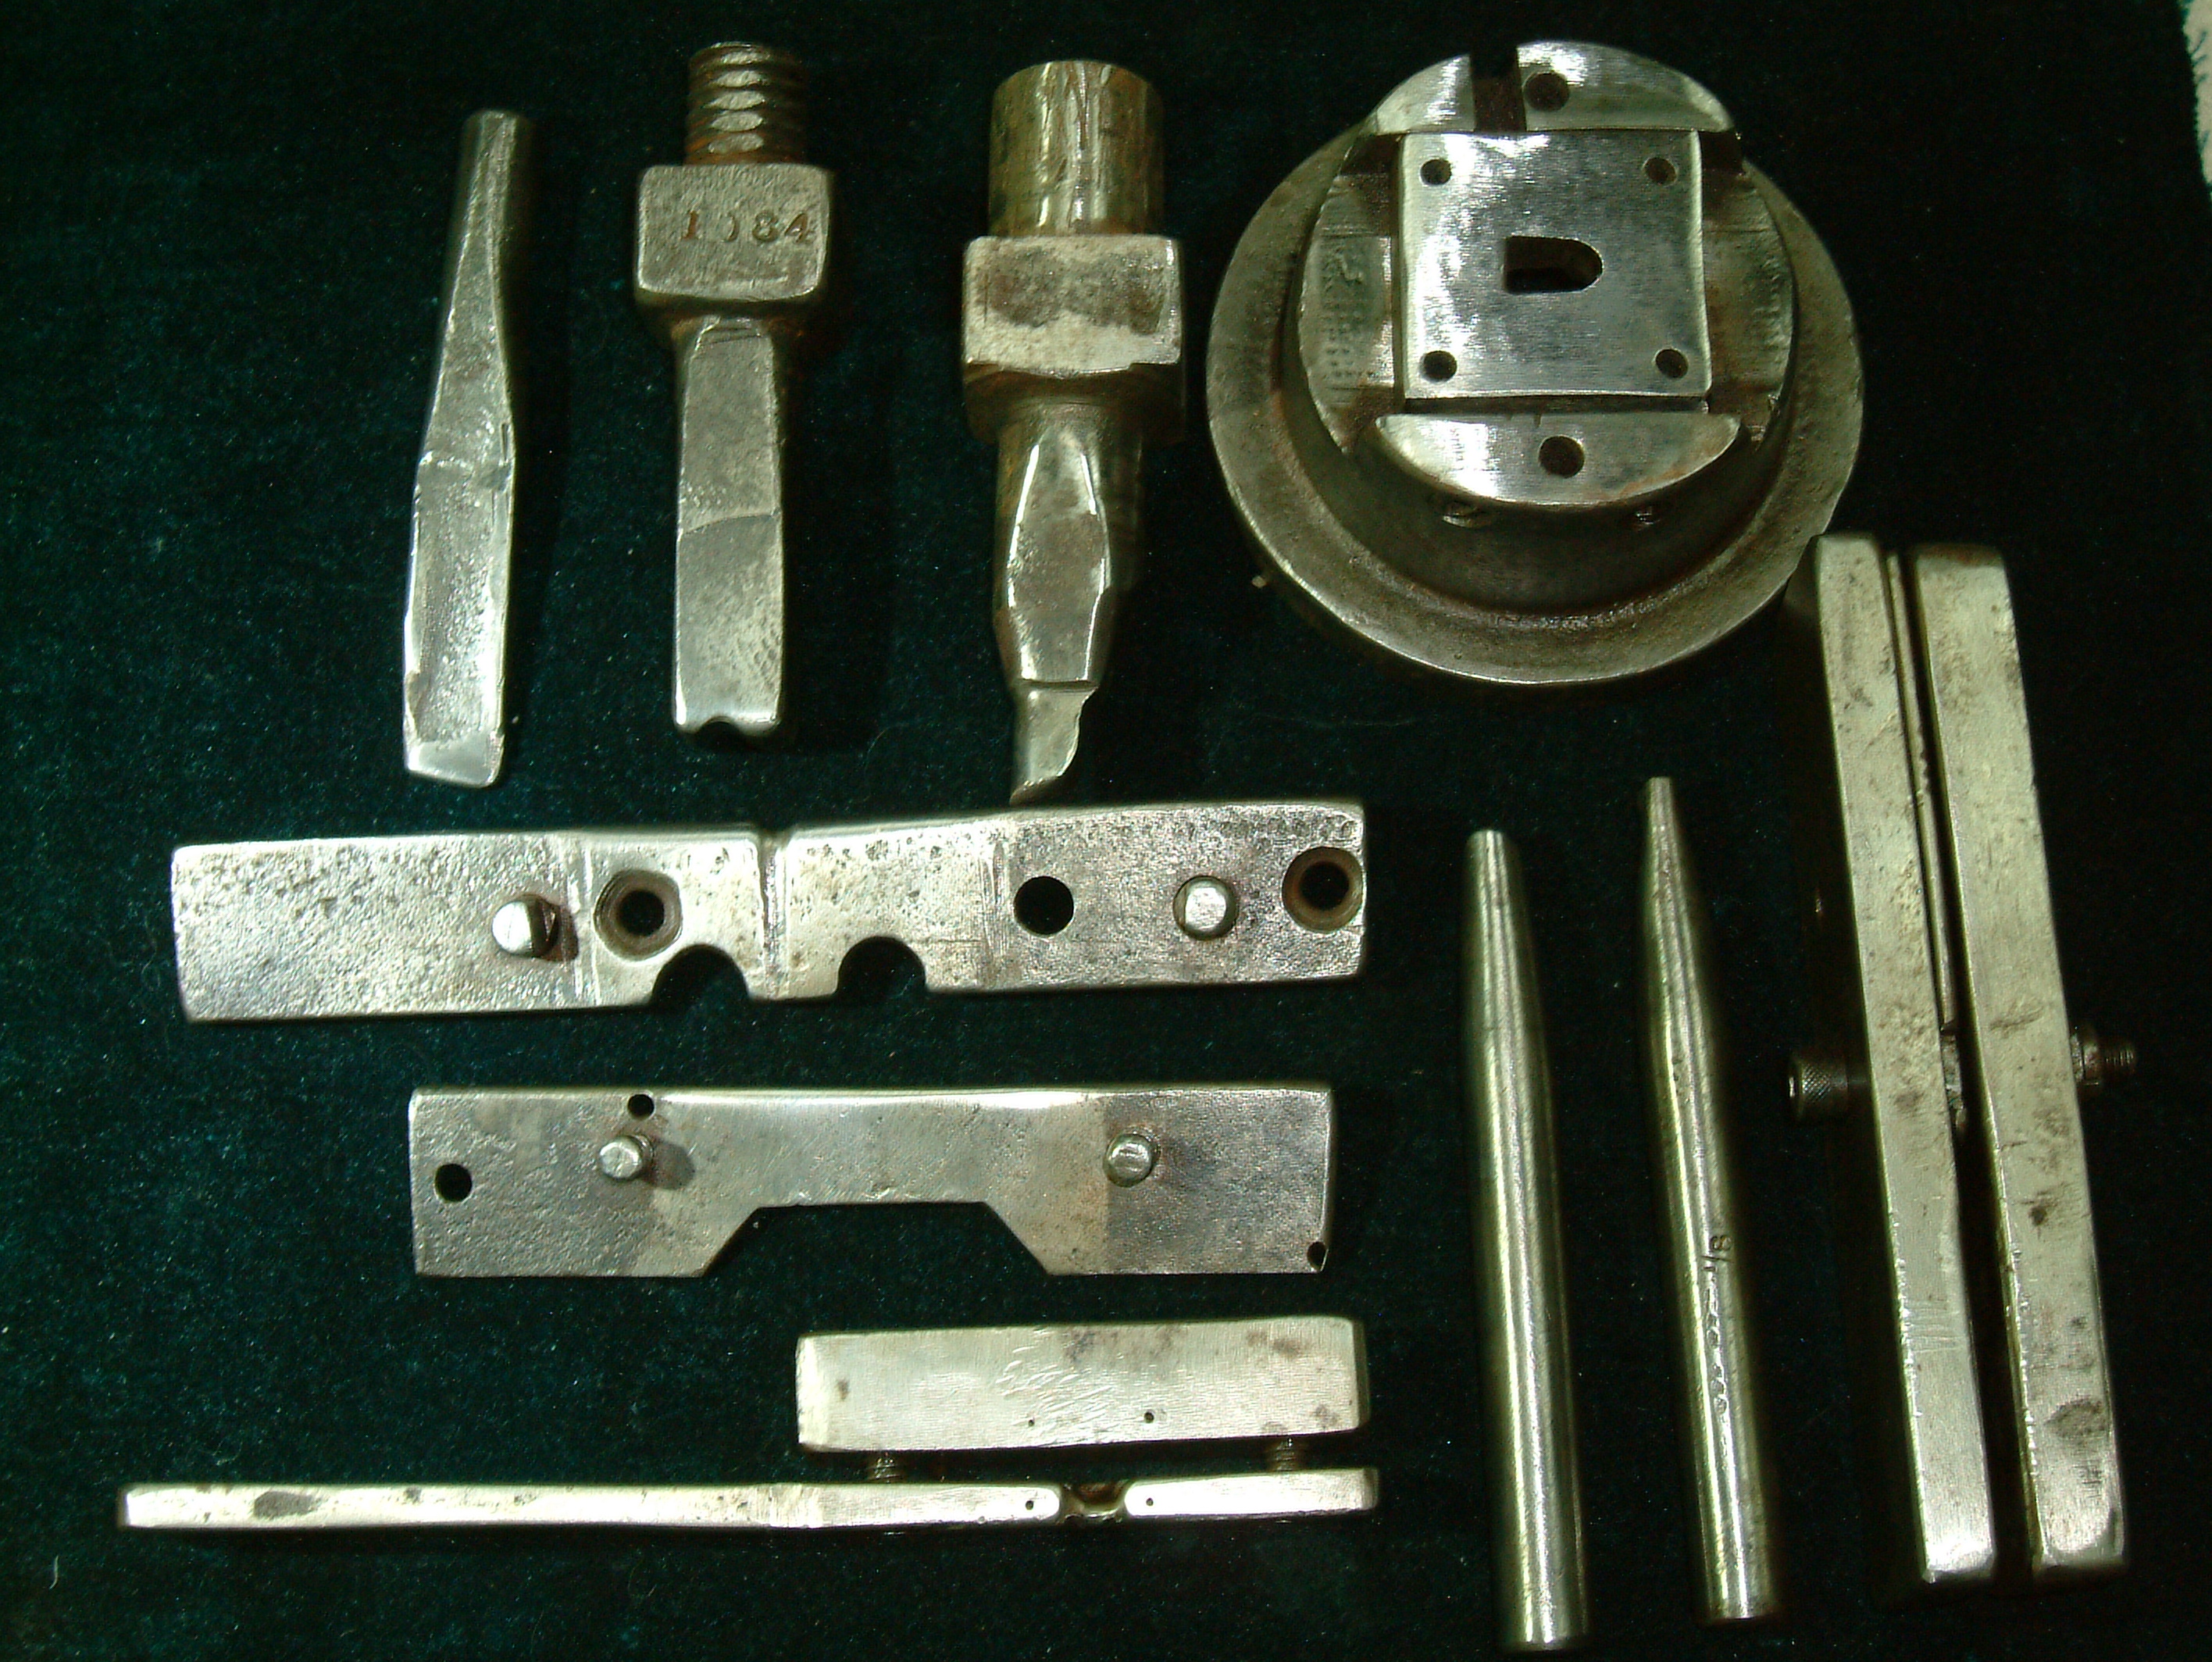
- Some of the tools used to make the all cold buckle back, the press tool that makes the tabs from which the hook, and the wire rectangular loop connections are formed.
The hook is 1st concaved using the 1084 support with the punch along side it, then rounded by a small hammer in the same groove… - then the b/back is held in a soft jawed vice with the larger of the dowelled strip of steel. You will see the tapered groove into which the hook is hammered over into a rt angle.
- the next strip holds the back again in the said vice so that the 2 tabs can be bent into a rt/angle preparatory to forming over the s/steel wire loops.
Thats it!.
Interesting to mention that this back will safely take a 250lb persons weight.
Connecting the leather is done with another blanking in the same colour metal this can be shown another time, so theres no double leather thickness to bulk up the buckle.
On the rt,is the tool/jig that makes the trefoil loops that hold the wires in my 2018 buckle. Thats from a blanking from the long leg of a French cross of Lorainne!, then held in it to make the 1st 90 deg bend, then a channel of steel encloses this to make the second reverse bend back on itself to 180 deg. Probably the most challenging tooling to work out , so far.
For this 2018 buckle the leather is held between the 2 parts of a hinge with as you can see, a screw from the back and the decorated double’ nut, on the front.
And finally something quite different. A 7in dia by 1/8th in thick titanium bowl forged then fire oxidised.
hope this is of interest.
Ted.
Hi Don,
this is my 1st go at this picture upload business. Its missed out the bowl. will try again tomorrow.
apologies.
Im really computer illiterate.
ted.
Ok, I’m working on trying to join the slotted wire border to the outside of the buckle. I don’t have binding wire. I do have wire of an unknown content. My thought was to heat it alone in order to see what happens to it. Then, if it heated fine, I’d bind the border and buckle and solder it, remove the binding and pickle. Would that be a dumb idea?
I would suggest that heating the mystery wire alone may not give you all the information you need.
Until you bind sterling with it, and heat it just as if you were soldering, you will not know what effect it might have on your sterling silver.
Cheap iron binding wire is usually easy to get at a hardware supplier. It is handy to have around the shop, I use it for many different purposes.
Thank you for that. I’ll probably go out and see if I can find some
Ok, well, I got some stainless wire and wrapped it. I tried heating it but i don’t think it got hot enough because the solder wouldn’t flow and I don’t think it was the right temp. So I pickled and tried again. And my solder blackened slightly. I assume because I couldn’t clean on the inside of the slotted wire. But as it sits now, it basically got stuck from the flux and heat to the buckle in the exact position I want it in and if I pull the border wire off the buckle, I’m afraid it’s not going to reposition properly and I don’t want to use the steel wire again as the heat sinking properties gave me issues trying to get it to temp. But I’m assuming if I don’t clean the surfaces again with sandpaper, after pickling, it’s not going to work. So what can i do here??
I’ll also mention, that after removing the wire, it got to what look like temp to me with the different colors on the silver and my solder turning the same white just before flow usually happens. So I’m more comfortable heating without the steel wire. I’ll also mention that I’ve never done a piece this big before. I’m using a single propane torch.
What kind of a torch are you using? How big is the buckle? What is the buckle resting on? If we know the answers to those questions we should be able to advise you on what to do next.
Jerry in Kodiak
It’s a single propane torch and the buckle is 3.25x2.25 20g sheet. I have it on a magnesia solder block
If by single propane torch you mean the kind that uses a blue tank about16 inches long, and the tank is full, you should be able to do it. It might take two of them though. They make a wire stand that you use with an iron screen that you can put the piece on and heat it from underneath which might help also. If it’s the smaller hand torch, the one with the tank about 6 or 8 inches long you probably don’t have enough heat for a piece that large.
Jerry in Kodiak
Yeah, I think it’s the larger tank. It’s definitely not that small.
I have a tripod, but i found that the mesh literally blocked my piece from being heated.
Rachel, I don’t have the wire you are using for the border so I can’t replicate you’re project on my bench. I did try a little experiment of soldering a ring to a piece of 20 gauge flat. I tried it on a screen and stand and I think a standard propane torch from the hardware with the basic tip isn’t enough flame for the job. The screen alone is a pretty good heat thief. Can you get a tip that will supply a bigger flame? Bigger doesn’t necessarily mean hotter. Just more of it over a broader area.
And Id look again for the iron wire.
Don Meixner
Sent from my Verizon 4G LTE Droid
You can make a substitute rack by bending a length of coat hanger wire into a “V” shape and laying that across the opening in the stand instead of the wire screen, also you need a tip that will give you a somewhat pointed flame. I made a silver buckle years ago that is a 4 3/4 X 3 1/2 oval out of 16 ga. sheet using that setup, so I know it can be done. Make sure you have a full tank of propane though, as the pressure does drop as the fuel is used. Stick with it, you’ll get it.
Jerry in Kodiak
Thank you both for your replies.
Don, I have seen on some YouTube videos of people who’ve cut holes in their tripod screens. If I had an extra screen, I’d maybe do that, but i don’t want to try it without another screen.
Jerry,
I figured it was possible with my current setup since I was seeing the colors and conditions for a successful join as I’ve come to recognize them. I’ll grab a new tank the next time I’m out and give it a go. This time, I’ll do a bit of extra cleaning and maybe wait until the flux as turned clear before adding my solder. I’m quite slow at applying my pallions, so it would likely cool quite a bit before I get it all positioned properly. Would I be better off with my current steps of applying my firescale preventative, flux and solder then heating?
Also, I picked up some Jel Flux from Otto Frei. Should I use that or stay with my handy flux since I’ve heard it’s really good with larger pieces?
Hi Rachael,
Been following your journey , and wondered if your still on course to have this finished before Xmas?
You have only 10 times 24 hrs to do this!
So far, you have learned a lot, what doesnt work for you,so perhaps? you might consider planning on this project being ready for xmas 2018, to give you the time to sort out all the skills you need to achieve your plan. Then plan something else for this year.
As a husband, partner and father, what would in my case be especially appreciated?
Why!, a very special apple pie, not just any one but a real special rarely made…
If you want, ask, and ill write you the recipe.
Ted
Thanks Ted. But I’m a very determined woman I’m also really at no other option. A plan B isn’t in the works or the budget. I do think I could try cleaning the whole piece again as that I believe that may be my issue and heating from the front as well. I think what’s happening is that I’m getting the piece to temp but the solder is oxidizing before it’s able to flow. So I’ll clean it again completely, as Jerry suggested, set it on my tripod, no mesh and heat the front from underneath and see if that’s the trick. I can’t give up
Well Rachael,
I too never give up, being trained that way in the military, so, ill help you out just once more on this one. Your really have proved your the sorcerer’s apprentice( Walt Disney)
- you just dont know what your doing, what you propose without prior experience will NOT work, and ruin the piece.
- the fact that the groove was/is tight is its meant to be. its meant to be an INTERFERENCE fit, which you hammer on to keep it in place prior to soldering .
- Next, how to measure the the right length, you take a piece of paper a4 and draw a line lengthwise. make a mark at one end. make a mark on your silver and roll it along the line till the mark is back on the paper. This is the exact length of the outside of the silver and the inside of the groove!
4.Cut your strip to the length between the 2 marks plus a couple of mm’s. apply to the buckle, hammer on and solder only where the ends touch by using a paste solder put INSIDE! the joint area. Make this by filing down some fresh solder into a powder, if you dont have any in stock. - your mystery wire? when you went to school did you take any science classes? all chidren here in the UK do. So what test is there all kids learn here to see what is iron? you work it out.
- you dont heat it from the face side unless you already have the fittings on the back? have you done these yet?
- Likewise you solder on these fittings assuming thats your plan, by using paste solder again BETWEEN the parts to be joined. Make some more!.
- And finally, there was no reason why you couldnt have make this buckle by wrought, as in cold working, riveting on the fittings and rolling the edge of the main plate in a groove with a tinmans hammer to get the decorated edge.
Thats for another day.
Ted.
Ahh, yes, the magnet test. I recall when I first started out and moved from artist wire wrapping to sterling silver wire wrapping, I had all my scrap clippings on my bench and I was trying to figure out which was artist wire and which was silver. The mystery wire is made of iron as it stuck to the magnet. I have the border wire cut and fitted, it’s just joining it that has has me paused.
No, I have not done the fittings yet. Hence why I was trying to heat the back in order to join the border wire. I’m wondering if I could also try MAP gas? I have an unused tank of it.