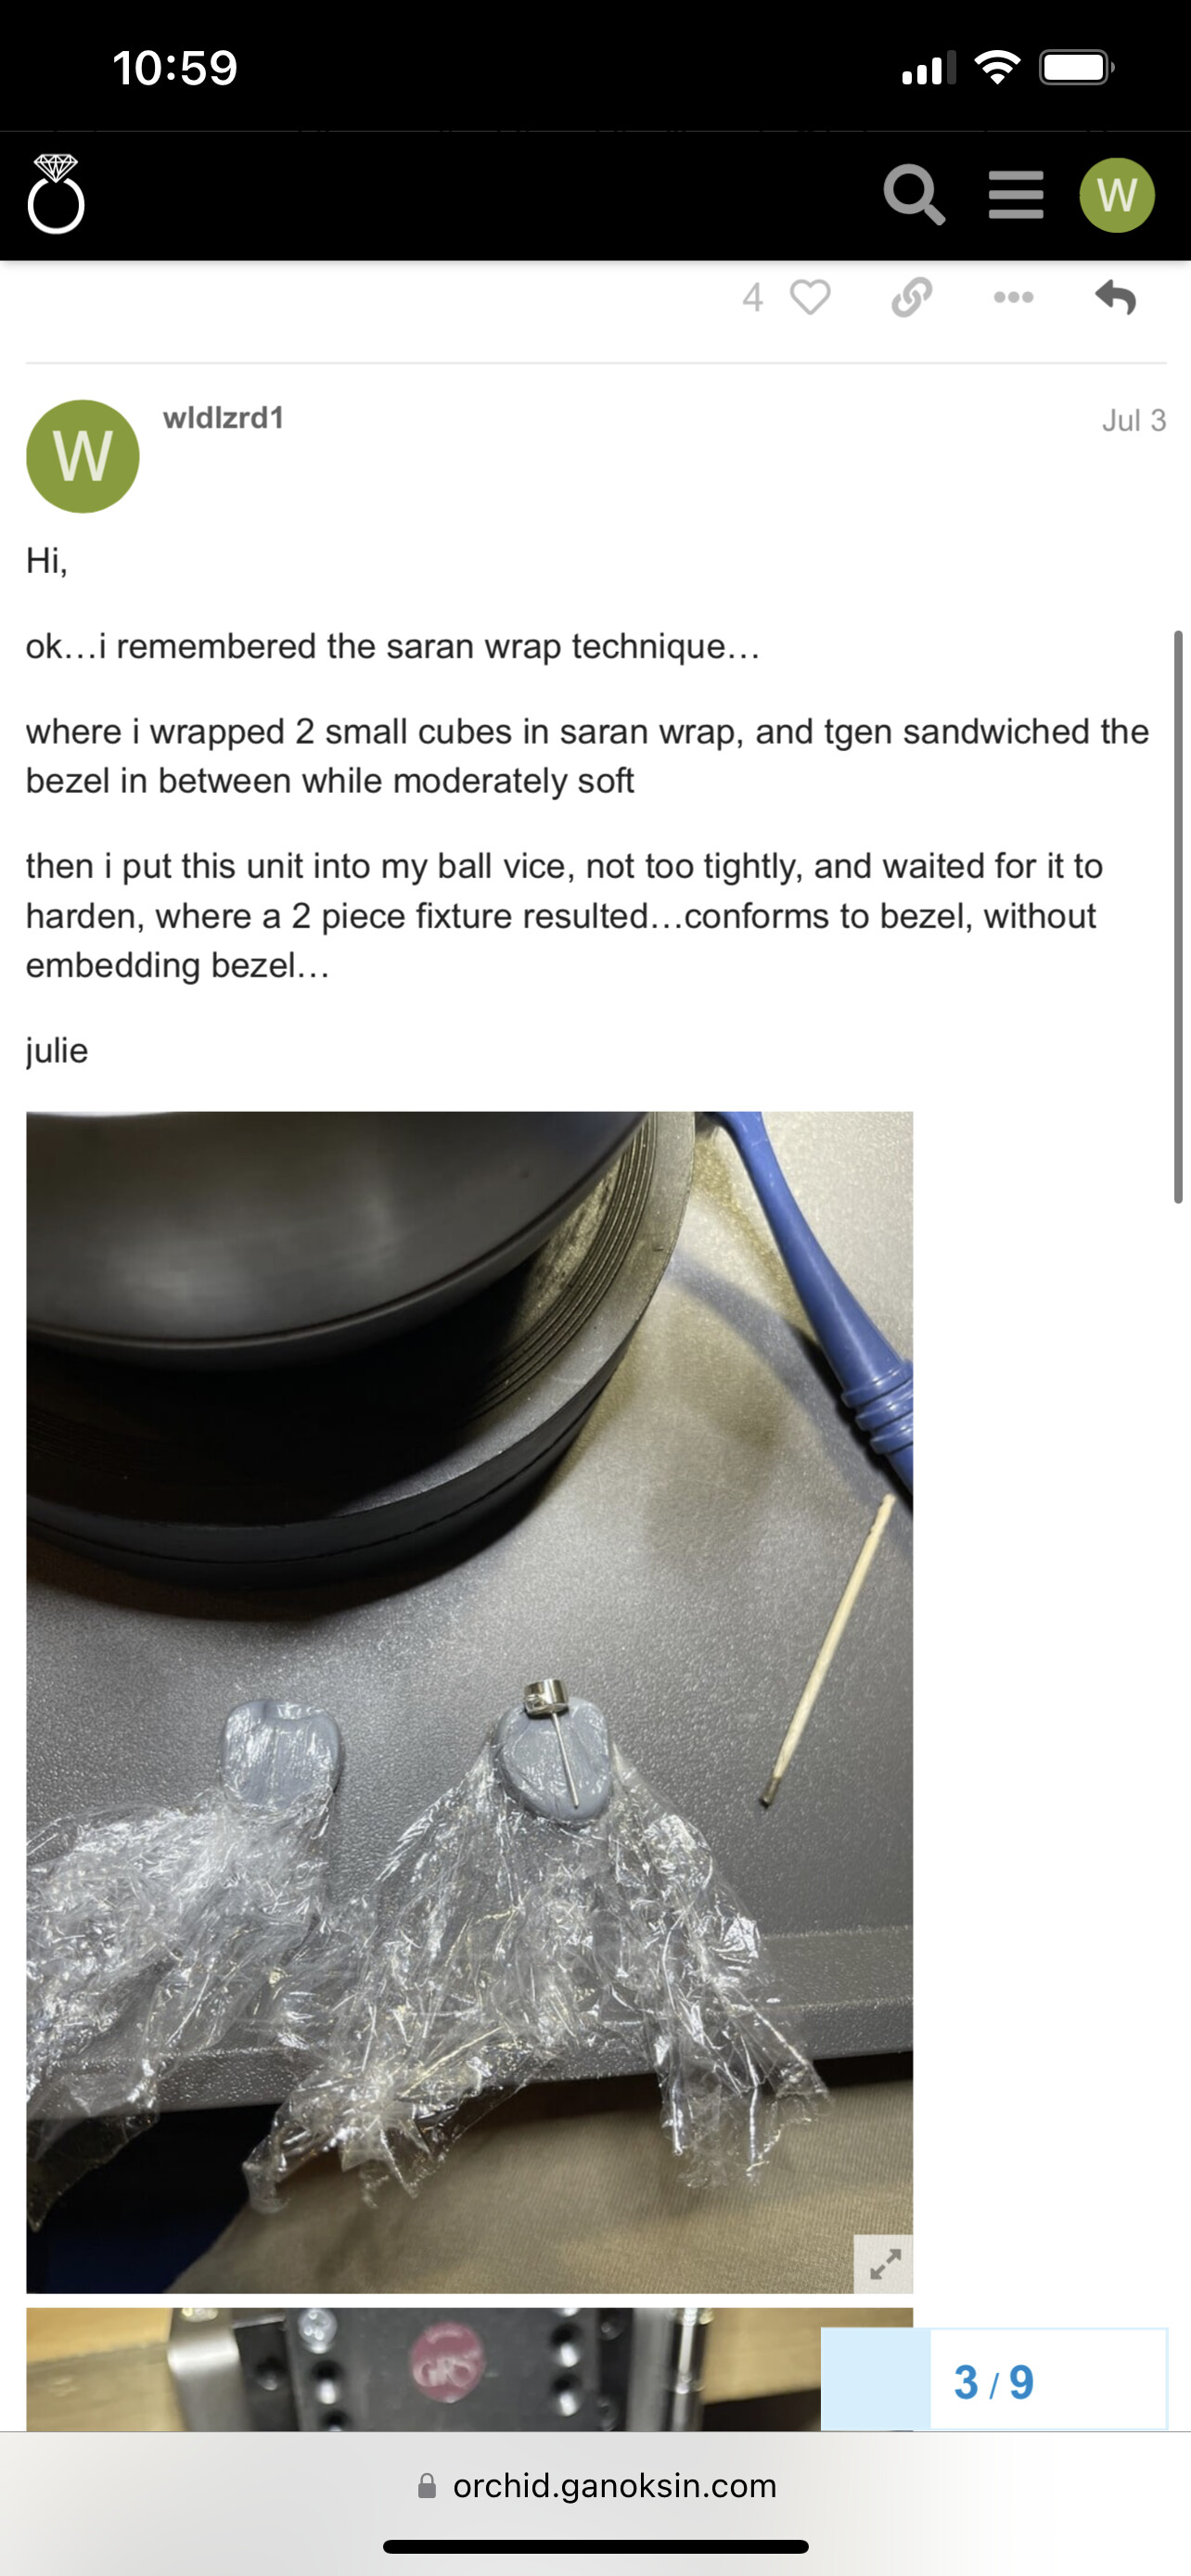
Anneal before soldering?

Hi all; I just watched a Ganoksin video on making a butt joint. In it, Instructor Mechelle Lois says the metal needs to be annealed first, but doesn’t explain why.
Why anneal the metal before soldering? Does this mean I should be annealing before performing any soldering join? I was not taught this step in soldering before, am I getting weaker joins?

Thanks everyone

4 Likes

Depending on the shape and proximity of the pieces being soldered, if they aren’t annealed, they may move as you heat the metal up to be joined and be out of alignment as a result of this movement just about the time that the solder flows. This is especially true of bezels. They can move and no longer be the shape of the stone when you solder them to a back plate unless they are annealed first. You need to decide this on a case by case basis or just anneal all the pieces of a join before you solder them…Rob

10 Likes

Hi,

one reason i can think of…is if the piece has been work hardened…in which case it may “relax” when being heated up to soldering temp…

ie: lets say you hammered a ring band to shape, then bending it closed to solder the joint…when heated, the band may relax, opening up the joint…

julie

6 Likes

Rob and Julie explain the reasons why one would anneal first very well! A lot of folks anneal before soldering and also teach to anneal before soldering. Not every one anneals first though and in most situations your joints should be just as strong. (I don’t anneal everything first)

You should try annealing first and see if it helps you at all.

Jeff

2 Likes

Hi
i neglected to say that metal may “relax”, when heated, if “tension” was built up in it, through work hardening, bending, etc

julie

2 Likes

Thanks everybody for their advice. Never heard that anywhere!

I’ve not heard of this, but I see my metal get misaligned more than once. I’ve told my jewelry teacher about this, and she hadn’t heard of it before either. She was taught by her teacher too. Now we know more and can do more research as to when and why we should anneal before soldering. I appreciate your answer Rob.

1 Like

Thanks Julie, I hadn’t considered that the metal may have gotten work hardened and relax when heated to soldering temperatures. That surely would be a good explaation why a join failed, and another good reason to aneal before soldering the two pieces. I appreciate your knowledge! Thanks so much.

1 Like

Jeff, thanks. I don’t have movement/shape issues when soldering bezels to pans, they’re usually unworked other than sawing the pan and wrapping the bezel around the stone. But, I’ll pay attention to the bezel packaging now to make sure it’s not gallery wire or some other hardened metal, and try annealing it first.

This discussion has furthered my understanding of metal properties, and is giving me more opportunity to say AHA!
I love learning how to get metals to do what I want them to do… It’s so different from paint or pencil on a flat surface!

1 Like

This is the greatest website. You can ask a question if you have one with the expectation that it will get answered and answer one if you can. Typically there is no judgement, unlike other websites. Metal does move as you heat it if there are unbalanced forces left in it from being manipulated or work hardened. Annealing a piece first is the best way to make sure that it doesn’t move in the process of being soldered. You might also coat it with an alcohol and borax coating first depending on what happens next. This reduces the chance of fire scale and, I think, improves the way that solder flows. Good luck…Rob

5 Likes

Thanks for asking this - I don’t remember ever hearing it. The explanations make total sense.

1 Like

I know, Right Marie? If I hadn’t watched that Ganoksin video I’d have no idea as well.
There are benefits to school learning, and working with a mentor. This is the next best thing, thanks to Rob and Julie, ]Jeff and others that frequent this forum.

1 Like

If you have ever drawn wire and, after several draws, coiled the wire up to anneal it, you would see if moving a great deal until the wire relaxed from being annealed. On a much smaller scale, this happens to other pieces that have been work hardened. Be especially careful of bezels. After you have finally formed the bezel around the stone prior to soldering the bezel to the back, anneal the bezel and then check for shape one more time…Rob

3 Likes

Rob, this doesn’t apply to fine silver, does it? I have some bezel strip from Rio that’s .999 fine silver, or is listed as Sterling Silver Dead-soft.
After thinking a second, the Sterling dead-soft strip will in fact work harden, won’t it. But what about the .999 fine silver?

I don’t work with fine silver for bezels. It’s too soft and dents while you are setting a stone. It will also dent while it is being worn if it is a ring or bracelet. You are correct that it doesn’t work harden much, but I anneal it anyway. My bezels are, at a minimum, 1 mm thick and made from sterling unless very small. I set with a punch and hammer or a setters punch. These decisions aren’t absolute, they are just based on my personal experience. It’s a journey and we all eventually make decisions that work for us, but maybe not for everyone. Find what works for you…Rob

3 Likes

I don’t much anymore either, because of all that you said, and I have a tendency to melt them about 85% of the time if I don’t use a stand and heat from below. Also, I’m just beginning to reach the stage where I might need to use a hammer handpiece, gratefully available at my Visual Arts Center Jewelry Class. I’ve also been thinking about a holding device for the piece which will help me figure the advantages and disadvantages to a hammer and punch versus hammer handpiece. I love the learning process, it helps me understand how things work at a finer level. Thanks again for spreading your wealth of knowledge Rob, Jeff, Julie, and so many others that contribute their knowledge to this forum!

Thanks all for the info on annealing bezels prior to soldering. That may help me too. MG

2 Likes

Hi,

holding devices…ah…what a broad and dangerous(ly costly) topic!…

as far as inexpensive options:

if you are doing flat pendants, i have seen people glue(?) it down onto a wood block, and then clamp the block in a vise of some sort…not sure what glue they use or how they remove the piece from the glue…especially if a heat sensitive stone is involved…

if you are doing a ring with a uniform width you can also use a bench vise with leather to protect the shank

when considering the various tools available, you might also contemplate where and how you want to sit…and what tools you will be using…that may affect your choice(s)

ie: if you want to be at your bench pin, using a flex shaft, then perhaps a GRS benchmate system would work well for you

if you want to work on a lower surface, with a hammer and punch, then an engravers ball vise might work well for you

both of the above allow for rotation or fixed positions, whereas a vice, while potentially a lot less expensive, would work better for fixed positions…

vises come in many sizes…and many price ranges…i have a Panavise clamped to my bench and use it alot…it has a ball joint…and rotates…and gas plastic jaws…

i have always coveted those cute little iron/ steel bench vises that i have seem on peoples benches…

i have a big vice but it is mounted on another bench table…i use it standing…

thermoloc is a good way to hold an item in a vise…you can use saran wrap on two pieces to make a two part easy release fixture…thermoplastics are great but if molded around a piece usually do require heat to soften them up for piece extraction

thermoloc has a nice consistancy
jett sett basic is more viscous and sticky when softened and is great for small settings and such

both require heat to soften, then they harden, and tgen require heat to soften for piece removal…or you can use the satan technique


julie

2 Likes

my understanding of the science behind it is that all metals have a microcrystalline structure. hammering, stretching, bending, rolling and any work done on them introduces dislocations, distortions and uneven areas of stress due to the disruption of the microcrystalline structure. This makes the metal hard but brittle; and if worked further, cracking… heating before soldering causes a restoration of the crystalline structure. That is how stress within a metal relaxes. This is critical for the aluminum parts of aircraft that are subject to expansion and contraction with repeated altitude changes. Each complete maintenance schedule includes taking a commercial jet out of service. many parts, including the fuselage and wings are tested. They are examined by X ray and ultrasound to look for internal microfractures…just FYI, correct me if I’m wrong.

Rare exceptions to annealing: I once made a sterling letter opener. I hammered the blade and left it work hardened for sharpness. The blade had to be filed into shape and could not be reheated to maintain its hard but brittle state.