Your preferred set-up for carving wax

I gave away my bench and tools some time ago and I would like your opinions for the “ideal” wax carving set-up before I replace everything.

I’m not planning on build-up,
no rings,

probably designing master models of elements to be combined to assemble necklaces.

Then send out for casting in sterling, to be returned to me for final finishing, then back to the casting house for rubber- molding.

Then have the caster shoot the waxes and cast using my 999 fine silver. All opinions and ideas are welcome!

Thanks!

hi
tool lists are forever, but here is what I would get

wax carving:

wax bars
many wax choices, properties to select from…chattery, smoother, etc)

saw frame/ wax saw blades

large flat file #0 to true up wax

6” metal ruler
starette divider (i like to have two)
scribe
square

2 sided half round wax file
set of cheap needle files

xacto knive and blades
kate wolf wax tools (amazing) (or, dental pick type tools, clay carving scooping type tools, etc…whatever will give you the result you want…maybe even pffeil wood gouges or spoon gouges! or metal stock to make your own cutting/ scraping tools)

alcohol lamp and dental tools, or wax pen, (for repairs, build up, etc)

wax gloss type of product

flex shaft or micromotor (maybe…not sure how small or big you wanna work)
wax burs (round, large cylinder, etc)
regular metal burs
twist drills

stuff to grind, shape, polish if making own metal tools…mizzy wheel, cutoff wheel, silicone wheels, sandpaper 320, 400, 600, 800, etc

a white chalky powder to sprinkle/ rub over surface to check lines etc…or disclosing wax (to “see)
stuff to transfer patterns (adhesive spray…does china white work on wax(?))

ummm…

also i got a book on carving wood architectural moulding that was helpful in understanding the progressive removal of material to achieve end results…

julie
hi
oh i forgot to mention

a bkack bristle wash out brush, clamped to the bench, to clean wax files and burs…

and any other good files i use are cut #00

julie

The pragmatic part of my brain says I need to know how to make a master model that
–can actually be sprued/gated
– consists of a dozen individual units
–would be carved, cast, polished and rubber molded as a single unit
–produces waxes that can actually be removed from the rubber mold.

After casting the waxes pulled from the rubber mold, I’d saw the “internal” gates on the dozen units. I say internal because the units would all be connected by multiple channels and they’d all be enclosed by large sprues or risers surrounding the whole piece.

To help clarify: maybe visualize a US silver dollar as the raw material with piercing around various design elements, all within the border of the coin, and with internal gates connecting a dozen of the design units that had been isolated by the pierce-work with the intact border acting as a sprue.

Or maybe visualize a female dog nursing a dozen puppies all at the same time. She’s the sprue; the puppies are the design units.

hi
ha ha

so you want to have the pieces all connected during casting, then saw them apart later?..”cutting the internal gates”…the jnternal gates are to connect the elements during casting but are not part of the design?

is there a design reason for them to be cast connected…?

are you trying to consolidate to fewer molds?

even if waxes are shot as one, they could cut apart and can sprue elements up on a tree otherwise…?

oh, and my list neglected finishing tools…polishing motor or flex shaft buffs, white diamond, rouge, or similar…sanding stuff…maybe contour-able sanding pads…

julie

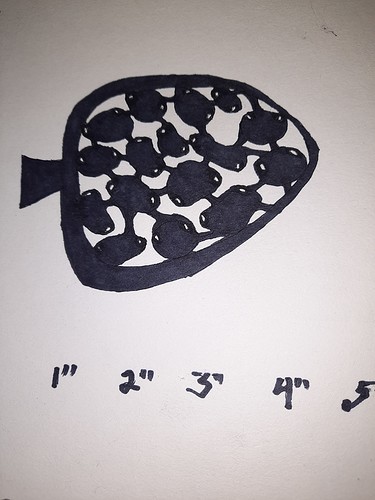
Image of master model to be carved in wax.

Critique of sprues/gates feasibility would be welcome! Thanks!

hi

so… you want to incorporate multiple elements in a single/ a few rubber mold, to reduce the number of molds needed…?

then once you have the waxes, they can be individually sprued up on a tree for casting…gate strategy no longer needed…?

also, look into progressive solidification

julie

Here’s where my inexperience with rubber molding will really show up: what would happen if the whole piece stayed intact right through the sequence of casting, polishing, rubber-molding, wax injection, casting of the new waxes and polishing; then sawing out the individual pieces, cleaning up the gate bumps and final polishing?

Great video!

Re progressive solidification: I was thinking that could be taken care of with all the connections and thick sprues?

Each unit would be slightly different but not different enough to justify a separate mold.

hi

…it looks like each element will have between 2-6 sprue attachment points, which will need to be cut off/ sanded/ blended.

…it might be easier to access/ finish edges if pieces were not all attached…and less sprue contact points…

…have you looked into mass finishing…?

julie

hi
here is s link yo Judy Hoch’s book on mass finishing

julie

https://www.judyhoch.com/page/2717/the-book

Mass finishing sounds like a big improvement over traditional finishing. Judy Hoch’s book isn’t available until her new edition comes out. The info at Rio is interesting but not as detailed as I’d like.

We have had a fairly good discussion of mass finishing in a recent conversation. There is a lot more to be found in the archives and learning center. Judy’s book is a good comprehensive source of information too. Following is a link…Rob

Thank you! The more knowledge, the better!

My plan is to polish the wax master model and then repolish the metal model before it’s rubber-molded so that finishing the final pieces would only need rouge (except for the sprue bumps). Is that a realistic plan or just wishful thinking?

hi,

so…in the sketch, there appears to be 16 pieces, approximately 1/2” to 3/4” in length…?

and…they will have a broad, non-uniform, softly contoured surface detail…

and you want to limit hand finishing…

…mass finishing might be your best friend here.

julie