Ways to finish silver other than high polish?

Hey all!

What are some ways to finish silver, like sterling, other than the standard high polish finish or matte finish? I’m curious to try some interesting methods to finish jewellery other than a high polish. I was thinking of using fine steel wool to give a matte finish, and maybe contrasting that with high polished parts. What about heat patinas? I’ve never really seen heat Patinas done on sterling before. What about odd texturing methods hammering with a rock? What are some creative methods of getting a finish or texture?

4 Likes

A hammered or planished surface is attractive. This is often found on hollow ware, less frequently on jewelry.
Silver doesn’t really have heat patinas, unlike steel which goes through a series of oxidation colors. But there are a number of chemical formulae which will color silver. Most of them are for browns and grays, but there are a few for brighter colors.
Pick up a copy of The Coloring, Bronzing, and Patination of Metals by Richard Hughes and Michael Rowe (Crafts Council, London, 1982), if you can find one. This is a very thorough compendium of formulae for copper alloys and silver.

6 Likes

Thanks for the info. What other textures do you know of?

Regardless of what final finish you give it, you need to high polish it first then: use a pall peen hammer, sharp chisel hammer, dull chisel hammer, sharp pointed hammer, many types of roll print finishes, steel wool, sand paper, various abrasive disks, brushes etc., sand blast or other media blast, chemically alter it, tumble with whatever media you want to use and so on. But first, high polish it. Just my bias…Rob

2 Likes

Textures are as much a design element in jewelry as is shape or added appliances.
There should be as much though put into textures as is put in the over all design. Think about where the textures will be worn and how they will be seen.

Alexander Calder was a brilliant visual designer but I sometimes think he was looking at jewelry only from the outside. I think he was more concerned about the statement it made to the observer than he was about the comfort it gave the wearer.
And I think some of it was flatout dangerous to wear. Google Alexander Calder Jewelry, then hit images and see where my thoughts are coming from.

There are as many textures as there are things to hit the metal with. I roll some earrings through the mill with a sheet of scotchbrite pad between them and I get a great look and texture. But the earrings are highly polished first and I leave them smooth where they touch skin. Onion bag is a great, rolled in, texture, so is lace but you have to polish the metal first if you are going to have a bright look. Touch up the metal afterwards very lightly but do too much and definition disappears.

Rob and I come by our biases honestly and probably from the same source. My Dad always felt the work wasn’t done until it was polished. I polished for several years for him, five years anyway, before I did much building on my own. And polishing was critical to his finished work. It is pretty critical mine. Only just now am I looking at starling and bolder textures but beneath them all is a high shine.

Experiment a lot. Have fun.

Don Meixner

6 Likes

The advice of les freres Meixner is always good, coming as it does from decades, indeed generations, of experience.
Another textural technique is reticulation. It is probably the most challenging texture to create, and certainly takes both skill and much practice to learn to control.

1 Like

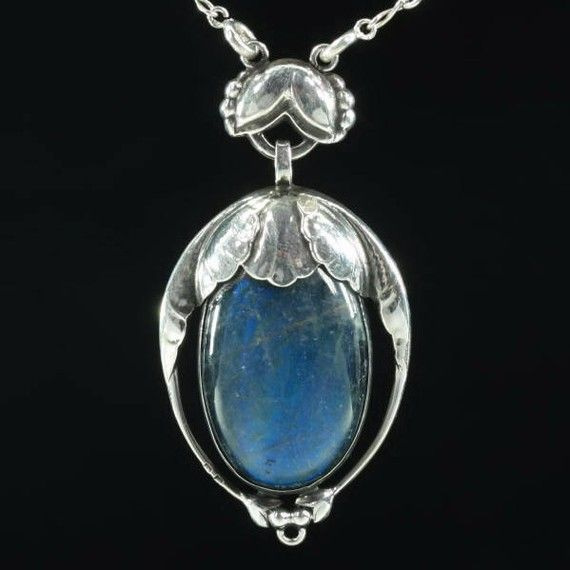
I’m a fan of Georg Jensen, Danish silversmith of the early 1900s. A defining look of his is a planished surface, fairly deep indents, and then the high spots lightly polished. He used dark firestain which looks like a patina with highlights around the planishing marks. This characteristic surface is found on both his jewelry and even more on his exquiste hollow ware and flat ware. Some of my work uses this surface finish as well.
I have one of these original pieces -

4 Likes

Jeepers Judy, ya wouldn’t wanna show a photo of the back would you?

1 Like

When I teach my textures class-“Creative Surface Development” —I break down surface into broad categories based on how they are produced.

-Heat generated: fusing, partial melting, reticulation, etc.

-Percussive: hammer, punch, chasing, forging ,plannishing, rolling, etc.

-Removal: grinding, filing, grinding with burs,etching, etc.

-Accretive: building surface by adding elements, i.e. soldering on small sterling scales top a sterling base sheet.

-Combo: Mix and match.

I really try to stress the building of surface through layering: of process, elements, etc.

Where and when it the making a surface is added or developed depends often on how it is generated. For instance, in most cases rolling (roller printing) produces stock from which something can be fabricated. Obviously, adding a rolled surface to a dimensional piece is problematic, unless you add a rolled element later.

There are also ways to replicate a texture from one category in another. This can be very useful. I often produce a really sweet hammered (plenitude) finish by grinding with a hard rubber wheel. It gives you a lot of control, won’t stretch a ring up by hammering and you can add a “hammered” finish after all is done like on a hollow object such as a tube.

Just some ideas.

The key is to take a day and play. Play, play, play. And take notes!

Best,

Andy
4 Likes

Hi Judy,
You say: " He used dark firestain which looks like a patina with highlights around the planishing marks."
I think I’m seeing what you mean in your picture…there’s light and dark (firestain?) around the planished curved surfaces of the leaves, right? But I have no idea exactly how such is produced. Is the planished surface lightly firestained by heating with a torch and then lightly polished to take the firestain off the highlights? Thx, royjohn

1 Like

Royjohn - when I do it, I simply don’t protect the silver when heating and I get firestain. then planish to shape and then run it in an abrasive media in a vibratory tumbler. I more often use patterning from a rolling mill, with the same result. sometimes we all try too hard. I think we all can make firestain without trying too hard… just make it part of your designs. Reticulation is a more common version of this - folks seldom polish the low parts of reticulation…

Interesting. Are you suggesting I don’t polish away firestain, but instead use it as a patina in its own rite?

You should probably polish away that which you can reach, but in your design, consider leaving it in the low spots where it can contrast with the highly polished high spots. You will see this in some of the heavy twisted bracelets that Don an I make. You can control firestain with boric acid/alcohol coats and pickle and a well controlled torch. The best way to find firestain is to look at the polished piece in sunlight . LED lights also help.

1 Like

That is what I do. Depending on the piece I plan on staining as a design element. Not all the time. But often enough.

I know when I can’t help but create fire stain so I work with it. I high polish where it an be achieved but fire stain can add drama and texture to a piece. We tell people not to refinish old Fumed Oak Stickley Furniture because that was the finish it came home with. The same with jewelry. Except with silver, while it looks great right out of the wash it takes months to develop the tarnish in the recesses that that give it the dynamics that only old silver will have.

Don Meixner

2 Likes

Thanks to Judy, Rob and Don. It is simple when you explain it! -royjohn

Well I learned something new today.