Vent holes in rubber molds

Good day

I am new to mold making. I have a class style ring type that is
produced from a rubber mold. I have inconsistent results in the wax
mold that are produced - some good - but many rejects. I have no
vent holes in the mold at the moment which maybe the reason from
some of my problems.

How do I create these - with a small drill from the inside to the
outside? How many vents? any position?

II don’t have my own injector but I am looking at getting a new wax
injector (hand pump) any recommendations?

Andrew

Andrew, Welcome to part of the world of LOST WAX CASTING

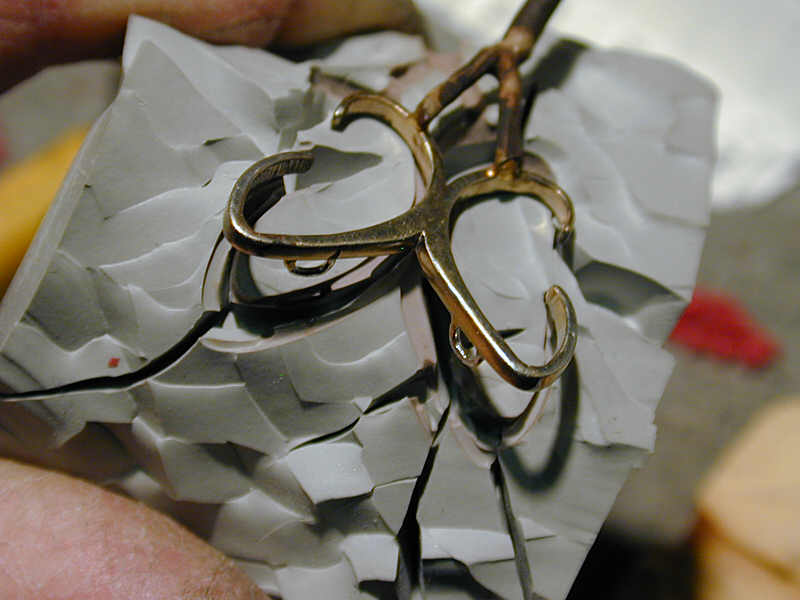
Normally vents are made by stretching the mold over a small diameter
post (piece of dowel glued to a base) and using a sharp scapel blade
to cut/pierce through the mold at the same time. The vents are then
held open and gingerly powdered with talc, corn starch, or baking
powder to keep them from totally closing up when the tension of
stretching is relaxed. This technique is used versus drilling because
drilled holes will leak and plug up after the first shot. I did
experiment one time, with mixed results, drilling and plugging the
hole with fine synthetic fiber to allow air to escape but wax to be
held in the mold. The patterns, shot this way, always had some kind
of flaw to be addressed before casting.

When venting a mold, in general, don’t forget to vent the piece near
where the sprue enters and even the sprue itself. This is the first
area of the cavity to see wax and last area of the mold to fill. If
there’s any back pressure here it can affect how the wax is allowed
to fill on the other sides of the mold.

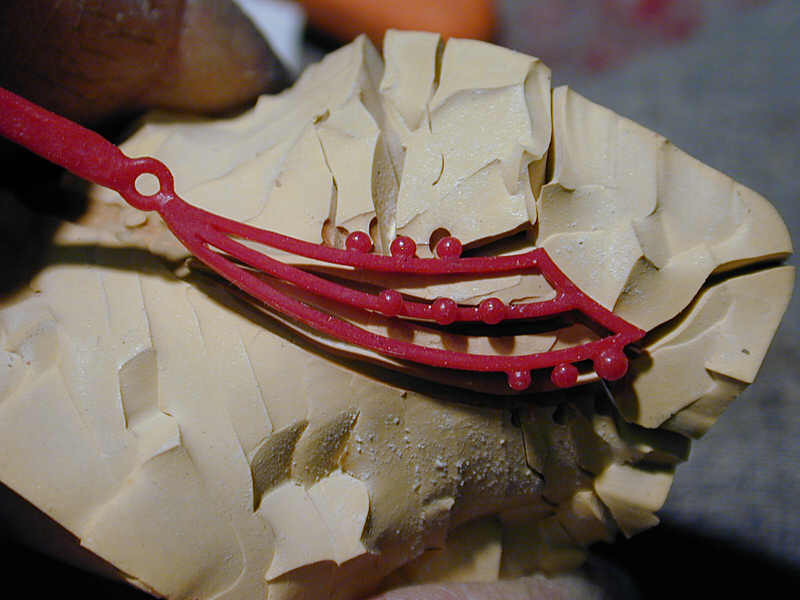
My experience has been that anything with raised lettering has
always been problematic in getting a good crisp CONSISTENT (notice
CONSISTENT) wax. The sharp corners of letters (and other designs)
tend to trap air and the surface tension of the wax resists being
pushed into the tight resesses. I’ve had to vent vent almost every
corner on some molds, which can lead to some extra marks being left
on the pattern to clean prior to casting.

This issue with lettering is why most emblematic lost wax jewelry
companies use metal molds and inject under high wax pressures and/or
vacuum to achieve consistent results.

And… your choice of injection wax and temperature can make or
break what you’re trying to inject.

Another importnt point to watch for is that your rubber mold makes a
good seal with the injector nozzle. If you’re losing wax here because
of a leak/poor seal, you’re losing effective wax pressure inside to
fill the entire cavity.

II don't have my own injector but I am looking at getting a new
wax injector (hand pump) any recommendations?

As far as I know there are 3 basic types of commercial jewelry
mechanical wax injectors.

In order of new price and reverse order of ease of use

A. Open hand pushed plunger pots (maybe $80-$100)
B. Lidded manual pump-up pressure pots ($200??)
C. Lidded pots with an adjustable regulator for connection to a
pressured air line or refillable air tank ($500+)
D. The Japanese vacuum type pressure injectors ($2000+)

All work well but A. does require some learning time to be able to
get repeatable results. C. is the easiest to use and produces the
best results for “average” molds.

Frank

We used to just take an exacto knife, peel open the mold and add two
small ‘v’ cuts that create a little channel to move the air away.
This little channel would only be about .5mm wide and maybe .5 mm
deep. We would add one or two of these at points farthest away from
the injection sight. It doesn’t take much space to move the air.

Good luck. Dennis

Dear Andrew,

You don’t say what the inconsistent results are and use the
confusing term “wax molds”, so it’s hard to give you any advice at
this point.

Is the rubber not flowing in and around the model and making a
complete mold? Or are you having trouble getting the wax to inject
into the finished mold? Those are two very different issues with very
different solutions.

But neither one of these problems is affected by drilling vent holes
in the aluminum mold frame.

The subject of vented vs. unvented mold frames has some similarities
to passionate discussions about religion: each side is immovably
convinced of the correctness of its position and unwilling or unable
to listen to the opposite point of view.

Molding technology throughout the rubber industry (non-jewelry, that
is) holds that molds should be closed, without vents, in order to
build up internal pressure in the mold cavity in order to force the
rubber into all the nooks and crannies of the design.

Believers in vented jewelry mold frames seem comforted by the sight
of rubber flowing out of the vent holes: to them this means that all
is well inside the dark and unseen cavity of the frame.

Millions upon millions of molds have been made with vented mold
frames and even more without them. Both styles seem to work.

There is a belief that rubber shrinkage is reduced by the use of
vented mold frames, but there is no empirical proof of this. I
remember attending an early Santa Fe conference in the 1980’s at
which Louis Sanchez, then at Rio Grande, presented research on this
subject. He compared shrinkage rates for molds made from unvented
mold frames with those made and mold frames with various size holes
in various positions.

I remember well his conclusion: “In conclusion, I have no
conclusion”.

So – whatever mold vent hole religion you belong to, you might as
well continue as you are.

Michael Knight
CASTALDO
www.castaldo.com

Hi Andrew

I have alwas found that it is difficult at the best of times to get
a very nice detailed wax of a class style ring from a rubber mold.
You can get duplication, but it is not really bright and sharp. What
I had done to get the best wax, was use a small drill bit, and drill
form inside to outside of the mold at all the high points in the
rubber…i.e. letter tops and detail spots etc. It helped alot to
bring the letters out but did increase the wax cleanup a bit. It
increased the reproduction from bad to marginally acceptable. Nothing
close to the sharpness you would get form a machine milled wax or
plastic injected model.

If you are thinking about getting in injector, be sure to get a good
one that will give you quality injections and last forever. I have a
spare used Kerr Injectomatic kicking around my shop I would be
willing to part with. If you ae interested e-mail me off list.

Good Luck

Dave

Hi Andrew, Don’t creat vent holes. If you must, you can create a
verticle slit in the mold beginning at the trouble spot and extending
to the edge of your mold. It need not be more than 3mm deep and
should be a clean slice. A wet surgical blade cuts easier than one
that is dry. A hole will cause a loss in pressure and cause more
problems than you have now.

Have fun. Tom Arnold

Hi Andrew,

I cut and injected 3 rubber molds last week—they did not fill well
until I enlarged the sprues. That worked for me. I worked 3 years as
the model and mold maker in a gold jewelry factory, and rarely found
vents necessary. As an added plus, when you get the sprue right for
wax injecting, it is likely to work well for the casting! In fact I
received the castings today, and they look great! Hmm…the other
thing that I did that helped my molds fill last week was adjust the
wax temperature. It worked better when it was hotter than the
recommended temp. on the package. I remember that some molds seemed
to work better with a release, such as baby powder (cornstarch is
healthier than talc) we put it in a cotton sock, tied up the end, and
sort of powder-puffed it on. Vents were a last resort. We usually
burned them in, but you could cut it, or drill it, I imagine.
Whatever works! Certainly, there is no harm in a small vent or two.
Don’t forget to let the wax cool long enough before you remove it.
And, be sure that you have enough pressure… Best of luck!

Cynthia

Hello Andrew,

I use a knife and the vents don’t reach the end. I wouldn’t try
drilling it. You don’t need to. The slits you make allow you to take
the wax out more easily as well as allow air to escape. The more
slits you make the more damage you do to the mould. It will shorten
the lifespan, so I am told. Where I learnt to make moulds, we didn’t
use anything and I remember them being hell to use. I learnt where
to put by slits by taking all my old moulds to a mould maker and
paid him to get them working. Now I know about 10% as much as a
professional, but all my moulds work pretty good.

I would always cut vents with a scalpel blade at the problem areas,
the no fills. As has been said, the mold is stretched and the cut
"pounced" w/ talc or cornstartch.

Every mold has a different and ideal combination of injection
pressure and time injected. If you have an air powered pressure pot
injector, experiment w/ different pressures and times. Once
consistent results are achieved, write on the mold w/ a sharpie pen
the psi and # of seconds injected.

Good luck, Andy

Andrew,

inconsistent results in the wax mold that are produced no vent
holes in the mold at the moment 

I make lots of rubber molds and often face the challenge of full
fills. So, let me start by saying that a number of factors could be
causing the problems:

  • Volume of the injector compared to the volume required in the mold

  • Injection pressure regardless of plunger pressure by hand or air
    pressure filling

  • Type of wax used

  • Temperature of the wax

  • Complexity of the object

  • Yes, also vents

Some questions to ask yourself:

  • Does it always fill (or not fill) in the same area
  • if not always the same, look for another cause other than vents
  • Is the quality of the filled area what you are expecting or is it
    unacceptable
  • if not acceptable, look for a pressure problem
  • Do you get everything from No Fill to Flash with injections
  • if yes, consider how the mold is held during injection. Too much
    pressure can cause partial fills

  • too little pressure can cause flash

  • I use spring clamps and 2 pieces of 1/4 inch plastic to establish
    consistent pressure while injecting

If everything you have considered leads you to believe that the
filling problem is trapped air:

ASSUMPTION ON MY PART – I am working with a fully CUT mold that is
in separate parts, usually 2 halves

  1. Select an area and mark a point for your vent that is the best
    mix of the following four characteristics:
  • within the area that doesn’t fill

  • furthest from the injection nozzle

  • on the portion of the mold that will hold the thickest volume of
    wax

  • will be the easiest to refinish IF the surface is disturbed

  1. Now draw a line from that point to the edge of the mold. I never
    vent to the top or bottom because it is covered by the compression
    plates during injection.

  2. Take the half of the mold that you have drawn the line on and
    fold or bend is such that the crease is on the line

  3. Take your scalpel or cutting instrument and draw it along the
    line to form a shallow SMOOTH cut. The rougher the cut the more
    likely you will release air and create flash. A proper vent IMHO
    releases the air and creates no flash.

  4. Take a very small (I use a flat dental tool) and pick up a very
    small amount of talc, bend the mold again to open the cut. Deposit
    the talc in the cut near the cavity for the pattern

  5. Allow the mold to relax and blow off any excess outside of the
    cut

  6. Inject wax as you would normally do it.

NOTE A – I usually add additional talc every 10 or 12 injections.

NOTE B – If you use Silicone spray it will tend to clump the talc
so I normally do the silicone spray, let it dry, then clean the cut
and re-add the talc

Regarding your second comment – > don’t have my own injector but I
am looking at getting a new wax injector (hand pump) any
recommendations?

When I started making molds, I used the equipment at the Rockhounds
Club for my injection. Since I live a very long way from the
facility, it was very inconvenient. Soooooooo, I went to the local
pharmacy and bought several sizes of plastic syringes the largest was
and the smallest was 12cc. They are dirt cheap. Buy the cheapest
double boiler ($4-6) that you can find and use it to melt the wax let
the syringe tip stay in the melted wax and be warm. Pull up the wax
and press it against the mold. Wala, home made injector. You may have
to trim the end of the syringe for a good round fit to the molds. I
still use this method today for several different waxes (color and
compounds vary) for things out of the ordinary. My normal everyday
wax is Plast-O-Wax.

Regards Caster

1 Like

I must commend all the people who contribute to this site…I can’t
remember who mentioned it on this thread, but I went back and took
some notoriosly bad molds, and vented them ( including the sprue
gate ), and then talced the vent slits. Wow…what a difference on
some of the molds.

Thanks guys…this old dog has a new trick!

Dave

I like to open a discussion of mold venting by first telling folks
that air is very, very skinny. That is to say it will slither out of
the tiniest opening without trouble. This means that there is
absolutely no need to drill holes, burn slots, cut v-shaped channels
or cut vents at the entry sprue. A vent at entry does nothing.

The vents must be slit at the far end of the pattern. That is where
the air gets pushed and trapped. Most of the air will escape between
the mold halves ahead of the wax, hence the comment from someone
that many molds don’t need vents.

Vents are cheap. Throw a few into your mold. They do not shorten the
life of the mold. Flex the mold and slice several slits leading to
the outside of the mold. Start the slice in the corner of the model,
or anywhere that may trap air. In mold rubber, especially silicones,
smooth slit surfaces tend to adhere to each other, almost like
tackiness. It is not tackiness, but that requires another discussion
and the science of what is going on there is not important right
now. Because the sides of the slits want to adhere to each other and
block air flow, they should be lightly dusted to take this tendency
away. The dusting is not for the purpose of keeping the slits
slightly open. It is too eliminate the tendency to adhere.

As for getting crispness of lettering, there are only two mold
rubbers which provide that today. Call me for our 4X ZeroShrink and
our LSLT-160. These are very dense products. Your mold will feel
like a rectangular hockey puck, but you will get true zero shrink in
one case and ten minute cure times in both cases. You will get
beautiful, crisp replication of lettering and other difficult
details. These metal mold like silicone rubbers still provide high
tear resistance and customary ease of cutting and nice flexibility.

Regards,
Bill Mull

Zero-D Products, Inc.
precision engineered materials solutions
http://www.zerodproducts.com

The best way to apply talc to a mold is to use a double layer of
material, I like to use an old flannel shirt, put several
tablespoons in the center of a 5 or 6 inch square, bring all corners
up and use a rubber band to form a ball of material with the talc
ball in the center. Just tap this ball on the mold with the vents
spread in several places, it should leave a light dusting of talc. If
too much gets on the mold, turn it over and holding by the edge tap
the end on the mold on a corner of your work bench. One thing that
has not been addressed is parting lines. My experience is that if you
do not have the right amount of vents in the right places you will
have parting lines that have to be removed in wax or metal. The
parting lines on my waxes are very faint and very easy to remove.

Richard Hart

These are two pictures of molds with the pieces they produce and I
have tried to show how I cut molds to let air escape so the mold
fills and there are minimal mold parting lines.


Richard Hart

For powdering molds try this.

Baby powder ( corn starch ) in the smallest plastic bottle sold, can
be used if the top has a layer ( or two ) of old T shirt tied atop it
with a piece if wire.

Keep it closed when not in use

Another use is to powder the surface of polished rings to dull the
glare when working on them. It makes fine details easier to see by
reducing the glare.

Bald, blind (nearly) and shaky. I use all the help I can find.

Robb.