Hello,
I have just soldered a Sterling Silver Bezel to a Sterling Silver backplate. Alas, it’s slightly de-centered. Is it possible to unsolder it? I put flux on it, warmed as much as I could (still taking care not to put fire scale) in the backplate but nothing happened. Should I direct the flame on both elements? Should it take place quickly? Do I need to pickle the whole between each attempt and re-flux? Should I put the backplate in a third hand vertically to help the Bezel to detach itself?
Thank you very much!

You can try all that you have suggested and asked questions about. I at least have been in your position before, and I suspect others have too. I usually find myself here when I solder a jump ring to what I thought was the top of a bezel. In the future you might consider not doing the final shaping of the back plate until the bezel is soldered. You may actually have this opportunity now if you want to trim the back plate a bit to bring it into an acceptable shape. Remember that it will be measured with your eye, so use your eye to do this reshaping. While it may not be the shape that you had in mind when you started out, the bezel would be centered. Who knows, maybe you will like the shape better. You did not say what the final piece would be. That may also have some influence on what you do to remediate this problem. Good luck and let us know how it goes…Rob
8 Likes
Hi Rob,
Yes… You’re right, sawing a part to adapt it.
The final piece will be a pendant. I even considered de-centering the Bezel before soldering to have the biggest part of the plate in the lower part.
But now I’ll probably just file a part of the “petals” to let them look symmetric or more or less symmetric…
And now I understand why most artists cut the final plate only after soldering! It’s just that I don’t like sawing with a Bezel right in the middle but well… it’s a question of getting used to it I think.
Thank you very much for your tip and have a sweet evening,
Christine
2 Likes
I would either reshape the base (a suggested before) or simply grind off the bezel, clean up the back plate and proceed with a new bezel. Costs a little maybe… But it really depends on what your tolerance is.
I usually hate getting or giving advice after the fact but…. When I solder on an element that is large or broad, I tack it first in one place then pickle or submerge in hot water to get the flux off (so you can see clearly) and then check it out. If it’s off a bit, you can reflow the solder and nudge the element… It’s much much easier to re-flow a small section of solder than to try to re-flow such large area and nudge… If you did all that, I apologize for any assumptions on my part. Just sayin’. If you did all that, I apologize for any assumptions on my part.
Andy
8 Likes
Dear Andy,
At this point I agree, it’s too big a Bezel to try to unsolder. The above ideas are good but belong in more experienced hands.
I’m too afraid of melting something! Ruining both pieces would even be a higher cost! Since I’m a beginner I think I don’t have the knowledge to unsolder this big piece; and I had soldered it with a lot of medium solder all around… better filing it!
Learning by experience 
Thanks a lot, have a great weekend
Christine
1 Like
Agreed. This is a very large area of metal to attempt to flow the solder across the entire piece at once, and sucessfully slide the bezel off of the backing plate.
It is possible, but…it is a very hazardous path to take.
Either adjust to make whatever corrections you can live with, or start over. Both are options.
3 Likes
Hi Rob, and hello everyone who commented and helped me
I sawed and filed the Bezel; and re-soldered it on the back (it was too visible once removed). No big deal; here’s the result - I just have to embellish it and set the stone
Ah I had forgotten that it’s not possible to post pictures. No problem. But indeed, better start again than melt your piece!
4 Likes
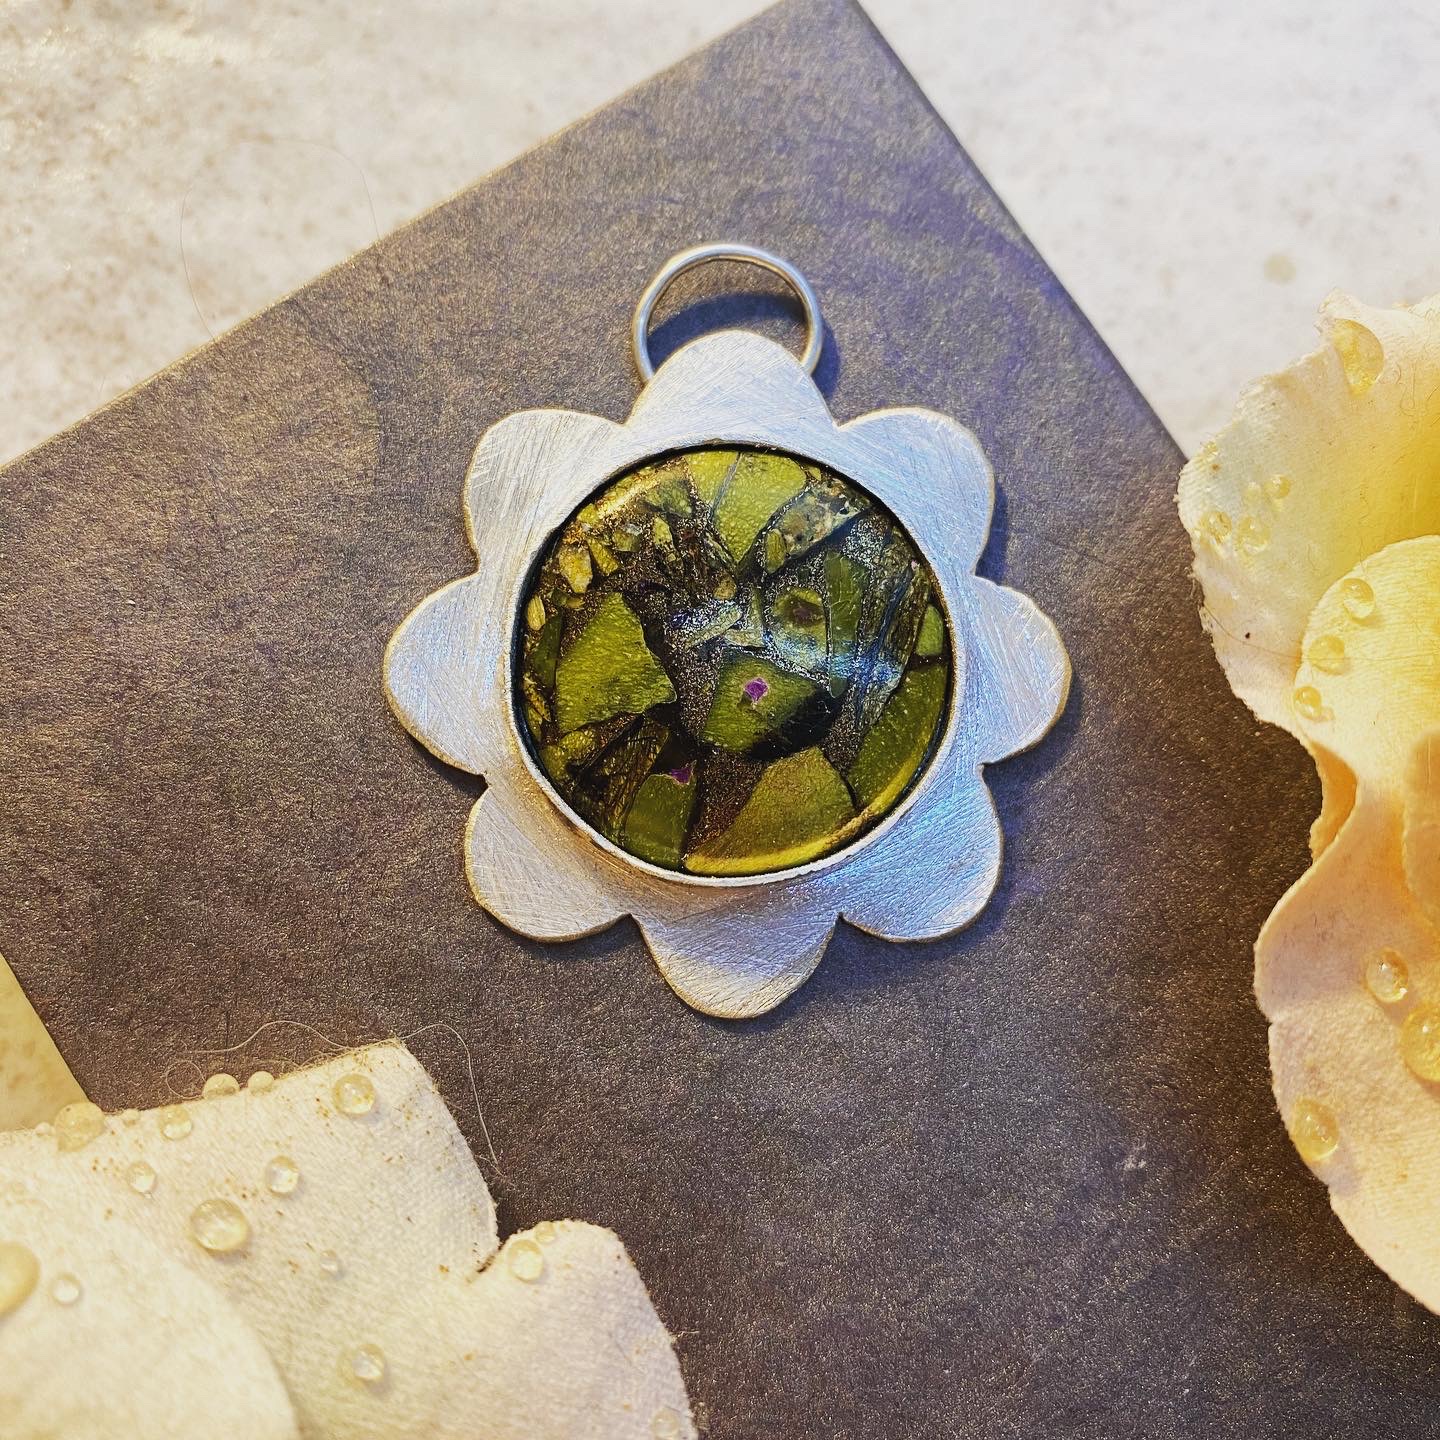
 ) and polish it.
Nice! What is the stone? With a Mohs hardness of 2, be careful that you don’t damage it in the process of rolling the bezel and polishing. Take your time and figure out a way to securely hold the pendant before you start this last step. Good luck…Rob
2 Likes
Hi Rob,
It’s a Stichtite. Yes I will pay extra attention when setting it. I’ll probably put some embellishments on the petals before.
Thank you very much for your kind appreciation and your advice,
Christine
2 Likes
Stichtite is a TWO?! Yikes. The colors are right up my alley but now I’m not in such a hurry to get any. Wow. I’ll practice for another year or two before I put myself through that!
The piece looks great, after all that. I share your distaste for sawing with the bezel in place, but having been bitten in the past, I’ve given up trying to solder the bezel on after. It might be awkward but I’ll take the control where I can get it.
1 Like
Hi ifutzwithfire, totally agree, sawing with the Bezel right in the middle is a pain. This time I had to, since I re-used both pieces, plate and bezel. Fortunately I had steel wire 0,4 mm and was able to fix both pieces perfectly together (between the petals it holds everything in place securely).
2 Likes
It turned out beautiful! I made the exact same mistake when I was making a large pair of domed earrings. I was attempting to solder the back plate on them and cut the plate to the exact measurement needed to fit the piece. You can imagine the challenge I faced! The top kept sliding all over the bottom and of course was off center. I was able to unsolder it and resolder it but it took numerous attempts! So, what did I learn? Never! Ever, cut the back plate to size! Solder your piece, be it a domed earring or a bezel, to a small section of a piece of whatever metal your using. This will allow you a bit of latitude in case your piece moves a little. I also learned a little trick that I now use every time I solder ~ i flux my piece then gently pass over it with my torch until the flux turns white (I use a paste flux) then I flux my solder and place it. Then I solder. Drying the flux stops it from bubbling and spitting and making the solder jump off of your join. This does not mean it will not move! So, keep that solder pick handy!
Teri
4 Likes
Yes Teri You’re right! I learned it too the hard way! As you say, the fluxed and heated pieced allow the different parts to “stick”. But at what cost did we learn it 


2 Likes
For future projects you might consider marking the position of the bezel on the backplate using a fine scriber then, using a smallish onglette graver and working towards the center of the piece, raise at least three small equispaced ‘stitches’ on your scribed line. With the bezel back in place for soldering the stitches will prevent the bezel floating out of position when the solder liquifies.
7 Likes
This is a fantastic tip! But won’t it leave mini gaps, visible after the solder has flown? Or visible pits around the bezel?
Hi Christine,
Sorry for the delay in replying - tried to reply directly to your email but that bounced back.
Regarding your question, I’ve never had a problem. The small voids left by using the graver are just that - small ; the bezel itself sits partially over the void ; and when the bezel is joined to the backplate the voids fill with solder.
Regards,
Stefan
3 Likes
Hi Stefan!
That’s very kind, I will give it a try!
Thanks a bunch,
Christine
I realize that this reply is waaay late in coming but thought I’d put it out here anyway… why not right? The question you raised about unsoldering a bezel is totally possible and I’ve had to do it a couple of times in the not so distant past! I just set the bezel on my tripod with the thick, heavy screen and point the flame towards the bottom of the bezel, moving constantly. I keep a pair of tweezers in my right hand at the ready for when the solder melts, and it will. It may take a little time, but it will. Oh, and I do floc both the inner and outer sides of the bezel first. Hope this helps you in the future… and again, I apologize for for being a year or more late! ![]()
1 Like
Thank you very much! Yes I had to unsolder several bezels, or open several bezels to make them tighter or so, and it’s no big deal. With tone you learn to do it quickly and easily ![]()