The one dollar photo "dome diffuser"

About 20 years ago I made my first camera setup for shooting
jewelry. It consisted of a copy stand with a Pentax 35 mm camera &
Macro lenses. I used “domes” made from translucent plastic lighting
fixtures… They generally cost less than $5.00 at lighting stores.

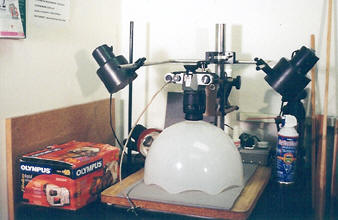
Ten years later I setup a shadow box similar to Charles
Lewton-Brain’s directions in “Small Scale Photography.” I still use
both the copy stand and the shadow box every day. Each has it’s
uses…

My wife teaches Photoshop, Illustrator, Publisher and many other
programs at our local college. I’ve talked her into doing a small
scale digital camera workshop for jewelers with an intro to basic
Photoshop techniques early next year.

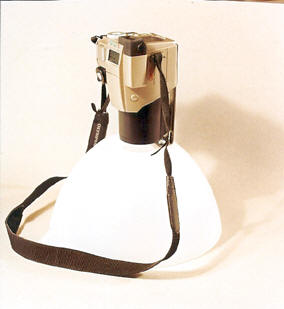
The recent thread on using the Rubbermaid cake server as a diffusing
dome had me thinking about other possibilities for half a dozen or
more students. I’ve since noticed everything from trash cans to
boxes made of suitable translucent plastics – but today I came
across by far the best!

I had to go to Radio Shack for a component I needed to fix a wax
pen, and next door was a brand new “Dollar Tree” store. I had a few
minutes to kill while I waited for the salesman to see if they could
find me the part I needed, so I wandered in. There was a stack of
mixing bowls that are the perfect size, shape and material for
diffusing domes – and as it is throughout this store everything is
$1… I bought a handful.

Then went by Home Depot and picked up “L” brackets in the lumber
dept. to mount the cameras. These were $1.69 each – including 2
mounting screws and a serrated thumb screw for the camera. Each
complete dome ready to mount a digital camera costs $2.69 + tax! It
took me twenty minutes to cut the access hole for the camera lens
with a hole saw and drill the holes to mount the “L” bracket on 6 of
these units.

Brian P. Marshall
Stockton Jewelry Arts
209-477-0550 Workshop/Studio/Classrooms

I bought that exact bowl from the dollar tree. Your right, it is
the best, looks like the same size as the cloud dome. I bought mine
several months ago. So if anyone is looking for it and they don’t
have it, they come and go, keep looking.

I too, found these translucent “mixing bowls” to be perfect for
diffusing light while taking close-up photos of jewelry. There are a
number of different “L” shaped brackets in the lumber departments
that will work to universally mount most cameras. I started my hole
with a drill bit, then used a rotary file and a little drum sander
on a flexshaft to enlarge it enough for the lens.

Alex

Hello Brian Recently I went to B&A (a retailer in NY for Carmera &
accessories for the professionals). They had a small folding light
diffuser for $ 40. It was a fold & Pop up light diffuser. Made of
spring wire & cloth one can fold this and carry in a breif case.

I wonder if one could use the cheap folding Japanese Paper Laterns
to do the same thing and this will be a portable studio in a bag.

I admire the effort you put in your postings it really makes it
interesting and so real with the Radio shack plus nine yards.

See you in Tucson on the 5th and I will let you know the time and
location.

Regards from New York
Kenneth Singh
karat46@aol.com

When using these dome diffuser’s when taking close-ups, what is your
source of light,and how do you position your lights over the dome?
Thanks for your suggestions. Alma

Brian…how about a diagram or a photograph of your affordable dome?
Dee

I made one from a Rubbermaid trash can lid
http://www.titaniumconcepts.com/dome.jpg It was $5 at Wal Mart. I
used a hole saw to cut holes for the lense and made a camera mount
from aluminum sheet and JB Weld. It works excellent, here is a sample
pic http://www.titaniumconcepts.com/images/abyss.jpg I ended up
raising it about 1 inch to get those black lines on the ring,
otherwise it looked too satin and not shiny enough.

I would like to get a better camera, this one is just 2 megapixels.

Wes

I just use a small flexible lamp with a 100 watt GE Reveal light
bulb, positioned very close to the dome.

Hi Kenneth-I just saw the fold-up fabric diffuser in the B&H
catalogue today and was wondering if it really works. Has anybody
tried it? According to the catalogue, it comes with a round, solid
plastic base (separately I think) and a piece of black fabric to
make a seamless background. I wonder if it would work well outdoors
or indoors? Sandra

Hi Janice, All cameras (to my knowledge anyway:) have a threaded hole
in the base of the body meant to be used to attach the camera to a
tripod or other support device…

There are at least six “L” shaped brackets sold at home improvement
stores that will work. These were meant to be used to tie 2 x 4’s, 2
x 6’s, and such together in various configurations. Find, drill,
and/or enlarge an existing hole in the upright (long leg) that is
convenient to use for mounting the camera. Determine this by holding
your camera (with lens mounted) up against the bracket and in
position over the hole in the top of the “dome.”

There is enough flat space on what will be the top of the “dome” to
easily bolt it in place. Use the holes in the short leg to attach
the bracket to the “dome” with a couple of screws and nuts.

There is a “lip” which was used as the handle on the particular
mixing bowl I’ve been referring to – that must be cut off with tin
snips so that the bowl will rest flat.

Hang on if this doesn’t make sense… I will be sending Hanuman
images of all this stuff to post in the next day or two.

Brian P. Marshall
Stockton Jewelry Arts School
2207 Lucile Ave.
Stockton, CA 95209
209-477-0550 Workshop/Studio/Classrooms
209-957-6157

Alma & Dee, I will get a photo of the complete setup(s) – copy
stand, “dome” with bracket, and lighting to Hanuman in the next day
or so. Then he’ll post where to find it on Ganoskin?

I will add a couple things… In my opinion, though it has the
disadvantage of not being as portable as just the “dome” with a
camera bracket - I REALLY like the versatility of the copy stand.
Besides being able to raise and lower the camera, you can use any
kind/shape of diffusing device, the lighting is moveable and the
whole unit is just sitting there 24 hours a day – ready to use in
seconds. It takes up about 18" x 24" of table space. I believe I saw
a new copy stand last week at my camera store for $139. It comes
with the lighting fixtures on flexible goosenecks. I’ve seen them at
flea markets and on Ebay for less than $50.

I’ve made a platform/table arrangement that allows me to slide
different color and shaded backgrounds underneath the work without
disturbing placement. Made of non-glare plastic and glass, this also
allows you to light the work from underneath. I’ve added a universal
ball mount between the camera and the mounting post that allows me
to tilt the camera just enough from above to keep from getting the
reflection of the camera lens showing up on larger highly reflective
pieces. I highly recommend the book “Photographing Minerals,
Fossils, & Lapidary Materials by Jeffrey Scovil - ISBN
0-945005-21-0.”

There are times however, when shooting down at your target just will
NOT give you the image you are looking for no matter how you arrange
it. For this I use the shadow box setup that sits right next to the
copy stand. I took Charles Lewton-Brain’s ideas from his “Small
Scale Photography” book and adapted them into a compact tabletop
version that costs less than $20 and an hour or so to build. (Not
including the lighting fixtures & bulbs)

I do use the “daylight” bulbs available from photography suppliers
on both units because I shoot slides and print film as well as
digital images. These bulbs supply light that is suitable to any
camera, and I’ve added in dimmer switches to control my lighting
even further. I use small mirrors mounted on cheap third hands to
aim light wherever else I need it inside the shadow box. (These are
placed out of the field of view of the camera)

One last thing, whenever I take in a restoration job, or finish a
custom piece it gets photographed. Here there is a difference.
Shooting what I call documentation archive photos versus shooting
product or advertising photos. For the documentation I generally
always use the copy stand and dome. I do little more than turn on
the light and check my field of focus before I trip the cable
release. For the product photos I take my time, arrange lighting
more precisely, fool with the backgrounds, and manipulate shadows. I
might invest a minute or two in the archive photo versus 20 or 30
minutes for each product photo.

In the 2 day workshop I plan to do with my wife, I will make a
diffusing dome, a shadow box, and half a dozen other little trick
implements in class, shoot the images with student cameras, and then
my wife will teach how to “improve,” manipulate, transfer, and set
up these images for commercial printing and website uses in the
Photoshop program.

If you are interested in this workshop, please email me with your
snail mail address and phone number. If we decide to do this
workshop on the “spur of the moment,” the phone number will help get
everyone together. The snail mail will be used to send out next
year’s brochure & calendar.

Brian P. Marshall
Stockton Jewelry Arts School
209-477-0550 Workshop/Studio/Classrooms

This morning I dropped by the local Dollar Tree and bought two of
the mixing bowls. Brian is SO RIGHT on this one! I have been
shooting through a one gallon milk container for the last six months
with pretty good results. The mixing bowl puts me in control with
highly reflective stones such as Crown of Silver Psilomelane. I
think the Cloud Dome would be a good seller at $29.95. I’ll stick
with Dollar Tree until then.

John Bozeman
It’s In The Works Studio
Little Rock
501 804-3246

Thanks for the 'photos Wes. The ring looks good. Kept it’s looks
when zoomed in as well. Gives me hope for my 3 megapixel.(couldn’t
aford more). What sort of lighting did y ou use? Apologies If you have
already put that info on the list and I missed it. Ruth. Fat Cat
Jewellery, in the UK.

Hello Sandra If you need to lug your photo studio with you it is
better to get something portable. If you are doing it at home or in
your shop then Brian’s solution is far cheaper. Yes the diffuser will
work out doors. Regards Kenneth Singh

Ok, I have bought the bowls, but confess I really have no idea WHERE
I’m supposed to mount the L bracket for the camera! I’m really
having trouble visuallizing how this is supposed to come together :frowning:
Given that the bowl curves, if I mount the bracket on the curve, the
camera won’t wind up in the right place, so I am quite clearly NOT
clear on where it should go!

I’ve checked the archives, and nothing I have found is making sense
to me. Any help would be appreciated.

Thanks!
Beth in SC

Crown of Silver Psilomelane 

Where can I find a picture of this? I used to do some work with
black/silver banded psilomelane, but haven’t seen it for years.

Tas

Here are the images of the $1 “dome” diffuser made from the mixing bowl

1. The bowl as purchased
		http://www.ganoksin.com/ftp/Dome-Bowl-original.jpg

2. The bowl after the "handle" is cut off - and hole cut for lens
		http://www.ganoksin.com/ftp/Dome-Bowl-cut.jpg

3. Some of the  various "L" brackets available in home improvement
 stores 
		http://www.ganoksin.com/ftp/Dome-L-Brackets.jpg
  1. The complete setup with camera mounted
    http://www.ganoksin.com/ftp/Dome_Camera.jpg

  2. The copy stand setup
    http://www.ganoksin.com/ftp/Dome_complete.jpg

Hanuman for Brian P. Marshall

Mounting methods - Camera to “Dome” diffuser

I used 10-32 x 5/8" bolts with wing nuts & washers to attach the "L"
to the mixing bowl. So far I have only done it with the Nikon CoolPix
995 & Olympus 2500L so for those of you with different brands you can
try looking /asking for any or all of these items:

Strap Ties (Put the bends where you want 'em)
Nail plates (Put the bends where you want 'em)
Angles (Cut one leg shorter if you need to)
Tie downs (One of these was perfect off the shelf)
Multipurpose braces (Alter as needed)
Roof truss ties (These have a neat slot running down one leg)
Corner irons (Cut one leg shorter)

Take along your bowl and camera, but expect people to look at you
rather strangely. I told the last one who asked what I was doing –
that I was a professional scatologist and needed close-up photographs
of animal droppings for my collection He left the aisle rather
rapidly:)

If none of these will work with simple alterations like drilling
larger holes, or shortening a leg – the last resort is good old
plumbers tape. This can be doubled to give it more strength and bent
into just about any configuration you could imagine. Has holes every
inch or so. Not as pretty – but it’ll sure work!

I managed to find serrated thumbscrews that fit the threaded hole
you’ll find in your camera body, but if you can’t find them or a
substitute – any camera supply ought to have tripod-mounting screws.

Brian P. Marshall
Stockton Jewelry Arts School
2207 Lucile Ave.
Stockton, CA 95209
209-477-0550 Workshop/Studio/Classrooms

I had a sign maker cut some one foot squares of plastic for me that
I then put together with velcro hinges. It let me fold it up and
take with me to workshops etc. Carl

Hi everybody, I can go one better than $1. How about 3 cents? I use a
hoop of 3 sheets of computer paper taped together. I set this hoop on
a white surface with the jewelry placed in the center. I have found
that I get better results by shining two goosneck reading lamps
(equipped with screw in halogen bulbs) down into the hoop instead of
trying to shine the light through the paper. I like the look used in
Tiffany catalogues of the jewelry item sort of “floating” with just a
small hint of a shadow below.

I tried the bowl/milk jug diffusers but the images seemed to turn
out too evenly lighted and looked kind of bland. When I shine the
desklamps into the hoop, the light bounces around inside the hoop and
gives a nice even light while also giving the piece highlights from
the desklamp bulbs from overhead.

I wish I could show you the results but I’m not sure where I could
upload them.

One thing you have to do is tweak the image in Photo editing
software. I use Paintshop Pro. You have to play around with the
brightness/contrast to get a nice white background. The unaltered
image right out of the camera renders the white portions as a light
grey so it really is necessary to use an image editor.

Hope you are all having a successful christmas season!

Dan T.