Techniques for a halo ring

Hi,

I am pretty new to the prong setting and there is a specific ring I would like to be inspired by in my next project. This is the ring: BESPOKE YELLOW DIAMOND HALO RING – Bobby White and here is a youtube video on how to do it: Making A Yellow Diamond Engagement Ring with Bobby White - YouTube

However, I have some questions and I hope some of you could help me.

  1. The prongs in this ring: are they soldered in a groove on the inside part of the metal that also holds the stones?
  2. Is the shape of the end of the prong obtained simply by filing?

The first question comes simply because the prongs seem to pop in in the video, without him showing how and when they were set.

1 Like

What a fun project.
Are you asking about the prongs on the Center stone only or the prongs on the melle?
The Center prongs look like they may have been tapered prior to fitting and soldering. Larger at the top and tapering down a little to the halo. It makes for a more graceful look. There were holes drilled or notches made into the inside of the upper halo at slight angle and the prongs were soldered in from underneath the inside of the ring. The Center prong tips were filed to shape after setting. The melle tips were done with a beading tool after setting.
When soldering on prongs I like to do them two at a time by simply making a loop of wire that looks like a u shaped hair pin. I bend and fit the single loop so that it snaps into place in the holes or burred out areas. If done right they will hold themselves in place while you make another u shaped loop and solder the next two. No trying to hang onto and hold the angles right and the previously soldered prongs don’t flop over while soldering the rest of them on. When done soldering I cut the tops of the loops off and set away.
Remember in all setting it’s really all about the seat being perfect for the stones.
Have big fun making this.

2 Likes

Thank you for the answer. Good information. I have something to start with :slight_smile:

I was asking about the prongs on the center stone but thank you for letting me know about the others as well.

I will try this and if I succeeded I will post some pics here.

I would like to clarify some issue here, a difficulty that I met along the way.

We have the prongs for the center stone and they seem to replace the small claws (for the stones around). Is the prong soldered and then the seat of the stone carved into the prong? Otherwise, how will the stone stay in place?

Asking these as I can’t really get this from the picture.

bespokeeng

With my previous question I am referring to the prong that supports the center stone, as can be seen in the picture. Is the prong carved to accommodate the small stones on the corner? And if not what keeps those stones in place?

When I set the smaller melee in a halo mounting I use a Hart burr to cut into or under the inside prongs, including the heavier corner prongs that hold the center gemstone. This is also the method I use when repairing a halo mounting.

1 Like

bespokeeng2

@ringdoctor I added a red oval at the point of interest. So that is where you also cut into the prong and that is what holds the stone in place, right?

Is the stone setting burr a bit too large for this operation?

That is why ringdoctor mentioned the hart bur. You take a smaller one and use the sharp edge to undercut the prong.

Also, when setting the melee, you wouldn’t use a setting bur. You would use a round bur, a cylinder bur and some gravers to do your work.

@arkaysilversmiths thank you. I am still new to this (as you can tell :blush:) but is there any specific problem resulting from using a setting burr when doing that?

The setting burr does not cut the small “notch” under this prong that you want the girdle of your melee to sit into. The stone will be push tightly into this notch when you push the outside prong down onto the other side of your melee, to lock it in place.
You will not be pushing down your pminside prongs to hold any of your melee in this style of mounting, bench the notch cut by the sharp edge of your small Hart but.

You can use a setting bur for the melee. That’s how I do it, no ball or cylinder burs here. Just drill bits, cone burs and setting burs. I find it much more accurate to use setting burs for aligning and leveling the tables so that they are flat and square to each other.

With a ball bur cut seat, there is no real seat, just a diminishing diameter into which the girdle is wedged. When using a 90 degree setting bur, an actual seat with the same shape as the pavilion of the stone is cut into which the stone naturally finds its level. If the seats are all cut to the same depth and angle, assuming the stones are more or less identical, they will naturally seat to the same depth and angle. No amount of pushing or wiggling will change the depth or angle of the stone, which may or not be an advantage, depending on the care used to cut the seats and select the stones.

To the original question, yes, the seat for the center stone is cut into the prong when setting the stone, usually done as the last step after all the melee is set and the ring is more or less finished. That’s how I do it anyway. I use a hart bur to cut the seat.

As in setting the melee, the bottom of the seat is more important than the shape above the girdle. The trick is to cut each prong to exactly the same shape as the pavilion of the stone. Sometimes the stone isn’t exactly the same shape all around, so extra care is important here. I use a Sharpie to mark a spot on the stone so I can orient it the same as the process is repeated for each prong. This is called “indexing”.

The prongs should be cut to the same depth relative to the girdle height so the table of the stone ends up perfectly level with respect to the rest of the ring. Sometimes the girdle isn’t the same thickness all around or even parallel with the table and the seat must be cut a little lower in one place than another, so indexing is important for this too. The prongs should also be cut to exactly the same depth into the prong, I usually shoot for around a third to half the thickness of the prong. The center stone prongs should be identical when the piece is finished which is much easier to accomplish if they are all cut the same to begin with.

With stone setting, as with almost everything we do, each step builds on the accuracy of the previous steps. For example, the depth of the seat into the thickness of the prong is dependent on the spacing and angle of the prongs when they are initially installed, which is dependent on the inside size of the halo, which is dependent on the size of the melee, which is dependent on … On and on.

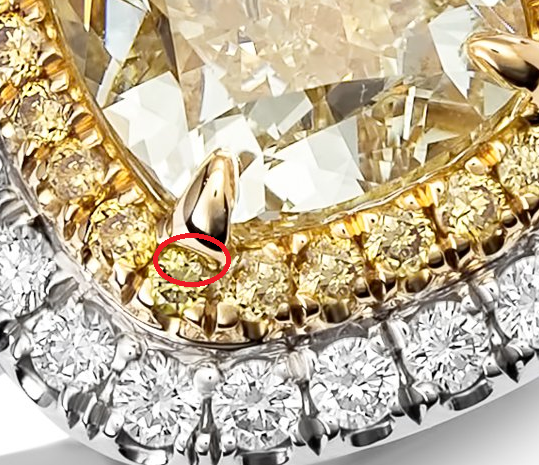
As to the prong’s positioning with the melee, you can see in your photo that the stone on the outside of the prong is slightly smaller than the surrounding melee. That allows room for the center stone prong while still allowing plenty of metal for setting the melee. That’s the way I usually do it too. Another method is to arrange the melee so that the prong falls between two melee, but that method has it’s own issues and I usually avoid doing that unless there is no other choice.

Just goes to prove that there are as many ways of doing things as there are people doing them. Ask five goldsmiths a question and you’re likely to get seven different answers.

The right way is the way that works for you.

Dave Phelps

2 Likes

Ah ok. So this is only applicable for the melee on the corner? I can still go with a setting burr for the others.

I find a setting bur good for cleaning up a setting, but the teeth on the pointed part of a setting bur don’t cut as well as the teeth at the edge and along the outer cylinder portion. If you push on them too hard, they will heat up and dull quickly, so you need to find a way to clear out the bulk of the metal. That is where the drill, ball/flame burs come in. They are better designed to cut out the bulk of the metal so you can go in with the setting bur to clean it up.

The cylinder bur is used to cut out the ‘window’ in the front and sometimes rear and sides of each stone in the halo. That creates the four prong ‘basket’, plus allows light in, easier to clean and looks pretty slick.

Like Dave said, there is more than one way to skin the cat. :wink:

1 Like