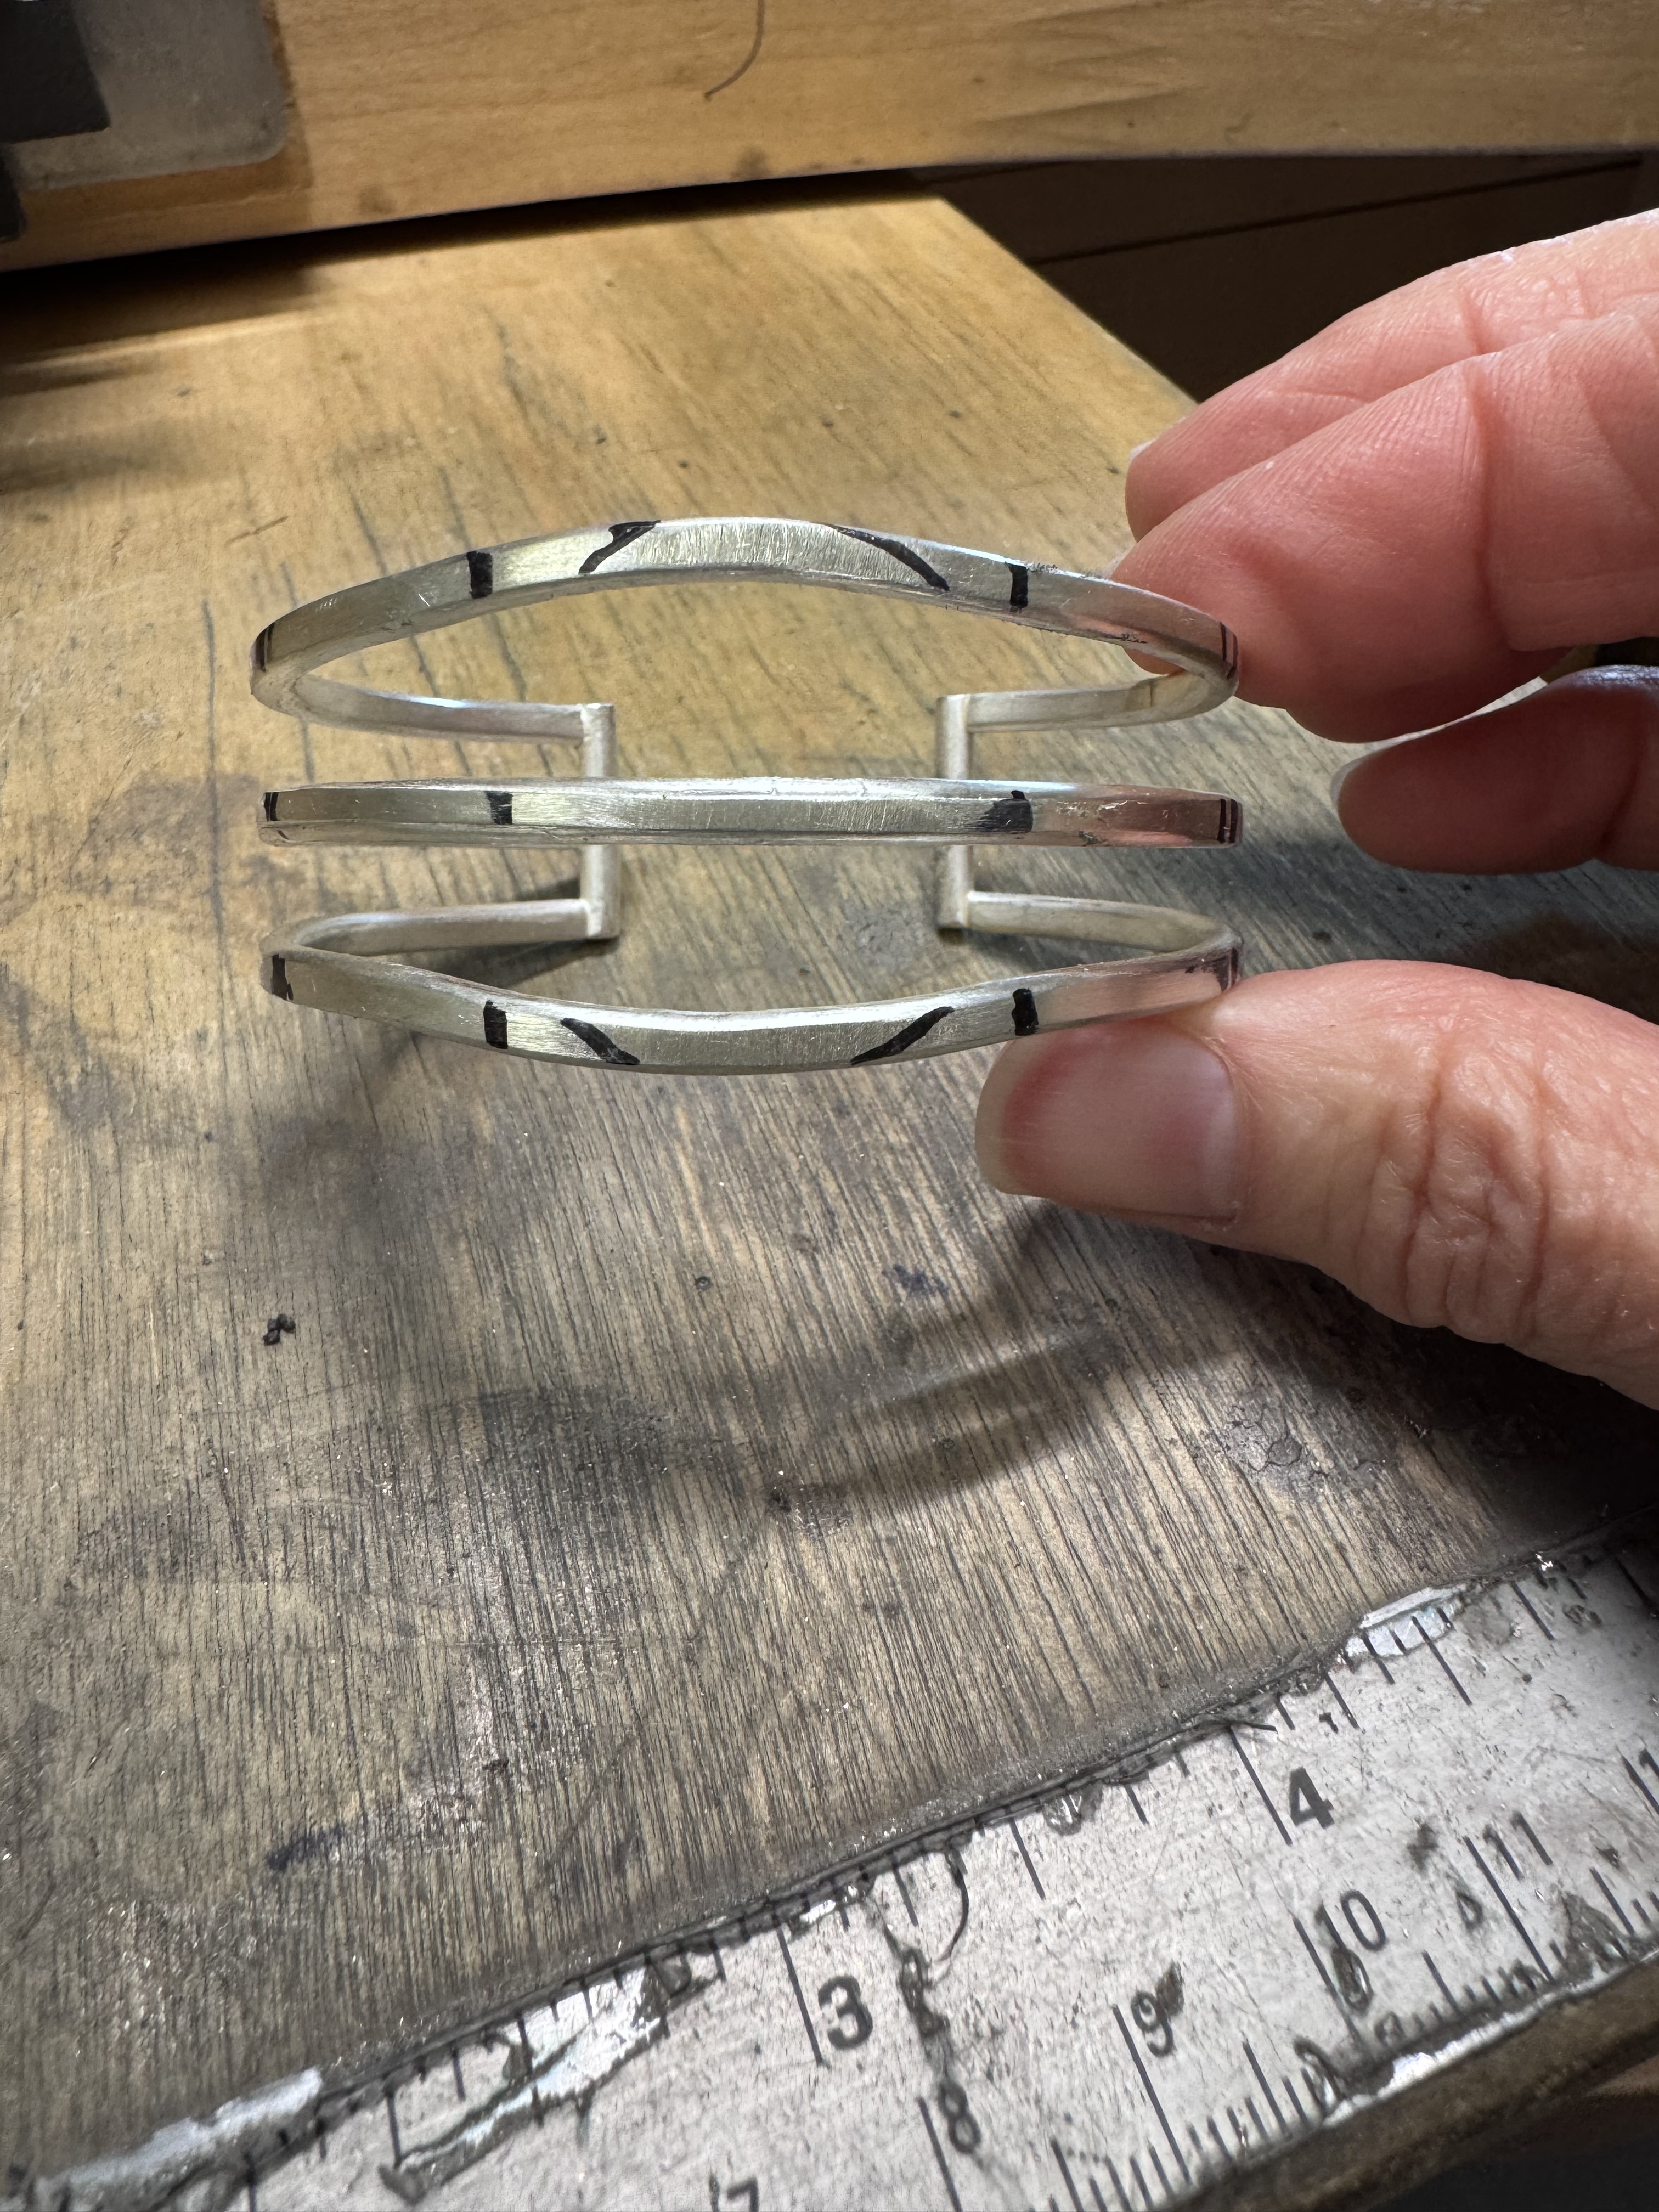
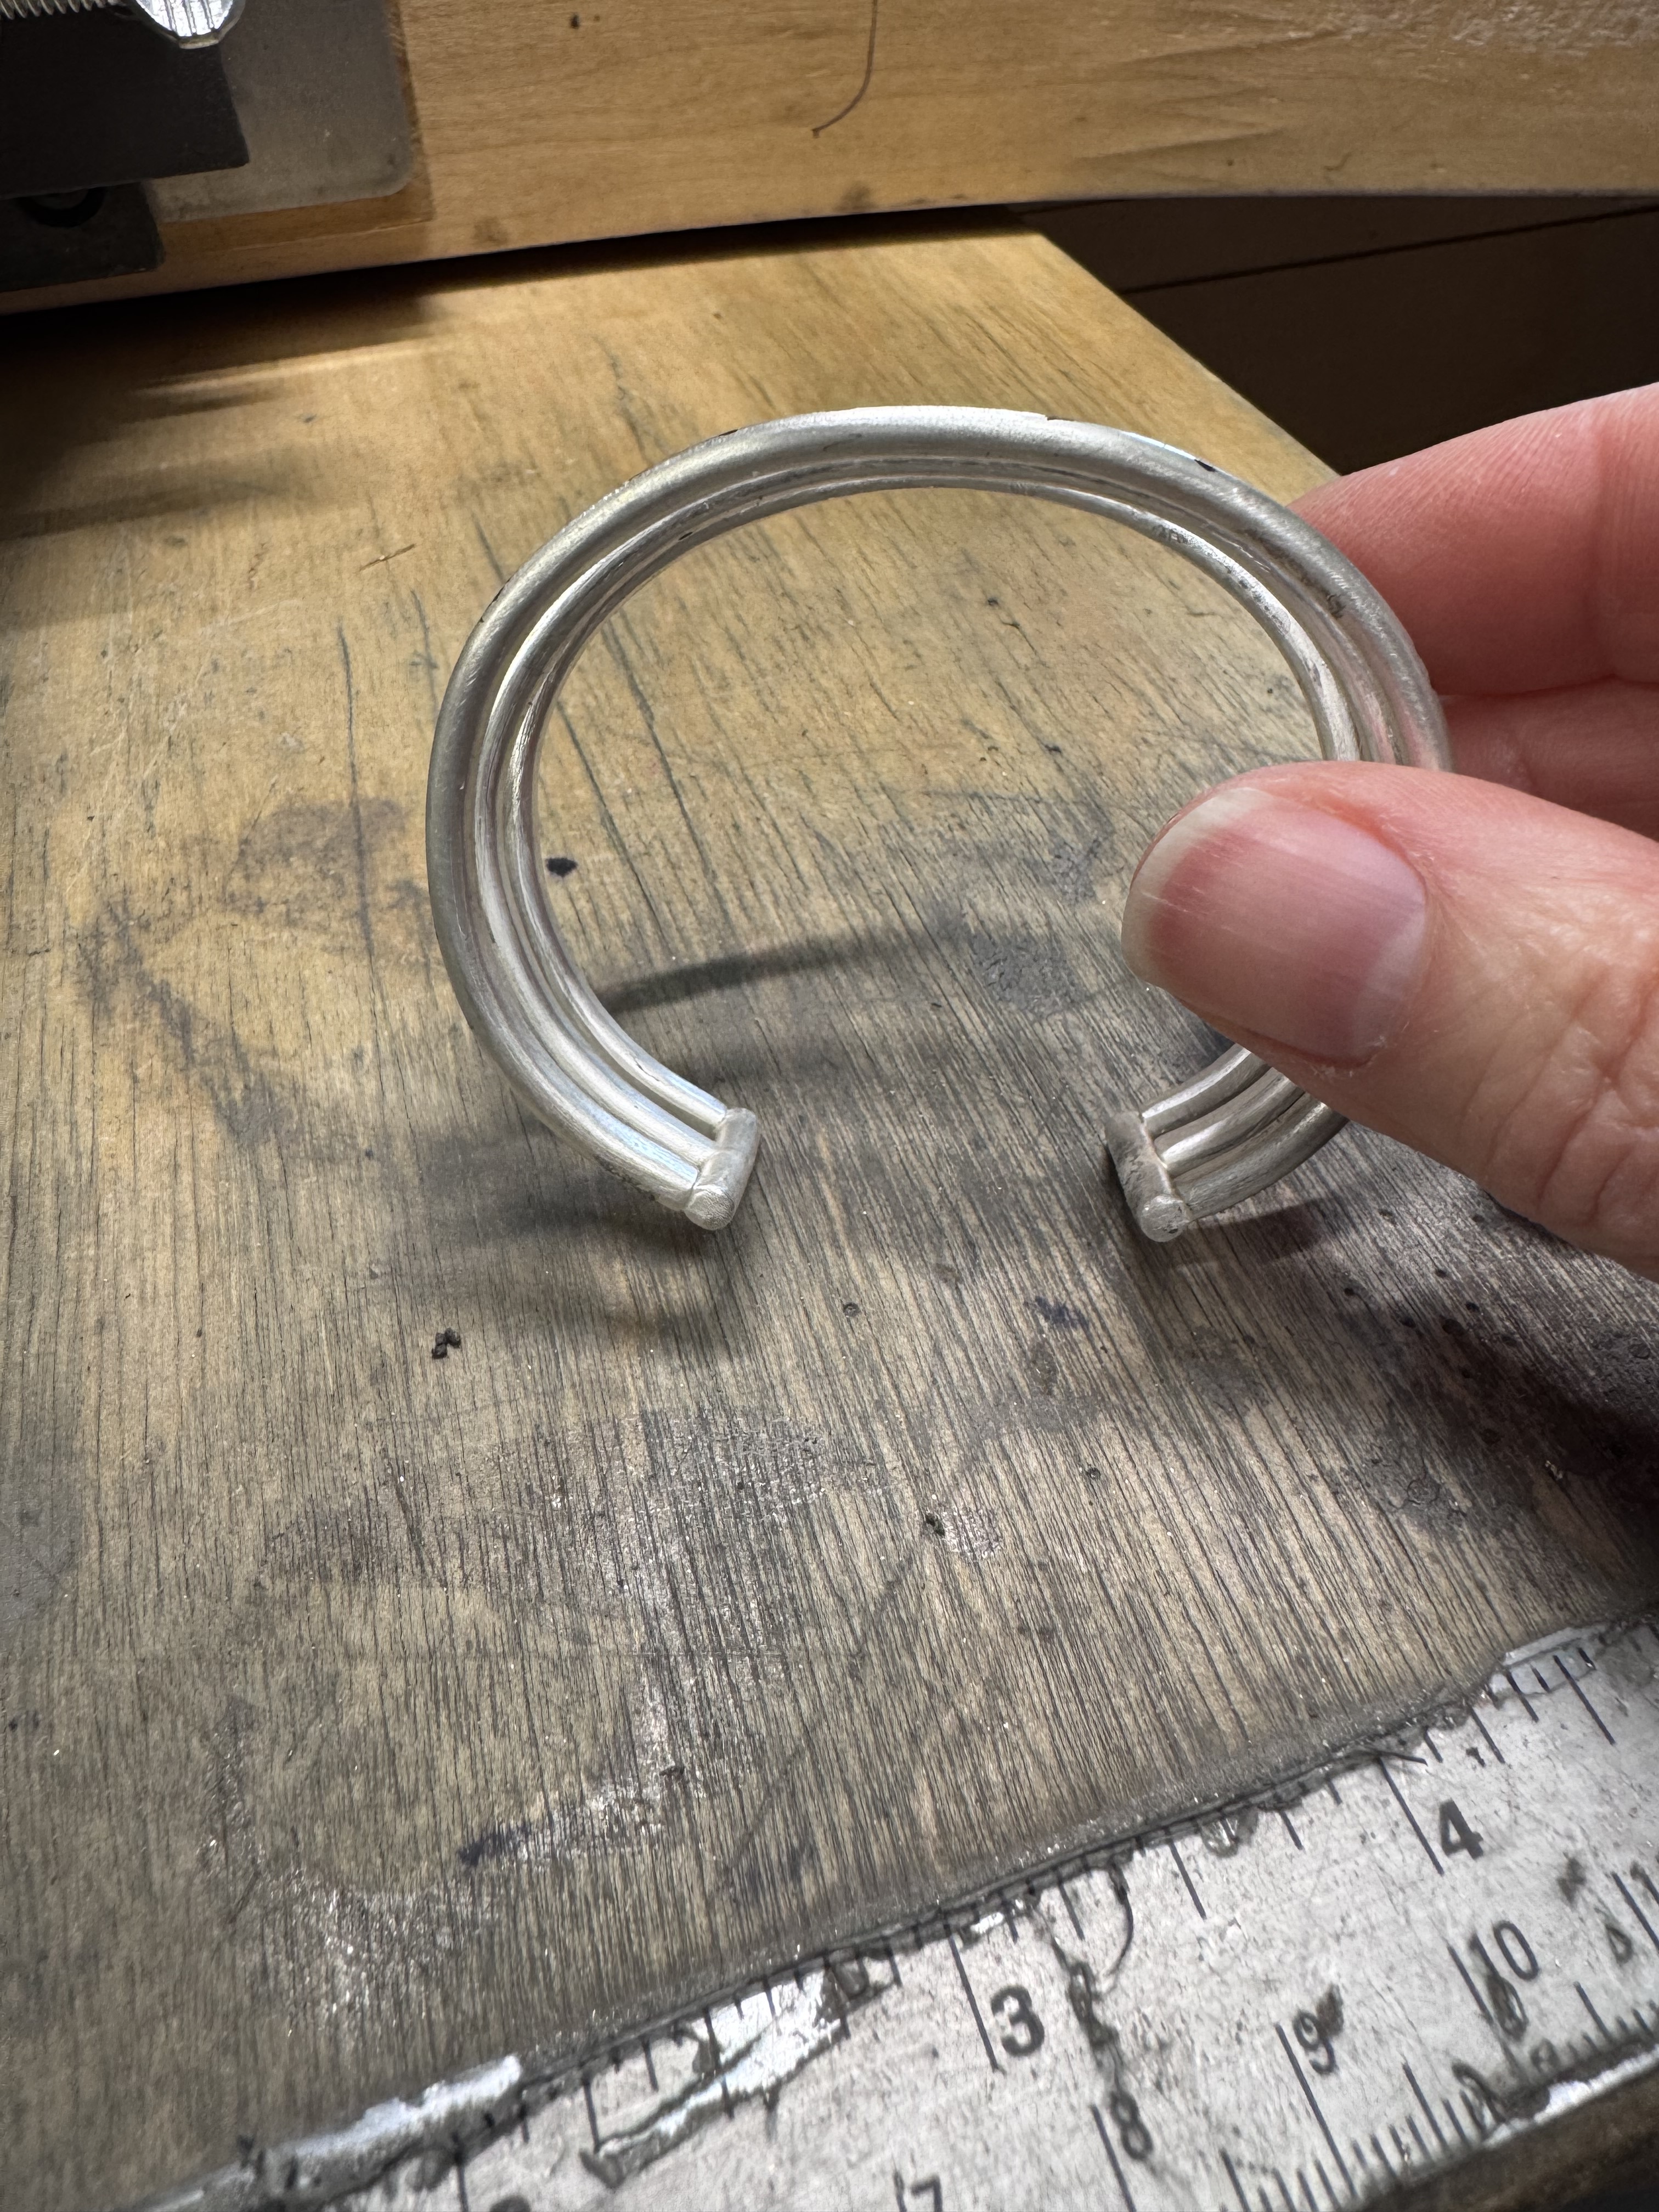
I’d love any tips on the best approach for soldering multiple bezel cups onto a silver cuff bracelet. Each setting has wire “risers” soldered under the bezel cup. These have been filed and sanded to meet the curve of the bracelet but they’re still somewhat raised. This is for a customer and I’ve been working on it forever. Need to finish it soon!
1 Like
Greetings Nancy,
I think I would ask you first. Does the bracelet fit the new owner right now? Your work looks pretty fine so I can see it’s not your first project but I had to ask. (It would not be fun to have to size that bracelet down) I also would like to know if you have sequentially soldered the bracelet with lower temp flowing solders.
If I were making this bracelet in my shop at this point I would have the customer in to make sure of the fit. But more importantly looking to see if the center of the bracelet is the visual center of the customers wrist. I have learned over time that this can be a different thing.
I’d work from the center out with a low temp solder. If I were sure of dead center I would go sequentially one side then the other checking each time to make sure the visual distance between the cups was the same. I tend to turn the bracelet over so I am soldering from the back, inside, of the bracelet. You could also wire the cups in place with binding wire prior to soldering.
I don’t know if that’s the kind of advice you were looking for. I can’t tell how many times in the last 38 years I have tripped over the obvious only to create more work for my self.
Keep the photos flowing!
Don Meixner
7 Likes
I am curious about the purpose of the wire risers and the possibility that the curve of the bracelet base wire might interfer with the bottom of the bezel backing. Looks like a big project. I have one like it right now that is keeping me awake at night trying to figure out the best way to proceed. You appear to have a good start. Please post a picture of the finished piece and tell us what the stones are. Good luck…Rob
3 Likes
Thank you, Don! I have been making jewelry for over 25 years, the past 17 full time. But i haven’t attempted such a complicated (to me) cuff as this before.
I have had the customer in for a test fit. But later I saw the need for a bit of a lip around the bezels so they’d fit on the cuff better. Once that was done, the lip around the bezels required a wider cuff. Great. So I had to somewhat reshape the cuff so the outer parts were spread a bit wider to accommodate the bezels. Probably a good idea to get her in one more time to test the fit. And your tip on finding her right center-very good. Thank you for the tips.
Nancy
Hey, Rob. The flat bottom of the bezels were too large to follow the curve of the bracelet. They needed to contact the surface of the bracelet better, for a more secure setting. So I soldered10 or maybe 12 gauge wire to the underside of the bezels to raise them. Then went back and filed and sanded the undersides of each bezel to follow the curve of the bracelet. I invented a trick to help me maintain the curve underneath the bezels by sticking sandpaper to one side of double stick tape, the other side stuck to my step bracelet mandrel. I’m sure I’m not the first one to think of this but I’m still giving myself credit for being clever. Now, all of the bezel assemblies fit on the cuff in such a way asto make a good solder joint. I hope.
5 Likes
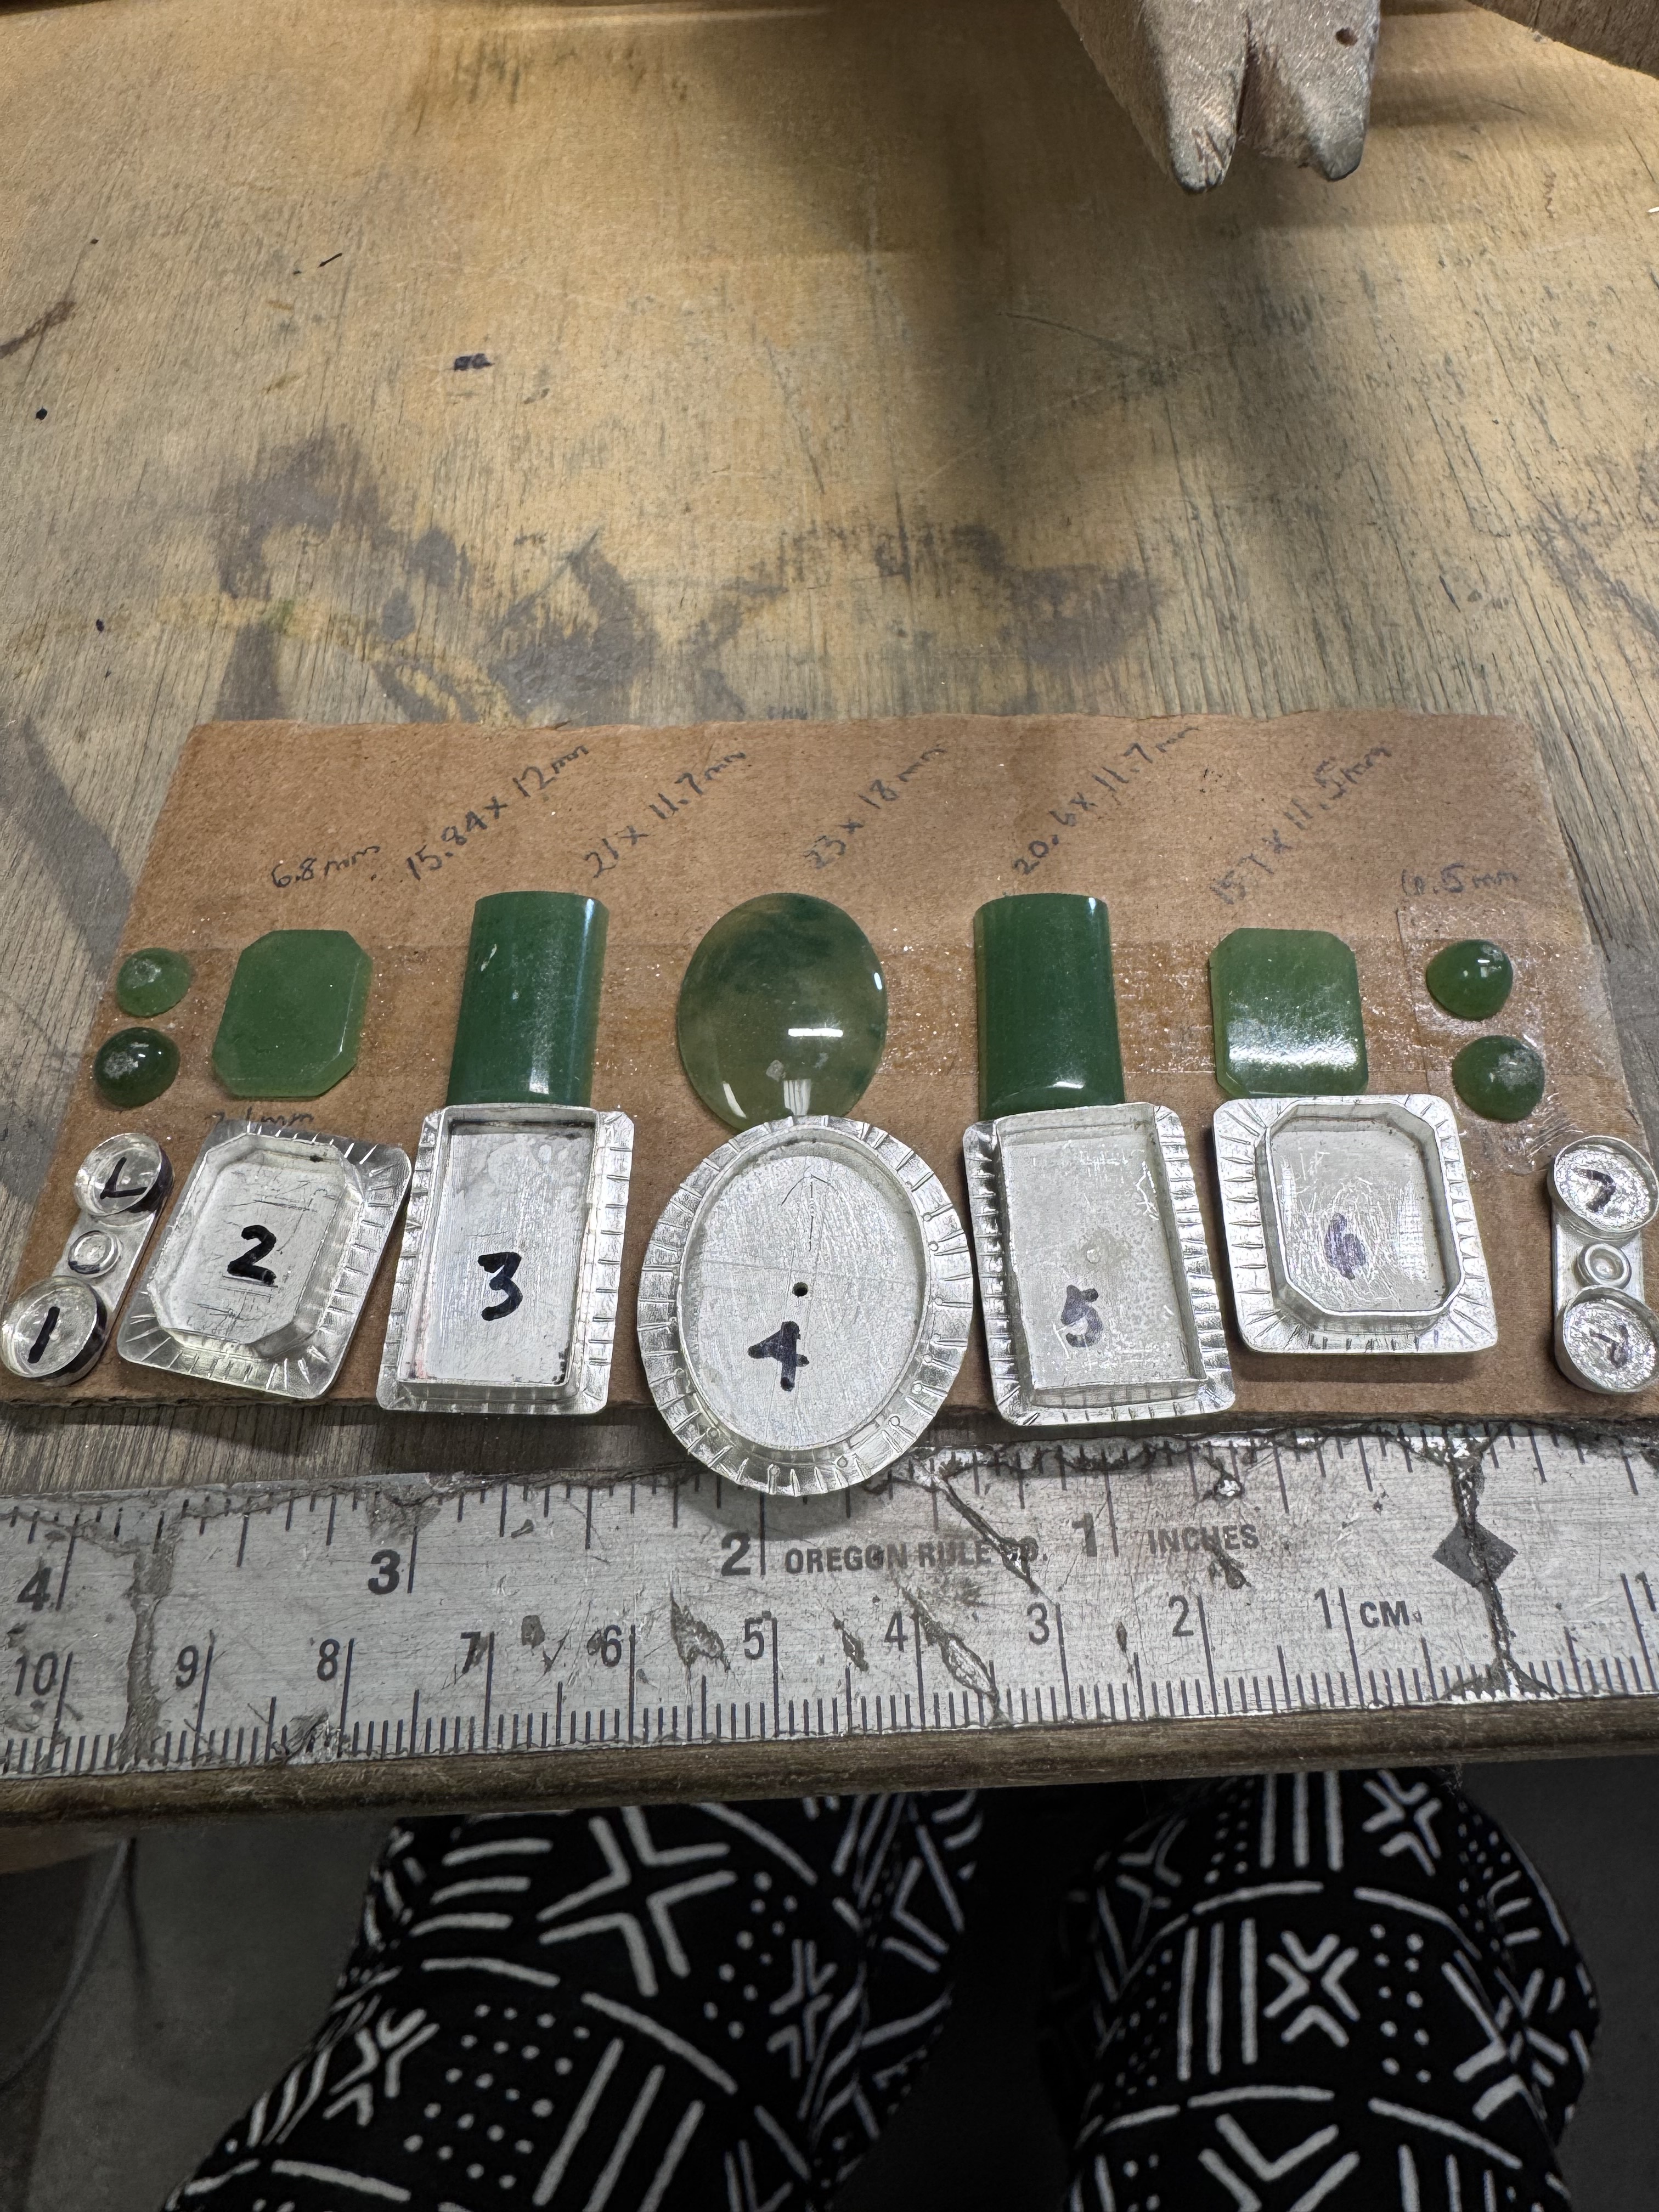
Oh, the stones are jade from the client’s grandparents who used to make jewelry
2 Likes
Actually I think your wire soldering surfaces is pretty good. Use the thinnest gauge you can and still get the job done. I would worry that you run the risk of making a too heavy bracelet with 10gauge soldering wires. . Or that while the bracelet itself may fit correctly the added weight tho’ seemingly small may be too much.
More photos please…
Don
1 Like
You can file a flat on the bracelet base to get a larger contact area. Are you going to pre-polish the bezels before you solder them to the bracelet? In my experience this makes final polish a lot easier. I can’t tell from the pictures what gauge your bezels are or if they are fine or sterling silver. Will you be able to roll the bezels with a burnisher or rocker or will you be hammer setting them? Securing them to hammer set is a chore, but I like the final product better and it allows you to use bezel material that you can’t roll or burnish. I am cutting some jade right now and I suspected that your stones were also jade or nephrite. Jade and nephrite are very hard. Be careful of any sharp edges as they can chip easily. Like Don says, make sure that the bracelet fits the customer and is shaped correctly before you solder on the bezels. A heavy bracelet like this will always sit right up against your hand unless it is real tight. Good luck and keep us posted…Rob
4 Likes
Don, it’s been a crazy week. I will need to contact the client to get her in for another fitting since I moved the wires slightly. And you’re right, the bracelet is going to be heavy. So I’m going make sure it fits her correctly before I proceed with soldering.
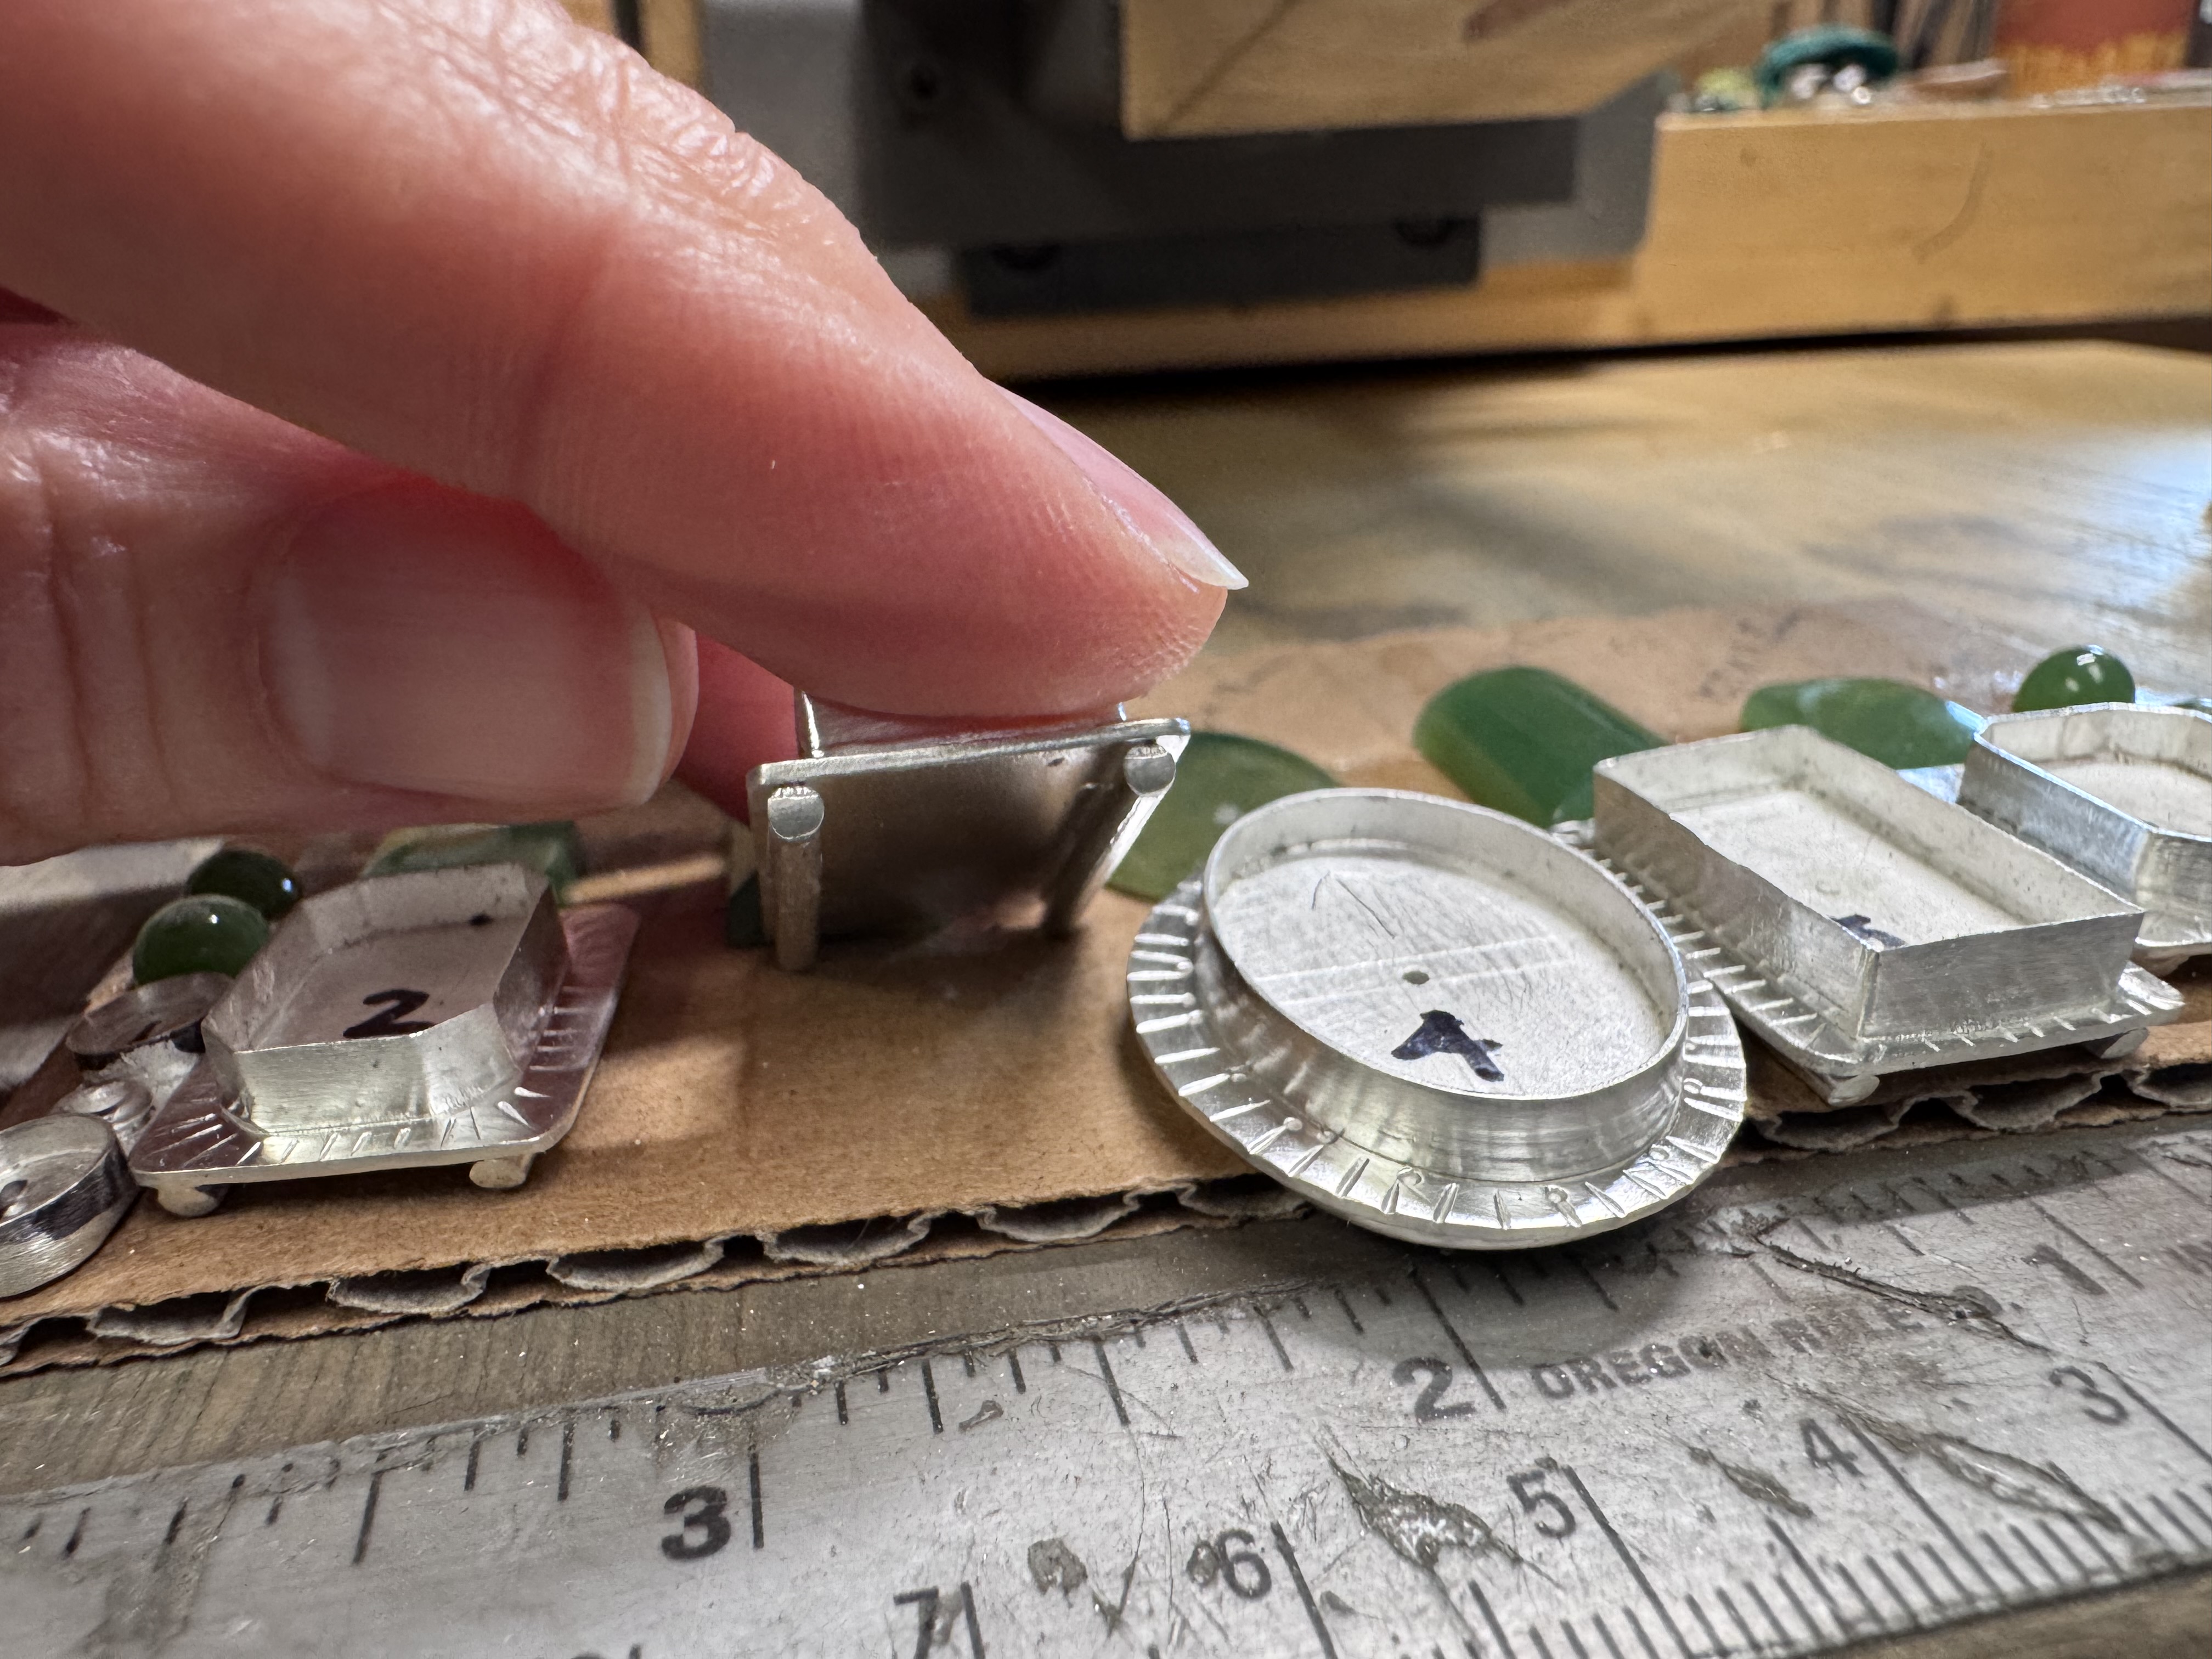
Rob, I have a soft polish on the bezels right now. I haven’t cut the height down to size yet. Wanted to wait until the soldering is done just in case the extra height will dissipate the heat. Several sharp corners to deal with in the setting. I used sterling silver on them.
Cutting the bezels down is the last adjustment that I make before I set the stones. This way you can see what they look like next to each other and make whatever adjustments are needed. I usually shim with sterling silver shims if the stone needs to be raised a bit in the cup. This way you can say that your piece is all sterling silver or lapidary. I know what it is like to lose sleep thinking about a piece as I just finished one that kept me up at night for several days. It was a design that I have never done. The challenges were more structural than esthetic. Good luck…Rob
1 Like
That’s precisely my plan. Love to see the one you just finished!
Nancy
Nancy…It is currently on the home page of my website: www.robmeixner.com
2 Likes
That’s gorgeous. I see why it kept you up at night. You nailed it.
Nancy
The challenge was how to support the ends of the bezel. Being mounted the way that it is, there was a fairly large gap between the end of the bezels and the bracelet. I added tapered shims to both sides and then there second bezel surround to tidy things up a bit. My fear was that, if I hadn’t added the shims, the bezels would distort under the pressure of hammer setting the bezel wall. It was fairly thick and hammer setting is the only way that I could move it. Thanks…Rob
1 Like