I’m trying to solder 2.5mm low dome to a 16g round argentium form to
finish a ring. But I’m having problems in figuring out how to get
these two widely disparate and difficult shapes together.
Do I solder one side then round the wire to the other side? And if
so, how do I get it to stay in place long enough to solder it. It
seems it should be simple, but for some reason my brain and/or
fingers can’t figure it out.
The wire form is in the shape of a leaf so it’s not only round wire,
but curved round wire. Any tips would help.
The half dome is sterling, the wire leaf, Argentium. I have no issues
in soldering the two metals. I’ve mixed sterling and Argentium plenty
of times. The problem lies in how to I connect the two securely
enough to solder. Connecting one side is easy, but how do I possibly
connect it once I round the shank to the other side?
I tried to do something similar with a half round shank and a bezel
and attaching to one side first then forming the shank to attach to
the other side. It did not work. The initial attachment went fine
but in rounding the shank I distorted the bezel. I have very little
experience with rings and am always flying by the seat of my pants
to try something I have never tried before and learning from my
mistakes. My next attempt will be a soldering mandrel. I will shape
the shank first and attempt to attach to either one side, then the
other, or both sides simultaneously. I too have mixed sterling and
argentium and they solder just fine. I think your ring will be a
really beautiful once it is finished.
I have very little experience with rings and am always flying by
the seat of my pants
Here is a micro primer on rings. Any ring, regardless of it’s
appearance and design must have certain functional parts. These
functional parts are always present. These construction elements
take various forms and that is what separates one type of ring from
another. The problem with the ring which started this discussion and
similar experiences is that construction principles of ring design
are ignored.
Whether we are talking about single stone, multi-stone, or cluster
rings ( a small subset of ring types ), the differentiation is based
on visual appearance. The visual part a.k.a. upper bezel, is only
one element of construction. The second element is called a gallery.
The function of the gallery is raise visual part above the finger
carrying ring. It has the purpose of keeping stones away from skin
excretions like sweat, which can deposit on stone pavilions and make
them look less attractive. The gallery also allows for light to
reach the fore-mentioned pavilions.
By it’s nature ( allowing light through) gallery is flimsy and must
be strengthened with lower bezel, whose function is to support
gallery and provide for safe and secure attachment of the shank.
Sometimes there also elements called shoulders, which strengthen
connection between shank and lower bezel/gallery/upper bezel
assembly. Whatever direction your creative muse may pull you, these
constructions elements must always be present.
For more view my videos either on benchtube or my
website.
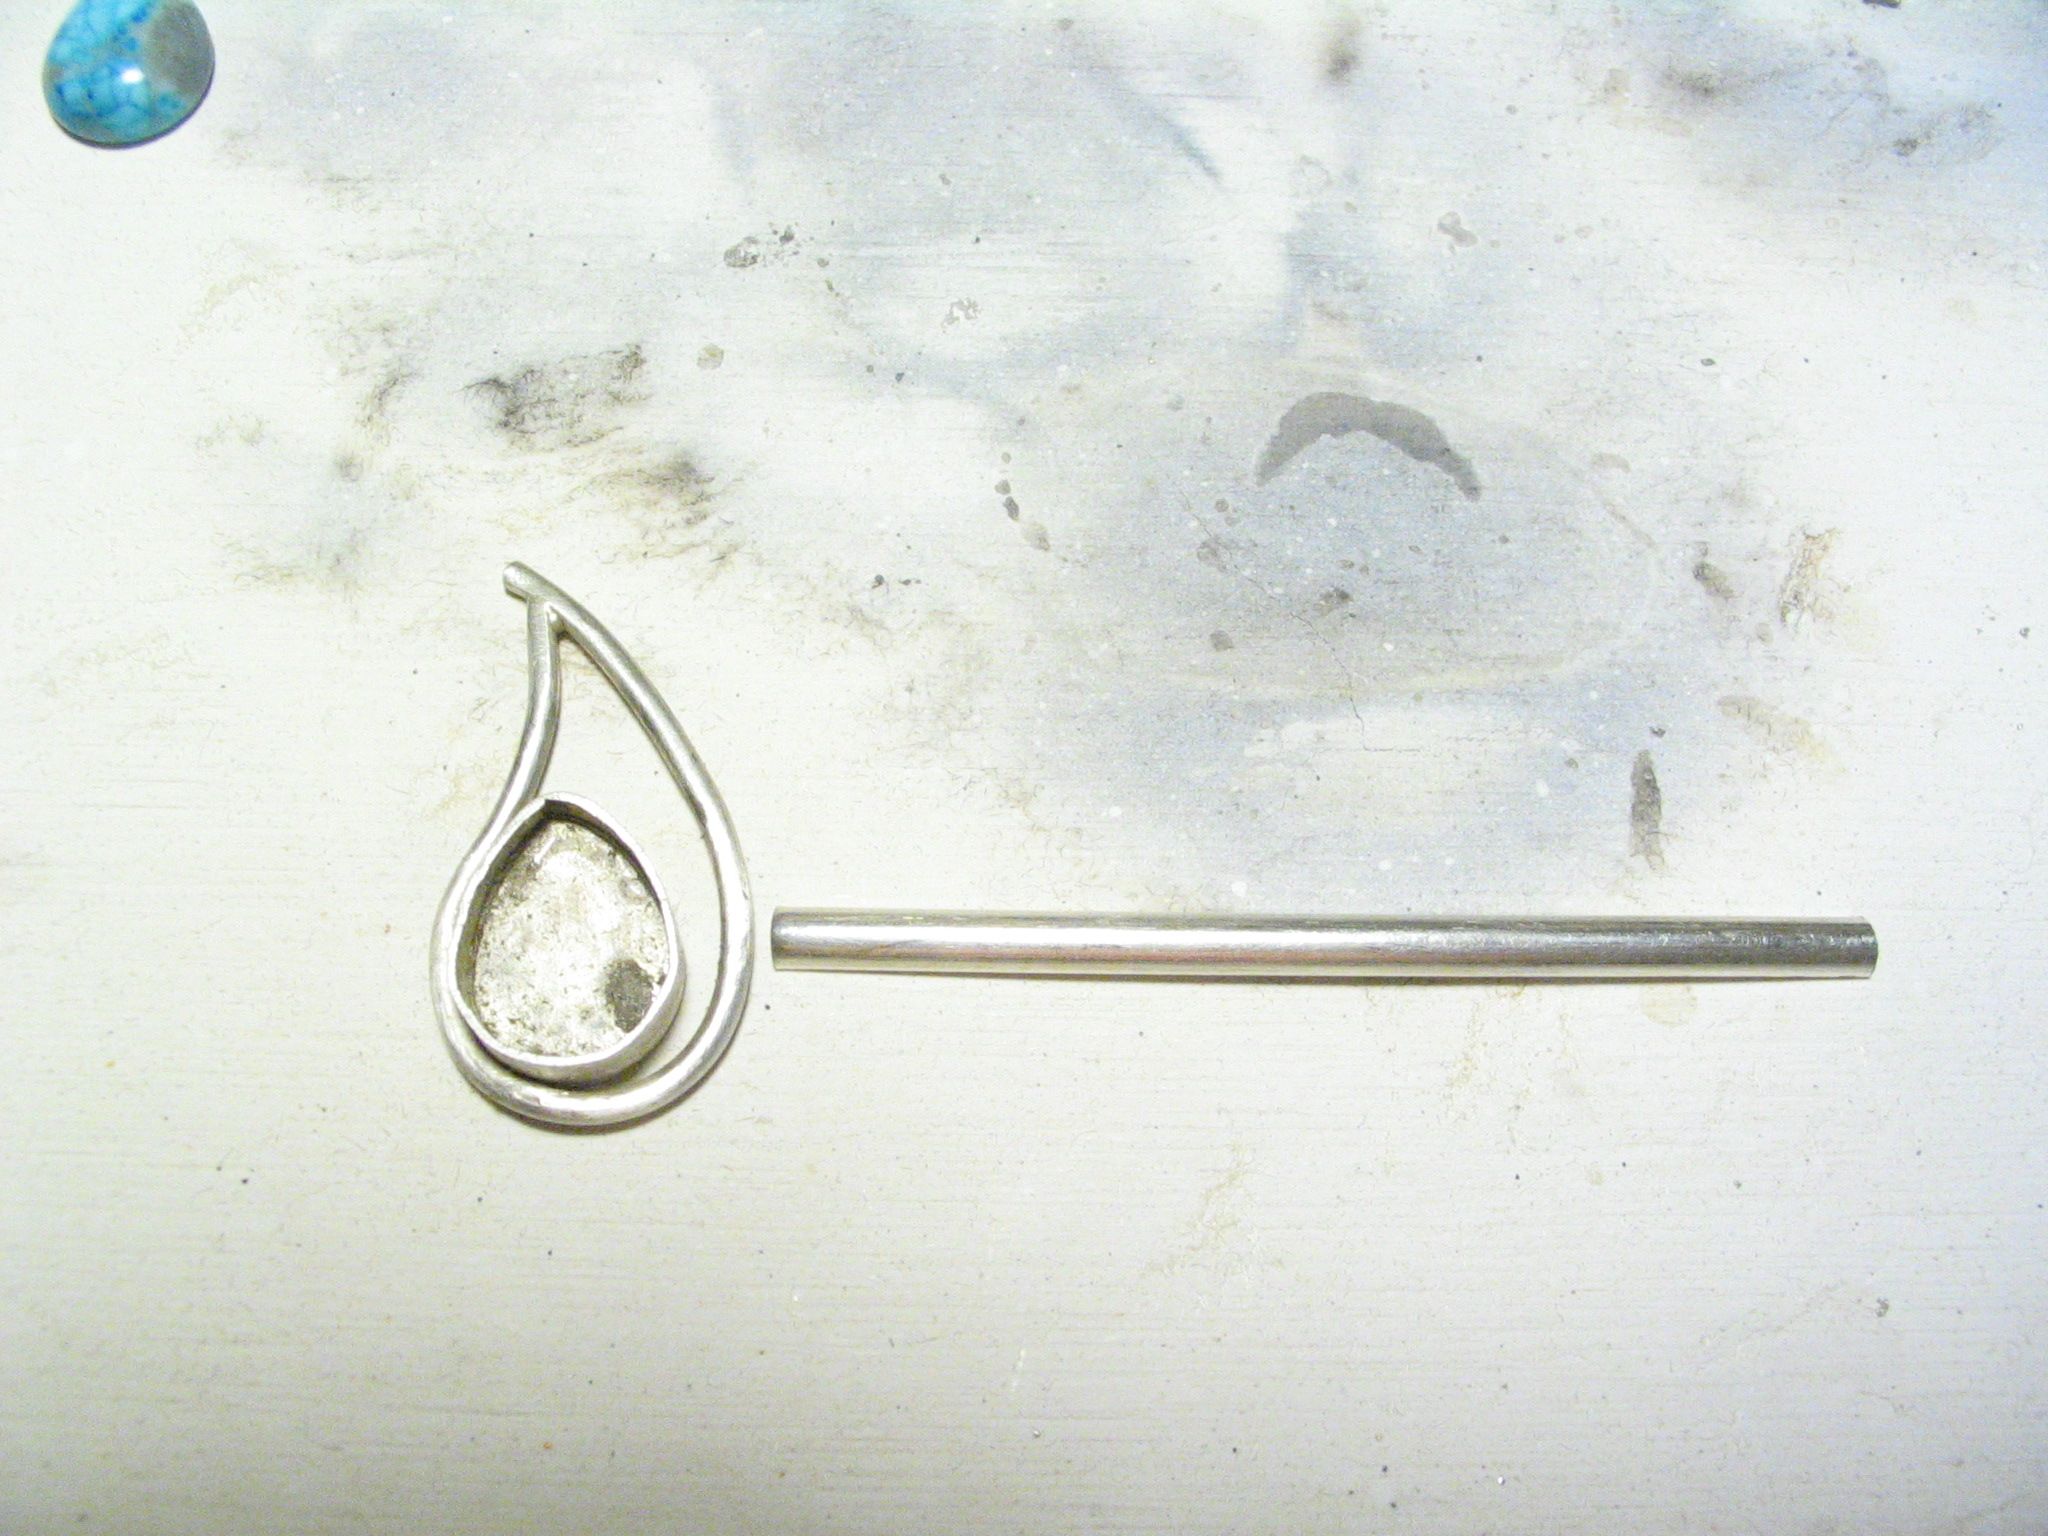
The photo really helps. You will need to file a flat place on each
side of your teardrop to increase the contact surface area for the
ends of the halfdome wire/shank. Solder one side and bend the shank
around to the other side of the teardrop, adjusting the fit with
pliers. Use binding wire to bring the shank tightly against the flat
area for soldering. In general, the ring can be rounded after the
final soldering.
That said, unless your teardrop shape is made from heavier stock, I
fear that it will be distorted when you round the shank to which it
is attached. That may not be unsightly, but it will make the ring
larger. You can probably use your pliers to compress the teardrop
back to its original shape, but be aware of the marks that may
result.
This is a learning experience, for sure. Let us know how you fare.
Judy in Kansas, where a northerly breeze is giving us a cooler day
and maybe some rainfall this evening. Now, back to making more
jewelry for the next two shows!!
I don’t know if my method may be considered wasteful, but I make the
ring first, as though it was a band ring. Stretch it up to the right
size and nice and round, then anneal and cut/file a section out to
fit whatever setting is to be mounted on top or between the gap.
Then solder/fuse both sides simultaneously. The cut out piece just
gets recycled.
Thanks Judy. This appears to be something I will try. I wish I had a
ring soldering form, it would make it easier to hold the final piece
in place. But I do see that I should have thought of filing the
rounded wire flat so the two pieces lie flat. (hitting top of head)
Seems obvious now. I will do that on both sides, solder one, round
and attempt to solder the other side. I’m not worried about
distortion, I think I can work with that if need be.
And how do you hold the two pieces together? Especially if one is
round and one is a dome? I have no issue with getting the correct
size for the ring, or in rounding it. It’s getting the wire section
connected to the shank with no gaps AND holding it in place while I
solder, that is the problem.
Theoretical advice is appreciated. Practical advice is what is
needed. Perhaps you could advise me on this particular issue?
I am sorry, but there are no good solution to your problem. Even if
you manage to bend shank without distorting and solder it, the top
will distort later under daily wear and tear. In anticipation of
this, stone has to set with excess of metal, or it will be lost, and
etc… The only advice I can give is to start from the beginning and
design you ring with elements of construction I elaborated on
earlier.
Thanks for posting the image— Let me put in my vote for the advice
of making the ring shank in a way that make it that you can solder
all at once. I think that your instinct that has been holding you
back from the idea of soldering one place and then the other. If you
solder one place, and then finish bending it is 99% guaranteed that
there is going to be distortion on your setting. You can do it
several ways, including: -that way that was suggested, of making a
shank, and cutting a section out -make a U shaped shank -make a
complete shank, and file a flat area on top so that the setting sits
flat on the shank best wishes, Cindy
Some said it couldn’t be done, some said it was too hard, some said
the design wouldn’t work… thanks Judy for the advice on filing
some of the wire structure flat where it gets soldered to the ring
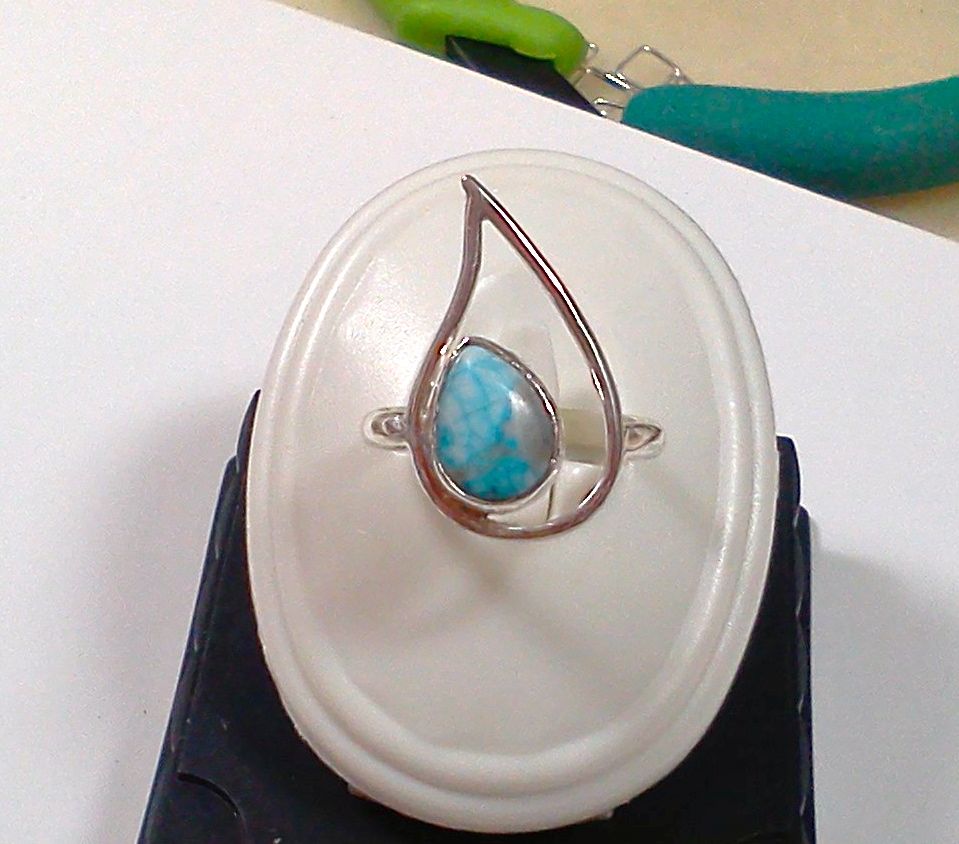
shank. You’re right, it was a learning experience but I did it! Yay!
I soldered one side first. Rounded the shank and bent it in a bit to
form a D where it’s soldered to the wire. It took me a couple of
tries before I finally figured out for myself how to connect the
other side without distorting the wire. I used a soft magnesia
soldering block and sat the structure down flat into it, then
soldered the shank. IIKTWIKN (If I knew then what I know now) I’d
have formed the U shaped shank first, shaped my D , used the soft
soldering block to hold the cab and wire and done both sides at once.
Hindsight is always 20/20 but that’s also how we learn, isn’t it?
Now if only I’d had a flat-side ring mandrel it would have made life
soooo much easier. Still, my little anvil horn and a lot of patience
worked well enough.
I’ve learned for next time and for now, I’m quite pleased with the
final result. Take a look at
Thanks for giving us “the rest of the story.” I’m glad my advice was
useful and also that you were able to complete your design without
incident. Good on you!!
Judy in Kansas, who has just canned 8 pints of Roma beans and
expects to repeat that tomorrow. Finally, the beans are producing.