Hi, here I have a question, when I solder bangles, very often there are pinholes on the joint, I have to pin the joint or puk the pinholes.
What I want to ask is, how to avoid pinholes on the the solder joint?
Thank you
Hi, here I have a question, when I solder bangles, very often there are pinholes on the joint, I have to pin the joint or puk the pinholes.
What I want to ask is, how to avoid pinholes on the the solder joint?
Thank you
There are a number of variables involved when soldering. You need a clean, tight joint. Need to prevent oxidation from forming, usually with boric acid powder and alcohol. Need flux with the solder on the joint. Heat, usually with a somewhat soft flame that allows the solder to ball up on the joint them be pulled thru following the heat. Move around the joint drawing solder where needed. If you’re doing all that, one thing might be to just let the solder flow a hair longer. The softer flame is important for that, over heating can create pits, as can under heating.
9 Times out of 10 pits in the solder seam are from over heating the solder.
I pick solder and only add the solder to the seam when my metal is hot enough for the solder to melt and flow. I can tell when it’s ready by how the paste flux looks. When it is all melted glassy, and liquid looking, then I add my solder.
I heat with a softish flame and then when the solder is ready to flow I tighten my flame up and use it to direct where I want my solder to flow.
An easy solder will be more likely to have pits than a higher temp. solder.
Also I find that if I use a rubber wheel They tend to drag out pits in a seam. After soldering I file the seam only 80% smooth. Then emery with a fine emery paper the rest of the way. If I finish with say 400-600 I only have to do a quick buff. Polishing a seam too long will also drag out pits.
Hope this helps.
Have fun and make lots of jewelry.
Jo Haemer
www.timothywgreen.com
@jhaemer52 (and others).
I heat with a softish flame and then when the solder is ready to flow I tighten my flame up and use it to direct where I want my solder to flow.
A question is going to follow…
I’ve worked my way through a number of torches, starting years ago with a Harbor Freight oxy-acetylene welding torch (it did a great job at melting metal ![]() ). Most recently I grew to prefer the Smith Silversmith air-acetylene torch (relatively large flame, not so hot, can be made very soft by blocking the air intake). Problems with the MC tank led me to switch to an oxy-propane Meco Midget with Paige tips that so many Orchid members rave about. I’m finding their flame too small, focused, and intense. At least in comparison to the Silversmith.
). Most recently I grew to prefer the Smith Silversmith air-acetylene torch (relatively large flame, not so hot, can be made very soft by blocking the air intake). Problems with the MC tank led me to switch to an oxy-propane Meco Midget with Paige tips that so many Orchid members rave about. I’m finding their flame too small, focused, and intense. At least in comparison to the Silversmith.
I remember watching Leonid’s DVDs and seeing how long he took to solder. Much, much longer than I learned to do. So my question is, about how long do you take to solder a small join? Say to close a bangle or to solder a head on a ring shank. Since metal may make a difference and I don’t do gold, specifically using a silver or white gold head on a sterling shank.
To anyone who uses Paige tips, which tip might one use for the above tasks? Would you use the part of the flame just ahead of the central blue cone, or heat with the very end portion of the flame?
A third Paige-related question might be why do you need a 7 inch flame that is only 1/4 inch wide? (When I have my propane pressure set at 5 PSI.)
Thanks!
Neil A
Iron out hard solder wire as thin as it will go. I end up with a strip of
flat solder I cut piece a little bit wider then the bangle. I put the piece
in between both ends of the bangle and Flux real good. Then I heat the
whole bangle with my torch and when the solder is about to flow I put my
torch on the joint. Been doing it this for years. Good Luck! Vince
LaRochelle
I meant to say I rolled out hard wire solder. Vince Larochelle
Regarding Meco torches and Paige tips. I agree that going to the Meco/Paige tip from a more bushy Acetylene/Air or Propane/Air torch can be a bit aggressive. You need to do your preheating in the outside general part of the flame and them move in a bit to flow the solder. I work almost entirely in silver and make sure to pre-heat the entire piece until the flux gets glassy and then concentrate a bit more on the area to be soldered. I also try to avoid adding the solder until the last moment either with a pick or tweezers. I also have an EZ Torch and Little Torch on my bench. I use the EZ torch for annealing and am using the Little Torch more an more as I discover what it can handle or if I am working on little pieces or elements like bezels, small rings, prongs etc… The Meco is still my go to torch as I am usually working larger pieces and need the heat. The rest of my torch is an O2 concentrator and 1lb. refillable camp stove tanks, so I have no idea what pressure they are operating at. The best part is my very small and flexible hose from the Tin Man (www.tinmantech.com). This arrangement serves my needs well including 2-3 oz melts, is a lot safer with only 1 lb. propane cylinders in the shop and a lot less expensive to run than buying O2 all the time…Rob
Thanks for the reply, Rob.
I agree that going to the Meco/Paige tip from a more bushy Acetylene/Air or Propane/Air torch can be a bit aggressive.
Nice understatement. ![]()
You need to do your preheating in the outside general part of the flame and them move in a bit to flow the solder.
O.K. With a really big soft flame I was able to envelop a piece, and it all went quickly. I’ll have to re-learn how to work slower with a small, hot flame. I’ve been afraid that working slowly would cause the firecoat to get exhausted, or the solder would melt too soon, or maybe burn off some zinc.
I also try to avoid adding the solder until the last moment either with a pick or tweezers.
My hands are not steady enough for that.
The rest of my torch is an O2 concentrator and 1lb. refillable camp stove tanks, so I have no idea what pressure they are operating at.
I use an O2 concentrator too. I have no idea what the oxygen pressure is. 5 psi for the propane sounds low but the flame really is intense. I’ll try 4 or 3 and see how it goes.
Thanks for the help!
Regards,
Neil A
Even when I ran regulated propane and O2 from large tanks, I think that my pressures were well below 5 PSI. Experiment a bit. Also, listen to your torch. Try to remember what it all sounds like when everything is working well. Those who know me know that this is odd advice, since I am profoundly deaf, but I rely a lot on sound in my shop to know when things are right. If my Meco torch is making a lot of noise, it is too hot…Rob
Hi Rob,
Even when I ran regulated propane and O2 from large tanks, I think that my pressures were well below 5 PSI. Experiment a bit.
Yes. I just soldered 12 ga. square sterling wire at about 2 psi, which barely registered on the regulator scale. That’s a lot lower pressure than I’ve ever used with any torch. Very nice, manageable flame with the M-5 tip. That looks like the solution to the Meco / Paige combination for me.
Thanks for the help!
Neil A
Just a safety comment. If you haven’t already, make sure to install flashback arresters and check valves…Rob
Hi Neil, (Acknowledgments to Rob Meixner, and others too.)
Lots of good soldering information in this thread. I wanted to address a few of your questions about Paige Multi-Port Tips plus review a few aspects of soldering and maybe add a little information of benefit to others.
For jewelry makers hard “Soldering” (technically ‘brazing’) is the most important jewelry making skill to master. Sometimes this ‘foundation’ technique may seem like one of the “Black Arts” but it’s not. Working with a soldering Torch and related elements like fuel gasses, oxygen sources, solders, fluxes, flame profiles & sizes plus the various metals we use is a learned process like other skills… if practiced with forethought and attention to reasonable details excellent results are all but guaranteed.
Although there are skilled jewelry makers using acetylene / oxy setups, often because of how they learned to solder or due to regulations restricting propane use, choosing an ‘Alternative’ fuel gas (e.g., propane or natural gas) is the best overall choice for jewelry making. These fuel gasses produce clean flames that are not overly hot (compared to acetylene), often are less costly re: refills and re: propane… a safer gas than many may have heard. (Look up “Flammability Ratios” of common fuel gasses for more information.) Small, hydrogen / oxy Torches offer an alternative for clean burning flames if equipment cost and generally lower, BTU heat outputs are acceptable. Propane / oxy, even natural gas / oxy are plenty ‘hot enough’ for even platinum bench work so either gas will basically cover all needs for typical bench soldering.
The Little Torch and Meco Midget have all but become the de facto soldering Torches lots of jewelry artists choose. Regardless of the Torch choice, the above or others Torches, it’s the Torch “Tip” that defines overall flame usability. Correct Tip design is directed related to fuel gas type. Alternative fuel gas flames (propane & natural gas) preform much better with Multi-Port Tips than with single hole Tips. The latter style being correct for acetylene and hydrogen gasses. Although any Tip design will ‘light a flame’ with different fuel gasses important flame qualities like flame stability, BTU output, smooth profile adjustments, etc., can be greatly improved by matching Tip design to the fuel gas used.
Several questions were asked about matching Paige Tips to different soldering operations:
1. Length of time needed to carry out different soldering jobs?
2. Best part of a flame to use?
3. Best Tip number to use?
4. Physical flame size considerations?
Silver soldering (sometimes) takes a little longer than gold soldering due to the high, “heat sinking” properties of silver alloys. Large objects like a bangle or wide cuff bracelets, jewelry examples with lots of metal mass, absorb more heat before becoming hot enough allowing solder to flow thus can lengthen time to complete an operation compared to say attaching a head to a small ring shank. Less metal to heat up in the ring usually means a faster completion of a solder joint. (The sterling shank with its heat sinking property being the main ‘time issue’ vs. the white gold head in this case.)
In addition, physical flame size plus flame (heat) profile (reducing, neutral, oxidizing) also, directly influence how long an operation can take. Add in other considerations such as how clean the metal is, how well fluxed, joint tightness and what substrate, if any, jewelry is resting on additionally impacts how long a particular operation may take. Generally speaking the shorter time we keep objects close to or ‘at’ solder melt / flow temperatures the better as others have noted.
In silver and gold soldering we often use several parts of a flame to take advantage of different heat levels in the flame. Regardless of flame ‘profile’ (reducing, neutral, oxidizing) the lowest flame temperature is the far, end of the flame. The far end of a flame is where we often start… gradually heating the flux and overall metal. As the flux dries, melts and becomes clear (re: white paste flux) we bring the flame (the central cone “tip”) closer to the area we want to solder heating the area to be soldered moderately quickly up to a point where it melts the solder… not directly melting the solder with the Torch flame. (Note: Platinum soldering is done differently so comments here are meant only for silver & gold work.) The hottest part of a flame is right on the central cone ‘tip’ …not above or below the tip.
For silver alloys work: Our M-3 is the go-to Tip. Heavy bangles & cuff bracelets most people would use the M-4 and M-5 Tips. Soldering a small bowl, sculpture or like size object or annealing pieces of plate say 3" x 4" and up the MA-1 (small) Rosebud makes the job easy. To attach ear posts the M-2 Tip. Soldering tiny jump rings and/or neck chain repairs (26 gauge and smaller) try the M-1.
For gold alloys work: The M-2 & M-3 is the go-to Tip. Use the M-4 for large, heavy rings. Most people working in gold alloys would only occasionally need the powerful flame the M-5 is capable of producing with propane / oxy.
Note: Paige Tip numbers (M-1 to M-5) do not relate to other manufacturer Tip numbers. Above Tip recommendations apply to all Torches we support.
All Paige Tips, including the Rosebuds, will make physically different flame sizes ‘flame lengths’ according to how the Torch is adjusted. As physical flame size is increased so is BTU (heat) output. To very flame temperature (up / down) the fuel gas / oxy mix is varied. The above adjustments are the same with all Torches and all fuel gasses… propane, natural gas, acetylene, hydrogen, etc.
Hopefully this helps answer your questions. We are glad to “Talk Tips & Torches” with callers.
Richard Paille
www.PaigeTools.com
Hello Richard @Paige Tools,
Thanks for the very informative post.
I especially appreciate the info about the different tip usage. That will save me a lot of trial and error.
Now that I’m using lower fuel pressure I’m having a much easier time with the Meco and Paige tips. It probably has helped that I’ve stopped trying to duplicate the Silversmith flame with the Meco. 
Regards,
Neil A
Thank you Richard Paille for your post. I have always been a fan of natural
gas and it’s flexibility for soldering and annealing. I love being able to
control the size and oxygen/ gas mix. Most of my students have only used
torches that cannot be flame controlled and have no idea what can be done
with a really good torch. With your permission, I’ll be printing out your
missive for my students
Jo Haemer
www.timothywgreen.com
Hi Jo, Yes you may use my post for your student needs. I’ll contact you off forum.
Richard
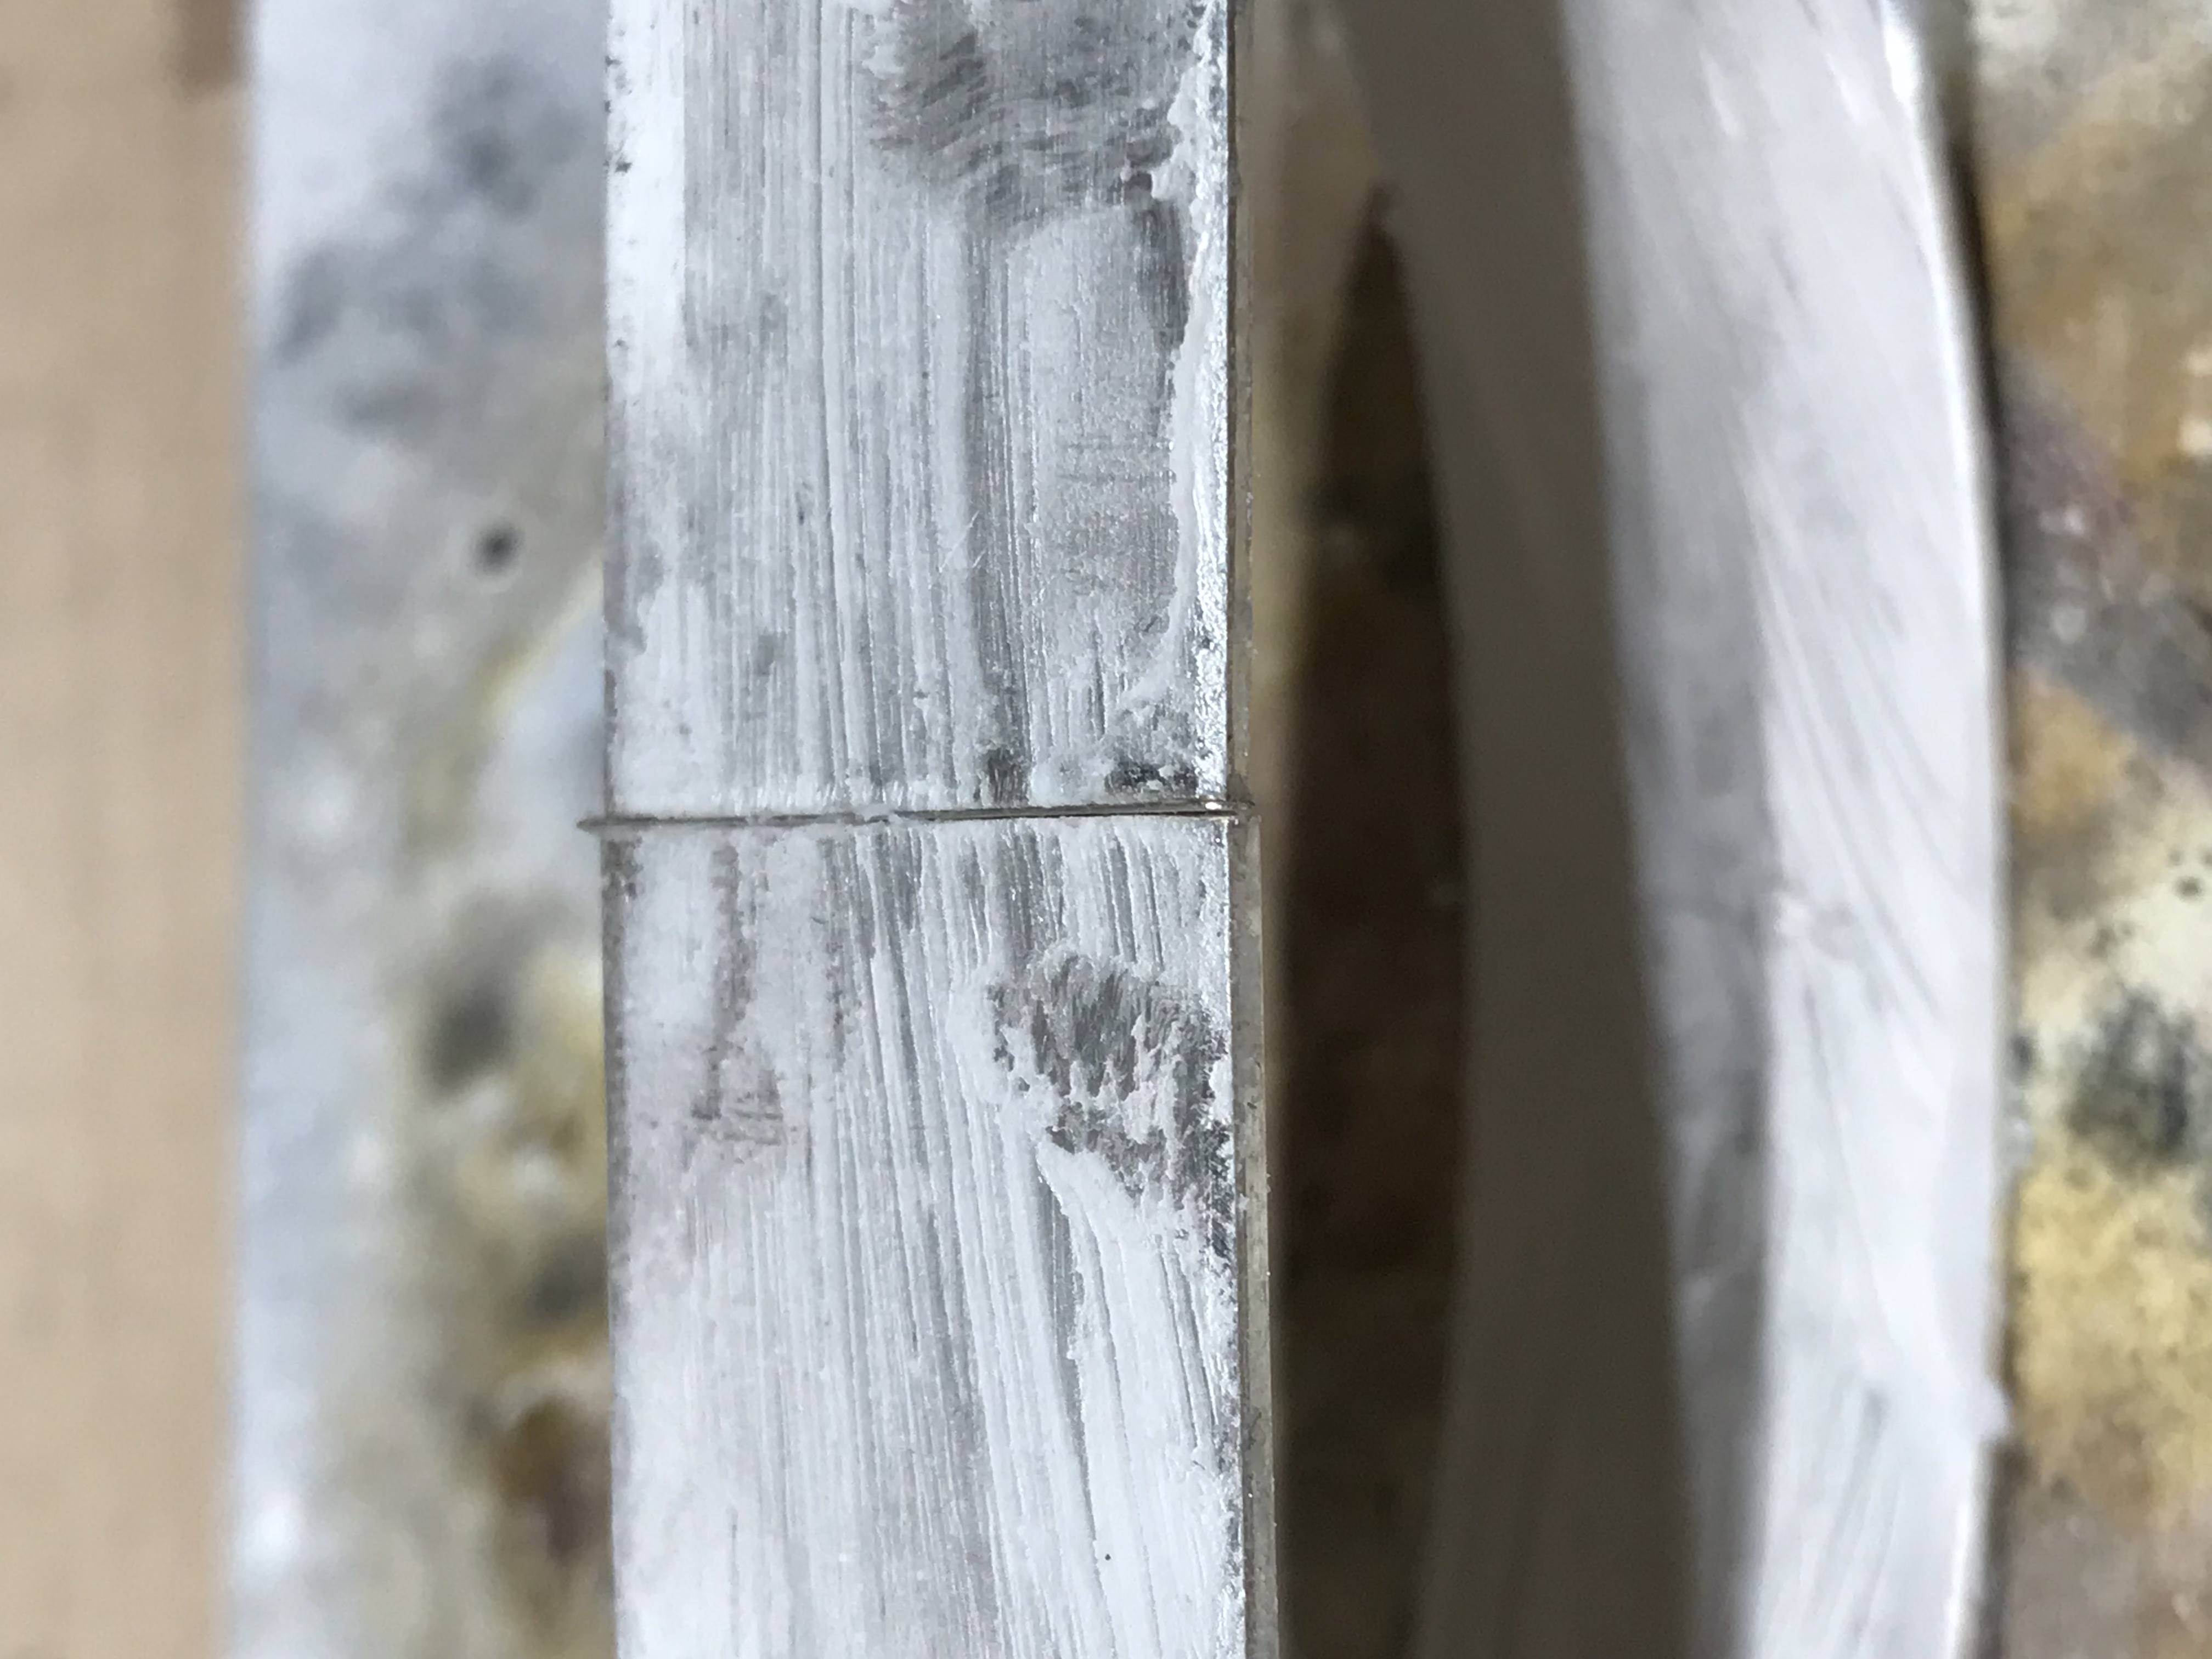
If I remember correctly, Alan Revere in his book, Professional Jewelry Making, calls this “tension soldering.” It makes a nice, tight joint.
I was just doing this tonight, in fact…
Alec
Hey Alec,
What am I looking at? What is the flux and what is the solder? I do the same when making bracelets. Typically 2.5x2.5 silver with boric acid/alcohol flux and medium hard sheet solder.
Great photo by the way.
Don
Sent from my Verizon 4G LTE Droid
Hi Don,
Thanks. The photo shows the two ends of a 14 ga x 3/4” wide sterling bangle “pinching”a piece hard silver solder wire, rolled thin. The flux is just Handy Flux that I’ve applied to the entire surface to protect against fire stain.
(I know you know the “whys” about this method, but I’ve included them for other future readers who might not.)
Alec