I am making a necklace with three small seperate faceted stones (Montana Sapphires) on stems then are wrapped with silver (the stems are wrapped in silver) and a bail at the top of the center stone. The necklace is made except for setting the stones. The silver is so work hardened that I cannot bend the edges over the stones. When I reheat the 3 step bezels it all falls apart. Then I have to re-solder and still it isn’t soft enough to bend the silver. Any suggestions? Deb
1 Like
Do a search on ganoksin for hammer setting. This is a method of moving bezels with a hammer and small steel, brass or even copper punches. You shape and polish the punch so that it will get into the places on the bezel that you want to move but do as little damage as possible to the metal. I use this method almost all the time regardless of how thin the bezel wall is. I even use it on fine silver bezels. It takes practice, but it is great skill to learn. You will need some sort of way to secure the piece so that you can use both hands. I usually embed the back of the piece in thermo plastic or hot glue. chasing resin will also work. You then secure the piece embedded in the plastic in a small vise and then let the plastic harden. Tighten down the vise and go to work. Others may have different ideas or refinements on my description. If your stones are round, you can buy setting tools that have a round concave shape machined into them. You then place the tool over the bezel with the stone in place and carefully pound on the tool while rotating it. It will quickly and fairly evenly roll the bezel edge over the stone. When this works, it works great, but the tool has to be the right size and you can’t have the bottom of the depression touch the top of the stone when you are pounding on the tool. If the tool is too small, it will dig into the side of the bezel and damage it. If it sounds like I have done all these things, it is true. I have a small lathe and make my own setting tools out of brass rod. Good luck…Rob
4 Likes
Thank you Rob, will try. It does sound complicated. Hoping there is a YouTube Video.
It can be a bit scary, but it works. When you do your research, and there are YouTube videos that demonstrate hammer setting, you will also come across people who use their flex shaft hammer tool to move bezels. You can do this, but I have never found my hammer piece to be able to move the thick heavy walled bezels that I often use. They may be up to 1.5mm thick sterling silver. Hammer setting will leave some dings and dents on the bezel. I usually go around with a rubber abrasive wheel and then polish to a high polish. Abrasive wheels and more abrasive polishing compounds can damage stones, especially softer stones. You can try to cover the stone with your finger while using wheels or compounds and let your finger take the damage or apply a piece of masking tape to the stone. Press the tape into the joint between the bezel and the stone and then cut off the excess with an exacto knife. You still need to be careful because the abrasive wheel especially can cut through the tape. If you are setting Turquoise, you can do your polishing with Zam as it is actually a way to polish Turquoise and some other softer stones. So while you are removing dings and dents, you also polish the stone. I have very little experience with faceted stones, but some of what is discussed here will apply to setting faceted stones. The best thing is to practice hammer setting on a piece that you can stand to lose when you are done…Rob
3 Likes
Are you using a burnisher to move the metal? I much prefer using a small polished flat headed chasing tool with a light weight chasing hammer. I use a very light touch so that I don’t have to remove dents from the hammering. I take it down very slowly. When finished I use a pointed and highly polished steel tip to where the edge of the bezel meets the stone. I have 2 sizes. Small and smaller. I then usually only need to give it a quick buff. When using an abrasive of any kind next to a stone there is also the risk of damaging the stone. The amount of time doing it slowly makes up for all of the time you need to smooth out the bezel. My advice is to get some not so great stones and practice.If you want you can start out with copper to save money for the silver.
5 Likes
One thing to add is that as far as I know, most commercial stepped bezels are made of sterling silver vs fine silver. Sterling bezels are harder to bend over the stone than fine silver bezels. Hammer setting like Rob and Jo are talking about could be very helpful for you. I just Googled “hammer setting bezels” that led to a pile of YouTube videos for both using a hammer and a punch and a flex shaft hammer hand piece. I love hammer setting. Once you figure it out, it’s very fun.
Hope that helps a bit!
Jeff
2 Likes
Debra
As of now I have been Smithing in one sense or another for nearly forty years. I did a lot of Dad’s polishing in his later years and he had me soldering and making some simple stuff for my wife and kids. Then I was working alone at the bench and busy doing craft and art shows. But I was in it until about five years ago before I set my first stones. Dad had left a few cabs and I bought a few and the next thing I know I’m setting stones. Rob gave me some good advice about bezel wire and different settings and I found a lot on YouTube. The best advice I got was to just go ahead and try it. Do some research, ask some one who knows, but to just go ahead. I’m not much further ahead than you just now so keep posting so we can see where you are. I have some stepped bezel wire myself. I’ll post a picture when I do. …
Don
1 Like
The OP uses the term step bezel. As I understand it, a step bezel is a manufactured bezel strip that has a thinner top section than the thicker bottom section with a definite “step” for the stone to sit on between both top and bottom. The thinner top section is rolled, pushed or hammered over the stone to secure it in place. I purchased step bezel strip to set cabs early on in my jewelry making career, but quickly abandoned using it because I could accomplish the same thing with a strip of flattened wire or just a strip of sheet or bezel wire soldered to a back plate or by soldering a smaller bearing inside a larger pieces of flattened wire or strip of sheet leaving the back open. This allows me to decide on how thick or high the portion of the bezel is that gets rolled, pushed or hammered over the stone is. This is especially important of you are setting an irregular stone like a tuquoise where the height of the bezel above what the stone sits on varies. In the case of silver, the bezel material can be sterling or fine. I like sterling as it is a good color match and it is less likely to dent than fine silver. A step bezel seat is flat. If you are setting a faceted stone, something that I rarely do, you need to cut a seat that isn’t flat for the stone to sit on so that it follows the bottom angle of the stone. This would require a modification of the flat step bezel. Otherwise you will have a very narrow point of contact between the stone and the seat. This can be done using various setting burs to cut a seat into a piece of thick tubing or a custom bezel that is fabricated or cast. Regardless of how the bezel is made, the top thinner section needs to be rolled, pushed or hammered over the stone to secure it in place, hopefully with very little damage as Jo describes so that it can be nicely finished without damaging the stone. I lack the patience to take my time and pay for it with dings and dents. I have figured out how to avoid damaging the stone with an abrasive wheel by shaping the wheel with a file to follow the bezel avoiding the stone. To me the key step is what you use for a punch. I have several tools made from steel, brass and copper with the ends shaped to move metal leaving as little damage as possible. Jo’s suggestion of a highly polished chasing tool is a great one and I will go through my chasing tool set to see if one works the next time that I bezel set a stone. Good luck to all of you who are just learning to use a hammer and a punch to set stones. For me now, the bigger time suck is how long it takes to secure the piece in thermo-plastic, hot glue or resin in such as way that the bezel can be hammer punched and then removing whatever is used to secure it in place once the bezel is formed…Rob
3 Likes
Hi Debra!
Don gave excellent advise when he told you to just dive in head first and give it a try. As he observes, nothing teaches like practice, and practice of course makes perfect. He gave still more excellent advise when he said to practice with copper and throw-away stones (or recycled silver that can later be recycled yet again) before trying these techniques upon expensive raw materials and work pieces in which you’ve already invested a lot of time.
Do a YouTube search and you’ll find literally thousands of videos on bezel setting stones using a multitude of techniques, including all those discussed thus far in this thread.
I’ve tried most of the techniques on YouTube and have come to personally prefer the hammer and punch technique because it provides me with more control and more options regardless of the thickness of the bezel material and regardless of how work-hardened hard it may be (within reason, as it will of course fracture if too hard), and regardless of the cut of the stone.
I tried using a flex shaft hammer handpiece and found it too difficult to achieve consistent results. I also bought an expensive set of round bezel punches and gave them a try, but no longer use them after I discovered the hard way they don’t have sufficient depth to set every stone. They can destroy expensive stones that have a tall crown due to an unusual or non-standard cut. And like Rob, I too learned the hard way that an undersized punch can destroy a bezel and force one to spend long hours doing repairs. Then there’s the fact that round bezel punches are only good for setting round stones, whereas I set all different shapes of stone in my work.
The hammer and punch method can also do a lot of permanent damage if one is inexperienced or careless. One must practice it enough to gain skill and confidence. But once mastered, one is very unlikely to go back to other methods.
I second Jo’s outstanding advice to go slow even when you feel confident enough to go fast. I made that mistake, along with nearly every other stone setting mistake one can possibly make. Moving too fast taught me a painfully expensive lesson when I had to buy an investment-grade 10 ct Alexandrite to replace one I carelessly fractured. My apologies to all those on this list that have bought investment grade Alexandrite over two carats out of their own pocket before and thus experienced instant involuntary sphincter pucker upon reading about my painful lesson just now.
Like Rob, I too use tape to cover stones when going back to buff bezels. I prefer thick, tough packing tape and trim it with a craft knife to perfectly fit the inside edge of the bezel where it meets the stone. And like Jo, I go back around the top of the bezel with a sharp pointed steel burnisher after setting to burnish the bezel edge. Unlike Jo, I will usually use a graver first to ensure the bezel edge is trimmed to perfectly fit the stone crown before going back over it with a fine point steel burnisher. I tend to purchase a lot of fancy cut faceted stones, which can have small irregularities in the crown facets that are difficult to notice until after the stone is set. Going around the inside of the bezel with a sharp graver isn’t strictly necessary, but I tend to be a terribly OC perfectionist.
Do come back and let us know how you get on, please. We’re all rooting for your success!
2 Likes
Reading Rob’s follow-up made me realize I left out a couple of key tips. I rarely use step bezels for cabs because they have a flat back and really don’t need the step unless the stone has a really shallow dome and one needs them elevated above the base enough to blend in better with surrounding stones that have a taller dome (I’ve only had this problem when setting hand-cut turquoise). I always use steps for faceted stones to ensure the pavilion stands proud of the base. I’ve never bought commercially-made stepped bezel material, instead always constructing mine to suit the particular stone by fitting a bezel inside a bezel. One more thing I forgot to mention was that when using soft fine silver, I go over the outside of the bezel with an agate burnisher to smooth out the worst of the dings left by the setting punch before buffing…
2 Likes
Sorry, mind like a lumber yard – item wanted always buried. One more addendum and I promise I’ll be done.
ALWAYS anneal all parts BEFORE soldering. Also, try to get in the habit of using hard solder exclusively wherever possible to avoid having assemblies fall apart when soldering on the final components. Apply a coat of borax flux before annealing, heat from below (I use stainless steel screen on a tripod, others use wadded up titanium or stainless wire, whatever works for you is fine), and when the piece gets hot enough that all the flux has melted, your silver piece is usually annealed enough to work on…
A little credit where credit is due. I didn’t mention trying things out first in copper although I am surprised I didn’t. Dad told me to do this whenever and often. And I do. So it must have been Rob that suggested it. We had the same teacher.
Copper is fun to work with and I like how it looks. I sold a few statement pieces at a show this past weekend in Indiana. Now it’s back to work to replace stock. I’ll try and fit in the step bezel project…, Don.
1 Like
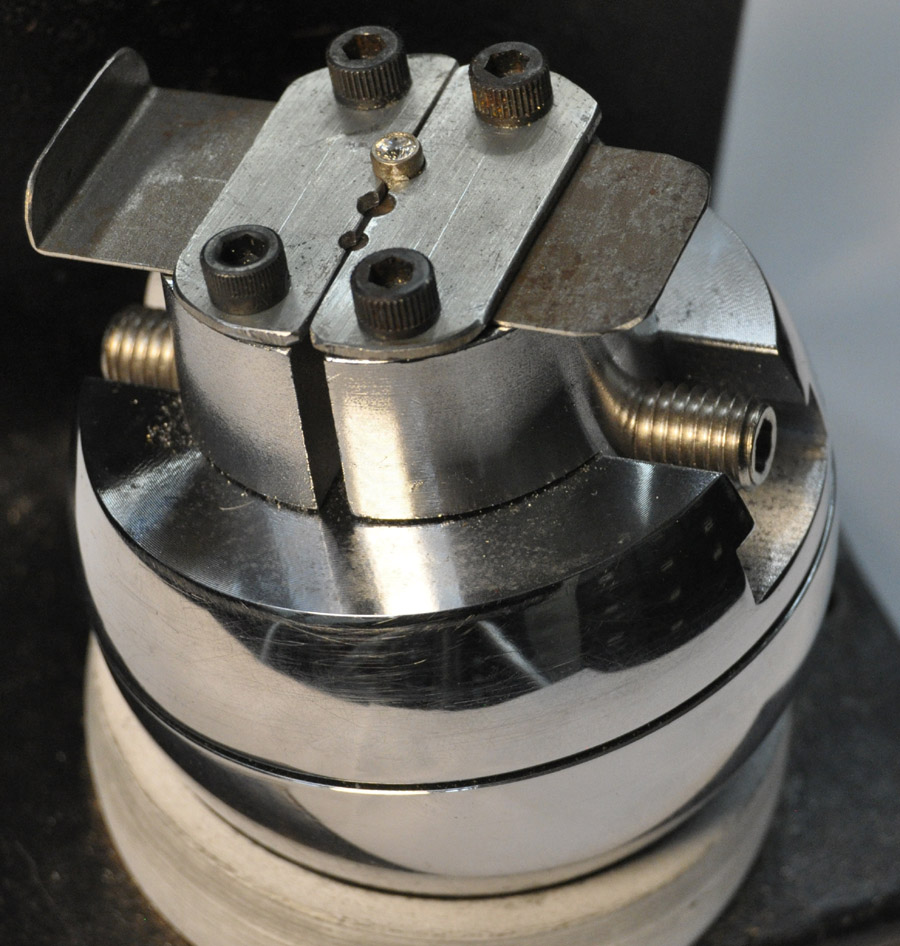
This is a device to hold bezels, bezel earings, small flat pendants etc. I have just about all of the holding devices available, pliers, clamps, collets, shelack. Little shallow bezels are hard to hold when cutting the seats. I have made a special arbor press to close the edges over the stones with the conical bezel punches. They sometimes need additional hammering to close tighter. It is hard to clamp them in the engraving ball with the usual accessories. You usually don’t get any support in the middle.
You can make this attachment for a GRS microball or the Chinese knockoffs. I used steel plates. Could also be brass. The balls are already tapped for 10/32 screws. My 1/2" screws were too long for the thickness plate I used, so I ground them back to about 3/8". If the cap screw heads get in your way, use flatter heads. If you make additional plates with thicker metal, you will need some longer screws.
Layout and center punch the holes accurately. To get center to center distance, put a screw in each hole. Measure the outside distance between them and subtract one screw diameter. You can drill several plates at one time to be ready to make clamps for other sizes. Bigger notches will need wider plates. I used a # 12 drill for the screw holes. My top plates were 0.040 " thick.
The bottom plate doesn’t have to be an exact width fit between the screws. Mine is a little sloppy so I can maneuver it around a little. Mine is for small bezels so it is 0.024 thick.
Make notches by drilling, burrs or sawing. You don’t want the plates tight together when drilling or laying out. You need some space so they will clamp. Shim between them with some extra stock or wire when making the holes. Be careful not to drill into your engraving ball. If the top of the bezel doesn’t clear the top of the clamp, bevel the top of the clamp hole , so you can hammer. Break the corners of the notches with a file.
The nice thing about this setup is that the whole bottom of the work is supported by the plate against hammering or pushing. If you have a wider gap for larger work, use a thicker bottom plate. I don’t shim spacing for the thickness of the bottom plate. I just leave the screws loose enough for the plate to slide. The plate is longer in the picture than it needs to be. I just left it longer for easy illustration. If you want to make it pretty, put a nice little knob on one end.
In shallow bezels the stone culet might stick out. Drill a little hole for it in the plate. There is room for a lot of holes.
4 Likes
Re… Setting stones in a step bezels and crowns
My favorite hack for cutting seats in any stone mounting is lining the inside of the setting with a black sharpie. While cutting a sea,t given that the stone is perfectly cut, it is MUCH easier to see if things are straight and even. It also works well with uneven girdles or edges on cabachons.
4 Likes