Hi Tara, I find it a bit difficult to explain how to set that
stone without seeing both the stone and the mounting, and what
is worse, my English is not good enough to give you an accurate
step-by-step written explanation. However, if you want to learn
how to deal with stones that have sharp corners or points (not
for this time -you are in a hurry I think), I would really
recomend you one of the Robert Wooding videotapes called
“Diamond setting: Fancy Cut Diamonds”. You can find about it in www.dryridgecompany.com. I don�t get any commision, it is simply
that it has helped me a lot. Good luck. Fernando, Spain.
Should you ever want to stop recieving robotic Emails from us;
Just send an Email to
I am making my daughter’s engagement ring at the moment. I am making
it in Palladium and it will be set with a half carat princess cut
blue diamond, seton the diagonal, ie with two opposite points in
line with the shank.
I am fabricating the shank and setting myself, as A) that’s what the
couple wanted me to do, and B) because there aren’t any shanks and
settings suitableto purchase in Palladium. I have almost finished
profiling the shank to thedesired knife edge shape and am working on
the setting too, which will havefour “V” prongs when finished.
My question really is what steps are necessary for me to do to the
setting, in order for the diamond to be set safely, without me
chipping any corners. Iknow that I need to make space for them, but
am unsure of what tools I should use, and any other tips people feel
would be necessary would be greatly appreciated.
This is my first prong setting for a princess cut stone. I have
successfullyfabricated and set many bezels with princess cuts,
without chipping stones, but really could do with advice before I
set this expensive diamond in “V” prongs!
Do you have any little ball burs? I use Hart burs too. The key is
having the corners sit in the recesses of the prongs after you cut
them and being sure the points aren’t coming up against them. Good
luck!
*I have the answers for your questions, * namely how to prepare &
set a Princess diamond.
In my written essay it shows the Marquise setting with a
"Vee-Shaped" claw. But in a Princess the action of ‘burring’ is
basically the same. As well you will have 2, mini-video’s (with my
narration) to see the preliminary and final stages of setting a
square stone, in filing action.
I’m trying to send these as ‘attachments’, but in all cases each of
the ‘files’ are greater than 25 mg’s in size. I will attempt this
again. directly to you & ‘openly’ to Orchid. I have ‘three
hand-drawn diagrams’ showing the same process in filing to have the
stone fit inside a 4-claw ring. I do have all the ingredients, but
all the ‘9 files’ are too great to sit down and post ‘past midnight’.
*I want everyone to get to see how this process is accomplished.
*please bear with me.
…T. T.F. N. (English expression).a. k.a “Ta-Ta-For-Now!”…:>)
Gerry!
I just finished teaching a workshop in prong setting faceted stones
and the princess cut is a fun challenge. Everyone has their own way
of doing things. This is what works for me.
You don’t need much for tools.
You’ll need a small ball burr. Really small. Like 1/2 mm. You will
also need a flat graver. I like a 38-42 size with a well polished
belly. You will also need a prong pusher and a pair of stone setting
pliers. Tim and I love using the smallest pair of channel lock pliers
they make. We soften the teeth and edges a bit before using.
You can buy them online from Amazon. The jaw is only 1/2 inch and
the full length is 4 1/2 inches. They cost about 10-15 dollars. There
is an article in MJSA Journal from April 2011 “Secret Shop Weapons”
with photos about our use of these.
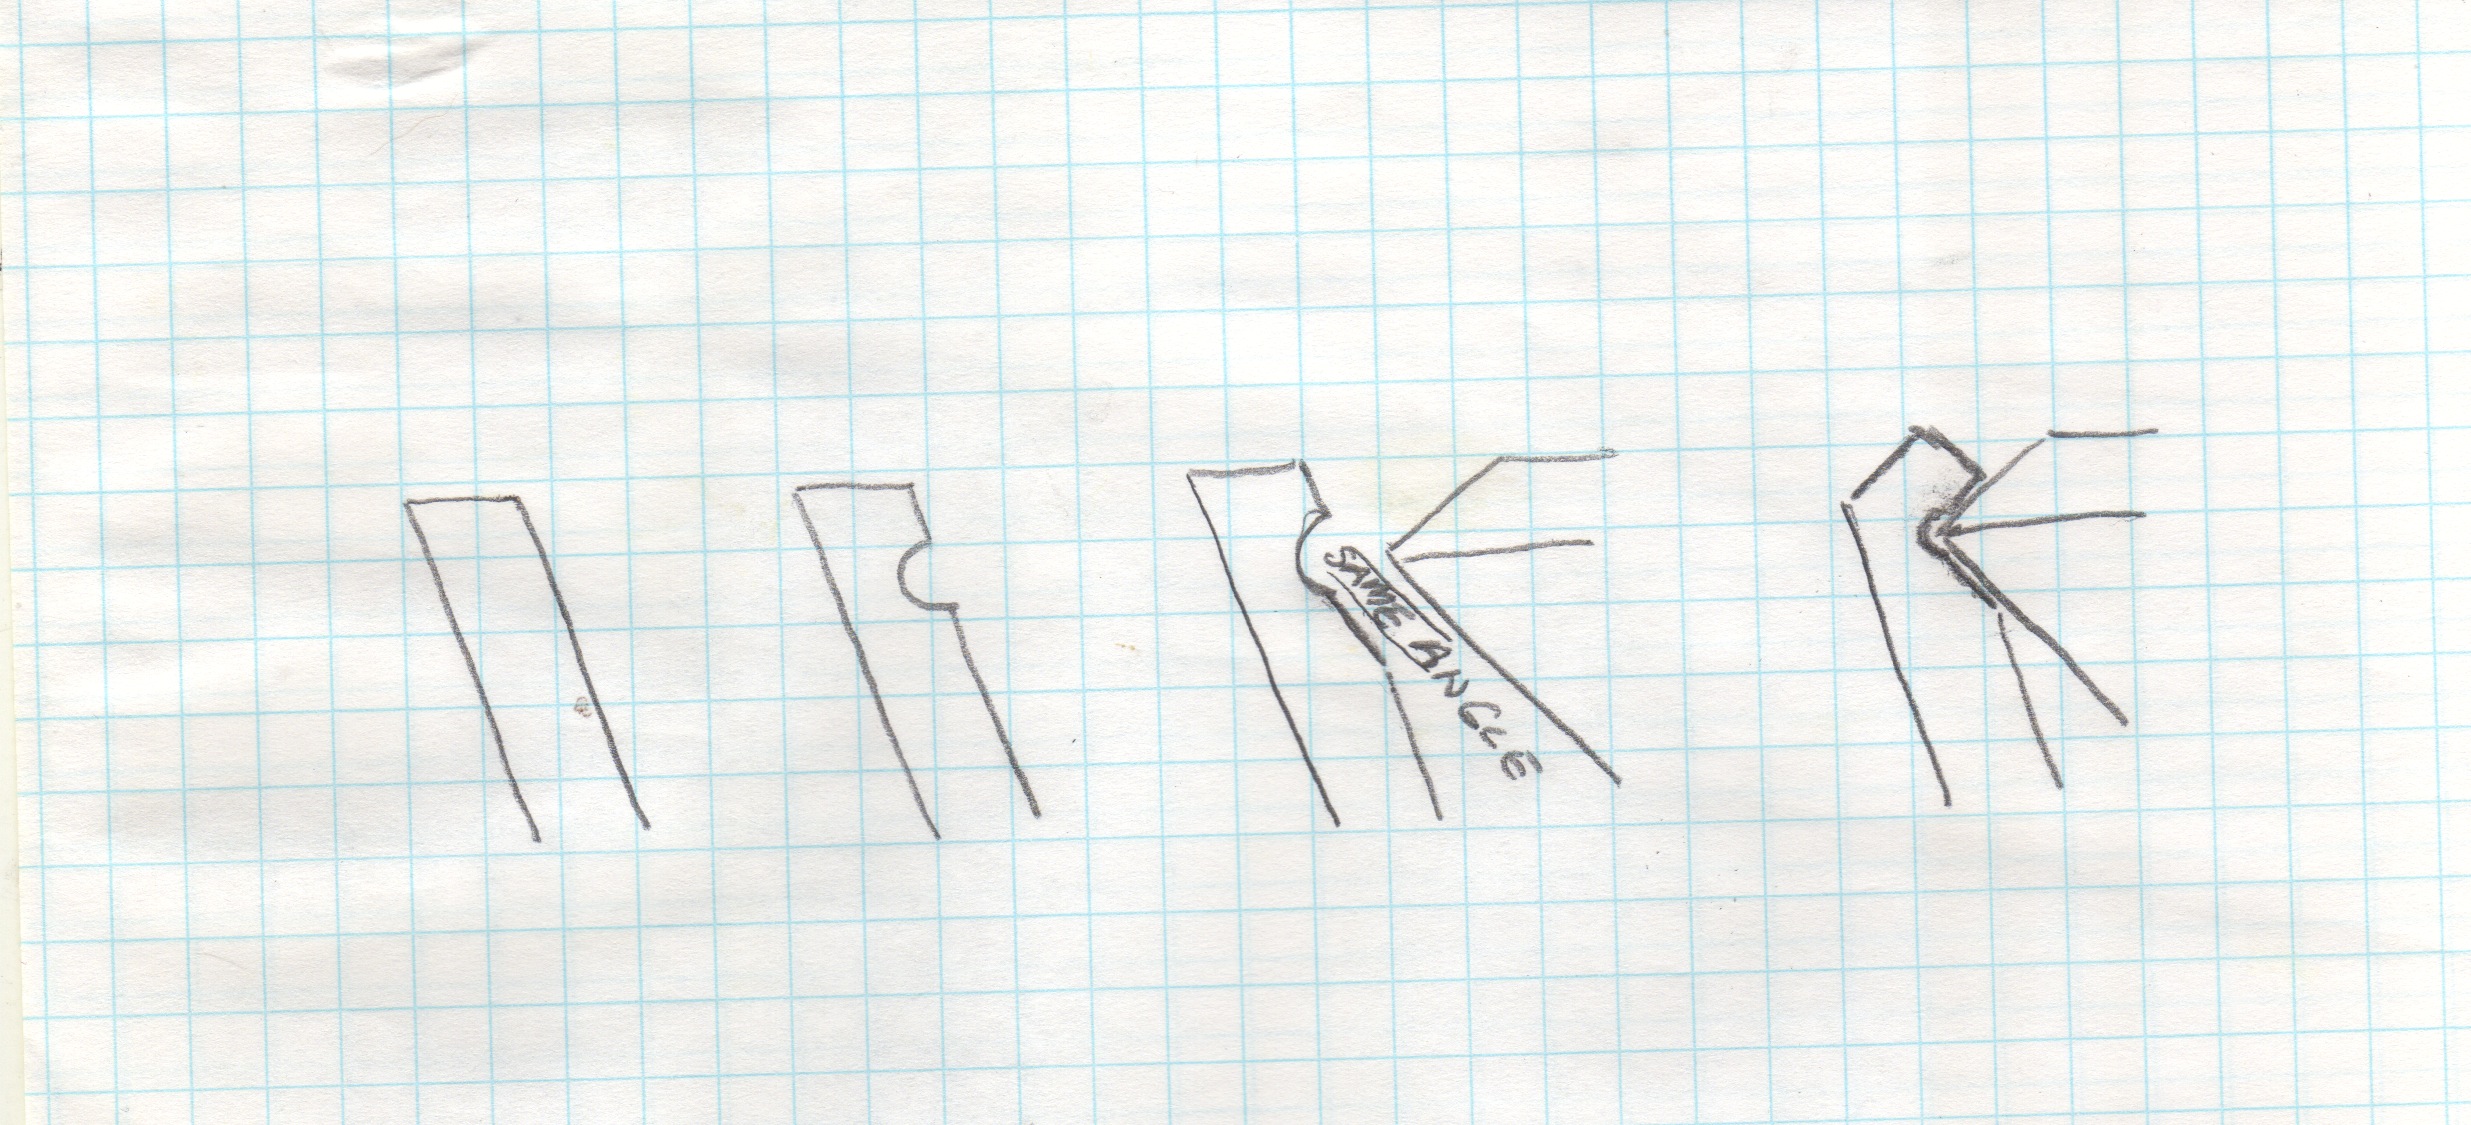
The first thing I do is blacken the inside of the v caps with a
sharpie.
Then I scribe where I want my girdle height on the inside of the
v-caps.
The marks/ lines show up better against the black background. Then
take your tiny ball burr and go straight into the middle of the v cap
about half way through. This will free your corners so that they
float rather than get pinched. For the stone to have a nice seat I
take my flat graver and remove metal from the bottom of each notch.
I’ll attach a quick sketch.
Once the stone is seated take your pliers and catch just the tops of
the opposite prongs and bring them straight up. This should capture
the stone in place and it should be tight and ready to trim. Do not
try to bend the v caps over. Then with a #2 or finer cut file flatten
the tops of the v caps to the height you want. Then take your graver
and just like setting a marquis clean up the inside of the v caps so
that there is a pretty and shiny inside bevel right down to the top
of the stone. In the process of cutting the inside bevel you may
loosen the stone as you push outward on the inside edges. Don’t
panic. Just push them back with your pliers or a pusher. If it
refuses to tighten I will take a pair of needle nose pliers and very
very gently squeeze the sides of the v cap right at the girdle
height. this will also take care of any bulge you might have in the
v cap where it is bent. Be very careful doing this bit. Then file
your outside bevels.
Before you do the blue diamond I would recommend that you practice
with CZs and silver v caps a couple of times.
I been trained by GIA and Allen Revere and the school of broken
points. Best tip I ever gotwas never pinch the point, girdle, and
keel. I use ball burrs from.2mm-.5mm and make very sure points and
keel are free from mounting before i set. Seen more broken points
coming from others that any jeweler should have to see. And so it
goes.
So Helen may I suggest that you farm the setting out to one of many
who have done this more than once or twice. I would also suggest
your family does not have to know.
It for me is about getting the job done right. I am currently CAD
and CAM my only daughter’s wedding band. PM me if youwould like to
see what a Cal grad and aUCSF PhD wants. It is on my B9 3d printer
now along with some jobs that will make some money
Well, I asked my question about setting a princess cut diamond, and
within aday, our Canadian diamond setting expert and guru has sent
me videos and drawings and talked me through the whole process!!! It
doesn’t matter how manythousands of miles we are apart, Gerry is
always willing and able to help us all out with our setting
questions! Thanks so much Gerry.
My advice is to make a prototype in sterling, and set a CZ in it.
They chip easier than diamonds do, so it is good practice. That is
what I did for my first princess cut white gold ring, at the
suggestion of my setting mentor. It worked great.
I relieved the prong corners with a round bur, and refined the
inside of the setting with gravers. There is nothing like a little
practice! It is liketaking your own specially customized class!
Gerry - you are so kind with your sharing! I am wondering if there
is a way Hanuman can put all of your notes and essays and drawing on
the Ganoksin site, so folks can access them more easily, if you are
willing? That would let them download directly from the site,
instead of having to go through e-mail. Most e-mail providers won’t
allow files that big to go through.
Helen, If you are using a 90* corner cut half way down with a 8/0 saw
blade to the seat of where you’re folding the prong(S). Before you
fold take ball bur in the corner to give it room, not to snap a
corner off a stone. Does that make since to you? You can then solder
the cut once you’ve folded it over. Works on all corners, sometime
you have to use a file on the corners as well. Just takes practice.
I haven’t done it since my stroke :-(…
My experience has to use a small ball burr after you have cut the
seats. You want to make a very small space to prevent the end
breaking from the slight pressure of the prongs.
I am sure someone with more experience can back me up but the
cleavage of the stone is going across the stone so it is very easy
to break off the tips. The grain of the stone makes it VERY easy to
break.
Most of the diamonds I have chipped over the years were princess
cuts. But then I was doing trade work for the mall stores so I was
not setting well cut gems at all.