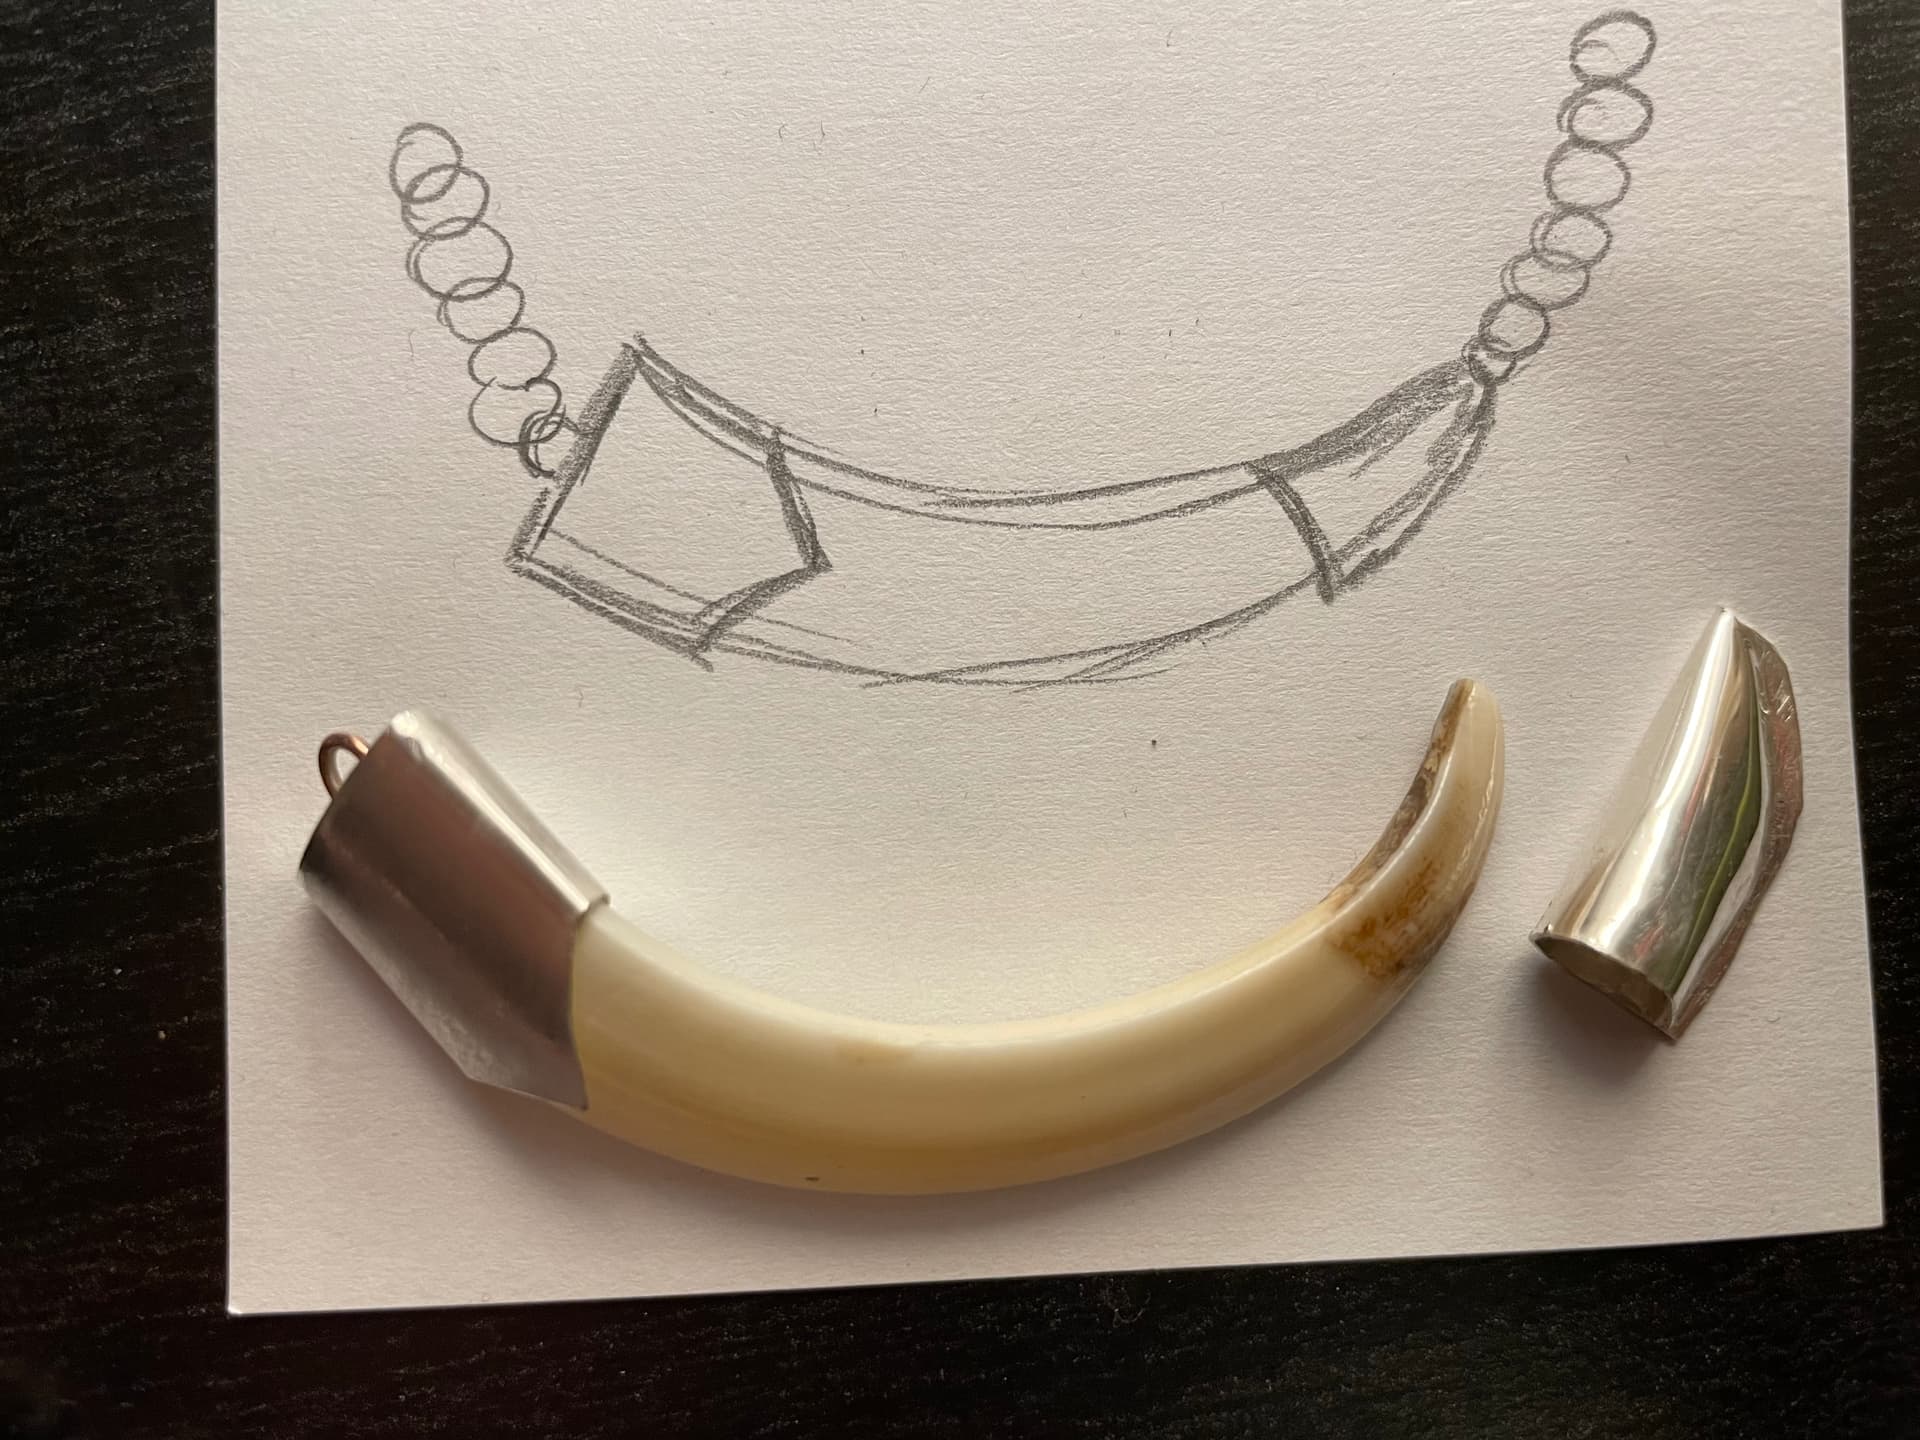
Hi all, so I eagerly agreed to take on this custom project of turning this boars tusk into a necklace. The backside fits nice and snug but I can’t for the life of me figure out how to shape the pointy side of it. I’ve tried separately cutting the three sides and soldering them which seemed to work until I got to the rounded side. What you see in the picture is the closest I got by using one sheet and bending it into shape. I’ve tried modeling the shape in clay and shaping the silver in there with no success. There must be a formula or something to calculate the shape I need but I just can’t figure it out. Any help would be greatly appreciated! Thank you so much in advance.
1 Like
That is a tough one. Are you working with sterling? Fine silver will move and conform a bit easier. Also, pinching the edge down will not lock the piece in place like it did on the other end. You may be looking at glue, a pin or two or cutting a recess into the tusk to burnish the edge into to hold the cap in place. Good luck…Rob
5 Likes
Maria,
Interesting project! I agree with Rob, as a Pin (or two) drilled through each end and then the ends Riveted on each side, is the most common method of Mounting Tusks. Though before you drill any holes, cut any recesses or even glue the point in, I would ask your client to see if they are OK with doing so. Most clients will understand that this is necessary for them to safely wear the Tusk and not lose it, but some will not and it’s better to know this before doing it, rather than after doing it… Unfortunately, you cannot “Un-Drill” or “Un-Cut” an Organic Object and sometimes Glues will stain them too, so always keep this in mind on these projects. Good luck!
Jonathan
5 Likes
Good cautions! I have never, and hope to never, work on such a project…Rob
1 Like
Yes I’m working with sterling silver. Right, I’ve already decided that I’ll use some glue to hold it in place, but first I need to get the shape right ![]()
Hi,
hmmm…i am thinking…perhaps wrap it in masking tape…then cutting it off…in such a way that you could then see the general shape…to make a pattern…and then use the forming technique used to make spiculums…using an anticlastic stake…or shaped hammers in a vice…and wood blocks that gave been shaped…
there is a fabulous book by Betty Helen Longhi and Cynthia Eid, titled “Creative Metal Forming…that teaches the various techniques for bringing shape volume and curved to flat pieces of metal…it is a great addition to a jewelers library!
julie
2 Likes
Hi again,
actually, i think it would be a synclastic spiculum!…using wood blocks with depressions!
very cool!
julie
2 Likes
You could do both ends out of metal clay or use the cured metal as a model and have the ends cast. These are both off the wall a bit and the best thing is to just learn how to form metal to the right shape. Since you did one end, just expand upon what you learned. Good luck and keep us posted on your progress.
2 Likes
The problem with metal clay is that it shrinks considerably, so something that fit well initially will be too small after firing. I’d advise cutting thick paper (manila folder) into a 3-piece pattern that conforms well to the shape, taping it together to check the fit, then duplicating the paper pieces in silver sheet, forming them in depressions cut into wooden blocks, then soldering them all together. I agree with the other people who advise drilling holes at each end and putting pins in them, headed at one end and upset at the other to hold the tusk in securely.
1 Like
Thank you for this advice Julie! I’ve looked up a bunch of videos on forming techniques as you mentioned. I haven’t tried this yet as I kind of assumed it’s impossible to shape without leaving some texture on the metal - although that might just be my lack of patience! ![]() It will be good to learn a new skill. Luckily I have plenty of time to finish this piece so I can play around with it some more.
It will be good to learn a new skill. Luckily I have plenty of time to finish this piece so I can play around with it some more.
Hi!
I highly recommend the book…20 on a scale of 1 to 10…in terms of detailed explanations along with photos!…you can read the beginning, and then jump to the synclastic spiculum project!
they also show that you dont need alot of expensive specific tools…they show many ways to make the tooks to get it done inexpensively!
it is a very fun rabbit hole to hang out in!!!
(i wanna figure out how to make fluted saucer and torpedo beads like the navajo next!!!…if anyone has a reference recommendation!
i havent tried to youtube search synclastic spiculum yet…!
p.s. “planishing” is how the surface is refined after forming…see “planishing/ planishing hammers…hammers…another fun rabbit hole!..as well as “polishing hammer faces”…oh me oh my!
julie
2 Likes
the easiest way o get a shape that conforms to the tip of the tusk is to approach it as a shell form. Following the information in Cynthias book, make a top and a bottom. The technique doesn’t mar metal because you will be using a combination of metal and delrin tools. I use this technique successfully on highly patterned metal with no damage to the pattern.
2 Likes
One more off the wall thought. Dip the end in melted casting wax and build the wax up to whatever thickness is desired. Do whatever needs to be done to the wax and then cast it in any way that you can. This is from someone who has never done a lost wax casting in his life. I like Judy’s suggestions…Rob
1 Like
Folks are giving great suggestions here! A few things I would add.
First, I’ve learned the hard way that bone and tusk can expand and contract in humidity. You mentioned that you’re going to glue it. That’s a great idea so it won’t loosen up over time, but like Jonathan said, be sure and get an okay to glue it from your customer.
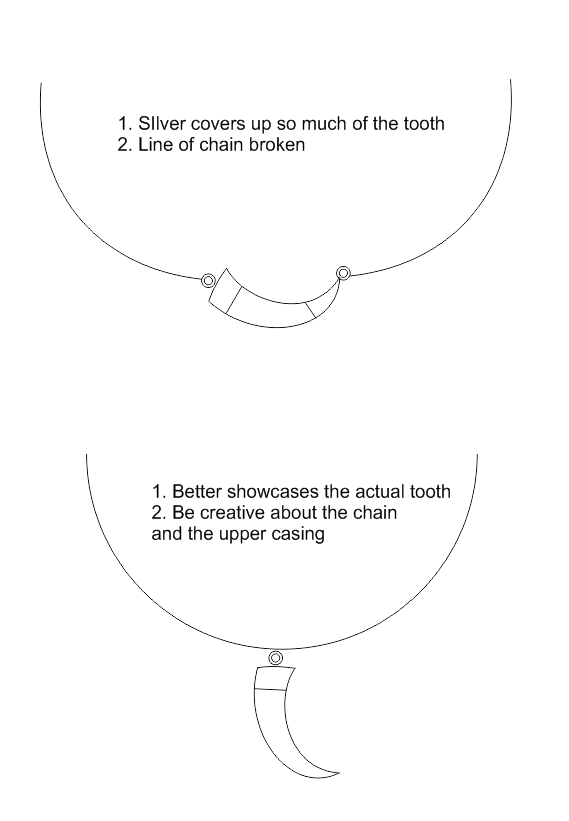
Think about shortening your caps so they’re not so long. Especially on the small end, as that is a tapered curve, which is harder to make. Not impossible at all, just harder. Plus, you’re covering up a lot of the tusk with metal.
Cynthia Eid and Betty Helen Longi’s book is awesome and I highly recommend it as well, but you’ve already got one side done right? That tells me that you pretty much know what you’re doing. Your original question was is there a formula to calculate the amount of metal for a cone/spiculum shape? Tim McCreight’s book, The Complete Metalsmith, has a formula to calculate the amount of metal needed to create a cone. I looked to see if there was something similar in Creative Metal Forming, but I didn’t see one. (It might be there and I just missed it?)
For me though, I’m much more of an eyeball it person, so I think Julie’s suggestion about making a template with tape and then carefully cutting it open is a fantastic idea.
You’re other question about not dinging it up is spot on! I was super lucky in the 1970’s to take a metal forming workshop with Heikki Seppa, the grandfather of anticlastic and synclastic metal forming. I asked Heikki that exact question of how do I remove dings and scratches from my first spiculum? His answer is one has stayed with me for the rest of my career. The easiest way to remove scratches and dings is to never put them in, in the first place. Betty and Cynthia’s book has great suggestions about how to shape and form metal without dinging it up.
Finally Rob’s idea of using dipping the ends in wax for casting will also work. I’ve done that lots of times with various found rock pendants. You have to deal with metal shrinkage, but it won’t take too much to ream it out a little bit with burs.
Hope all that helps! Looks to me that you’re way over the hump and that you’re almost there!
Jeff
3 Likes
looks great. nice work.
1 Like
Sorry Maria, I have made or rather wasted a lot of time making these many years ago. Since then people like Fretz and metal forming have evolved for the student and professional alike. Now that would be the path that I would search through. For the few jobs that my work needed those tools didn’t justify the cost unfortunately. Not an answer but a possible lead to informative video.