Hi All!, I am a new member of Ganoksin and so happy to be part of this learned group! To date, my wax work has been limited to carving small pieces (think rings etc) out of hard wax for the lost wax process. I’d like to take on a larger project that consists of creating a model for a thick bangle bracelet formed in the shape of a horse’s leg. In year’s past I sculpted well when working with clay. Would I be better off working with a soft wax that would allow me to build up my piece verses a hard wax that requires carving? If so, can someone recommend a good wax for me to work with? Thanks in advance for your advice!
1 Like
Hi Sally, you have many options. One of my favorites is to start the sculpture in any material that will favor the sculpture process in ease and speed. For me, that is often plasticine clay, though it could be anything. From there, an RTV mold can be made of it and the sculpture is then transformed to another material, usually a medium or hard wax that can be further refined. Additionally, the shape of the RTV mold can be changed to suit your needs: such as left flat or tied into a curve. I work a lot in AB45 wax and find it a good medium consistency; soft enough to sculpt and hard enough to file. It can also be put in the fridge or a cup of warm water to temporarily change it’s working quality. I’ll also go the additional distance by casting it to do the final sculpting in metal before making a production mold of it.
Rob,
Thanks so much, this is a huge help! Plasticine sounds like a medium that would feel very much like clay. With the process you suggest in mind, it sounds like I could create an armature with a brass rod to build out my piece, and offer some stability to the piece while working on it. I had not thought about making a mold and working from a wax model midway through, another great suggestion. Thank’s so much! Sally
Good Luck! Yes, plasticine is a lot like clay but without the water, it won’t dry out and shrink like clay will. That makes it work well on armatures. Like waxes, plasticine comes in may varieties. Try to find one with out sulfur added as that will inhibit the cure of RTV (if you intend to use RTV). There are lots of great videos on YouTube about making RTV molds.
Thanks again, I’ll let you know how it goes!
Hi Sally and dlengle and All,
If you want to go the route of using more than one stage of model making, there is an old book by Gerald Wykoff called You Can: Master Jewelry Design & Creation. It covers the whole process of jewelry design, model making, casting and finishing, with an emphasis on using alternative materials to initially create a model. You can use paper and glue, paper mache, clays, soaps, balsa wood and various other materials or combinations of materials to create a model and then use dental alginate or various RTVs (and there are lots of alternatives, not just silicone compounds) to make a mold and create a wax from that and go on in a traditional way from there. I read through the whole book and on the one hand I was intrigued and on the other I wondered if I wouldn’t do better to just learn how to carve and build up wax in the first place. I suppose I was put off by the necessity of learning how to mold in the various RTV’s in addition to learning about waxes and rubber molds…but it could be a great approach. If you don’t need rubber molds for production, for example, you could just make, say, a heavy paper model of a ring and make a mold from that and shoot the wax from there. Clean up the wax a little and cast it. The RTV mold, if successful, could be good for years and for many wax models, tho’ possibly not as many as a traditional vulcanized rubber mold. The devil, as usual, is in the details and the more expensive RTV’s tend to last longer and produce more impressions. Wykoff even covers methods of shooting waxes without the usual air pressure wax pot, so there are lots of methods which use low tech, low cost options. He even covers steam casting, which is useful for small batch casting. Just some other alternatives…HTH, -royjohn
https://www.amazon.com/gp/product/0960789251/ref=as_li_tl?ie=UTF8&camp=1789&creative=9325&creativeASIN=0960789251&linkCode=as2&tag=ganoksincom-20&linkId=1ad655c54be9617446c7c36102091344
RoyJohn,
This sounds like a great read. I’m off to search it out on Amazon. I’ve used RTV molds in the past and don’t mind the idea of them for this project, however this model will definitely exceed the size of all my frames, so other options could be fun and useful to experiment with. I’m also intrigued by the idea of multi-media… Now to avoid the pitfall of analysis, paralysis as I dive in!
Thanks so much! Sally
I never got to meet Wykoff, who I think is now deceased, but he must have been a remarkable character. He ran a newsletter and certification process for gem faceters, innovated several polishes and other refinements in faceting and gem polishing, and wrote a number of books on lapidary, faceting, jewelry construction and care and even diamond cutting. Sometimes there is stuff in these books that is difficult to find elsewhere…he seemed to be all over the place on the cutting edge. Some of the ideas seem oddball, but there is just so much in what he wrote that it has to be of varying quality and use. There is info in that book about the various types of RTV which I have not found elsewhere. You might find a copy cheaper at thriftbooks than Amazon right now. -royjohn
The Wykoff book arrived in the mail today and I am thrilled. I’m looking forward to spending time immersed in it this weekend. Meanwhile, I started work with plasticine clay this week. The sulfur free variety was easy to find and I used a simple brass armature as a starting point. This piece is ultimate destined to be finished in two stages, first as a sterling bangle bracelet and then after further refinement as a belt buckle. It’s about 3" in diameter and weighs about 40 grams at this stage. Still a long way to go, but this is so much easier than starting with wax! Thanks so much to you both for all the great advice! Sally
1 Like
I’m glad you like the book! It does have a lot of innovative techniques in it…when I first read it I wasn’t sure I would use any of them in preference to wax, but seeing your model, I thought, “wow, that would be a hell of a lot of wax to carve!” I think you’ll be interested in the number of RTV materials that are available, too. Keep us in the loop…I’ve already learned something! -royjohn
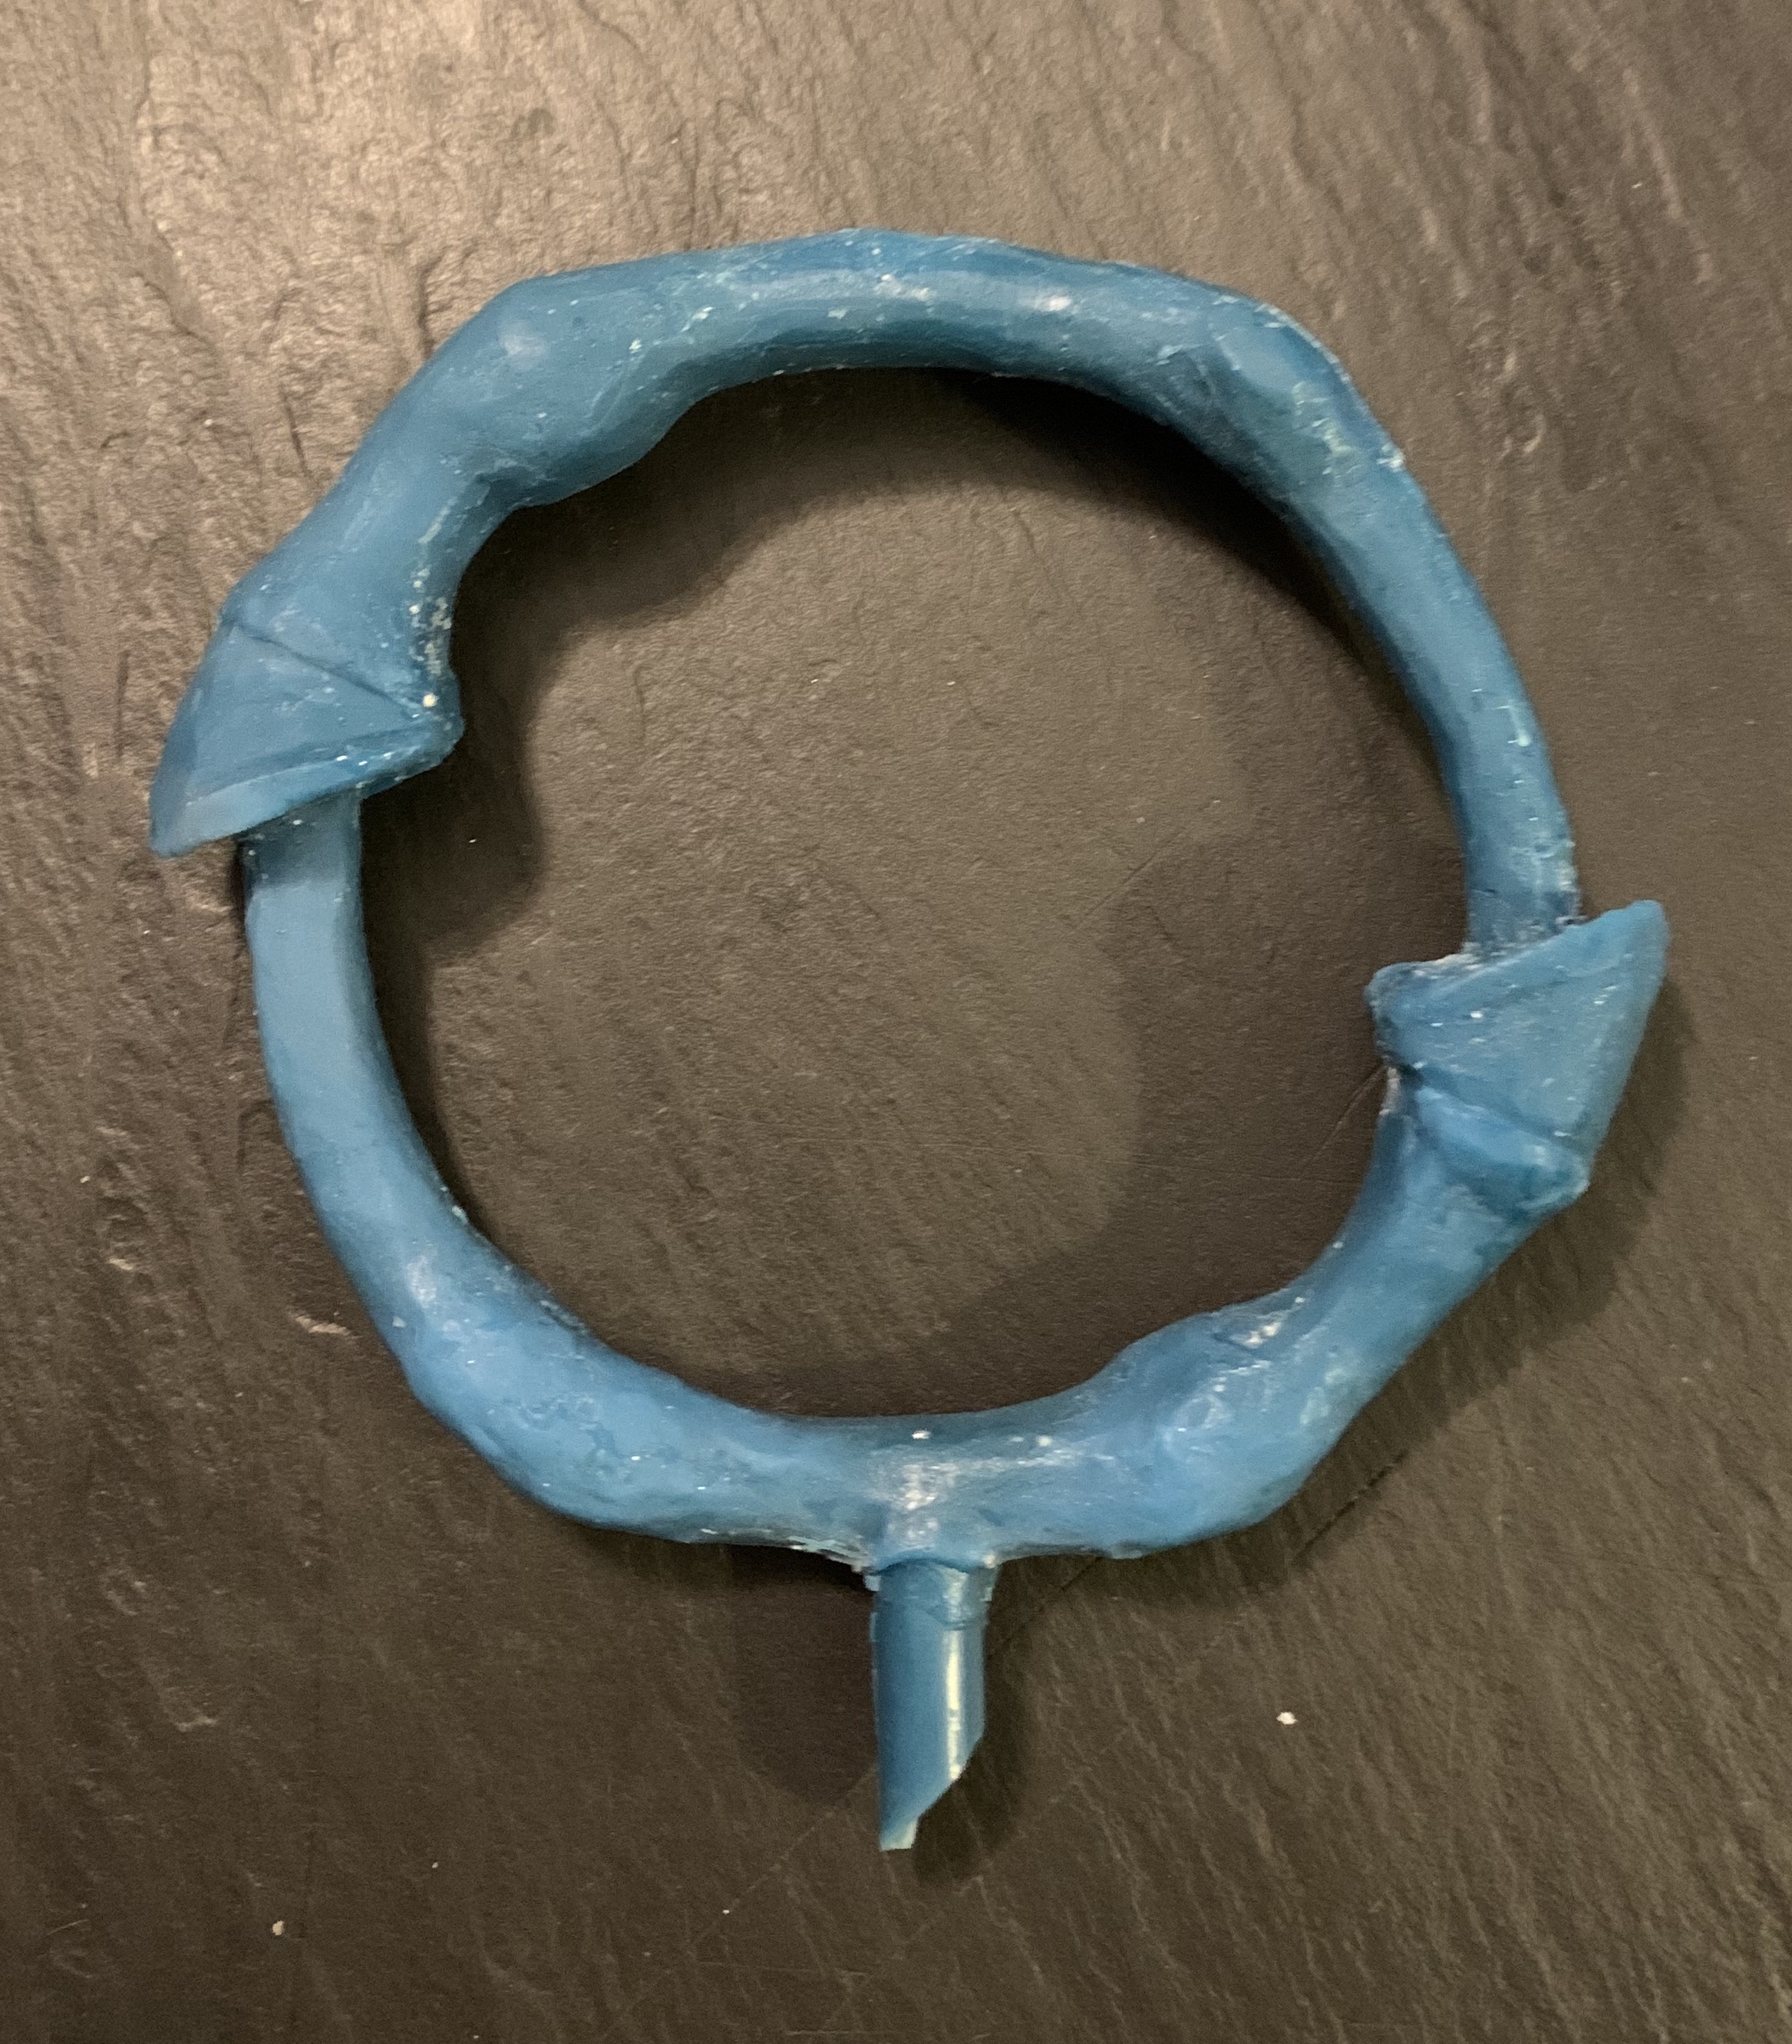
First wax out of the mold. This piece is 3" and the model was quite heavy so the toughest part of making the mold was stabilizing the model well enough to pour the compound. Lots of refinement left to go, but all in all, I’m happy with my progress to date. Thanks so much for all the great advice!!
2 Likes
for largish models like this or larger, you might think of making a 2 part mold verses, I am assuming, a one piece mold to be cut.You could imbed the model into no sulphur clay, deep to where you would want the mold to separate,
pout the “first 1/2”, let it cure, take clay off of the model and 1st half of the mold, place dams and pour the second half of the mold for a complete mold.
You can make molds of far larger pieces with the method above, I do so for my foundry work, the limit is how much weight and how much bulk can/do you want to handle while pouring or injecting the wax……
If further questions I would be happy to help you or give suggestions or thoughts….
John Dach
360.808.3086
1 Like
John,
All of the above makes sense, however my model was no sulphur clay, so not sure if it would work to use the same substance to support the model, without damaging it? What else could be used?
Thanks so much,
Sally
YES!!! Cynthia’s (my deceased wife) used clay models in her sculpture works of rather hard clay, but softer clay can work fine too. Her jewelry pieces were almost ALL carved in a VERY HARD, plastic filled was (Filo Wax). To keep the model from sticking
to the clay foundation/mold “frame” it was being set into/being built around it, we would spray the master with shellac if we were worried about it sticking to the foundation clay but most often, her clay was much harder than the clay I was using so that was
not really a problem (it was more of a problem when I was making molds of other artists pieces who used softer clays…. would pretty much stop any problems if the master was a sulphur base clay too.
When “pushing or forming” clay right up to the sculpture piece, I used rubber tipped modeling tools, again my clay was softer (and I heated it before using it against the master) and easily pushed against the master for total clay to clay contact
(no leaks). Once the first half of the mold was finished (rubber and mother) I removed my “damming” clay and built a new “edge” and made the second half of the mold. There were many times I had to make 3 part molds to be able to ultimately has a mold that
could be removed from a wax, a bit more complicated but not that terrible. For jewelry I cannot see there ever being a need for a 3 part, but some heat vulcanized molds can be VERY complicated in the way they are cur so the wax can be removed from, lets
say a basket, without damaging the the basket. They are terrific to see how they work and how a very good mold cutter can cut something that works so well.
So for small pieces like yours, you could do a single pout and cut the mold or do a 2 part mold. It is difficult to get all the information down here in type, when I my mind it is perfectly straight forward but to the listener it is a good sized
**?. **If I might be of any further talk help, please feel free to call me (360.808.3086) and if I miss your call, leave me a message and I will get back to you.
I hope this helps a bit more…….
See her sculptures, mixed media and pastels at
MLCE.net if interested. I can send you some shots of some of her jewelry if you would like, as she never put any jewelry pieces on the MLCE web site.
John Dach

Hi All,
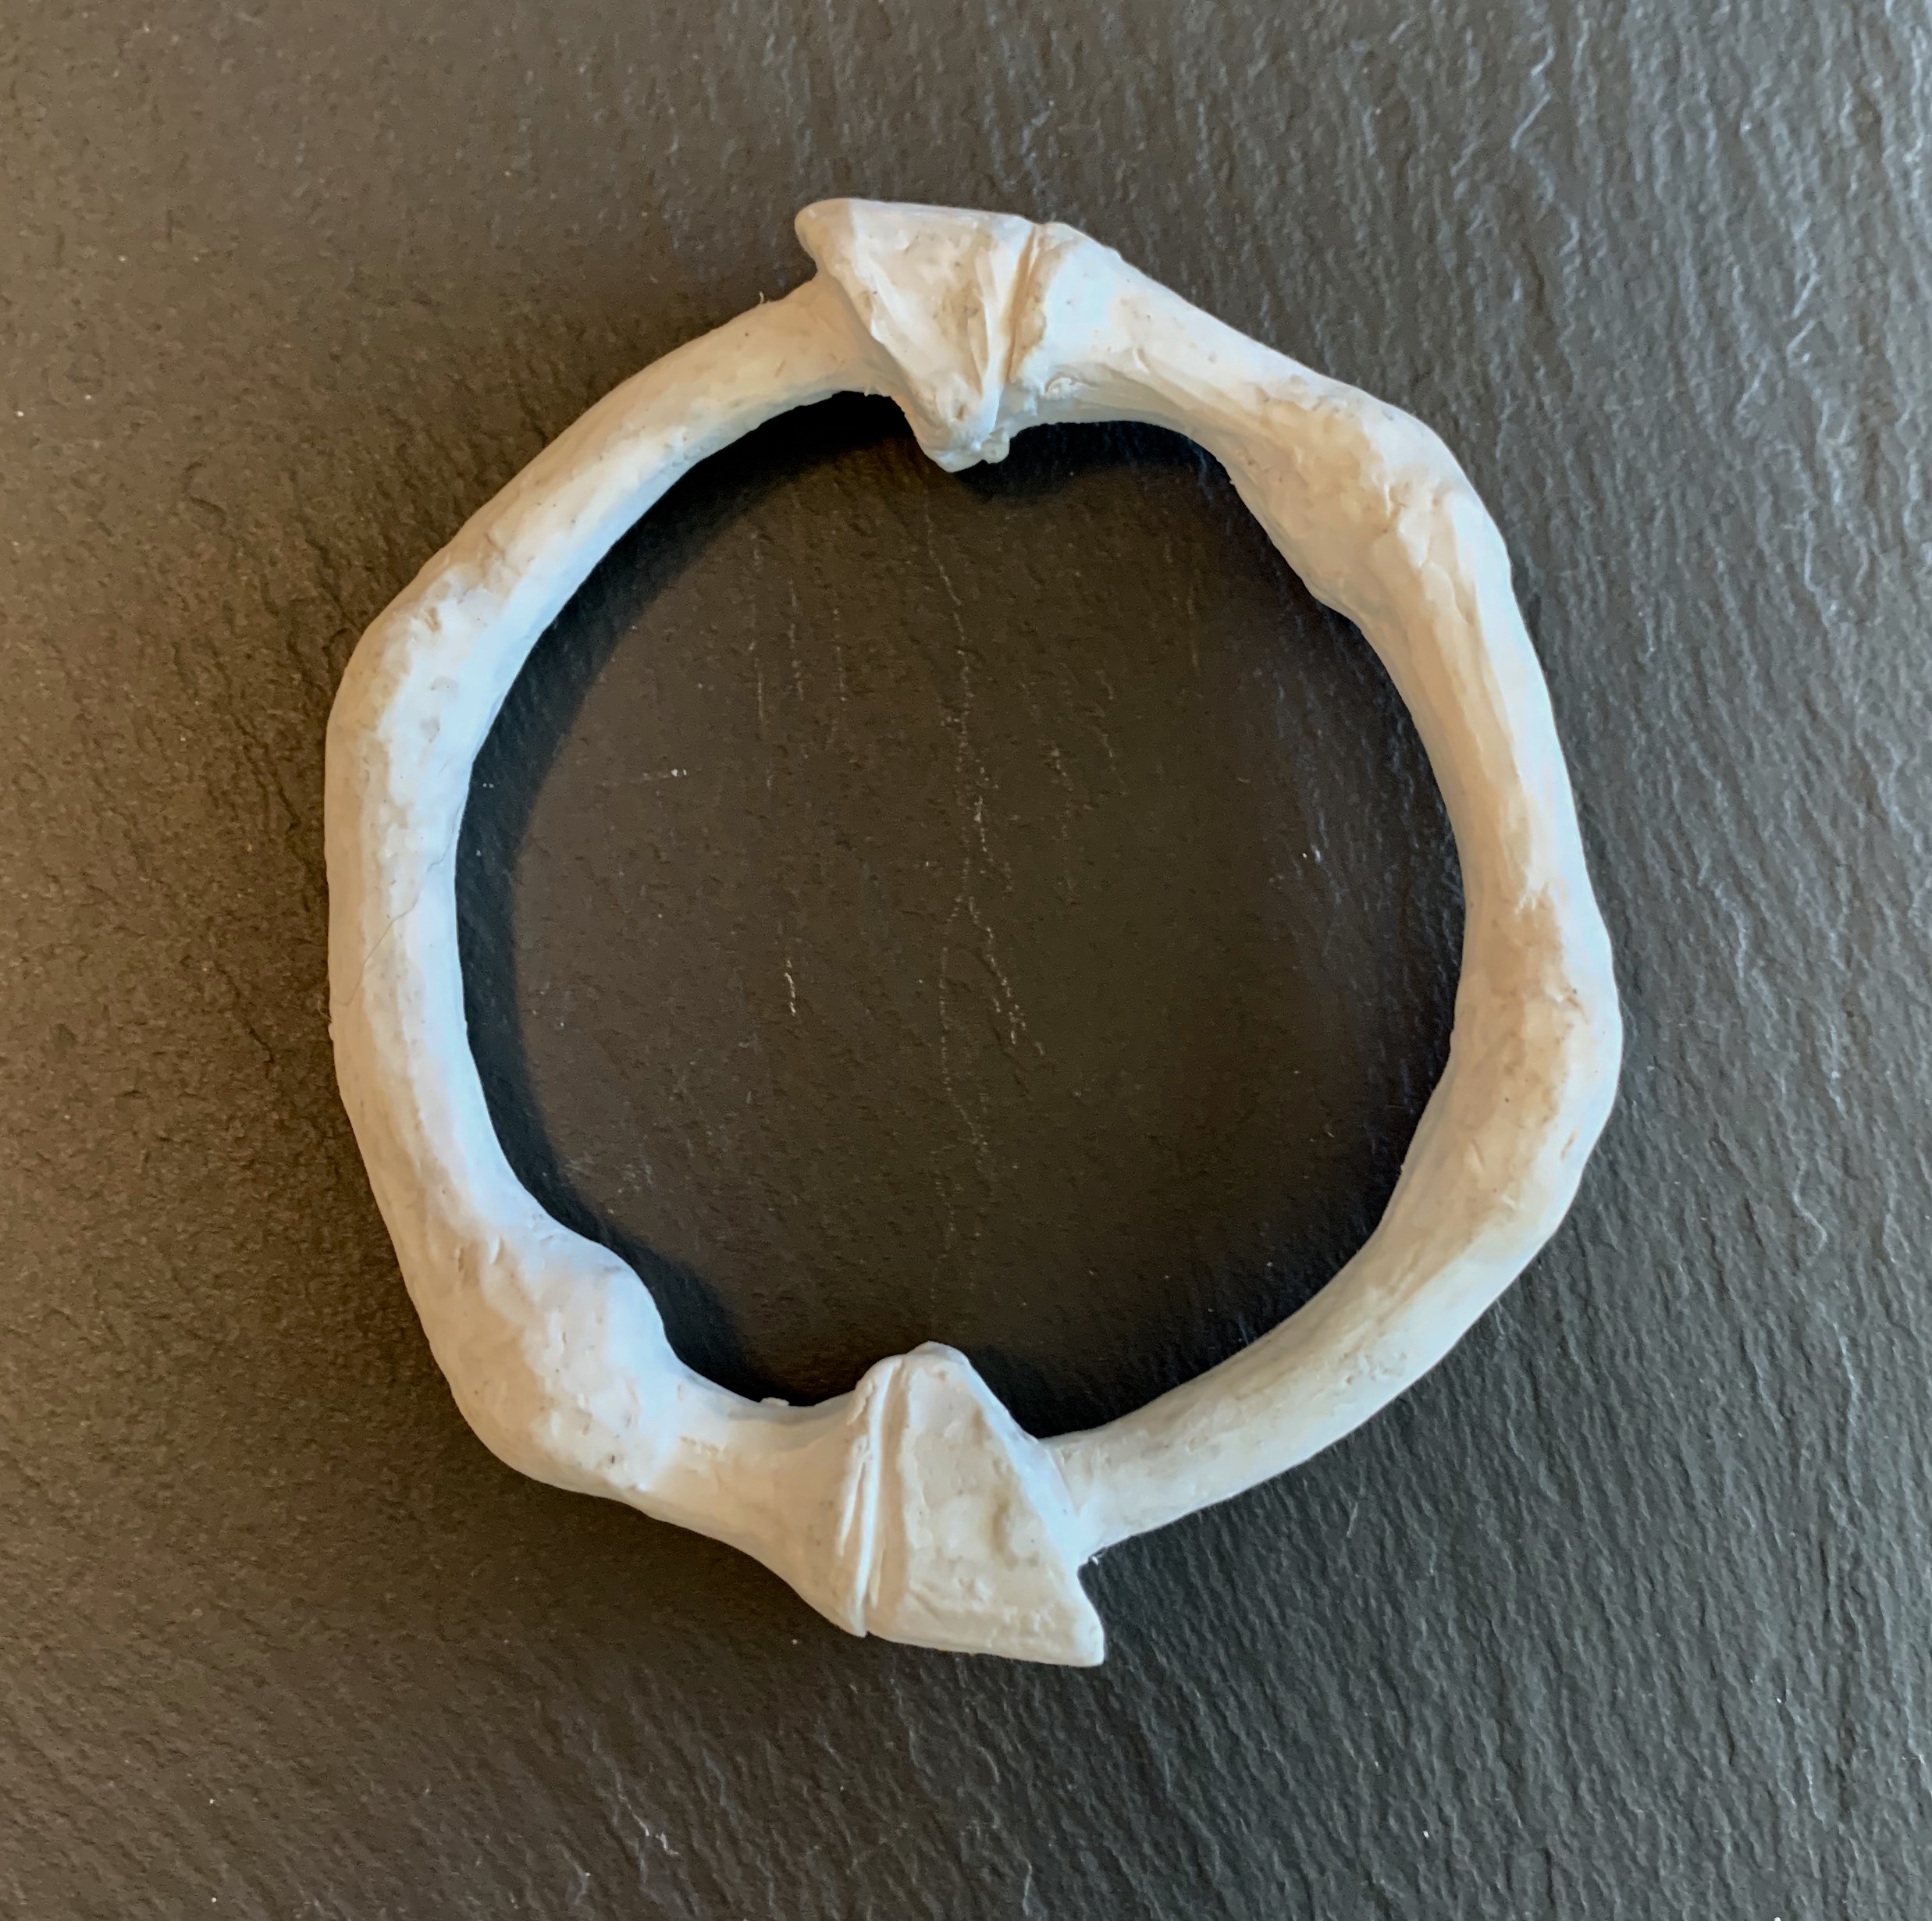
This is where I am in the refinement of my model which originated as a wax injection. My question at this stage is whether I am close enough to go to RTV and cast or need more refinement to remove blemishes. This piece will be cast in sterling silver and become a bangle bracelet. Wax models from the molds will be refined to become a new model for a belt buckle. All advice, criticism etc is welcome! TIA Sally
1 Like
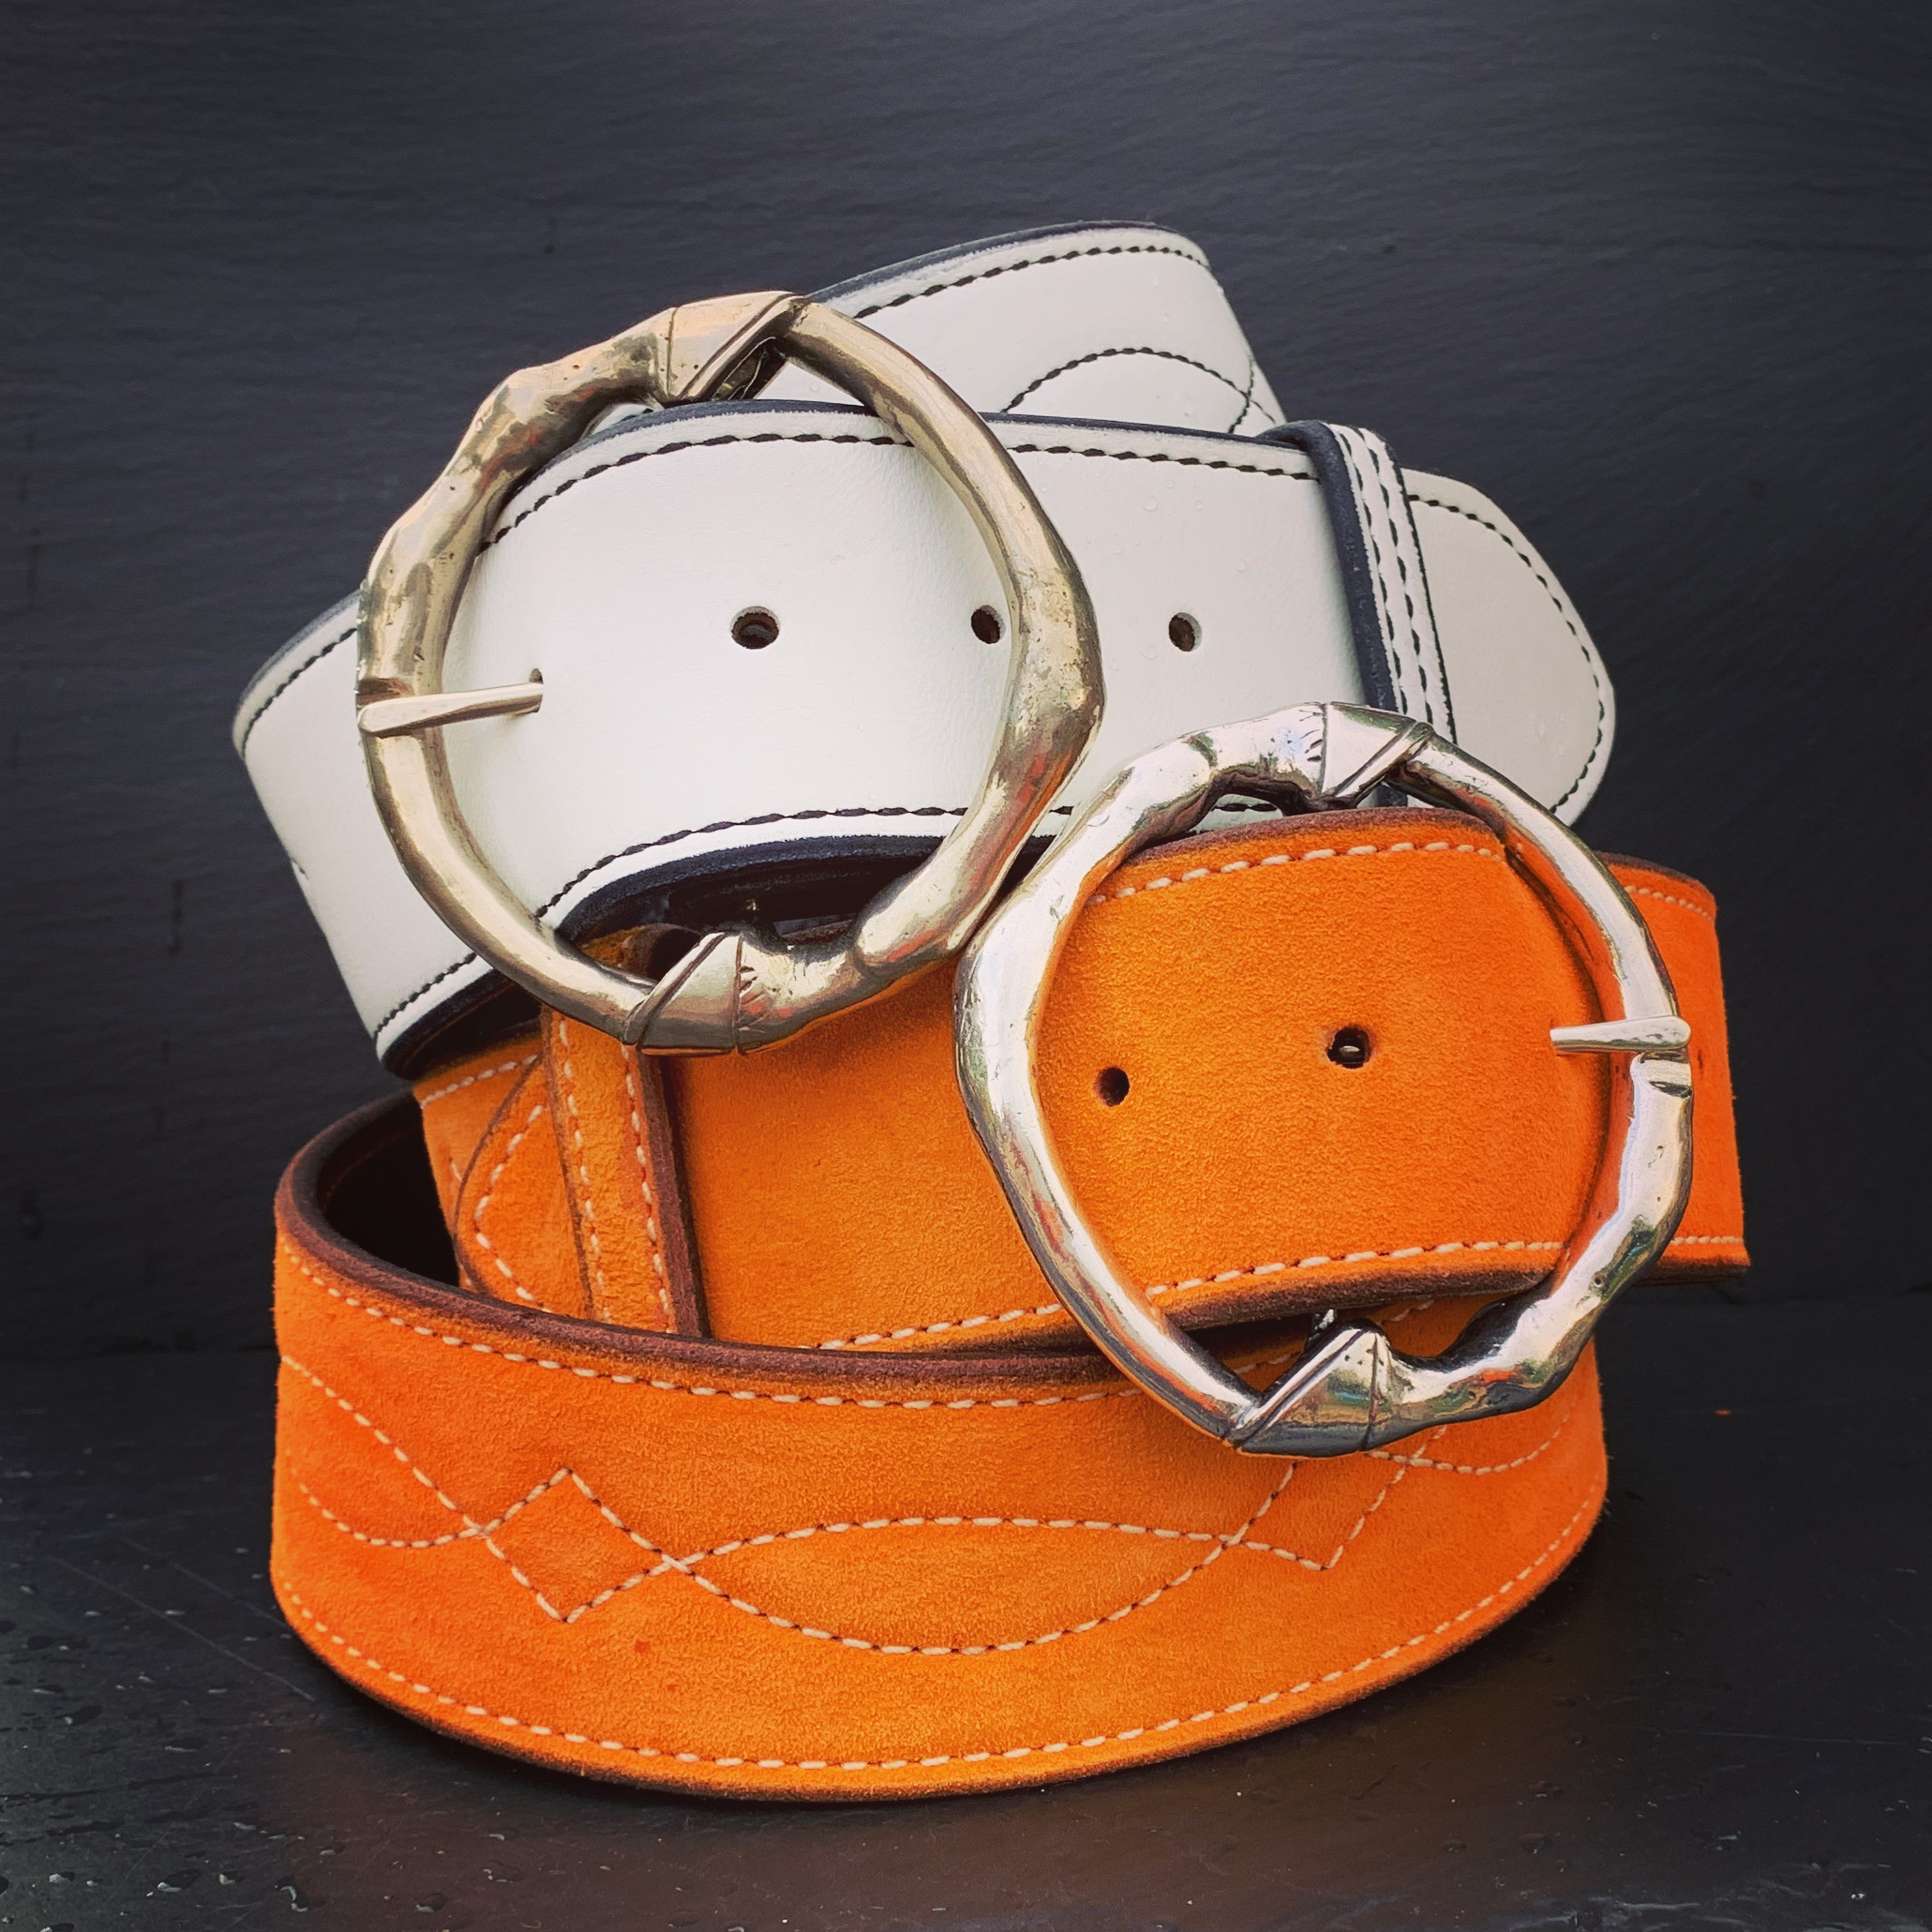
Many revisions later. Here is the finished product in white bronze and sterling silver. Thanks so much for all the great advice!!!
5 Likes
I am impressed.
Aaron
Thanks Aaron,
The learning curve on this one was pretty steep, with numerous failed attempts before I completed a model that I was satisfied with. Lots of great advice from this group was a tremendous help!
Sally
Happy to help. Don’t hesitate if you have additional questions.
June 6
Many revisions later. Here is the finished product in white bronze and sterling silver. Thanks so much for all the great advice!!!
Visit Topic or reply to this email to respond.
Brought to you by:


You are receiving this because you enabled mailing list mode.
To unsubscribe from these emails, click here.