Hello. I made this pendant from sterling silver and solder a little 14k ball on top. After I oxidized, I saw the gold flowed into the space surrounding it. What do you use to remove the excess gold? Thanks.
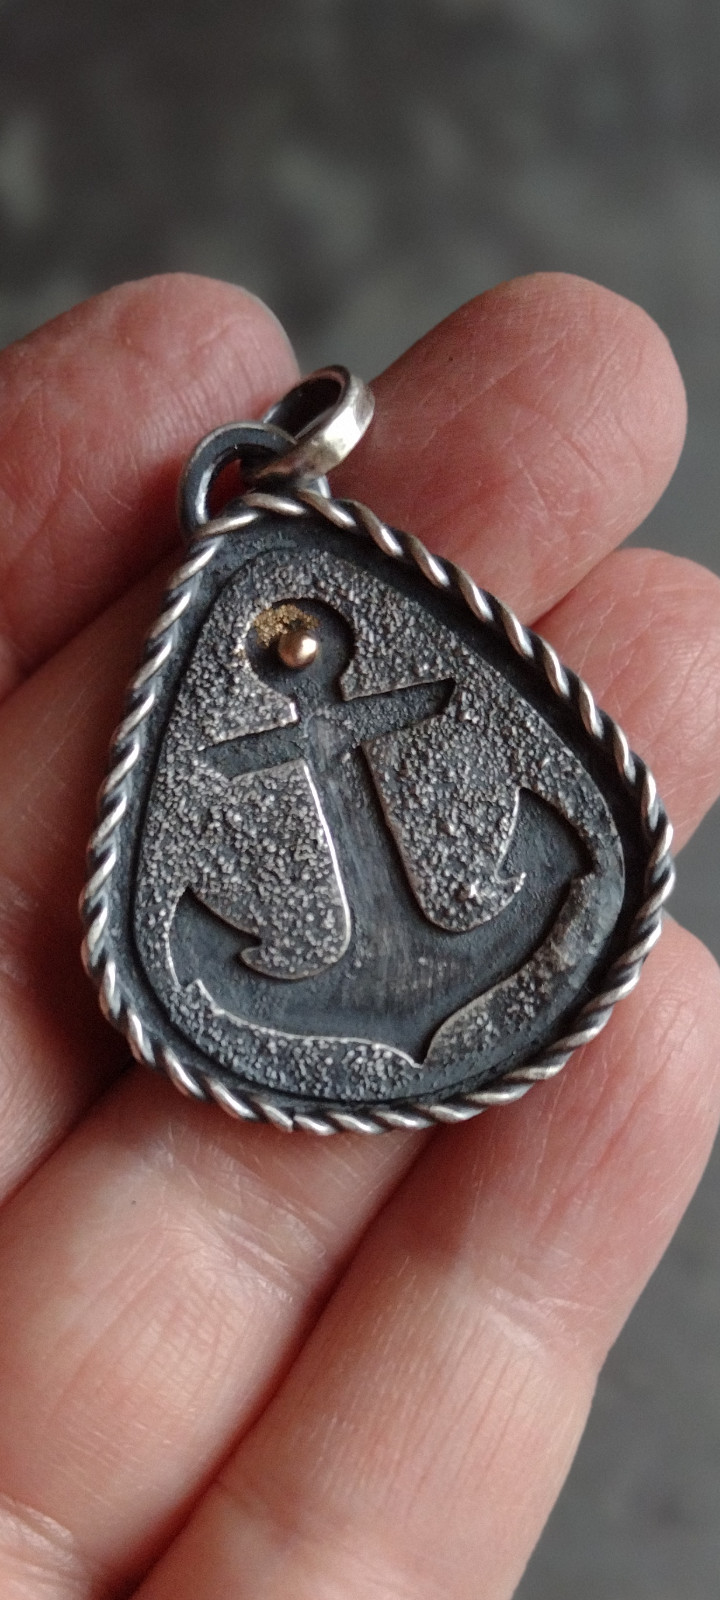
Very simply, I’d take a tiny ball bur(005 to 009) and grind the 14k solder out, then blend the texture to match as closely as possible. If I had to, I’d text the whole recessed area with the tiny ball bur. Since it’s going to be oxidized anyway.
Tjones
1 Like
Carefully abrade it away with small flexshaft mounted abrasives, toothpicks with grit on the end, make a small pick tool out of steel wire and see if you can scrap it away. Go slowly so that you don’t damage the surrounding area and try to match the texture around it. This is a hard one, but you may find the perfect solution. Please share it when you do. Good luck…Rob
1 Like
hi,
i would try this…
320 or 400 grit emery paper
cut a rectangle…1”x1/2”
fold it over, the long way…by thirds
then fold that in half to create some stiffness
use this to rub over the unwanted gold until it is removed…
you might also try not folding it in half, and rather, creating a curve to rub around the curved area…
this is a slower process but might allow you more control in maintaining a flat surface…
you may have to adjust your folds to get the correct size to fit in the space…
in this case you are utilizing the “edge” of the folded emery as a teeny sanding stick.
the folding creates stiffness for easier handling, and more folds increases the “width” of the edge
i hope i am making sense…
julie
1 Like
Hi Denise,
Here are my suggestions for fixing it now and how to do something similar in the future without facing the same problem;
If the piece were mine I would take the gold ball off carefully with tweezers. Then clean up the background removing all the gold solder. Then solder it on again with a very small amount of silver solder. Believe me it will be quicker and you will have a better more professional result. There is not enough space to emery or grind away the gold and you may damage the ball or edge of your design in the process… It will look much better that way. Oxidize the piece and you won’t even know it happened!
My rule when I am soldering one metal to another is to use the solder that matches the background when you are working with two colors of metal and attaching something small. Pre-melt a tiny piece of low melting temperature solder on the ball and then file a small spot so it remains in place when you gently reheat and attach the ball. Easy or extra easy would work…Be sure not to use solder that has a melting temp. close to the melting point of the ball… It is a lot faster to clean up the background with a ball burr or something similar rather than trying to use emery paper. Grind carefully so there is absolutely no gold color remaining on the background… Trying to do it the other way will not look as good and it will cause frustration… Good luck! Marilynn
1 Like
Great solution!..Rob
Thank you. I used medium silver solder for the gold ball. I think I am having trouble seeing if the ball has been soldered and I overheated the piece, causing the gold to melt.
One of the bracelets our Dad made a ton of and sold for years was a sterling twist with one or two gold ropes laid in along the twists. This was made for my wife and it is the first bracelet I ever made myself but made along with Dad’s watchful eye. I was a bit anxious with soldering the sterling in the body of the bracelet but I got through it. Then Dad handed me a 14k yellow rope and said, “Solder this bit in too. That’ll be $10.00 for the gold.” I was anxious before I was terrified now. My assumption was I was soldering gold so I would need gold solder but Dad explained, " You could use gold but it would look better to use silver solder." He explained the gold would flow over the sterling and become a smear of color on the bigger surface and it would be hard to polish out, even on an easy to reach area.
I could file or sand it off but it would change the shape of that part of the bracelet. The sterling solder, he explained, might run up the gold rope a little but it would be so small a stain it would be hard to see. And then it would be less visible once polished and some of the gold solder removed. Then he added that the little silver solder that was visible would tarnish in time and become almost invisible.
What I learned was not to be afraid to try something new but also not to be afraid to ask questions and get advice.
Polished and bent into shape it was the first bracelet to carry a hallmark that indicated I made it and that it came from Dad’s.
Don
1 Like
Denise,
I’d be a little hesitant to try and pull and re-solder the ball. It’s been my experience that gold will fuse with the silver, and I think this is what you’re seeing with the small bit of gold in your picture. If you go in and try and pull the ball off with tweezers, and the ball is fused, the tweezers will act like a heat sink, and could compound the problem of trying to remove the ball. If you think the ball is not fused, and just soldered and still want to try to re-soldering it, I’d suggest a small soldering pick to break the ball free.
In the picture it’s hard to tell, but the background looks very granular, and this is why I suggested going in with a very small ball burr and grinding the gold metal away. From the picture it looks like there is plenty of room using the suggested sizes, and you don’t endanger the top of the piece. The background is not uniform and the ball burr could be used to texture the whole recessed area. giving a more uniform look, and then oxidized.
In soldering in general it’s important to remember that solder will flow to where it’s the hottest. This is true with metal in general, and was probably what happened when you overheated the piece.
It’s been my experience that pre-melting solder on a very small piece can be a problem, when you melt solder, it raises the flow temperature, so it takes more heat to flow the solder a second or third time, and when it becomes harder to flow, it can contaminate the metal, making the soldering process impossible.
The way I approach something like this, is to use a very small clip of solder held in place with a small amount of flux. I pre-heat the area I’m going to solder, bringing it to a uniform temperature, then place the small clip of flux cover solder (Gesswein Hard Soldering Flux) using tweezers to the area I’m soldering. The flux evaporates to a dry texture holding the solder in place. I re-heat the area to uniform temperature, then direct the torch to the area I want the solder to flow. In this case from underside of the pendant under the ball. Since the whole area was pre-heated, the small gold ball isn’t receiving to much heat and the solder flows to where it should. Since the solder hasn’t been pre-melted it will flow easier at the correct temperature, which you can better control with your torch and see when it does flow.
Tjones
2 Likes
Thanks. I’m sure the gold ball is soldered and I do have a tripod, but I’m using a micro torch and it never seems to work when heating from underneath unless I use two torches. I almost always get some melted gold on my piece when I add the gold balls. 
Hi Denise,
If you overheat gold next to silver it can start to alloy with the metal underneath and can even sink into the surface if it gets too hot…… That is why I suggested easy solder. When you can’t see if it has adhered pickle your piece and try to pull it off…. If you want to locate a ball in a particular place use a center punch to make a small indentation and then it won’t roll and attach where you do not want it…. Marilynn

2 Likes
Denise,
I’ve never used a micro torch, but hopefully you can get a broader, wider flame, transitioning down to narrower hotter flame.
I do almost all my soldering with a locking tweezer, suspended out over my bench pan. I would imagine that the tripod has metal mesh wire that your pendant would lie on. This acts as a heat sink and will not allow enough heat to get to your piece. By holding the pendant in locking tweezers, you have total excess to apply the heat where, and when you need it.
I use the bench pin to brace my other hand. Here is a photo taken along time ago, the flame was for the camera, but you can see how I used the locking tweezers.
[https://photos.app.goo.gl/Z3fvSsBB44stNtc36]
1 Like