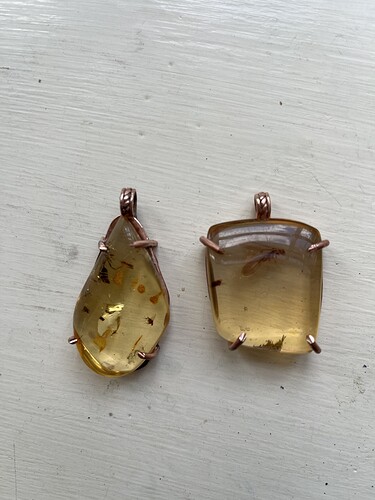
So i have some amber pendants here. And for me a beginner im happy so far. But what does everyone suggest for getting the prongs snug up against this amber which seems to be very soft. Maybe its not even real amber not sure
My plan so far is to cut a small notch on the outside of the prong so that the last 2 m of the prong will push down with out me using a hammer of even the burnishing tools bc this amber i dont think will survive either
The one on the right in the picture looks like you could slide the stone straight up without much trouble. You need to make sure that there isn’t any sharpness to the ends of the prongs so that they don’t catch clothing or even skin. By thinning down the ends of the prongs, you make it easier to move them closer to the stone. It might also help if the metal was annealed if it isn’t already. Experiment with different plier shapes to see what you might be able to use to squeeze the prongs down. There are pliers made specifically for this purpose. You can also make a prong pusher out of soft metal like a brass rod 3" - 4" long polished on both ends. You can also polish a groove in one end that you can use to push the prongs into place without slipping off them. Finally, secure the piece first in themoplastic and then into a vise. You can then carefully use a small hammer and the brass rod to push the prongs into place. Good luck and let us know how it goes…Rob
3 Likes
Look into prong design for square stones. You need at least one prong on each side of the stone. Better to have two.
I was setting a bezel on a soft crumbly stone recently and I couldn’t get it to set because the metal would chip off parts of the stone. Softer materials are tricky!
Amber is one of the softest materials out there. All in all, keep going!
2 Likes
Im using the bale as almost a fifth prong or a stop anyhows. It ‘ seem’ stable??!? Bc putting the prong under the bale i didnt consider dangit
I took the advice above and made the prongs really thin and then burnished the backwards going toward the prong and away from the amber. It seems to have worked.
No more amber!!! And thank you for this nice advice i really learn from it
2 Likes
Rob thank you i really learn from the advice. I did what you said and made the tips of the prongs very thin then i burnished backwards going toward the prong and away from the amber. I chipped the amber just looking at it just a bit. But my sweater isnt snagging in the prongs
Amber is a jerk!!! No more amber
1 Like
Just keep making stuff! It’s wonderful.
2 Likes
Test for amber by heating a needle and applying to an area that won’t bee seen. Amber will give off a fragrance, plastic will smell of burnt plastic
3 Likes
