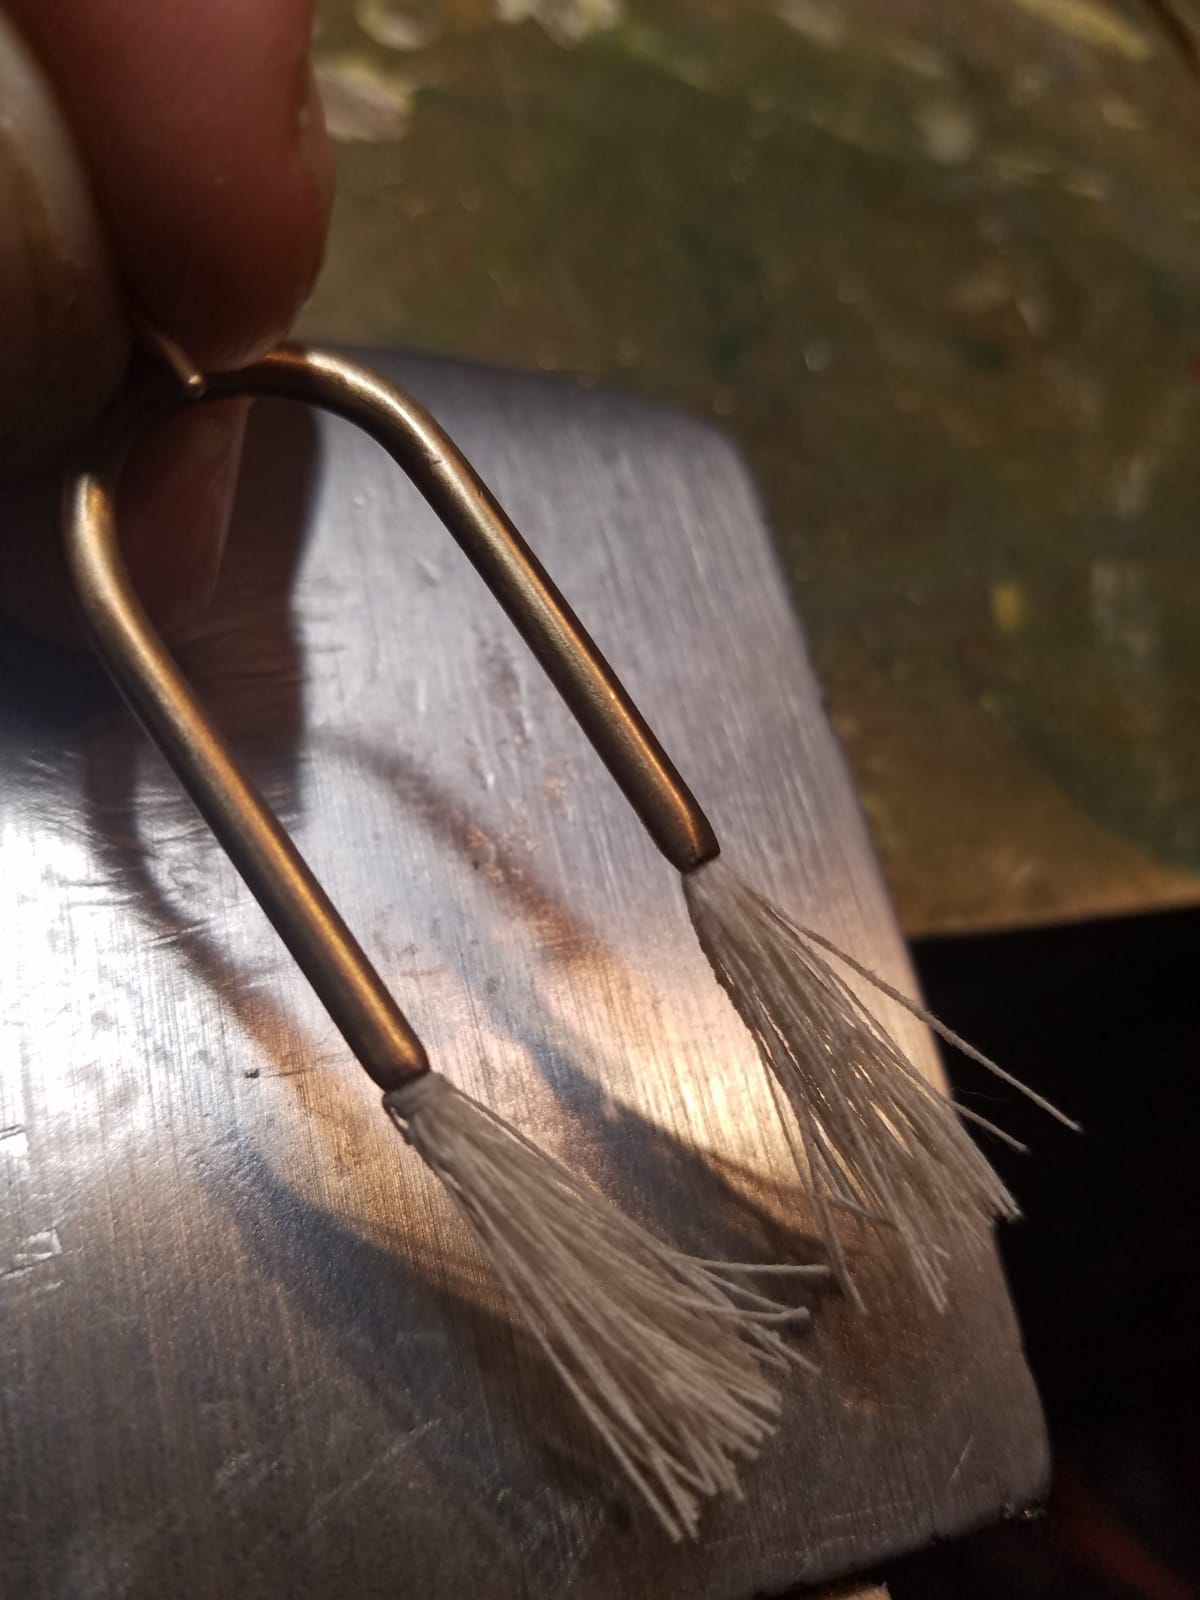
Currently working on a new design and trying to figure out the best/easiest way to make this design consistently and accurately. I’m taking some 2.5mm brass wire and hollowing out the ends of it about 7 to 8mm deep so that I can add some fibers into the ends. I’m the treating it like a bezel and rolling the edge over the fibers to trap them in place.
I did this one by starting with a .8mm hole drilled to depth, then came and hollowed it out with a ball burr, but I think I might have overheated the burr and made it lose its temper (much like myself ) as it now won’t cut without excessive pressure.
Any ideas on an easier/better way to achieve what I’m doing or it just a matter of going much much slower with a ball burr? Thanks for any advice!
Solder or crimp on a thin piece of tubing over each end. The fibers can go into the open end of the tubing and then crimp the tubing. You might also consider adding a touch of glue inside the opening just in case the crimp doesn’t hold all of the fiber. Otherwise make a jig and use a drill press. Brass can be mushy to drill. Isn’t that a technical term! Good luck…Rob
There are several ways to prevent a tube from crimping when bending. The simplest in this case might be to draw out some copper wire so it just slips into the tubing. Cut it to the appropriate length, and then just use a bit of lead solder to fix it in place in the middle of the tube before bending. This will prevent kinking and also make the bend solid.
Since you’re working with organic material I suggest epoxy for fixing the fibers in the ends.
Been missing around with using a drill press to drill it out and I see what you mean about the brass being “mushy”. I’m having a hard time getting the drill bit to bite into time metal, it’s more so just spinning and heating up. Any ideas?
If the drill bit is ‘walking’ around the surface and not biting, then you need to give it a divot to help it get started. You can use an automatic centering punch, an awl/scribe/sharp point, a tiny heart bur to make an x, or a spotting drill bit. From there the twist drill bit should stay in place as you begin adding pressure to start drilling.
I tried doing this to see what ideas came up. I finally settled on clamping the tips in my 3" vise. This worked for me. My vise jaws are lined with leather to prevent slipping and scratching. What did you end up with as your solution?
Thanks for following up on this, happy to hear someone else gave it a go!
So I don’t have access to brass tubing where I’m located, just brass wire I can draw out, to that ruled out the tubing idea, although it would be easier.
I ened up putting the U shape bent wire into a ring clamp to hold it steady. Then i marked out the exact center of the wire on both sides. Came in with a small ball burr to creat a divot to prevent the drill bit from walking. Then I used a 1.5mm HSS drill bit to slowly drill into it to a depth of 6mm. I follow that up with a 2mm HSS bit to widen it out a bit more to make room for the sisal.
It definitely takes some extreme focus to drill straight and level as there is little margin for error, especially once you come in with the 2mm bit, but if you get it centered it works! I then just use a bezel pusher to close in the sisal, it stays in there nice and strong.
I even tried throwing the piece into a vibratory tumbler for 5 hours followed by a rotary with steel shot for 30 min and the sisal came out intact and squeaky clean!
Glad to hear you are hard at it and nice work. The drilling out of brass sounds like a pain in the ass for production work. If you can’t source brass tubing how about silver. It might give a nice accent. If tolerances work you could heat tubing to fit over brass then cool to make that connection. As for fixing fibers I would suggest some thin copper wire twisted at a knot then epoxy before crimping. PM me with specs and I will see what can be gotten state side.
Regards
Franz
PS I continue to be impressed with you, and your teams work!
For sure it’s a total pain in the ass drilling it out but our team here are getting the hang of it and only once in a while do we have a drill blowout the side of the wire. Slow but sure getting it dialed in! Only problem i’m running into now is how to prolong the life of the 1.5mm drill bits. Using bur life while drilling and going nice and slow to keep it cool. Gonna have to learn the art of sharpening tiny drill bits with some silicone carbide cutters!
Unfortunately the only tubing i can find in Malawi is galvanized 1/2" water pipe of PVC haha, but we are making our wire from scrap brass which is fairly abundant, so it’ll do for now.
I like the idea of using thing copper wire for tying the fibers, that would help lock them into the hole much better than using the fiber as a knot, good idea, i’ll give it a whirl provided i can find some electrical wire thin enough.
of course, duh! I have a draw plate here, just didn’t put two and two together, thank you!
Side question on drawing wire though. We work with some guys locally that take scrap brass, hammer it out into long pieces and then we use it as wire. We’ve started trying to draw this through a draw plate but it is tough! I mean i know it isn’t easy to draw wire, but this is ridiculously hard to pull through. I have guys that exercise daily trying to pull it through with all their might and are having a tough time. Am i missing something here? We do anneal it regularly and have a pair of draw tongs but wow…
Look for a small winch. A boat hoist works well. Attach it to the end of a six foot board and supports for the draw plate on the other end. Figure out how to attach the winch belt to the draw tongs. This will depend on how the tongs are constructed. You can also make tongs out of lock jaw pliers and other heavy pliers. The key is that the tension from the winch pulls the pliers shut. Taper the draw wire end, lubricate the draw plate, attach the pliers and pull. You can only pull a bit less than the distance between the end of the pliers and the draw plate when the pliers are fully drawn to the winch. I have a way to extend this length without using a longer board, but it is best explained in pictures. Good luck…Rob
You may be trying to start it in too small a hole. You must draw wire down in gentle stages. Also, depending on the particular alloy of brass the annealing process you’re using may not be softening it enough.
And be sure to lubricate the wire while drawing, either with oil or beeswax.
Following is a link to a useful ganoksin conversation about draw benches. Take your time. You draw in very small increments annealing often and using a lubricant on the wire or draw plate holes.
cool, thanks for all the info guys, much appreciated!
We are using beeswax and going little by little, annealing along the way. @Elliot_Nesterman what might we be doing wrong when it comes to annealing? What are the different processes for the different alloys?
We do have a rolling mill, so i even tried rolling out some square wire to a diameter slightly larger then the round wire I wanted to end up with. After that I annealed the square wire and filed down the end to fit through the draw plate. It did speed up the process certainly as well as make it easier to pull through the plate as I was really only shaving off the corners of the wire little by little, but a weird thing happened after i got to my chosen diameter.
I went to use the wire for a curved design (see picture) and the wire started flaking apart is the best way to describe it. It almost seemed like at some point while drawing, the corners of the square wire kind of folded over and got smashed into the wire and then when we bent it for the design it came apart.
I hope that makes sense, i don’t have the actual piece near me at the moment to take a picture, but has this happened to anyone or know what might cause such a problem?
Regarding annealing, beats me. I never work in brass. I was really just speaking from an assumed analogy to different steel alloys, which require different heat treatments.
As to your brass flaking, this is a common problem if you aren’t careful when rolling. A sort of fin can develop in the open space between the rollers which can then be partially bent over on subsequent passes through the mill. Make sure to roll in small increments, always rolling twice at the same setting while turning the rod 90°. This will keep the rod square and not allow such a fin to develop.
As Elliot suggests, there are lots of different brass alloys, each with a unique set of characteristics. I only use what Rio calls jewelers brass. I think that it is an 85/15 alloy. It rolls and draws well. I have a lot of scrap that I would like to recycle. It needs more heat than silver and gold do and my torch isn’t up to the job.
used the suggestion to turn the wire 90 degrees and pass through each size twice on the rolling mill. Helped immensely! Thanks for the tip @Elliot_Nesterman!
Now to start doing pushups everyday for pulling this mystery brass through the draw plate until I can figure out a motor of sorts. Cheers everyone!
 ) as it now won’t cut without excessive pressure.