I have been a goldsmith for over 40 years. Some of the tools that I use today I have owned for 40 years. That old original third hand, spring tweezer on a base has served me well but it is - just not enough.
A number of years ago I started to use something different and recently I upgraded what I was using to make it even more useful. This is a picture of what I made and I want to share it with you so that you can make one too!
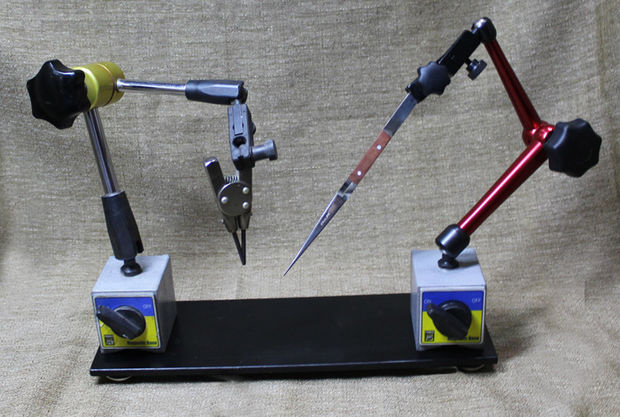
I am using articulating arms that are used in machine shops to hold measuring devices.
The larger knob on these arms when loosened causes the arm to become flexible and they can be adjusted to any position. Then when the knob is tightened the arms are held in place.
The arm on the left I have used for a long time and the red one on the right is a new addition.
I have these arms on a steel steel base. A magnet is in the bottom part of the arms and holds the whole articulating arm device on the steel base. By turning a lever you can release the manet and position it anywhere on the steel base.
Using different tweezers and clamps at the ends of the arms gives you an ability to hold your work in place. Each arm can hold a different work piece and then with the pieces held in place you can solder.
I created an “Instructable” to show how to make one of these “Ultimate Third Hands”.
An instructable is a set of instructions and accompanying photos uploaded to the “Instructable” website.
I have several photos and instructions on how to make one and suggestions for the use of this idea on the site.
You can see my instructions on how to make and use this here…
I encourage you to take a look at the instructions and see ideas for its use and see how this can help you do your work easier and faster!
If you find my idea useful and it makes your life at the bench better, then I am very pleased.
Best regards to all,
Franklin
Note From Ganoksin Staff:
Looking for a third hand tool for your jewelry projects? We recommend:
I mentioned a third hand here some weeks ago to a poster called Sharon.
I like what you have done and if it meets your needs then thats what its all about.
My work is wrought so need a “third” hand on a some what larger scale.
Ive just come in from the w/shop but before that put a tape on the 2 attached to my little bench, some 10ft long by 5 ft wide.
the jaws are 5.5 in and the smaller is 4.25.
both are used just about all the time in holding tools and things, the larger jaws have distorted by 1/8in over the 50 yrs ive used it. had it from new, tho its dated around 1900. Its a proper wrought iron smiths leg vice with crucible steel jaws fire welded to them.
I couldnt do my wrought work without one.
Thats without all the other tools and tooling i need to do what i want to do.
Its a great life if you not afraid to hit it.
Ted.
blockquote, div.yahoo_quoted { margin-left: 0 !important; border-left:1px #715FFA solid !important; padding-left:1ex !important; background-color:white !important; } I love this. Thank you for sharing this elegant idea.Karen
Important Update!!
Here is a video showing the use of these articulated arms that I used.
I received a message from the man who made this video and with his kind permission, I am sharing it here with everyone.
It shows how the arms can be moved to where you want them and then how to lock them in that position.
It also gives a good view of how the fine adjustment knob works.
(When you see his video, show him some support by liking it or subscribing to his channel.)
Regards,
Franklin
Thank you for posting your idea on the third hand. Is there any particular brand you like to use for the articulated arm? I have searched and found them in a huge price range .Thank you
I have owned the arm that is on the left in the picture for many years. The red one on the right I bought about two years ago and was too busy to do what I wanted with it. Only just recently did I find the time to make my idea then I posted it here as an instructable.
When writing my instructable, I did a quick search online and also discovered that there was a wide variety of prices. The most obvious thing that I could see that made a price different was that the small knob that does the fine movement of the end of the arm was not on the cheaper models.
Please see the video that I added to this instructable to see how this fine adjustment works.
Given a choice, I would choose the ones with this fine adjustment.
I was also unsure if the cheaper ones where shorter in length and I will tell you that I would not want a shorter length.
It is worth noting that these arms are used by machinists to measure very small amounts. I expect that very high quality arms are needed for very fine machinist work. However, I could not see the need to that kind of quality and chose lesser expensive ones.
I also noticed that some of the more costly ones had a further fine adjustment capability. They had an adjustment just above the magnetic lock. It would appear that this adjustment would make the entire arm tilt back and forth. I can see an advantage to having this adjustment. However it was only available on the more costly ones and I am not sure that it would be valuable enough to justify the extra cost. Having said that, I have not used one with this additional adjustment, and if I did get a chance to use one of these, I may like it. Perhaps one day I will get one of these and add my thoughts about it as an edit to my instructable to let you know about my experience.
Price is a difficult way to measure quality, but I can tell you that at the time of this post,( May 2017) the ones that I use cost about $40.00 US dollars.
I hope that I have been helpful. If you have a further question, please ask.
It will be my pleasure to answer it.
Regards,
Franklin
Speaking as a machinist who does use these things for precision measuring, get the cheap ones. Or get the cheap ones that have the final-stage fine adjust. I’ve got half a dozen of them in various configurations and price ranges, and while the ‘serious’ ones are stiffer and more rigid, that only really matters if you’re using measuring tools that can read to a thousandth of an inch or better. For holding a widget? No difference. Get the cheap ones.
They do come in a variety of sizes, and having a mix is never a bad thing, for what that’s worth. There’s also another style that’s sometimes called a ‘snake’ style indicator holder. It’s a series of tube sections that can be either clamped or locked by a knob at the bottom. With the clamp open, the whole thing goes limp, and can be moved anywhere. Throw the lever, and the snake locks in place. Not as rigid as the elbow type, but for this application, I can’t see that it’d matter, and the added flexibility would be very handy. (search “flexible magnetic base indicator holder” to find them.)
Franklin: kudos for coming up with this, very cool idea.
Regards,
Brian