Pave setting information?

Hello gang, I just got back from the New Approach Stone Setting Comprehensive. Ask any questions you might have.

I’m curious about furthering my learning about pave setting. I’ve purchased a book called, “Bead Setting Diamonds With Pave Applications”

I’d like to see if anyone else has any other good resources for information on this style of setting.

Thanks so much!

1 Like

Hi Brennan!

I am jealous! was it awesome? Do tell!

Julie

1 Like

It was really really good. We learned a ton and really set up a wonderful foundation to grow from. A lot of the time was spent understanding the reasons for doing things and creating a model that can be applied to more advanced setting challenges in the future.

Sadly I now definitely will be yearning for a micromotor. They all use NSK units and I’m feeling the cumbersome nature of my flex shaft.

2 Likes

Hi,

do you have a power hone and fixture for graver sharpening? (or better yet, have you made one yet, haha!)

did you use one in class?

i would get a power hone before a micromotor, since you have a flexshaft…

a properly sharpened graver can make or break you…

did you use a gravermax/mach or lindsay pneumatic air machine? there are a few more…i forget the names…

i would get that or similar before a micromotor too…

(all of above is just in my humble opinion)

(for pave stone holes, i often use round burs in pin vises for the final few twists to open up the holes…i have em all by size, in a rack…)

julie

2 Likes

I do. I use the Lindsey system and converted a worksharp 3000 to a power hone with some simple 3D printing.

Haha!
i knew it! you are the best! so handy!

julie

2 Likes

Thank I appreciate it :blush:

Super jealous! I was hoping to do a stint there myself between grad school and the working world but COVID got in the way. Then I started working and it got away from me. Maybe one day I’ll take vacation and do it…

What’s your biggest takeaway after the formal class? Anything in particular that you picked up that you feel would be really hard to get reading and watching videos? My forays into it have been all self taught and definitely clumsy - I find I can do it, but it looks amateur to me when it’s all done. There’s definitely a practice aspect there, but I’m really curious how much you get from formal instruction vs. regular practice.

1 Like

Well, I don’t have a lot of stone setting experience so it’s hard for me to judge the course from an experienced place, but I can say that it felt very comprehensive in that. I think I understand the principles of stone setting well.

Based on that photo you posted I think you would be a little bit bored in the class. I was a little bit bored and I don’t have much experience. If I were you, I would try to get into the advanced stone setting in class based on your skill.

1 Like

Sorry Brennan! I just remembered this. Gerry Lewy has a pile of video tutorials in Ganoksin that members can access.

Here’s one on bead setting. It could be helpful for you.

Jeff

1 Like

Thanks! I’ll make sure to ingest them all!

1 Like

Sorry to come to this post so late.

Aside from accredited coursework required to pursue my EE degree, I’ve never taken any formal training class upon any topic. Instead, I’ve been a life-long autodidact since childhood. Assuming one has strong enough motivation to learn, and assuming one can read and comprehend printed material without undue difficulty, I’ve discovered that one can teach oneself pretty much any subject matter topic one cares to learn through a combination of reading books, watching videos, and repeatedly practicing to acquire skills and knowledge through trial and error.

I’ve been through the Lewy videos and they are excellent. Major sections are tedious to the point of being painful due to the glacially slow pace. However, the advantage of video tutorials over classroom instruction is that one can learn at one’s own pace, skipping the parts already mastered and replaying parts one still needs to master.

If you have not already purchased Alan Revere’s book, you must endeavor to remedy that oversight immediately. His stone setting book was my introduction to the topic and I found it extremely helpful. It covers different styles of setting in detail with clear images that impart all the required knowledge.

I also bought several other books. They all present the same information, but each has a little something extra to add to a topic or offers a slightly different perspective that in my view makes it worth having in one’s personal reference library:

Creative Stonesetting

Stonesetting for Jewelry Makers

Stonesetting

Stonesetting for Fine Jewelry

Techniques of Master Stonesetting

There are many stone setting tutorial videos on YouTube. Far too many are an unfortunate waste of time, but some are excellent. I’m afraid I haven’t bookmarked all the better ones, sorry! You’ll just have to spend time browsing. Here’s a handful of those I found interesting. Blaine Lewis (from Rio), Diamond Mounter and Andrew Berry have popular channels. Jewelry School Italy Accademia Delle Arti Orafe is excellent. Stuller is helpful. Otto Frei is of course helpful.

I bought a variety of cz stones to use for stone setting practice. They’re cheap enough to just throw away when done practicing. I bought copper sheet and wire in various gauges to use for practice in setting stones and engraving (I also use copper sheet as a base for enamel projects). Copper has physical properties close enough to sterling silver that it makes an excellent inexpensive sterling substitute for practice work. It can be silver soldered, so one can use sheet to make stone collets, one can use copper wire to make baskets and prongs, and one can roll copper wire out flat in a rolling mill to make stone setting bezels.

For graver sharpening, your idea of adapting a WorkSharp is a clever way to save money. I considered using my stone cutting rig, but ultimately opted to buy an import power hone with a set of diamond laps. I have a set of shop-made templates produced on a CNC mill that are equivalent to the full Lindsay set. I use a set of GRS compatible quick-change graver collets that are 3-D printed to hold my gravers. I buy 3mm (1/8”) square lathe tool blanks and turn them into gravers by shaping honing them using the templates and power hone.

I’ve been wasting time inserting Fox ball burs into a Starrett pin vise to use for setting work, then removing it and putting it back in its plastic Fox storage case when done. I really like Julie’s idea of putting a complete set of ball burs in their own dedicated pin vises and storing them in a rack. I’m now looking for a cheap source of quality pin vises to use for this purpose. The rack will be an easy shop project, likely 3-D printed…

Hi Greg,

another time saver tip is to get a bunch of wooden bur boxes…i use the 100 hole square ones for my main burs…

each bur shape has a dedicated box…

each hole is marked with bur size (all sizes available, even if i do not have them all yet)…

and i put a broken bur, upside down in the hole of the bur size i am using (end painted with red nail polish)

so a box for each of drills, round, bud, setting, hart, cylinder/ tapered cylinder, etc

then i have the larger, rectangle wooden bur boxes for each of my other attachments…rubber/ silicone, 3M scratch, 3M radial, metal brushes, pre-polish buffs, final polish buffs, etc…with same size plastic boxes for the compounds…they stack nicely, and are easy to grab and go…

i also made wooden blocks with holes, to hold often used, sharp hand tools like scribes, dividers, pin vises, tweezers, ruler, center punches, etc

(made in a class that had access to a big drill press…i covet one!)

julie

2 Likes

Hi Julie!

Thanks for all the great suggestions!

I bought a bunch of rotary bur stands in different colors with clear covers for storing accessories like Cratex, Dedeco, and 3M wheels; my treasured set of Agilo Cabshine wheels for intaglio and stone carving work like my recent daisy flower cuff bracelet project with faceted citrine center and flower petals individually carved from white jade, and leaves carved from dark green nephrite jade. These also store my graver polishing wheels; bristle brushes and wheels, etc. These stands stack, and I have shelving above my bench where they can be stored out of the way when not in use.

I used power tools to convert a thrift store book case into a tall hutch that sits on the back of my bench. There’s enough space under the lowest shelf (20”) to allow my import Leica clone microscope to slide under it when not in use without hitting the long led light fixture attached under each shelf – I often work evenings and need lots of color-corrected illumination for aging eyes. Instead of drilling holes in my bench and permanently bolting the microscope to it, I bolted it to a wooden base. This enables me to slide it forward to the edge of the bench where the adjustable arm can be easily pulled out over my 5” ball vise sitting in the catch tray when I need to do stone setting or engraving, then slide it out of the way and store it under the bottom shelf of the hutch at the back of the bench when I’m done.

I segregate used buffs and wheels by grit and store them in a drawer unit in plastic zipper bags along with the compound I used on them to prevent abrasive grit cross-contamination. (Don’t ask! Yes, I’m human, yes, I made that mistake early on, but it only took one time around to learn that painful lesson).

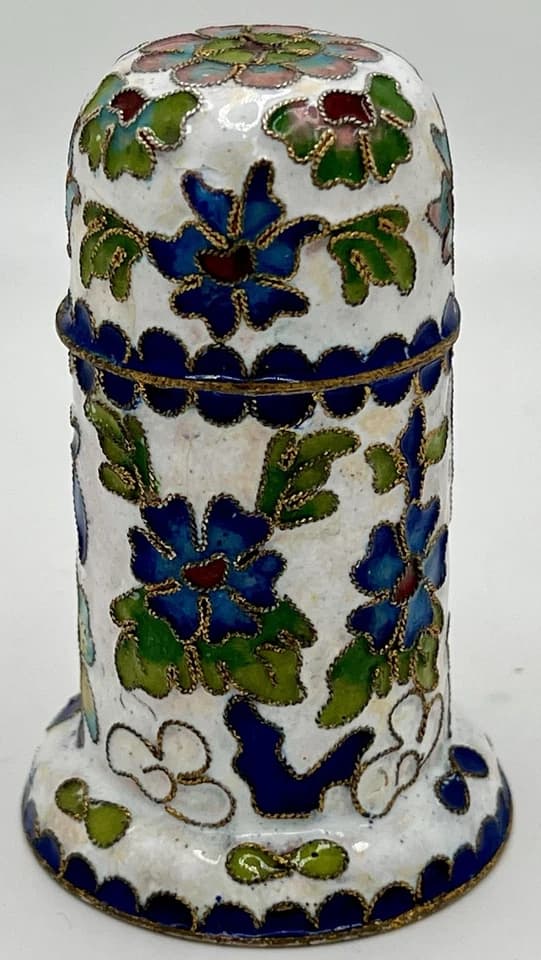
Like you, I have dedicated wooden stands for sharps like scribes, tweezers, dividers, punches, etc. I also use a set of four fancy little vintage enameled copper trinket boxes to store shop-made sanding twigs I make from toothpicks, rock tumbling abrasive powder, and CA glue. These trinket boxes were a gift from a family member that knows I enjoy doing cloisonne enamel work. As it turned out, they’re perfectly sized to hold a good supply of these toothpick sanding twigs, and each of the four holds a different grit of twigs that are easily distinguishable by the different colored trinket boxes. This white one holds the coarse grit:

As a former closet tool addict that has now come out of the closet, I have a self-admitted fetish for metal measuring sticks and layout tools. However, they must all be Starrett brand to ensure consistent, reliable precision traceable to NIST standards.

I have tiny little 2” adjustable precision toolmaker’s No. 14 squares, one with an inch rule, another metric. I have larger No 13A 4” double squares with replaceable inch and metric rules along with an ungraduated rule having angled ends, one 30 degree and the other end 45 degree. I have still larger No 13C 6” double squares with replaceable inch, metric, and angled rules.

I have hook rules in various styles and sizes in both inch and metric. I have flexible steel rules in 6”, 9”, and 12” length, equivalent metric rules, and some rules with both inch and metric graduations. I even have a couple of Starrett #62 rule holders of the type used on a precision ground granite surface plate (yes, I have one of those too, along with surface gauges and a height gauge I use for layout and metrology work).

I also have Starrett layout tools including dividers in multiple patterns (flat leg, round leg, Fay pattern, etc) and sizes from 3” up to 6”, protractors, a No 47 universal bevel and a No 49 multi-angle bevel.

I have enough other toys to go on for quite some time, but readers are likely bored with this post and I’m embarrassed enough by my admission of tool gluttony to stop for now. The post was supposed to be about storage, not tools. I keep most of these toys stored away in drawers in my workbench, but a few stay out on the bench all the time because they’re used daily, such as the tiny No 14 precision toolmaker’s square with the metric rule, and my 6” Starrett metric dial caliper.

I too coveted a big powerful floor-standing drill press for many years. I just couldn’t bring myself to pass up a deal to buy a used but like-new top brand model at a great price. But less than a year later I sold it. It was overkill and took up too much valuable floor space in a machine shop already having multiple machines capable of drilling holes. These include a Sherline tabletop mill and lathe, a HF mini-lathe, a Jet bench lathe, a Delta bench top drill press, and a large 220v 3hp Jet mill-drill with power feed having enough torque to drive a huge 1.5” diameter Silver & Deming twist drill through a 2” thick block of alloy tool steel without breaking a sweat.

Over the course of more than two decades worth of machining experience, I’ve discovered there are vanishingly few jobs requiring more power or capacity than my trusty Delta tabletop drill press has. Then it’s both cheaper and safer to just farm those jobs out to a local machine shop…

2 Likes

Setting of Gemstones by Walter Zeiss has some good information on bead setting.

Donna

1 Like

Thanks Donna!

Your post sparked a search for the book. It appears to be out of print. Amazon didn’t have a copy either new or used, neither did Barnes and Noble or Abe.

A great source for out-of-print books is the Archive site:

Unfortunately, they didn’t have it either.

However, the search turned up this older thread:

The post by Alan Revere is both informative and helpful, listing several books on the topic that were new to me…