There is a new Hans Meevis newsletter / tutorial.
I learned to pierce designs in the back of a pendant from an Alan Revere tutorial, did not think to engrave the back until I saw this from Hans Meevis:
This seems like a shorter newsletter than usual, but if you click on videos and other links there is more. Like the crishy (?) effect (wriggle engraving). Also taping the back of thin sandpaper to strengthen it, for cutting into narrow thrumming strips. (The link is there somewhere, but I can’t find it again, so happy hunting.)
I really like 3M Tri-M-Ite sandpaper:
and
https://www.amazon.com/Tri-M-Ite-Polishing-Abrasive-Assorted-Sheets/dp/B07CP9CCH4
It is on very thin non-woven fabric that shreds easily. It could use the extra support he suggests, especially when cut into long thin strips for thrumming.
There are many great tips and tutorials on his site. Enjoy!
5 Likes
Neil…I have a Christmas Rose flower design that I like to engrave on the back of a pendant if there is enough room. I also keep a pack of Tri-M-Lite papers on a clipboard and a thin piece of sheet steel and move it behind whatever piece of abrasive paper I am using to keep it flat. If the piece that I am sanding has a curve to it, I remove the steel sheet to allow the papers to give and follow the curve. These papers seem to last a long time since I have yet to replace the first set that I bought. Hans Meevis does some very nice work and I appreciate it when he shares his ideas. I hope all if well with you. The Robins have arrived in Central NY and Spring is trying to make a run. Trout season opens in a week. Too many distractions. Then there is the 75 years old knee…Rob
1 Like
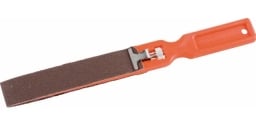
Rob, for a lot of sanding & polishing I use the different grades of Tri-M-Ite cut into 1 inch wide strips and mount them on these:
The problem being the cloth backing is so thin the tightening bar on the stick does not get much grip on the sandpaper so the strips move around and start to shred at the stick’s corners. Backing the sandpaper as Hans suggested would help a lot. For now I wrap blue tape around the rod under the metal bar to take up some slack, but the whole length of the thin fabric needs better support.
Can you tell which side of the mint green (finest grade) cuts? How? The color is the same on both sides. I try each side, don’t see a lot of difference. 3M should have something printed on the back (like a ‘3 M’ perhaps?)
The Robins have arrived in Central NY and Spring is trying to make a run.
Ours arrived almost a month ago and they promptly drowned. My yard has fish instead of birds. (But not trout, alas.) Enjoy your spring!
Regards,
Neil
1 Like
Sorry about the fish. As our climate has changed, spring can be a non-event some years and we go from late winter/early spring right into summerer. Fall has become my favorite season, especially since I retired and no longer have a new school year facing me in the fall. I have had one of those plastic abrasive sticks for years and keep a strip of 220 grit abrasive cloth on it for just general cleanup. Not sure about which side of the cloth works. I just used the green to give a little polish to some LOS. It worked well. The surfaced had been highly polished before the LOS…Rob
I also like the 3M Tri-M-Lite polishing papers. They easily impart a superb finish.
I bought a couple of those plastic sandpaper sticks with clamps a while back, but found them awkward for the range of work I do. I then discovered I could buy wooden paint sticks in bulk for cheap. I like the wooden sticks because they can be cut and shaped to whatever size I need for a project.
I’ve used tough plastic double-sided tape to attach these thin 3-M papers to the wooden paint sticks. This tape reinforces the thin papers and makes them last longer.
For other sandpaper such as wet-dry or cloth-backed or 3-M Trizact, I just use 3-M Spray Mount adhesive. It binds the paper well and I can wrap the paper all the way around the stick…
1 Like