Hi folks,
I’ve just achieved my very first silver-soldered joint!!!

Granted that the metal joined was copper, but there was a reason for
that:
My current project is a chain necklace that I’m kind of doing as a
quiz of everything I’ve studied and learned to do this past year.
I wound about 22 turns on a small tapered form, twice, and sawed the
windings into links, for a total of 40 round links (and bits).
This still achieved only 14 inches, insufficient length for anyone to
wear.
But my silver supply was limited, and didn’t want to use all of it in
this necklace. I decided I would make oval links, out of pure copper,
to connect the silver links with.
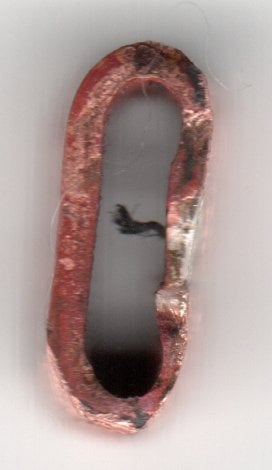
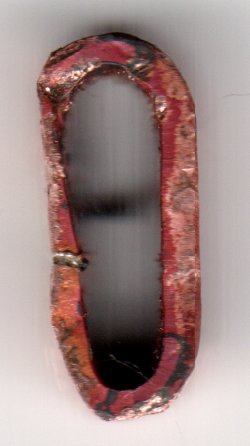
That implied I had to cut copper strips and close them in a
mechanically stable manner, which further implied that I had a
genuine need to attempt to solder it shut, and because of stresses
involved it needed to be medium silver solder rather than
silver-bearing electronics solder.
is 1/4 inch long by 1/8 inch wide. I intend to put round silver links
in the sides, and the whole system should be able to flex and lay
comfortably on the wearer’s next.
I followed most everything I saw from Orchid postings correctly, and
from the books you all gave me: especially on using the jeweler’s saw
to cut through overlapping material to obtain identical saw cuts on
both sides for a tight solder joint.
I bent the joint shut, then filed the local surface clean.
(making the working assumption that a sawed surface is by definition
clean).
I then cut a medium solder rectangle paillion 1/8 by 1/16 inch size,
and mounted it in soldering tweezers.
I dipped a cotton swab of Stay-Silv flux and moistened not only the
joint but also the surrounding surface.
I wore my Optivisor with my light on and set the room dark. I lit my
butane pencil, and heated the copper with it. As soon as the flux
melted and the gas from the torch bouncing off the metal was turning
green (copper ions present), I released the paillion from the tweezers
to drop onto the surface.
The paillion melted almost immediately, I could see it flowing over
both the cut area and also surrounding surface.
I turned off the butane pencil. There was a glassy shiny layer over
the surface. Filing it away did not seem to work evenly, so instead I
applied a 220 grit Dremel sanding drum to the surface, exposing the
underlying copper but also exposing the joint for inspection.
I did not sand the sides. I want anyone with experience to see both
the sanded surface revealing the joint, the sides to see how well I
did my first try, and how I could do better.
This is not intended to be the final appearance of the link, I know I
have a little more bending, sanding, and polishing to do to even
things out and make it look pretty.
What I want are people’s opinions on the joint itself for the sake of
kaizen, incremental improvement.
Thanks,
Andrew Jonathan Fine