The stand looks scary/tippy to me with the shortened legs on two sides. I would move the buffer to the stand waaaaaaaaaaaaaaaaaaaay far away from the mill! Those buffing compounds get everywhere and will really do a number on the mill rollers!
Aurora
||I want to move the mill to it’s own stand/table… it’s a little crowded where it is now on an old library table.||
I have two mills. One is the small economy mill that many of us start with. I built a stand for it made out of boxed 2X6 lumber and added very large legs and weight to the bottom of the box. It is still unstable. I have since purchased a large Durston 130C and bolted it to a 2.5’X4’ heavy workbench. The bench and mill still move when I use it depending on the direction I am moving the handle when it is working against resistance. My message is bigger and heavier is better for the stand if you can do it. I second keeping it away from your finishing area. Also keep it away from pickle especially when it is on a piece of copper that you are rolling. Make sure anything that you roll is dry. I usually just put the piece on the soldering pad that I just annealed it on allowing the residual heat to dry the piece off. I cover both of my mills with an open weave pillow case when not in use. This keeps the dust off, but allows it to breath. Finally, I polish the rolls regularly with simichrome polish. Good luck…Rob
I’m a bit over 6 foot, so things are never the ‘right’ height for me. I’ve just gotten used to things being screwy. Don’t know that I’ve ever paid much attention to the ‘proper’ height for a rolling mill. If I’m using it enough that I care, I should probably get around to rebuilding the power mill. (It’s amazing the stuff you end up with simply because people know you can fix it.)
That said, the only thoughts that I have are that as a woman, your strongest muscles are in the legs, so if I were setting out to make a stand, I might make it a little low, so that you could use your legs to power the upstroke. That’s why some mills (not yours) have two handles. So you can either have two people cranking, or set it up so that you’re always on the upstroke on one of them.
I have a couple of mills: a small squaring mill about the size of yours. That lives on a slab of 3/4 plywood. In use, I just set it on a heavy counter and c-clamp it down. Works great, and doesn’t eat up counter space. Also easily taken with me to workshops. Might be an answer, depending on how much you enjoy the notion of lifting the thing.
I’ve also got one of the bigger twin Durstons that does not go roving with me. That one’s on its own stand, which in turn sits on a couple of steel channels, which are bolted to a big ‘lillypad’ of plywood. In use, I’m standing on the lillypad, so my weight anchors it without the need to drill into the floor. Also, since I’m generating the force, and I’m on the wood, all the force is contained within that system, so there’s no net force applied to shifting the thing around. The Durston stand is a little wider front-to-back than yours, and a whole lot heavier. With the channels and the lillypad, it’s MUCH bigger. The channels are about 3 feet front-to-back, (with the mill in the middle) and the lillypad is about 4x3. (Scrap lumber, nach.) Not entirely centered. More of it on the input side, since that’s where I’m going to be standing.
It’s a big hunk of plywood, but it’s on the floor, and doesn’t get in the way particularly. I just walk over it when I’m not using it.
Your stand needs to be attached to a permanent structure that will not move. If you have concrete floors, then perhaps you could bolt it to cabinetry that is supported by the floor but attached to the walls.
Here are the Durston stands which are designed to be attached to the floor:
Hi Sharon,
Ted here in uk,
Ive the same model Durston as you but an earlier one with half the main rolls for sq wire and a T bar on top. Out of interest, Father Durston supplied me with another gear such as goes into the handle, to that I fitted a 12in by 2section a belt pulley, via a similar set of pulleys to a 1.5hp motor so mine is powered. much easier to use and easy to modify this Durston model.
.I think these earlier mills are better than their later models.
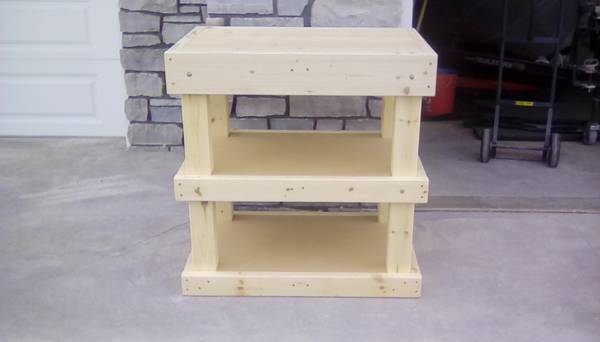
Now As this is such a nice one, it deserves its own table, the height of 29.5in is about right. Id go to 30.
Then id make a dedicated table for it out of 2 by 4 PAR, thats prepared all round. About 3ft by 2ft top .
then with the mill on one side youve a place for what I dont see in your pics is a 3rd hand.
IE a proper smiths vice This is better for us metal workers as its designed with a leg to the floor so it can be used as a holdall for holding stakes to hammer upon. an engineers vice is not for that use.
If you think this is something youd like to make id be happy to write again on how to thats quick, strong and safe.
Let us know how you see this.
Ted
Best from Sunny Dorset
UK.
Thank you so much Brian much appreciated. So I guess then my plates do have the carbide inserts so its a good thing I’ve been using them the way you have outlined. I bought them used so I wasn’t certain exactly what they were. The numbers are on the ‘wrong’ side of the plate compared to others, they are I believe in 1/1000’s of an inch.
Again, thanks for putting my mind at ease.
Aurora
//To Aurora, with the tungsten drawplates: Typically the numbers and info are on the front of the plate, but the wire comes through from the rear. There’s no law about where the info is though. What determines “the wire starts on this side” is which side has the biggest funnel shaped opening. If you cut through a drawplate, the holes are funnels, and you want to go from big to little, whichever way you have to set up the plate to get that to happen.
This is especially important with carbide plates. The carbides are inserts, and they’re just pressed into the body of the plate. They’re designed to expect force in the ‘correct’ direction for drawing. If you try to go the wrong way with a carbide plate, you’ll very likely pull the insert out, which will be a big problem.
Look at the biggest hole. Under a loupe if you have to. You should be able to see which way the main body of the hole tapers. Set up the wire to go from wide to narrow.
99% of the time, that’s from the blank side, towards the side with the numbers. The idea is that way you can see the numbers while you’re pulling, which helps you keep track of which hole you were just in, and which one’s next.
By the way, the numbers may or may not mean anything. On a lot of plates, especially the older ones, they’re just '1-2-3-4-5…" to keep track of which one’s next. May have nothing to do with sizes, other than which one’s smaller than the last.//
@alberic, I thought maybe I could duplicate your “lily pad” idea and attach the pedestal to a 3/4" piece of plywood (3’ x 4’). I would use 2" pipe clamps to secure the feet, 2-3 on each leg with metal screw inserts in the plywood.
I have the pedestal now… It weighs at least 25 pounds and is VERY solid; commercial grade. It’s cast iron with a 3" pipe, feet are 13.5" and 9.5" long and 2" wide. Certainly good enough for something if not the RM, but I think if I use a double thick platform with the mill centered as close to the post as possible along with the “lily pad” idea, it could safely work. FWIW, for the time being, the mill will not get a lot of heavy use… just some metal texturing, rolling to smaller gauges of sheet when needed and using the wire rollers. I’m experimenting with a lot of different things to find my niche…
A final or future option is that I would build a 2’ x 3’ version of this table (similar to that suggested by Ted). It looks rock solid constructed with lag bolts and screws. I have to wait til Spring though… It’s been between 10-20oF this week and snowed last night! Just when I thought we might have an early Spring… It was in the mid-70’s last week!!! BTW I’m in Iowa USA and it is NOT supposed to be warm in February/March . Crazy!
I will definitely separate the RM from the polisher; thanks to everyone for making this point… I was totally unaware of the damage it could do to the mill (I did know about the pickle). The buffer hoods are attached to a small shop vac under the table to help minimize the amount of dust. The pickle pot is about 6-7’ away on the soldering table; I always keep it covered.
I’m not sure what a “3rd hand/proper smith’s vise” is… Is it something like what I’ve seen attached to a stump and both bolted to the floor? Can you post a picture? I don’t have any staking tools at this time, those skills are definitely above my current level.
That said, I do have a beautiful black walnut stump with a 15lb anvil that I need to secure to the stump; it slid right off the other day!!!. I obviously need to level it a bit as well. I’m borrowing a belt sander that will hopefully do the job. If not I’ll have to get an electric hand planer…
The c/iron? stand, unusual in this day and age, the picture of it looks like pressed steel. nowt wrong with that BUT you would need to add some diagonals, 4 off ,in 1/2in box to give it the stability the loads youll put on the handle, with a thick or heavy bit of metal through the rolls. get someone who can stick weld these in place for you.
the wooden table looks a much better bet. Tho id put the bottom shelf 6in clear off the w/shop floor for your feet.
3.go and visit a local iron smith he will show you much easier than a long winded spiel i can give you on how to fix an anvil to a stump.
A 3rd hand. also your local iron smith, as in hand work they/we all have them!!. the problem is finding one thats the right size for you.
they come in jaw widths from 3in upwards. 4in is a good compromise. youll never break that size.!!
Pictures? not good at that, tho will try later in this coming week. Have a pallet full of them!.
Ted.
@vladimirfrater Ted,
Can you check these instructions and translate Not sure what this means…
BTW, the base is cast iron, the pipe and table plate is steel.
Thx,
Sharon
I just discovered that you are the author of the instructions I followed to realign my RM! I found them via a Google search. Your instructions were the best and easiest to follow. Just wanted to say Thank You!
I was also tickled to see that you are the creator of the FrankenBench. I so enjoyed looking at these when I was looking at benches. I dreamed of creating my own FrankenBench, but alas found a very nice tool deal that included a brand new generic bench. Some day I may still build my own
Glad you liked the various bits of my website. We aim to please, although I can’t claim total credit for the Frankenbench. The first one (that I know of) was my undergrad professor’s. Michael Jerry. He built it for the school shop. His at home was much nicer, but he wasn’t one to waste money when there was a perfectly good way to do it for almost nothing.
I just publicized it.
My one word of advice regarding your plans is “Don’t obsess”. Two words, but appropriate. It’s just wood. If it ends up not being what you need, you can change it.
Now that I get a chance to ponder your designs for the RM stand…errr…maybe not the pipe stand.
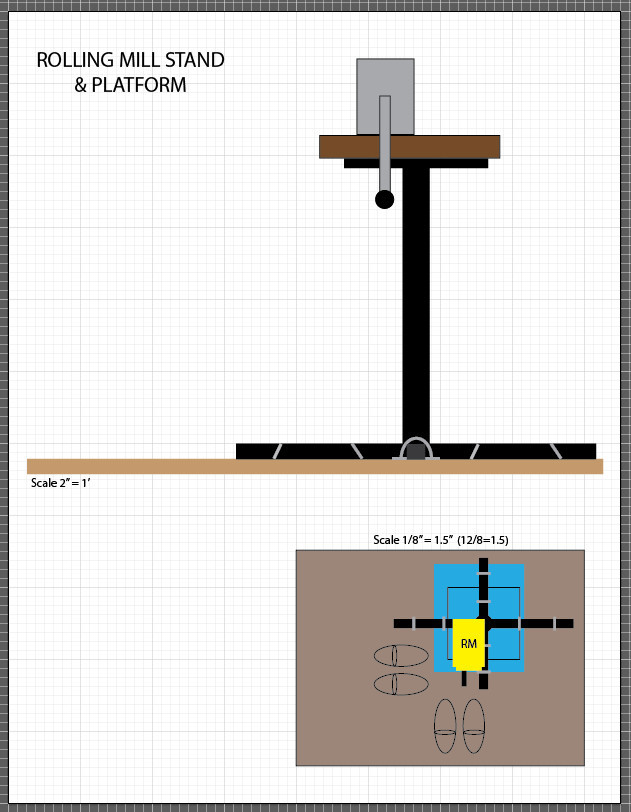
Your idea of pipeclamping it down to the lillypad should work, but you’re putting an awful lot of torque on the fittings on either end of the pipe. Depending on how strong they are, and how deeply socketed the pipe is into them, they may crack. There’s a surprising amount of force on a rolling mill. All the ‘official’ stands have legs that splay fore-and-aft at an angle, to give the thing some bracing. (4 legs, tapered out at the bottom, wider in the axis parallel to the feed direction of the mill. (or perpendicular to the axis of the rolls, take your pick.)) I’ve seen pipe stands done, but they were welded, and most of them were using 5-6" diameter steel pipe.
Oh, to translate from the Ted, he’s talking about what we Yanks call a “leg vise” or a “Blacksmith’s vise”. The big ones with the legs that go down to the floor. They’re very handy, and in Iowa you may be able to scrounge one up for less than a king’s ransom, (they’re spendy here in Cali) but unless you’re expecting to do some serious pounding, I wouldn’t make that my first priority. I have one of those on a similar lillypad stand, came out of the Alameda naval yard. The lillypad is a 2 foot disk of 3/4" steel plate, and the vise is fixed to a welded steel pipe as a stand. It’s what gave me the idea for doing that to the rolling mill. Best places to find them are either farm auctions, or find the local hobby blacksmiths and ask them if they have any, or know of any for sale. The answer will likely cost you beer. But having friendly blacksmiths on call is never a bad thing.
1/2in box is square steel tube
with the base c/i then forget welding the box to that. not reliable.
the diagonals give you an outline like a pyramid.
From the middle of each side of the top steel plate to the outmost point of each of the 4 feet.
hope you follow.
That stand will NOT be man enough for that mill. Youll have an accident with that.
trust me.
go for a wooden 2 by 4 table.
Safety is all important.
If the mill falls over ,ok youll break or bend something, if it falls onto you? its a hospital trip and maybe months off work.
Ted.
Well between the two of you, I’m convinced that I should not use this stand for the RM. To make the obvious even more so, the pipe has a 1/4" or 3/8" threaded rod running through the center, bolted to the base and platform at the top. The pipe sits into a shallow divot at top and bottom with those 2 bolts being all that’s holding it together. I’ll use it for the buffing station and move it to the far side of the room. Solves the problem of being too close to the RM and frees up some space on the library table, where the RM will stay for the time being. It should hold up until Spring, but I better check the lag bolts and give them a tightening. Then when the weather warms up, I’ll build a good solid table like the one in the photo.
Regarding the Blacksmith’s Vise, in my research I’ve seen many photos with those attached to tree stumps. Very cool… I received a nice black walnut log from my tree guy last summer; it sat outside for over a year and has been inside for 7-8 months with minimal cracking. The tree guy told me the bark will stay attached after drying out; so far it’s stable. I just need to level out the ends a little then sand, and finally seal the whole log.
Funny, now that you brought it up, I recall there is a Blacksmith’s shop in a little town nearby. Looked it up… “Village Blacksmith - welding, fabrication, and repair of metal items.” Hmmmm…
You’re right Brian, Iowa is full of OLD farm equipment and these vises are probably around. I visit a lot of flea markets in summer and fall; I’ll put a blacksmith’s vise on my “items to look for” list. Likely will be too spendy for me at this stage…
I really appreciate you both taking the time to ponder and respond to my ideas. Saved me a lot of time and aggravation on the “learn the hard way” curve as well as possibly a fractured limb or even worse, a ruined concrete floor and broken mill…
Dear Sharon,
Ted again!!
its because im confined to my bed with an illness that im only able to do this forum thing!". however, your derterimed i see, to use this strand for something! ,your idea for your buffer? is just as BAD!! as for the mill.
With buffing, you PUSH against the b/wheels so youll just as likely tip it over in that use .
Just put a nice piece of fabric over it in the house and use it for a plant stand. Thats all its safe for!!
NOT in a metal work shop.
You remind me of Walt Disney’s sorcerer’s apprentice. You like many others here really need a mentor to save you from yourself. Meant in the nicest possible way of course.
Just take care!!
I really am quite offended by the supercilious, condescending tone of this message!
We come together here to share and learn from each other, not to insult those who are less talented, learned, or accomplished than others.
Intolerance and judgments are best left unspoken - or typed as the case may be!
Hi Aurora,
I cant let your reply go unanswered, your offence has NO basis.
It might have IF you had bothered to warn Sharon of the dangers she as a beginner? was heading into.
But you did not.
We have, as old timers, not my words by the way, a duty of care to others in this trade.
Lets ask here, what others here have to say about this?
Im also minded to remind others that sometimes the stick and carrot approach works well.
Ted.
I’m a senior myself and believe there is no excuse for rudeness, belittling or insults - nor should it be ignored or tolerated on a public forum…
There are dozens of old timers here who make their point gracefully and with kindness.
 . Crazy!