I estimate (some) jewellers do not know of this much easier and simpler method of “creating and forming” Beads used in Diamond Setting .
The word “Beads” is synonymous to holding a gemstone in place after the Pave’ or Bright-Cutting have been completed. The word “Beads” does not mean beads as in fashion jewellery, these are two very different meanings.
Level of Difficulty: 6-7, out of 10!
What tools ar e needed?
Round bur #004, #005! (#006 is too large for this small particular area)
Onglette graver that is greatly modified to be 0.26 mm’s in width. (A new graver is 1.25 mm’s)
Flat Graver #40, if and where necessary, to be used at your discretion.
Onglette Graver #1 that must be highly polished & shaped for cutting only on the ‘Right Side’!
Bead Burnisher : #12, #13 & #14. (depending on the size of the new Beads).
Let’s now start with this new & easier process!!
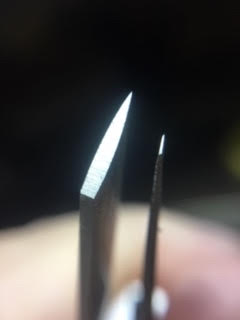
In this first photograph, you can see the wide difference between the two gravers. Each new graver is an estimated 1.25 mm’s in width.
Under an intense series of modifications, I reshaped the sides to approximately 0.26 mm’s. Why did I do this? I needed a graver tool to create newer beads in the metal via rough-cutting stages.
You will see in the next few pictures where this specialized graver will come into use.
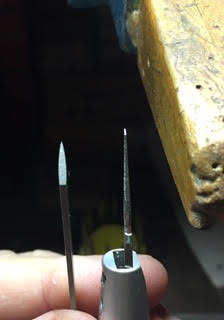
This newer graver is almost paper-thin as compared to the original graver on the left. Imagine all of the reshapings from 1.25 mm’s and it’s now 0.27 mm’s…whew!
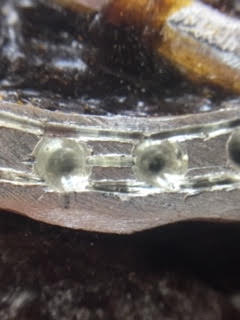
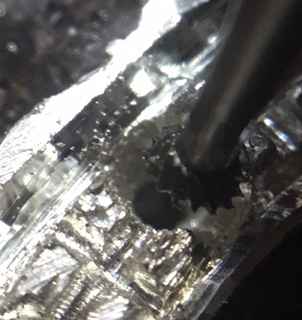
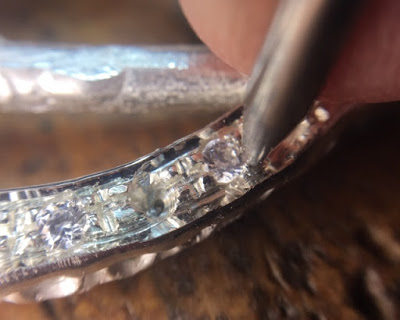
This fantastic new graver actually cut a fine line around the curvature of the silver item . You can see just where the cuts were made. I wanted to ‘graver-cut’ just at the very rim of each hole . The many reasons are to follow shortly!
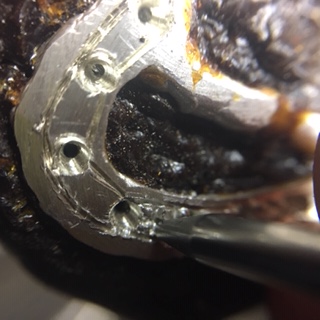
In the rectangular space in between each hole needs to be given a fine line-cutting. NOW do you see why I reshaped my graver, just for this singular purpose?
I cut once…then twice…and again three times…just to get a nice DEEP cut!
Once the horizontal line was cut, I then so very carefully cut a vertical line at the top to the bottom position. This appears to be like a ‘cross-shaped’ formation. Can you see something starting to appear?
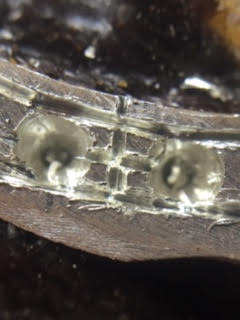
When some of the spaces were too far apart, I graver-cut two lines instead of the one! All these cuts were done with my new 0.27 mm graver.
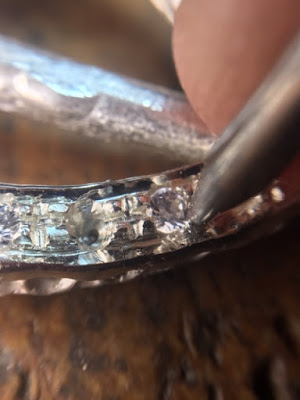
I used my ultra-thin Round bur of #005 or #006 and widened that horizontal cut just to make it more even and uniform. The new graver gave the round bur a place to cut.
This couldn’t have ever happened without the graver cut. It’s a symbiotic relationship. "No graver cuts => no round bur cuts!"
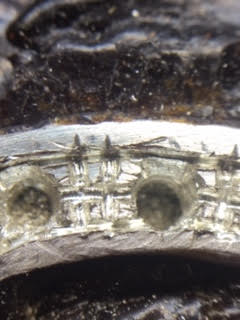
I then used that same round bur and reshaped the ‘cross-cuts’ again.
Get those cuts either by your graver or even the round bur…DEEP AS YOU CAN!!! Why? These little squares will be reshaped into individual ‘posts’.
Is this a repetitive move? NO, not in the slightest. This round bur cuts the metal right after the graver-cut guide and this is so very much needed!!!

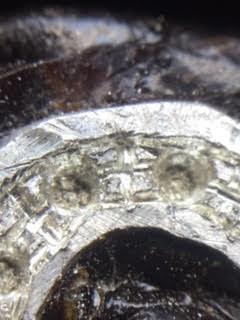
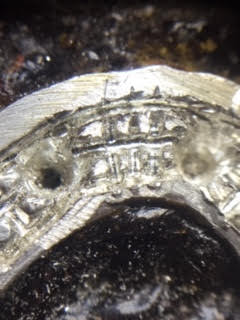
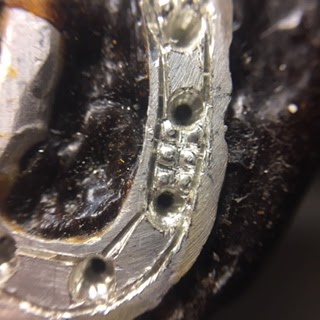
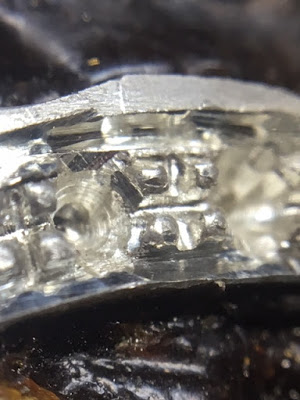
These three photographs are the same but just showing different close-ups and angles. Here you can see an unusual “eight-beaded” design. No other setting tool can replicate this pattern, there is the reason for your very thin Onglette graver…!!!
In this view, you can see how and where the bead-burnisher is forming the new beads! I used a #14 burnisher as the square shape was quite large and the tool-face had to cover the tip.
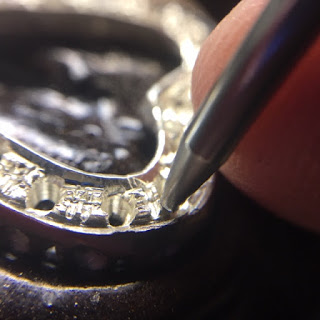
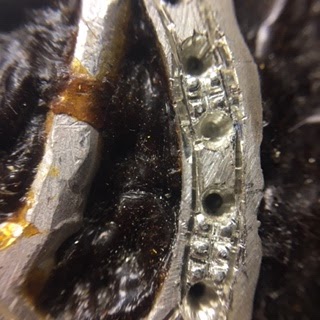
This is just another view of another new-beaded area. Remember to get the round bur and drill deeper into the metal. We need the posts to eventually ‘move’ over to the facets of that stone.
Can you now see the total difference, from a rough-looking mound of metal to a great looking new round bead?
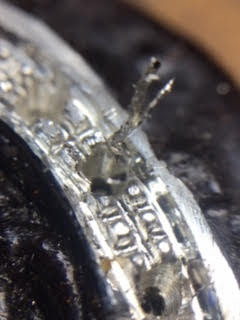
As you can see this picture the many ‘cuts’ are NOT DEEP ENOUGH . these are not well defined and need to be cut much deeper. I would use either my graver again, or maybe my #004 round bur.
Whatever used, the cuts MUST be made much deeper!!! They are just little “pegs”, but not posts!!!
I’m now ready to start the Bright-Cutting process. The new beads are now so very secure and not to get ‘ripped away’ by the " Right-Sided, Onglette graver, #1 ".
This description is a real mouthful of words, but it describes the correct name of this graver.
This is the start of the Bright-Cutting procedure and you can see the flare of metal starting to be formed . I really like the Onglette, as it gives me a slightly curved cutting. This curved angle reflects more light than a flat cutting surface.
I sometimes need either the Onglette or the Flat Graver to do the cutting. This is all depending upon where the cutting is required.
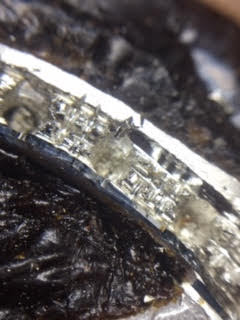
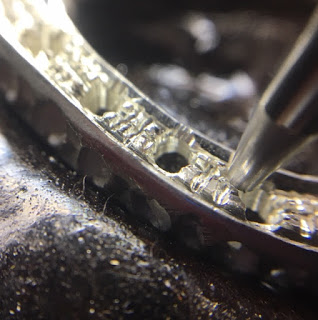
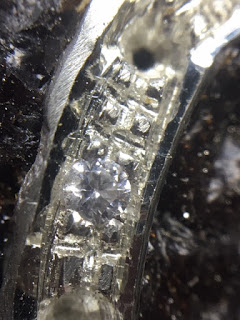
With my under-cutting bur that is 75% of the size of the stone , I’ll cut a bearing into 4 of the new bead-posts!
Here is a close-up of the new bearing that will hold the stone level and not crooked! NOW do you see how deep the linear cuts that were made?
This is now showing just how deep into the metal post, or not so deep the bearings are being made! I always use my 10x power loup to examine each bearing cut. I never depend upon my #5 lens Optivisor, as I need to know just how these important bearings are being made…at all times!!!

This photograph just emphasizes why the beads must be nicely fashioned prior to the all-important Onglette cutting.
I’m now using my burnisher to round the new beads, by pressing down on each bead , you are giving strength to each during the (aggressive) Bright-Cutting process. Plus, I can visually see where each bead is now located!
I’m using a #13 Bead-Burnisher to round off the “Bead-Posts” and press down the metal onto the stone. If the ‘posts’ are too small in height, or with a shallow cut, the metal will…just…not…move!
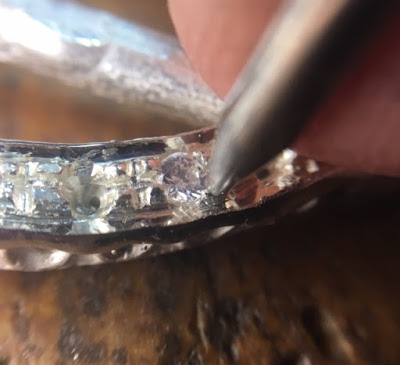
You can now see how deep the metal is, therefore making the “posts” taller. Great idea?..>:)
The final angle or positioning of the burnisher is ‘nearly’ vertical. If the position IS VERTICAL, you might have the tool touch the stone and have it break! I lean the burnisher 15-20 degrees away from the facets of the stone .
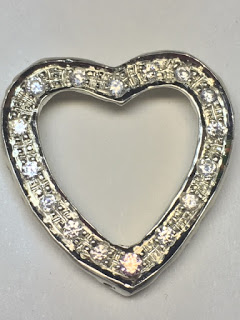
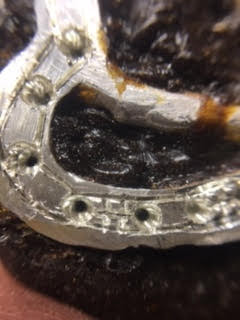
This photograph was taken while this ‘pendant’ was still on my shellac stick . I had a large space at the bottom, then I placed a pink stone of 2.50 mm’s to fill in that wider spaced area!
What do you see with the beads?
"I see many things!"
All of the beads are all in a row , there are larger stones at the top areas of the two ‘curves’.
The beads are all the same size & height.
Where there are larger spaces in between the stones, I created “multiple beads” as this will give harmony to the overall appearance.

Previously in my earlier years of learning to ‘raise beads’ with an Onglette graver, the process was a mind-boggling process just to learn. This newer technique is a real eye-opener, in its simplicity.
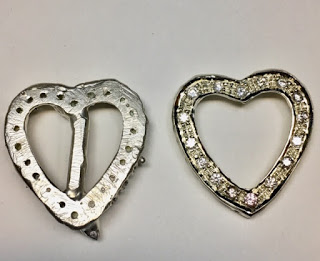
Finally, here is the original rough casting (still with the casting sprues) and now the finished item . Is this a “WOW” effect? I use the sprues to keep the item ‘in & on’ the shellac stick and not moving!
In this photograph, you can see all of the “multiple beads” everywhere and all hard at work making this pendant an enjoyable sight!