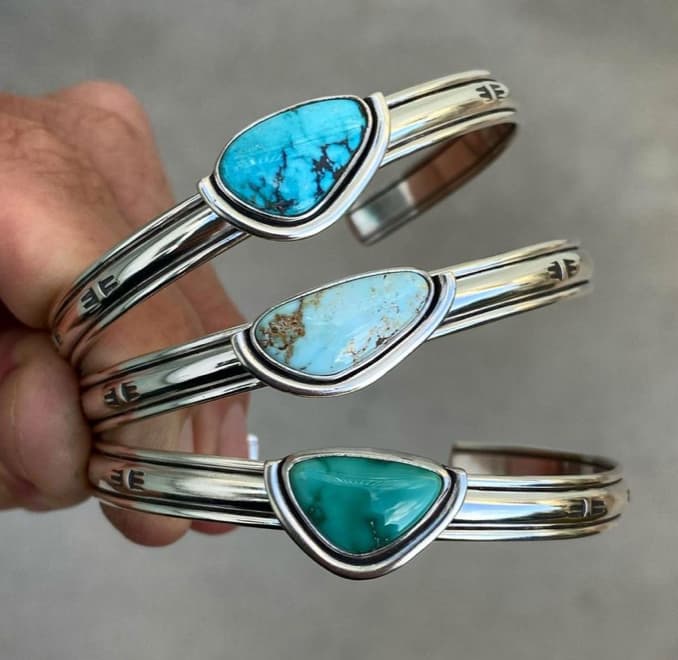
I was cruising one of my fav designer’s sites on IG and he referenced an artisan who influenced him, @vcustomjewelry, so I went looking. He does a lot of these “triple cuffs” that baffle me. I can see in the attached photo that the three H/R wires are soldered side by side, but here’s what baffles me.
How do you get the wire dead flat an perfectly parallel prior to soldering?
How is it set up to apply the solder; I would think that the solder is “raised” from the bottom by applying the heat to the top and drawing the solder up?
From what I can see, there is no noticeable solder joint seen from above; I only see the joints from the underside…baffled…
Interesting… Could it be just a bar of silver that has been Rolled through a Custom Die to make the bangle portion? I’ve seen Custom Dies for just such a thing. I do agree that it would be pretty difficult to not have any evidence of solder on the top, though he could have used a graver to clean it up and it looks like he has blackened the recesses too, which would hide some of the solder join, if present. Just a thought.
These are very nice bracelets. You can see the underside of the joint between the outside pieces and the larger half round in the background of the picture. If you make sure that all three pieces are very straight, you can presolder the edges with very small pallions of solder and then solder all three pieces together flowing the solder along the joints. The only thing that I would do differently is to add small blocks to the ends of the bracelets so that they are nicely finished. You need to make sure that everything is clean and covered with borax and alcohol as well as regular soldering flux in the joint. We have been soldering multiple pieces of straight wire together this way for years. If there is a little solder bump somewhere, It can be smoother out with a graver or shaped rubber abrasive wheel. I have one bracelet like this that I have made for years and have had a special roller cut to roll a profile into the metal rather than solder it together this way. I am more curious about the bezel and how it is soldered to the cuff . My guess is that the half round around the bezels helps to hide the flat back of the bezel. In my mind, this is not a fault, just a fact. To answer your specific question about how to get the wire flat, pull it in your draw bench by securing one end with a vise grip and stretch the wire with your draw tongs until the wire relaxes and draws straight. I do this all the time whenever I need really straight wire. It helps if you anneal it first. Thanks for sharing these really nice cuffs…Rob
Thanks Rob…they are beautiful pieces. I’ve only done one piece where I soldered twisted wire to heavy rectangular wire for a ring (pic attached) and that took a lot of straightening and fixing things in place so they didn’t move out of position while soldering. These pieces are waaaay beyond what I did, but I’ll have fun trying! Bezel to cuff…I figured he just flattened the half round at the junction point to make a flat mating, backplate to cuff. I’ve done quite a few heavy bezels to 18g backplate and then finished the edge so the the joint is imperceivable. Ho may have done that here to make the visible side of the bezel as one piece. Hard to tell what we can’t see. Thanks for the great tip on straightening using the drawbench and your always helpful advice!
Definitely possible, but I think Rob Meixner is correct and they were soldered together flat and cleaned-up afterwords with either a graver or a chisel-shaped rubber abrasive wheel. I have joined different ring bands together, white & yellow gold, all yellow gold, platinum and silver without too much difficulty and without the solder seam showing, so it can be done. I just had never soldered long stock together to form a bangle like this, I always used a solid bar and milled/carved the ribs or design in, leaving the top-centre flat for mounting stones or a bezel. Thank you Bruce for the interesting discussion and thank you Rob for the detailed techniques, I always enjoy reading your posts and replies!
Something no one has mentioned was the strength of the solder join between the lengths. where the half rounds touch each other is minimal. To have good strength to hold for wear and even the bending you would need a bit more surface. That doesn’t mean a huge amount, just a mm or 2 filed off the side to be joined would add much more strength. Just a thought. Then there is the holding it down so they touch while flat. We did something like that in class nearly 40 years ago. One way was to hold them flat with bailing wire. We would join only a few sections the first pass, then take the wire off and solder the rest of the sections. Now they have that holding mud you could put your lengths into and solder. It should hold them while you are soldering. Again just some thoughts.
The only way to get a perfect fit with the components is to make sure that the wires are absolutely flat and straight. The best way to do this is to first anneal all the 1/2 round wires. Then to get them perfectly straight put one end into a vise, grab the other end with a pair of sturdy draw tongs. Give them a really hard jerk. Reverse the end that is in the vise with the draw tongs and do it again.
Lay them all flat together face down and solder from behind. Use hard solder. You may want to use pins pushed into a charcoal or soft soldering block to hold them tightly together. I’ve tried using binding wire, but it just makes the wires want to curl up against each other and not lay flat. Try both ways if you like. Soldering from the back keeps any solder lumps and imperfections on the inside of the finished piece. The trick to get the bezel on the bracelet is to curve the back of the bezel to make it fit the curve of the bracelet. It’s a pain in the ass and pretty time consuming. Easier is to flatten the area on the top of the cuff. Use hard solder for the bezel seam. do not clean the seam up on the outside. When soldering bezels onto a back plate even with a lower temp solder the side seam often will want to wick out leaving the seam visible. By the time one tries to smooth out the wicked and exposed seam the bezel ends up too thin and uneven in that area. Then attach the back plate and 1/2 round wire with medium. Get a soft charcoal block and place the bezel and surrounding wire upside down in the block. Lay the shaped bangle on top of the back of the bezel and again solder from behind. This time use easy solder. Be sure to heat the heavier bangle part first to avoid over heating the bezel and having the solder just want to make a puddle on the bezel. I always prefer to solder things from behind so that the only seams you need to clean up afterwards is on the inside of the piece leaving the out side looking crisp and only in need of a polish.
Let us know how it all works out for you.
Jo
Jo…Before I built my draw bench, I would secure one end of the wire to the bottom of my vise jaws so that the wire would hang straight down. Thread the other end of the wire through a light weight bar plate and somehow secure it so that the wire couldn’t be pulled through the hole in the plate. This was usually an eye bolt in a piece of wood. Then I could carefully pound the weight plate down against the wood stretching the wire. As an alternate, you can rest one end of the piece of wood on the floor and step on the wood using it as a lever stretching the wire. While these methods worked, It didn’t take me too long to decide that it is easier and more accurate to use the draw bench…Rob
I have a draw bench. It’s probably over 100 years old and still works just fine. I usually work with lighter weight wire so I can do it by hand with the vise and draw tongs. For an old broad I have remarkably strong upper body strength and I rather enjoy showing the metal who’s boss:-)
If you lay them together face down, won’t the center one be sticking up above the 2 outer borders (since it’s higher)? Or were you thinking of pressing them down into a soft block such that the flat sides form a single plane (in which case you wouldn’t need the pins)?
I agree aggie, like when you make a ring shank out of two pieces for a Y ring band, I always flatten the point (bottom of ring) where the two join at their sides. It creates a much stronger joint.
Thanks for the detailed blow by blow Jo! whenever possible I always solder from behind or best possible position to avoid a lot of clean up. I thought about that when I first looked at the cuffs…two different size wire! So when you lay them face down they’re at different elevations
Once the wire pieces are straight, clean them and file along the edge of the solid half round piece, boric acid and alcohol flux everything, position everything together, flux the joint and then use medium to hard wire solder because it fits the joint pattern better than pallions and just solder it. Clean up the joint and you should be ready to go. If I am soldering a twisted piece to a solid piece I use pallions presoldered to the solid piece and carefully control how the solder flows with the torch. Do all of this on as flat a soldering pad as you can. You can flatten a used soldering pad by rubbing it on a patio block or even the sidewalk…Rob
Thanks Rob, because i’m also a bladesmith I have a 2 x 72 belt grinder and a 9" VS flat grinder. I can flatten those pitted soldering boards in about 2 seconds…lol! Thanks for the additional tips. I’l probably tackle this one after the holidays bc I have a couple more Christmas gifts to make I’ll keep ya’ll posted on how it turns out…or not, ha! Thanks for all the feedback…much appreciated!


 I’ll keep ya’ll posted on how it turns out…or not, ha! Thanks for all the feedback…much appreciated!