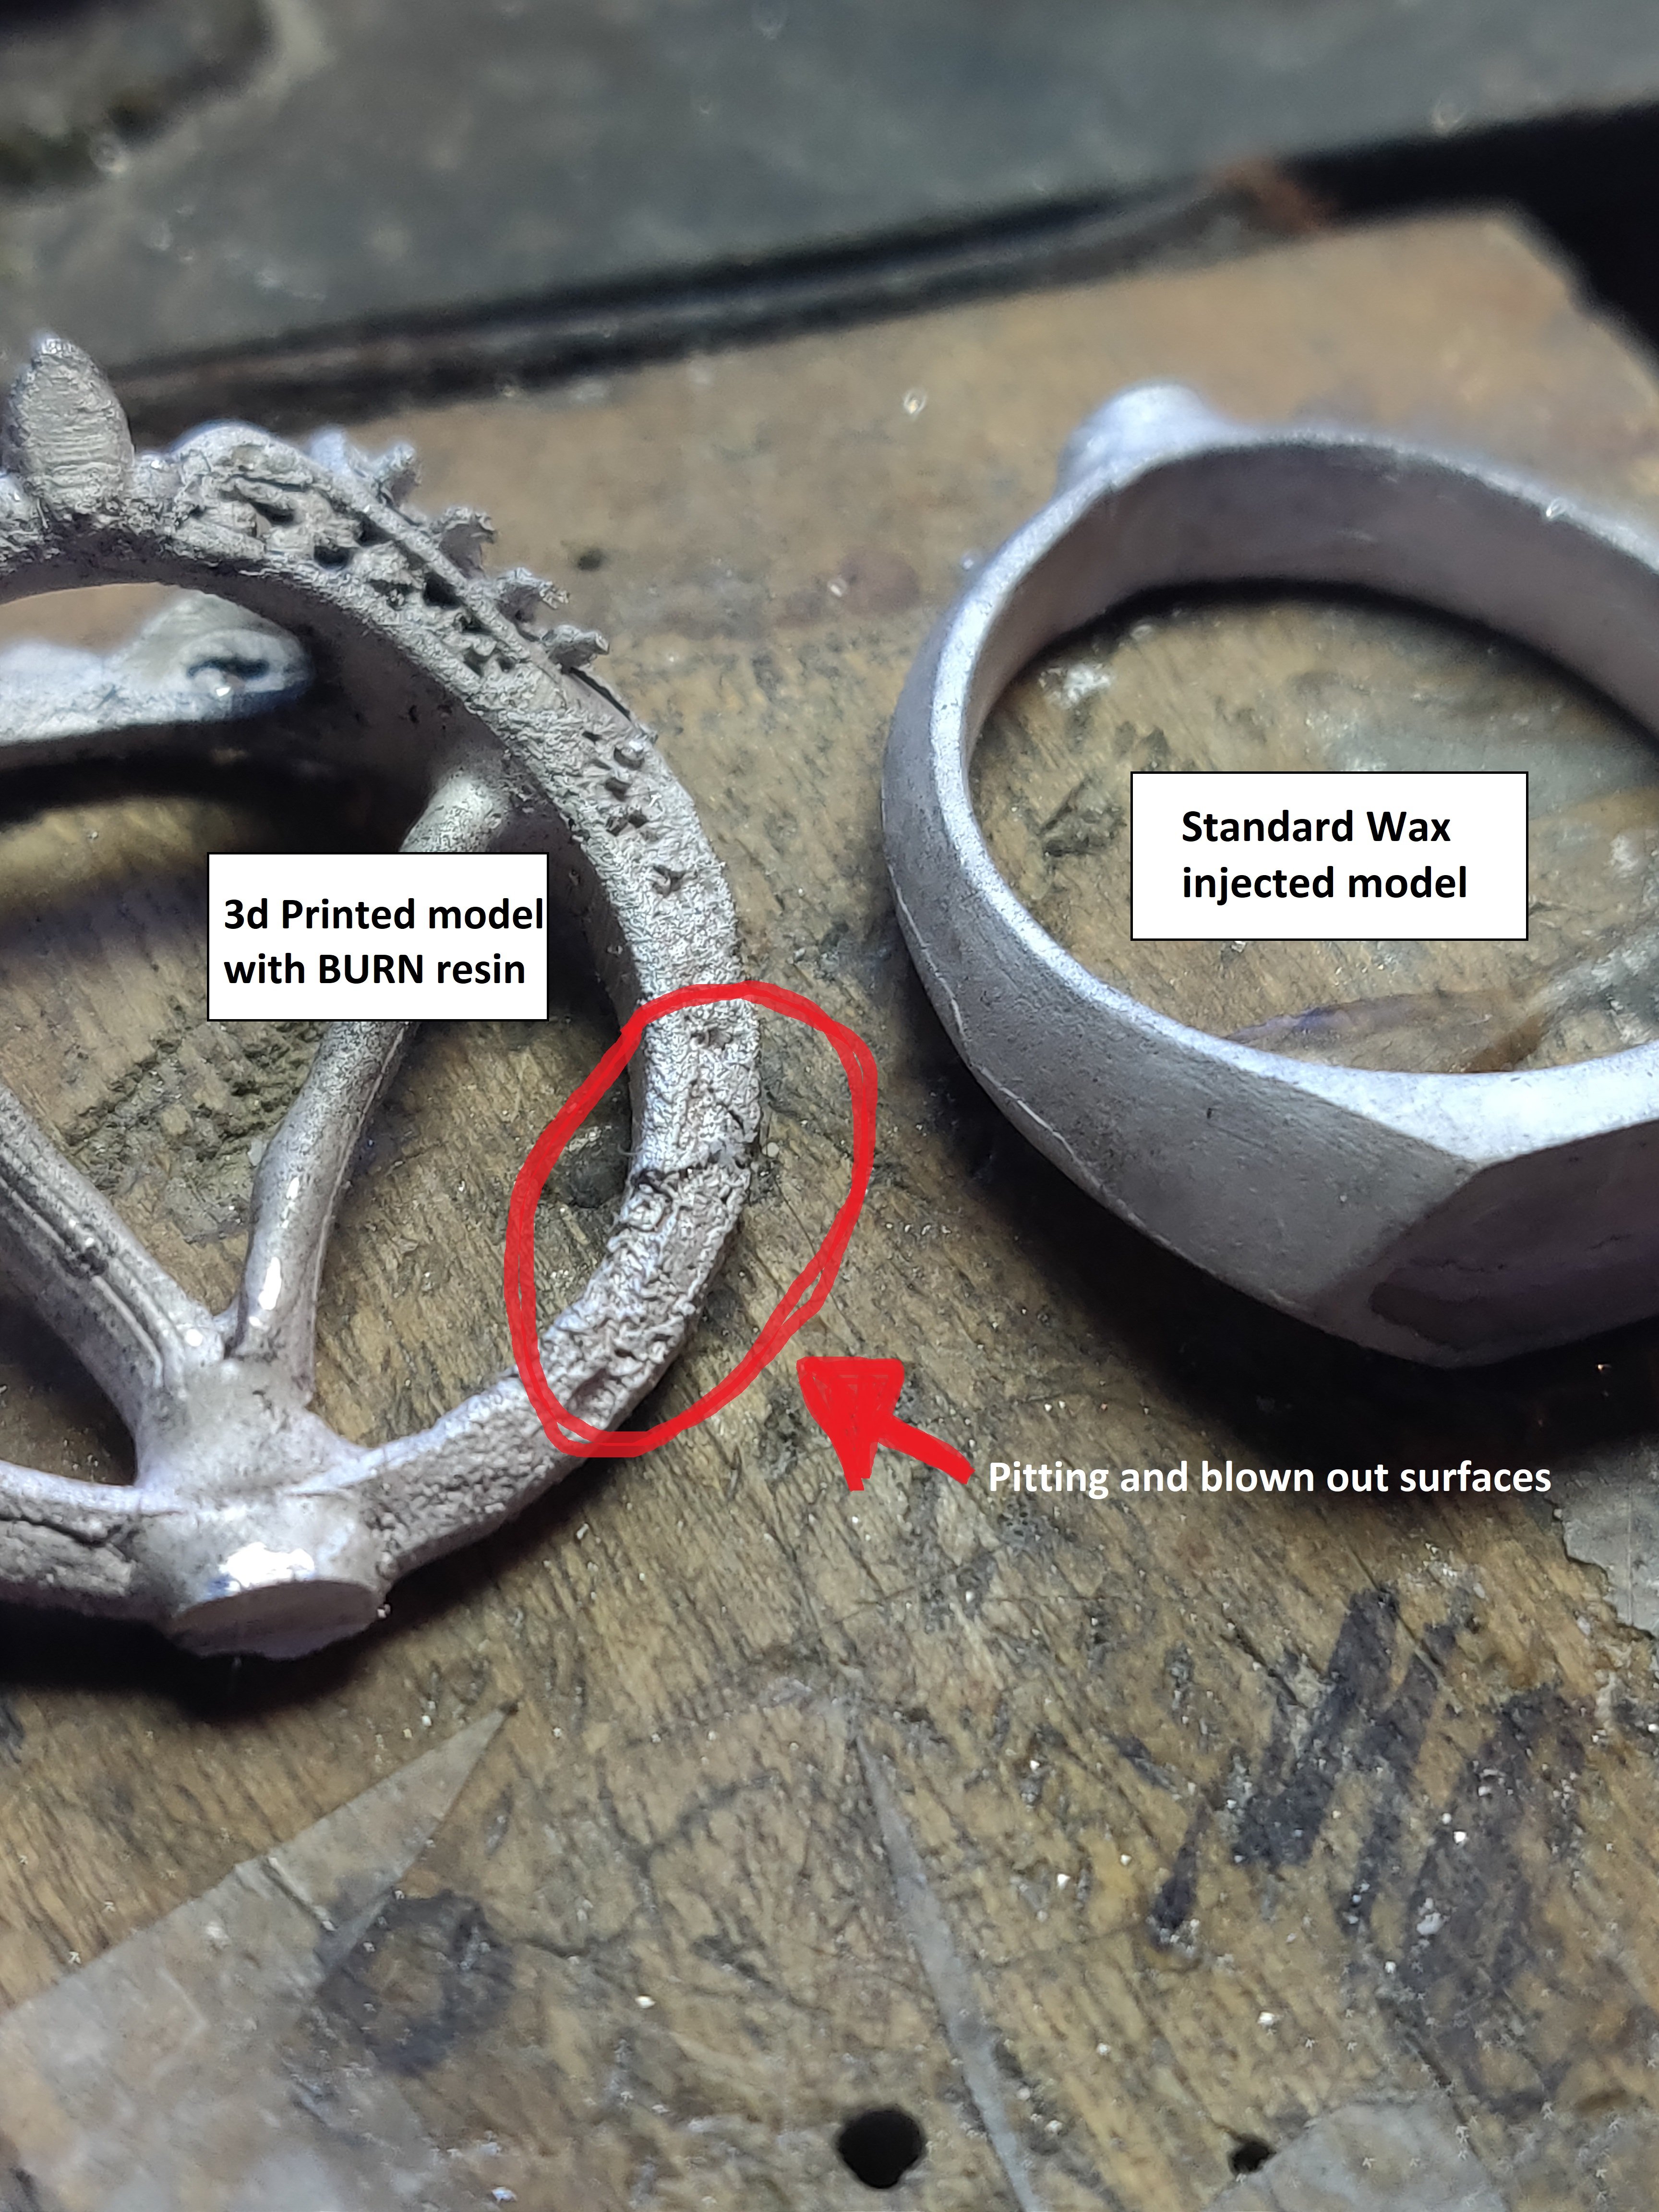
I’m coming to you now because I am stumped! Ive been experimenting with this for months, and alas I still have no solution other than “make it work”. This year I got an Elegoo Mars Pro 3D Printer, and started designing my jewelry on the computer, which has been incredibly exciting and beneficial. With that said, The casting aspect of this new process has continually given me issues that I cannot seem to resolve. I will share pictures of my issues, along with my steps, process, and supplies. If you have any ideas or solutions to this issue, I am at my wits end and would love to hear them!
I have tried casting with Allied Mineral SC20 Investment, which is an industry standard for wax jewelry models. The burnout cycle with this investment is much shorter, but I have similar results.
I have also tried mixing 1% boric acid powder into the water before mixing the investments to harden the mixture and prevent breakage, but had similar results…
-Contacted the resins manufacturer for help. no luck
Process
Print the model
dip in quick bath of alcohol, then quickly clean model with water
Dip model in Ultrasonic cleaner to shake loose any remaining uncured resin.
Pressurized air dry
Sprue model and attach to sprue base.
Mix investment and water at reccomended ratio for 3 minutes, then vaccum to boil 29.5cfm (aproximatly 2 minutes)
Pour investment mixture into flask slowly
Vacuum filed flask to boil for another 2 minutes.
9.Let Flask rest for 1-2 Hours
Place flask (button down) in oven and begin burnout cycle.
2-3 hours into the burnout, after letting the wax sprues melt out, I flip the flask over (button up) for the remainder of the burnout to allow the resin fumes to escape the flask.
After cycle is complete, I melt the metal in my crucible until sufficiently hot, and then insert the flask into the casting arm at 600 C (1,100 F)
Immediately submerge the casted flask into chilled water, cooling the model.
remove and rinse casted model with water.
I have spent countless hours and hundreds of dollars on Investments, resins, etc. trying to figure this out. I know it is possible with what I have, I just have to figure out what I’m doing wrong! Any ideas?
maybe this will help, although I am not familiar with any of your materials. I am using Plasticast, although I do not think the investment really makes a difference.
I add 20 grams of boric acid and 20 grams of sodium hydroxide to one quart of water to mix the investment. the boric acid hardens the investment, I am not sure what the sodium hydroxide does. I read it somewhere…I think it is suppose to add oxygen to the burnout cycle.
I am printing Romanoff’s Burgundy castable resin. Absolutely 110% cured does make a difference, First an alcohol wash, then into an ultrasonic with denatured alcohol for 15 minutes. then blown dry with compressed air and redo the ultrasonic bath. Air dried again and then under the UV lights for at least 6 hours.
Just changed to a new burnout cycle. 300F for 5 hours, 1000F for 2 hours, 1450 for 2 hours, then down to casting temp at about 1100F. It has worked perfectly in 14k white and yellow gold since I have used it.
The flasks go into the oven at a slight angle to allow airflow under the button and then never moved until they are ready to cast. I am using a 35 year old Neycraft programmable oven, so I am not 100% sure of the accuracy of the temps.
BTW if you quench the flasks immediately after casting you will anneal and soften the castings, I usually let them sit for several minutes until the button is no longer red. I have read that quenching white gold casts while they are still red is a bad idea.
The rough pitting is the result of uncured resin interacting with the investment. Make sure the model is fully UV cured after printing. The surface should not feel soft or tacky. Use Plasticast investment and follow their directions for the burnout. Don’t turn over the flask but leave it undisturbed till casting . Use deionized water to mix with the investment. If your fully cured resin still interacts with the investment, you can try a high temp investment used for metals such as platinum. I use CP Invest from Ti Research. There’s a hi temp Plasticast PT which is similar.
I am having the same problems. Here are my thoughts.
*use an investment that is specific to working with resins. I have just started using Plasticast and had much improved results. I am using formlabs castable wax models, they recommend Prestige Optima by Certus - which I didn’t find out in time.
*The material you are using sound more like Formlab’s Castable resin rather than their castable wax resin. here is what they say about the burn out cycle.
"Castable Resin is an acrylate photopolymer, which requires a different process from a traditional wax schedule. Instead of melting at low temperatures, Castable Resin transitions to a gas. The recommended burnout schedule is designed and tested to allow Castable Resin to transition into a gas gradually. The slow transition reduces the possibility of the investment cracking due to rapid expansion of the printed part.
Some customers have reported success in casting Formlabs Clear Resin. More advanced casting houses familiar with successfully casting photopolymers may want to try this material, which offers high detail, good surface finish, and a faster cure cycle."
I think all of our problems are caused by investment strenght and burn out. I haven’t found a solution yet either but am getting ready to try again. Mean while I am making RTV molds of the models since some of them are expensive and time consuming to have printed.
I know this is an old thread, but I think sodium hydroxide (aka “lye”) is the last thing you want to add to your investment mixture.
An MJSA article from Tyler Teague recommended using 20g boric acid and calcium nitrate mixed with 1 L of water. The calcium nitrate breaks down when heated to supply extra oxygen, but does generate nitrogen dioxide, which is a breathing hazard - make sure your kiln/oven is well vented using this method. They talk about it on this B9 forum thread (Account Suspended)