It’s been a year-long saga, detailed on my Facebook group
Dar Shelton’s Pancake Die Paradise | Facebook
so I have not had time to post much about it here (though it wouldn’t have been that hard to copy text and add pics…oh well, plus my posts there are heavily sales oriented).
The progression started with designs etched into the face of cutting dies, which was not entirely new, but still somewhat revolutionary. One potential flaw/drawback in the version (my youtube channel DogBoyDar - YouTube has videos of all 3 versions (V 1.0, V 2.0, and V 3.0) of such “combo dies” , plus a quickie of the rolling mill (and more detailed videos of THAT later))) led me to abandon it, but also change the way those were used , so that they COULD still be used productively (V 1.0 video is current on that).
The next stage of evolution was V 2.0 , a sort of interim version to use up the etched pancake die plates I already had. It was/is a separate etched plated used in conjunction (during separate press operations) with an etched pancake die. Both V1.0 and 2.0 are obsolete, pushed aside by 3.0
Combo Dies V3.0 – Impression plate and Pancake die (youtube.com)
which is now the default version, consisting of an etched plate and a plain (un-etched) RT/pancake cutting die. The shallow plates I’m doing render embossed pieces that have the embossed areas sturdy enough to not get crushed by the closing of the pancake die, when a thin cushioning material (1/16" 95-a urethane, or similarly thin cardboard is placed on the die to protect the piece in the press. It even works well enough to use a single die to cut mirrored parts.
Great, then, all was well enough until I started making larger plates for ornaments. Smaller ones sometimes took multiple pressings of 25-20 tons, using 1/16" 95-a urethane, which was tolerable, but not ideal. 3" diameter ones were sometimes taking 6 or more pressings at 50 tons, which is not at all practical for me.
This is when I started thinking about rolling mills, since I hear all around about people using with impression plates. One thing led to another :a 4-armed , 54" diameter extension of the handle on my Cavallin mill led to me reanimating it as FRANKENMILL, with a modest 1/2 hp gear motor pulling some #50 roller chain and sprockets . This works SO MUCH better than pressing for me. The 4-armed thing was almost there, but was too physically demanding. The first sprocket combination was also almost there, but got bogged down by certain designs and/or plates that had warpage. The final tooth ratio (9 teeth and 40 teeth) gave me the juice I needed.
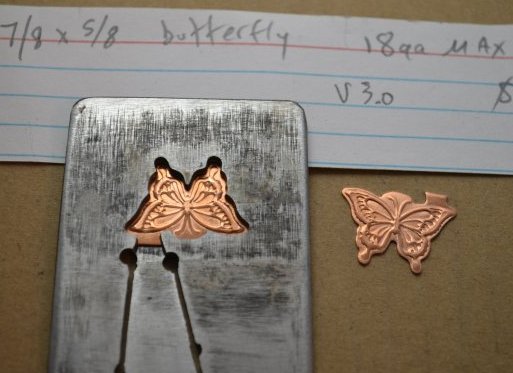
One crucial aspect to me, was/is finding the right hardness to make the impression plates so that they don’t either break, or curl prematurely. The run of 100 small butterflies in 20 ga. copper mentioned in the Frankenmill short video
Frankenmill Butterfly Test Run (youtube.com)
pretty much answered the question for me. The plates can’t be as hard as the rollers on the mill, obviously, and if they are even close to that hardness, it’s too hard for such thin plates (usually 5/64" - 3/32" 0-1 tool steel from this point on). I experienced breakage of thin plates when I was pressing them with small pieces of urethane, if they were too hard. (Also obviously) they can’t be so soft that they curl after a few, or a few dozen. 100 plates doing a heavy roll with 20 ga. metal, and zero curvature imparted to the plate is good enough for me.


Next : more designs on my Fb group ![]()