I want to solder half-round (HR) sterling wire and get a neat join at the meeting edges, only.
I’ve tried soldering adjoing wires laid flat, hard sheet solder laid along the join, the solder fills the void between wires. The result is 2 flat sides
How to get a result that shows a flat back and half-round front?
It’s difficult (for me) to envision what you are doing. I think that it sounds like you are trying to solder two lengths of HR wire side by side flowing solder into the long joint between the two. If that is the case, I would suggest that you get some very fine wire solder and cut small pieces maybe 4mm long. Make sure that the HR is cleaned, coated with boric acid and alcohol that was burned off and then well fluxed. You might even run a flat file down the edges first just to make sure that there aren’t any high spots. Line it all up and make sure that the flux is dried so that it doesn’t bubble moving everything around. Place the little snippets of wire solder in the valley between the two pieces of HR. Preheat everything and then start at one end drawing the solder along adding to it each time that you pass a piece of solder. It doesn’t take a lot of solder so do this. When placed inside the joint, the wire solder makes equal contact on both sides and is likely to flow into the joint rather than go up one side or the other. If this happens, it means that one side is hotter than the other. It can also be a sign that your flux has absorbed all the O2 that it can and it is time to quench, pickle, reapply boric acid and alcohol and new pieces of wire solder. You can try and jig the pieces together or use steel wire to wrap it. I usually just use a heavy pair of tweezers to carefully squeeze the pieces of HR together, but don’t squeeze too hard or you may flip them around or actually leave a dent. If it sounds like I have done these things before, I have. I solder pieces of round wire, half round and triangular together lengthwise all the time and it can be a chore. Just so you know, you can buy solid double half round wire. It saves a lot of time. Good luck…Rob
Here’s another path to consider. It’s assuming that you’re making ring size lengths. (this won’t work for really long lengths of wire) Make your lengths are longer than what you need (probably 1/4" or 6-7 mm). Make sure that your two lengths are straight and match together perfectly. You can pin them onto a clean, flat solder block to keep them in position with straight pins if you’d like. Pre-melt solder on each end, then draw the melted solder down the middle of your two pieces. Solder is attracted to heat and you can pull it down your two wires, probably without any need for filing and extra clean up. Cut off the extra length.
I do this all the time. My students are amazed that solder will follow the heat so easily.
One of the things that I love about jewelry and metal is that there are often multiple answers to the same question and they’re all correct.
Jeff…I have one of those honeycomb soldering pads that I have never used. I might try to see if the holes line up with what I am soldering using pins in the holes to hold the work in position. When I think that I am done soldering one of these joints, I go back and make one more pass using the heat of the torch to even out the solder. I never got tired of watching for the flash of light that tells me that solder has flowed in the direction of the heat. You are correct about there not being just one way to do most of what we do, just wrong ways. I think that I have found all of them…Rob
I use soft solderite pads for pinning objects with straight pins or t-pins. I think I remember that you have a PUK or an Orion welder. You could also spot weld in strategic places. That will do the same thing.
I can’t remember if I posted this, but a jeweler buddy with a laser welder told me that he prefers platinum silver laser wire over palladium silver laser wire. I bought some from Gesswein to try out. It’s less than half the price of PUK palladium silver welding wire and is a better color match to sterling. I like it a lot. Just letting you know.
If you tin a piece on the flat side near the edge, then file or clean the matching edges and flux, the solder from the back will run between the two. Works for long pieces when the trick of putting solder on the ends isn’t enough. Or you can buy double half round wire…
Judy H
Since we are discussing HR wire, I need to ask a question. I want to be able to reliably and repeatably bend HR or any wire that has a wide and a narrow dimension around the narrow dimension. This is always a wrestling match for me to keep it from flopping over and trying to bend along the wide edge. I have been trying to design a jig that will help me do this, but so far I have not come up with anything. Any ideas would be appreciated. Thanks…Rob
Rob –
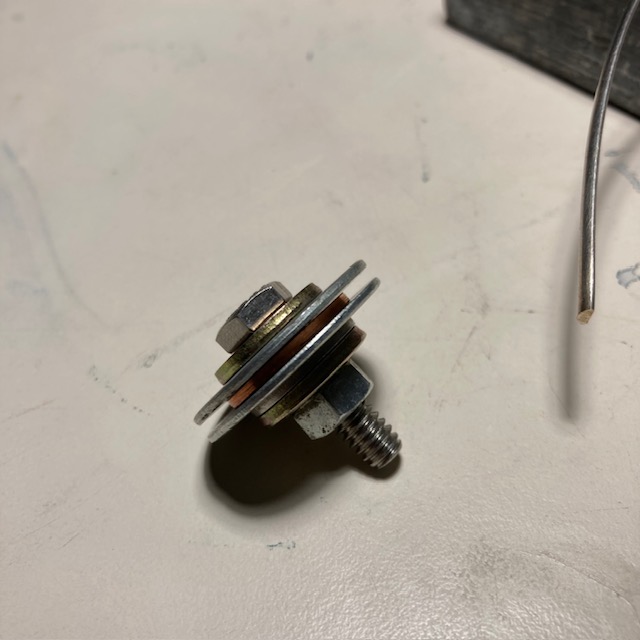
That’s a tough one. I wanted to bend some 8 ga. SS HR into a circle to form a border on silver disks and had all the problems that you are having. The closest I came to a jig that would help me was to put 2 washers that were the OD of the circle I wanted to make on a bolt with a spacer that I made with an OD the ID of the circle and the thickness of the HR’s flattest dimension. Think of a round sandwich with the meat having a smaller dia. than the bread. This sorta worked. But the ends of the HR were still a struggle to get formed properly.
– alonzo
Great minds think alike! I was just working with two washers doing exactly what you described. I got sidetracked with another idea that seems to work. I secured the wire in my bench vise with the part that I want to bend sticking straight up. I need a particular diameter circular section, so I use a pair of bail making pliers where one side was close to that ID. Held the wire tightly while resting the pliers on the top of the vise and carefully bent the HR on its narrow edge around the bail making pliers. It seemed to work. I am still looking for a fool proof jig, so I will go back to the washers and see what I can do with them. Thanks…Rob
Would using the thread of a large bolt work, then unscrew the bolt and cut circles off? The bolt needs to have a coat of something or polishing/ smoothing so it doesn’t mar SS.
Rob –
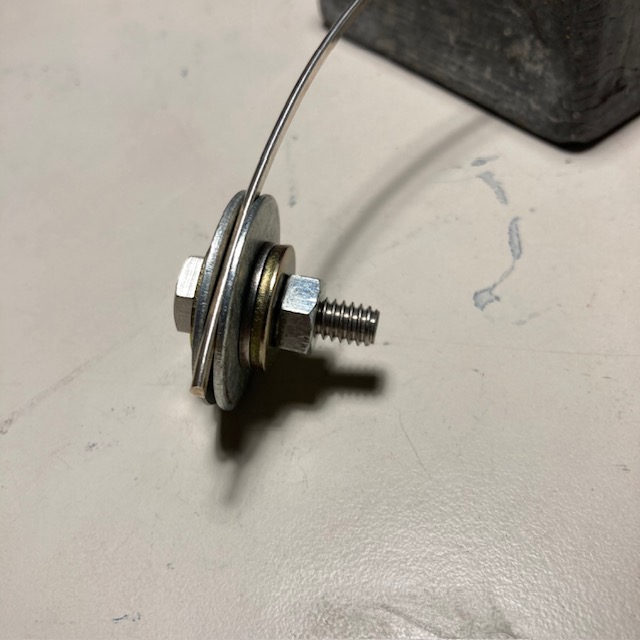
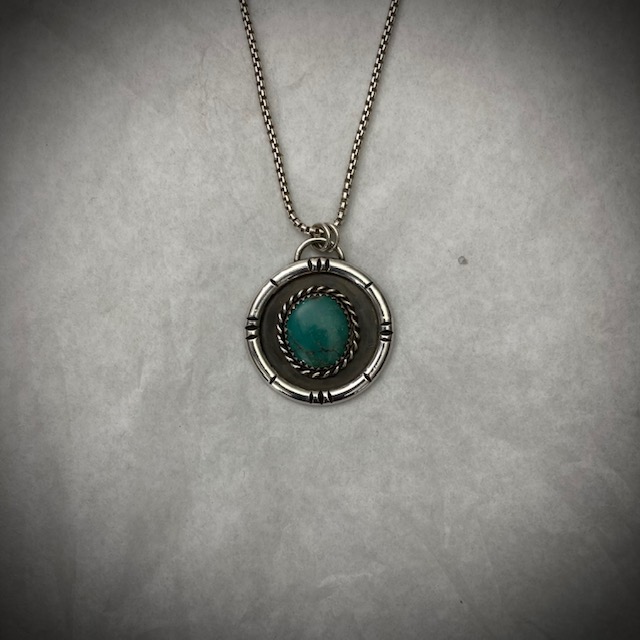
Here’s a couple of pics of my jig:
First shows jig with copper spacer.
Second shows jig with 10 ga. (not 8 ga.) HR wire.
Third pic is jewelry piece where I used the formed HR.
– alonzo
That’s pretty cool. Smaller washers as spacers to solve the problem of pinching the material and also not rubbing on sharp threads that might damage the material. I will be putting it together tomorrow. Thanks…Rob
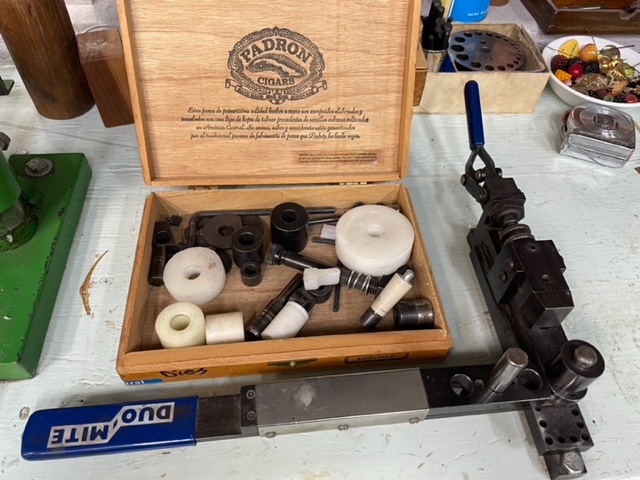
I love and admire the washer rig. That said, if any of you tool junkies have some extra money burning a hole in your pockets here is what we use. It paid for itself pretty quickly. Besides bending things on edge it’s also great for bending heavy shank stock.
That doesn’t make double half round wire. I had a flat roller machined so that I can solder two pieces of 8 gauge wire together length wise and then roll them through the machined flat roll to make double triangular wire. You can do the same for double half round. I haven’t done that because I can buy double half round…Rob
I made my version of your washer rolling tool and it works well. I also recently asked a machinist friend to make a tool that would fit into my Durston ring bender. It has a groove cut into it just wide enough to fit a 2mm flat piece on edge. It works fairly well, but I have to insert U shaped pieces of square wire to shim in or out depending on the width of the piece that I am bending. I could also have my machinist friend make various depth tools too. At $75 for each tool, I could buy my own small lathe and make my own. Following is a link to a picture of the tool inserted into my ring bender…Rob
I used this tool to bend some tapered half round pieces on edge. It is an improvement over what I was doing, but not the end all be all that I was looking for. The problem that I am trying to solve is the piece flipping around as I try to bend it on edge. It is an improvement, but I still have to pound the curved piece flat once I am done bending it. Hope you all had a great Thanksgiving…Rob