Hi all,
In response to several requests, I have posted a couple photos of my
homemade bead loom on Orchid’s FTP page: the file names are

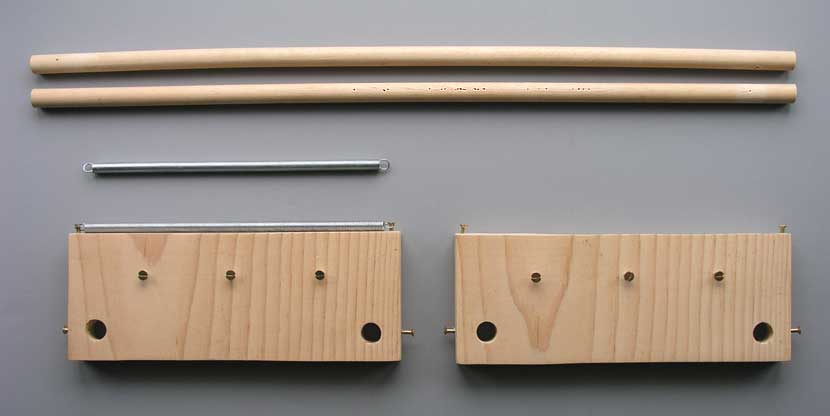
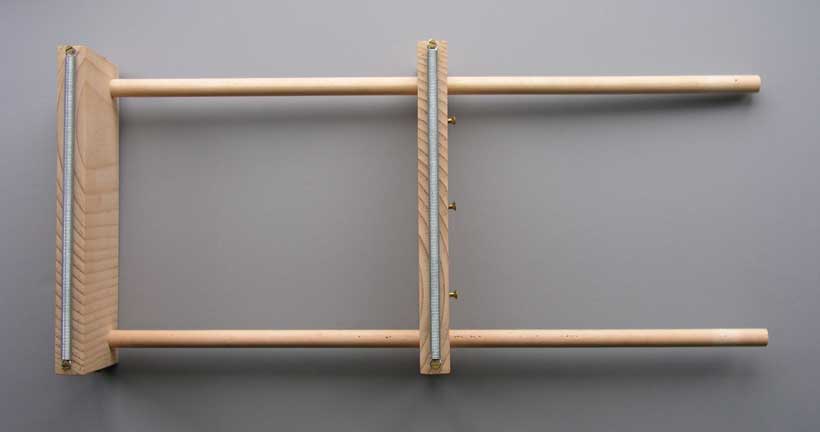
The first picture shows the loom assembled and ready to go, while the
second shows its constituent parts.
I remeasured the loom and found that the boards are about 8 1/2" x
3", the dowels are 1/2" diameter, and the springs are 8" long.=A0 The
dowels were originally straight, but seem to have gotten bowed with
use; this doesn’t interfere with the effectiveness of the loom.
I got my springs from beadcats.com, but they can be found at
hardware stores as well.=A0 The wire thickness of the springs is
about 18 ga., which makes them a good size for small beads (14/o
through 22/o) as well as larger ones; a thicker wire might only
accomodate larger beads, but with the smaller gaugewire, you can
space out the threads to fit varying sizes of beads. The screws
that hold the springs are spaced just far enough apart to have to
stretch the spring a little bit to pull it off, but not so far that
the spring is streched out during use.
As you can probably tell from the picture, especially the little
dents along the dowels, the screws that hold the dowels in place
aren’t driven all the way into the dowel, but just enough so that
they “bite” into the wood and keep it from moving.=A0 This has the
advantage of making the loom infinitely adjustable, and you can use
longer dowels for longer pieces of beadwork.
When stringing up the warp threads, tie the free end of the spool to
one of the screws and pass the thread between two of the coils of the
spring. Stretch the thread across the loom to the other side, pull
it between the coils of the spring on that side, loop the thread
around the screw to hold it in place, and bring the thread up and
pass it between the next pair of spring coils. Do the same on the
other side…and so on until you have the requisite number of warp
threads (one more than the number of beads that will make up the
width of your piece). For 14/o beads (the ones I use most
frequently), I string the warps in groups of three, skipping a space
of two coils between each group.
When the weaving is finished, I usually loosen the screws at one end
of the loom to relieve the tension on the warp threads, and then lift
off the springs one at a time and stretch them to release the threads
and remove the work from the loom. Sometimes a thread will
magically loop itself around the spring in a way that doesn’t seem
physically possible, but I allow enough length that I can just cut
the thread if need be.
If you’ve gotten used to the sort of bead loom that has a roller
attached to one end to take up the finished portion of long strips of
weaving, I think this could be easily made by cutting a length of
dowel to fit horizontally between the dowels at either side of the
end board, setting bolts with the heads removed into either end, and
drilling holes for the bolts horizontally through the lengthwise
dowels. The roller dowel could then be fixed in place and tightened
with a pair of wing nuts.
A disadvantage of the loom is that it rests flat on the work
surface, which can cause back and neck strain after a while. I
usually prop mine up witha copy of Gould’s The Structure of
Evolutionary Theory, which is heavy enoughnot to move while working
and a handy 3 1/2" thick or so. I have come up with some sketchy
ideas for a free-standing upright loom, and I’ll be happy to post pix
of that should it happen to work ![]()
For other diagrams, loom ideas, and instructions on beadweaving, I
(again) highly recommend Virginia Blakelock’s Those Bad Bad Beads.
It was from Blakelock’s book and the Beadcats store (which she
co-operates with Carol Perrenoud) that I got the idea for the bead
loom, and any credit for it should probably be theirs.
[Usual disclaimers]
Those bad, bad beads!
By Virginia L Blakelock
Manufacturer : V.L. Blakelock
Release data : 1988
Hope all this is helpful - happy beading!
Jessee Smith
www.silverspotstudio.com
