I created one out of hard fire bricks in my previously large work space. But now I’m soldering on my bench with little available space, but I’ll be in business if I can determine how to make a small heat cave that is easily moved.
In the archives, Jay Whaley @Whaley_Studios gave directions for an annealing cave, made from an old ammo box completely lined with solderite boards. It’s not too big on the bench and it’s great for annealing, but I wonder if it holds enough heat to be a heat cave. Would it hold more heat if I used soft fire bricks instead of solderite on the sides? Although there is not much room inside for thicker walls.
I’m thinking about lining a shallow box with a Silquar soldering pad on the bottom, soft fire brick on the sides, topped with a solderite board. The Silquar board is thin (height issue on bench top), the soft fire bricks are easy to cut (to custom fit into the box) and the solderite is lightweight (the loose top piece).
The box makes it portable and holds the walls in place, but maybe a better solution for the walls would be to somehow attach the bricks together at the sides.
Does anyone have a solution for making a moveable heat cave for soldering on the bench?
Hello Betty, I simply use solder bricks to make a heat cave. i have a long life, hard charcoal, 5"round from Rio Grande on top of a on a steel lazy suzan (from home depot) . It works very well.
I’m sure you could use smaller thinner bricks or something to make a smaller one.
I was fortunate enough to take a workshop with the amazing Carol Webb on etching bimetal. She makes her own bimetal and part of the workshop included an afternoon working in her studio making our own bimetal.
She had a small area in a similar style as Leslie shows, but we would move a fourth wall into place to completely enclose it. It was made with small rectangles of the perforated hard ceramic soldering board and the entire area was not very big — maybe 4" x 6"? The individual pieces of board were around 1.5" x 3" and arranged around a center (on top of another piece of perforated hard ceramic, on a larger soldering board).
Since we were fusing a sheet of copper onto a small square of 10 gauge silver, this little setup up was perfect. We came in with the torch from above and the heat was concentrated enough to fuse the two metals.
I should note that this was not on her bench, but at a separate soldering area, but the size and maneuverability of the ceramic pieces made it seem perfect for small jobs.
Yes, four sides (five, if you count the bottom). No top.
The rectangles had one or two smooth sides (from the edge of the larger perforated hard ceramic board they were cut / broken from) and stayed in place pretty well, so not attached. I would knock one over now and again, but I think that was novice-me’s fault rather than the design.
We tended to leave three sides untouched and only moved the fourth side to put the small piece in, then close the fourth side up (with tweezers! 'cause…hot! after the first time).
The perforations seemed to intensify the heat. (Guessing here…) When we were working, it definitely felt almost kiln-like with a red hot heat.
Again, this set up was small because we were fusing copper onto ~1" squares of 10 gauge sterling silver (which we would then roll out to the thickness we wanted with a rolling mill), but I would think it could easily be adapted to slightly larger sizes with no problem. I’d probably keep everything in a small baking pan to move it about and a tile or something underneath to protect from the heat.
HTH
Editing to add: Carol’s studio included a soldering corner area that had large soldering boards tiled on a table, and she set up this fusing area on top of that. I wanted to make it clear that she had something under the perforated ceramic board on the bottom.
I saw a soldering station that was created out of large solderite boards on AtTheBench.
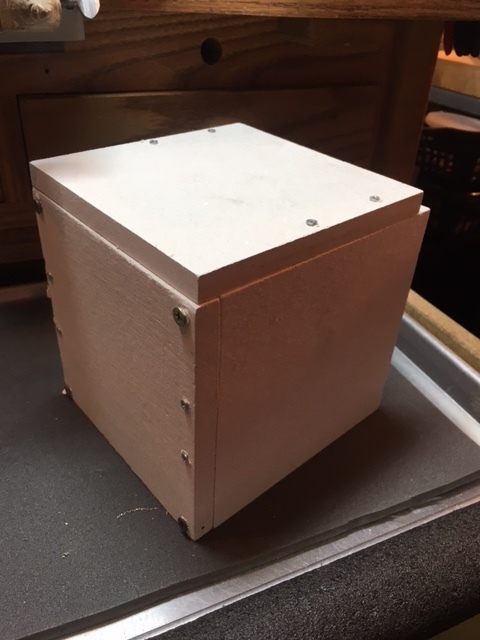
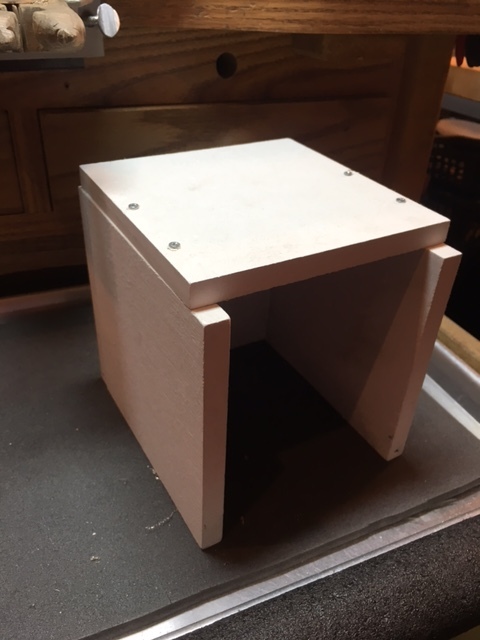
I made myself a smaller version, for a little heat cave, using four 6x6 inch solderite boards screwed together. It is three sided with a top ceiling, and open at the front. I rest this unit on another solderite board as the floor, to complete the cave. (this way I can replace the solderite floor as needed.)
It is small, but suitable for my needs, and is one piece, lightweight, and can be put away when not in use.
My soldering station is also portable, in that it is set up on a baking sheet, and can be placed upon my bench when needed, and later slid onto a shelf on my rolling cart when not in use.
Please describe more about the screws, where they were placed and how you inserted them.
Do you think solderite’s powdery texture will allow screws to loosen due to moving it on and off the bench, even if it is sitting on a solid surface while moving?
If I drill through the solderite to use screws with a nut, corner braces would be necessary; but it seems doubtful that would prevent the powdery texture from wearing away around the screw hole.
In addition, after I solder on it the solderite barely feels warm, which makes me wonder how well it retains heat.
I will study how I made my heat cave and advise…I believe I used very thin wood screws, to grip and hold in place…no nuts and bolts,
my heat cave feels very sturdy and tightly held together at present…it is very lightweight so moving it from place to place does not seem to be resulting in it pulling apart at this time…although it may…over time…?
as far as boards go, I “think” that some are heat “resistance” to withstand high heat applications (like platinum boards) and some are heat “reflective” like solderite boards, charcoal, etc…(?) which are good for reflecting heat back onto the piece while soldering…(?) ( more technical information would be greatly appreciated!)
Here is a photo showing how I assembled and screwed together the solderite boards for my little heat cave. I probably did not need the 4 (larger) screws on the back (in the corners) …the boards are rather thin so thin short screws worked best so that the boards do not split…and I had to be careful of where the screws might overlap each other (if that makes sense)…
Hello Betty2,
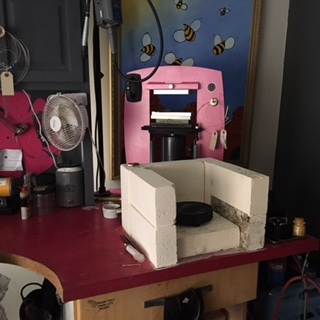
Compared to @lesliervillarreal’s photo, my heat cave looks pretty awful, but it is similar. I simply cut up a soft fire brick with a hack saw into long slices - oh probably about an inch thick. Then cut slices into whatever lengths will be satisfactory for the sidewall and backwalls of your cave/oven. It can be useful to have at least two lengths for the back walls, so that you can form a long cave and a shorter one. The size of the cave should match the size of the piece you need to solder; smaller cave for smaller piece. The top is a slice placed across the sides and backwall.
This is a long-winded way of describing my collection of fire brick pieces that I simply lay on my soldering surface in a configuration shaped like a fat “U” with a slice on top. It’s easy to disassemble the pieces and store in a small box. No screws, just gravity keeps things in place.
So true, so true, brick stacking is often best and very customizable in size and shape. ( Although, I never seem to have the same sized bricks around, so my tiny brick caves are always wonky! I need to buy more and cut them up to consistent shapes and save them specifically for brick stacking!)
(My solderite board cave was initially made to help me heat my whip crucible for ingot pouring, so it is a bit large for small applications, but i also like that I cannot (easily!) topple it)
I was lucky enough to have done this in her own personal studio and I remember hers as being a tad neater, but the idea is identical to what I was talking about.
You indicated earlier that her perforated ceramic soldering boards were 1.5" thick. Do you think the thickness matters? I have .5" thick, and found 1" thick online, but have not found any thicker. Although I saw a video of @leonid_Surpin soldering on one, balanced on top of a bench pin …if I tried that, me and the bench would be on fire!
In Carol Webb’s video it appears that she used them for 4 walls without a top? I’m guessing a top would be unstable and too hot to move.
Is it tricky to prevent that metal from separating? I’m afraid to try making mokume-gane because undoubtedly it would separate and fall apart.
My apologies for not being clear earlier — I meant the size of the rectangle was about 1.5" along one side (a guess from memory). The thickness of the board was about 1/2" (again, as I recall). Don’t forget the piece on the bottom.
And, yes, we fired from the top and somewhat from the sides. The idea was to get the area hot enough to fuse the copper sheet to the thicker silver (the silver was 10 gauge; both were about a 1" square).
We then rolled that out to around a 2 1/4" to 2 1/2" square. (LOTS of rolling and LOTS of annealing , with other things before and after.)
Not sure what you mean by the metal separating. We were fusing one copper sheet to a chunk of silver for her bi-metal etching process. This little setup she’d made worked perfectly for that.
I have not made any mokume-gane myself — I’ve only watched Chris Ploof’s videos — so I can’t speak to if this setup will work for that or not. It can certainly get hot! Chris Ploof’s is an industrial-sized workshop, and I don’t know how much of that is necessary for a small piece of mokume-gane.
My own setup is with a Smith Little Torch with propane and an oxygen concentrator (from Rio Grande), so I can probably get the heat, I just haven’t tried it yet.
I noticed the word “fire brick” used often in the replies to this post.
After researching “fire bricks/ kiln bricks” online, I am a bit confused and am hoping to get some clarification.
Are actual Fire Bricks/ Kiln Bricks best for making heat caves, to heat ingot molds and crucibles?
It seems that they are refractive…that they soak up and hold heat…and hold up well (don’t break down) under high heat…although, it does seem as though there are two types…refractive (hard), and insulating (soft)…which makes me even more confused…
Would it be better to make a heat cave with reflective materials, where the bricks/ boards reflect heat back at the object?
I am asking for a friend, who has purchased fire bricks, but after further research, we are now confused as to whether fire bricks would be the proper/ best choice.
I am thinking the goal would be to create an environment for the ingot mold and crucible to get up to temp and then maintain it…so, reflective sounds like it would be the better choice? Or are fire bricks better because they hold the heat and then do they radiate heat back at the object? or continue to heat soak away from the object?
Any advice would be greatly appreciated!
Best Regards,
Julie
I bought a damaged sheet of tile backer board at Lowes for $5. I cut part of it into various sized rectangles and store them under my main bench. You just score and pop the seam. When I need a heat cave, or just a bit more protection when I am casting, I assemble the rectangles in such a way that they serve the need. When I am done, they go back under the bench. I also use a curved sheet of copper in a similar way…Rob

 and LOTS of annealing